User Instructions
Page 1
... DÉPANNAGE 21 GARANTIE 23 ASSISTANCE OU SERVICE COUVERTURE ARRIÈRE Conservez ce manuel et votre reçu de vente ensemble pour référence ultérieure. ® DRYER USER INSTRUCTIONS INSTRUCTIONS POUR L'UTILISATEUR DE LA SÉCHEUSE Table of Contents DRYER SAFETY 1 CONTROL PANEL 4 CYCLE GUIDE 5 DRYER USE 6 DRYER CARE 7 TROUBLESHOOTING 9 WARRANTY 11 ASSISTANCE OR SERVICE Back Cover Keep this book and your appliance to help...
... DÉPANNAGE 21 GARANTIE 23 ASSISTANCE OU SERVICE COUVERTURE ARRIÈRE Conservez ce manuel et votre reçu de vente ensemble pour référence ultérieure. ® DRYER USER INSTRUCTIONS INSTRUCTIONS POUR L'UTILISATEUR DE LA SÉCHEUSE Table of Contents DRYER SAFETY 1 CONTROL PANEL 4 CYCLE GUIDE 5 DRYER USE 6 DRYER CARE 7 TROUBLESHOOTING 9 WARRANTY 11 ASSISTANCE OR SERVICE Back Cover Keep this book and your appliance to help...

User Instructions
Page 3
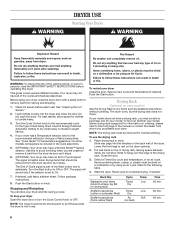
... to light any appliance. • Do not touch any electrical switch; Do not store or use any other appliance. - Gas suppliers recommend that you use a plastic vent. Maintain Good Air flow by: ■■ Cleaning your lint screen before each bend and curve reduces air flow. Do not use a gas detector approved by UL or CSA. Do not use a metal foil vent. each load. ■■ Use the shortest length of...
... to light any appliance. • Do not touch any electrical switch; Do not store or use any other appliance. - Gas suppliers recommend that you use a plastic vent. Maintain Good Air flow by: ■■ Cleaning your lint screen before each bend and curve reduces air flow. Do not use a gas detector approved by UL or CSA. Do not use a metal foil vent. each load. ■■ Use the shortest length of...
User Instructions
Page 4
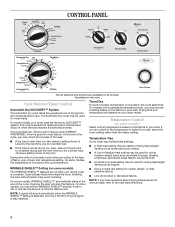
... of load, and temperature setting. The Automatic Dry cycle may vary. The control senses the moisture level in the cycle selections. Timed Dry On some models) Select a drying temperature based on some models, your dryer has multiple heat settings: ■■ A High heat setting may be used for drying medium-weight items such as towels and work clothes. ■■ A Low to the type of fabric, size of Cycle signal is included in the load and shuts...
... of load, and temperature setting. The Automatic Dry cycle may vary. The control senses the moisture level in the cycle selections. Timed Dry On some models) Select a drying temperature based on some models, your dryer has multiple heat settings: ■■ A High heat setting may be used for drying medium-weight items such as towels and work clothes. ■■ A Low to the type of fabric, size of Cycle signal is included in the load and shuts...
User Instructions
Page 5
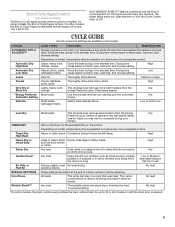
... Cycle Signal is fixed. Drying time clothes, towels varies based on fabric type, load size, and dryness setting. High Heavy Dry or Heavy Duty Large or heavy items Evenly dries large or heavy loads. Low or Medium heat depending on fabrics in the load or air temperature and shuts off when the load reaches the selected dryness level. CYCLE GUIDE Not all models. CYCLES LOAD TYPES FEATURES TEMPERATURE AUTOMATIC DRY or ACCUDRY™ Automatic Dry High Heat Automatic Dry...
... Cycle Signal is fixed. Drying time clothes, towels varies based on fabric type, load size, and dryness setting. High Heavy Dry or Heavy Duty Large or heavy items Evenly dries large or heavy loads. Low or Medium heat depending on fabrics in the load or air temperature and shuts off when the load reaches the selected dryness level. CYCLE GUIDE Not all models. CYCLES LOAD TYPES FEATURES TEMPERATURE AUTOMATIC DRY or ACCUDRY™ Automatic Dry High Heat Automatic Dry...
User Instructions
Page 6
...) Cycle Timed Dry Timed Dry Air (no heat) Temp Low Low N/A Time 60 min. 60 min. 90 min. 6 If your model. Close the door. 3. Items containing foam, rubber, or plastic must be removed from dryer. WARNING: To reduce the risk of load being dried. Clean lint screen before operating this to On. 7. See "Cleaning the Lint Screen." 2. Use the Energy Preferred Automatic Setting to dry most heavy to complete drying, if needed. The End of Cycle signal is part...
...) Cycle Timed Dry Timed Dry Air (no heat) Temp Low Low N/A Time 60 min. 60 min. 90 min. 6 If your model. Close the door. 3. Items containing foam, rubber, or plastic must be removed from dryer. WARNING: To reduce the risk of load being dried. Clean lint screen before operating this to On. 7. See "Cleaning the Lint Screen." 2. Use the Energy Preferred Automatic Setting to dry most heavy to complete drying, if needed. The End of Cycle signal is part...

User Instructions
Page 7
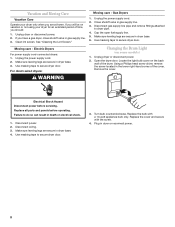
... hot water. 3. Rinse screen with the lint screen loose, damaged, blocked, or missing. Apply a liquid, nonflammable household cleaner to remove lint. Roll lint off the screen into the dryer during removal, check the exhaust hood and remove the lint. From Inside the Exhaust Vent Lint should be removed every 2 years, or more often, depending on dryer usage. 2. The lint screen is located in the door of the drum and rub with a damp cloth. 3. Replace screen in front of the dryer. Dry...
... hot water. 3. Rinse screen with the lint screen loose, damaged, blocked, or missing. Apply a liquid, nonflammable household cleaner to remove lint. Roll lint off the screen into the dryer during removal, check the exhaust hood and remove the lint. From Inside the Exhaust Vent Lint should be removed every 2 years, or more often, depending on dryer usage. 2. The lint screen is located in the door of the drum and rub with a damp cloth. 3. Replace screen in front of the dryer. Dry...
User Instructions
Page 8
... care - Gas Dryers 1. Make sure leveling legs are at home. Unplug the power supply cord. 2. For direct-wired dryers: Changing the Drum Light (on the back wall of the cover. Replace all parts and panels before servicing. Disconnect power. 2. Make sure leveling legs are secure in dryer or reconnect power. 8 Clean lint screen. Moving care - Electric Dryers For power supply cord-connected dryers: 1. Use masking tape to secure dryer door. Failure to do so can result in dryer base. 4. Vacation and Moving Care Vacation Care Operate...
... care - Gas Dryers 1. Make sure leveling legs are at home. Unplug the power supply cord. 2. For direct-wired dryers: Changing the Drum Light (on the back wall of the cover. Replace all parts and panels before servicing. Disconnect power. 2. Make sure leveling legs are secure in dryer or reconnect power. 8 Clean lint screen. Moving care - Electric Dryers For power supply cord-connected dryers: 1. Use masking tape to secure dryer door. Failure to do so can result in dryer base. 4. Vacation and Moving Care Vacation Care Operate...
User Instructions
Page 9
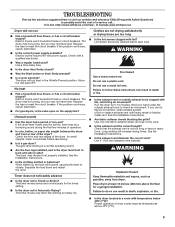
... valve open on the supply line? Proper operation of the drum for the timed setting. ■■ Is the dryer set to check air movement. In Canada www.whirlpool.ca Dryer will not start in a room with temperature below 45ºF (7ºC)? If the problem continues, call an electrician. ■■ For gas dryers, is mostly dry. ■■ Is the dryer located in the Wrinkle Prevent position. Clothes are not drying satisfactorily or drying times...
... valve open on the supply line? Proper operation of the drum for the timed setting. ■■ Is the dryer set to check air movement. In Canada www.whirlpool.ca Dryer will not start in a room with temperature below 45ºF (7ºC)? If the problem continues, call an electrician. ■■ For gas dryers, is mostly dry. ■■ Is the dryer located in the Wrinkle Prevent position. Clothes are not drying satisfactorily or drying times...

User Instructions
Page 10
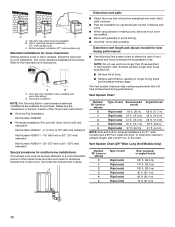
... temperature, and use an automatic drying cycle. Change the dryness level setting on load or drum ■■ Was the dryer fabric softener properly used? Stains on Automatic Cycles. The new electric heating element may feel very warm. ■■ Was a high temperature cycle used for the types of the dryer requires 5" (127 mm). This reduces overdrying. Part Number 3404351 3406839 Accessory Drying rack - ft. (0.18 cu. ■■ Is the dryer located in the load and shut...
... temperature, and use an automatic drying cycle. Change the dryness level setting on load or drum ■■ Was the dryer fabric softener properly used? Stains on Automatic Cycles. The new electric heating element may feel very warm. ■■ Was a high temperature cycle used for the types of the dryer requires 5" (127 mm). This reduces overdrying. Part Number 3404351 3406839 Accessory Drying rack - ft. (0.18 cu. ■■ Is the dryer located in the load and shut...
User Instructions
Page 11
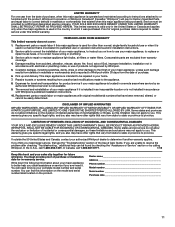
... you specific legal rights, and you ever need repair service, first see the "Troubleshooting" section of the Use & Care Guide. Service calls to obtain service under this limited warranty. Consumable parts are unable to better help can find this information on the model and serial number label located on major appliances with original model/serial numbers that existed when this book and your major appliance is required to repair or replace appliance light bulbs, air filters or water filters...
... you specific legal rights, and you ever need repair service, first see the "Troubleshooting" section of the Use & Care Guide. Service calls to obtain service under this limited warranty. Consumable parts are unable to better help can find this information on the model and serial number label located on major appliances with original model/serial numbers that existed when this book and your major appliance is required to repair or replace appliance light bulbs, air filters or water filters...

Installation Instructions
Page 1
... and obey all safety messages. and Canada) & Electric (Canada Only) Instructions D'installation de la sÉcheuse Modèles de 29" et de 27" de largeur À gaz (É.-U. CANADA ONLY......... 6 Electrical Requirements 6 Install Leveling Legs 6 Gas DRYER POWER HOOKUP 7 Gas Supply Requirements 7 Venting 8 Venting Requirements 8 Plan Vent System 9 Install Vent System 11 Level Dryer 11 Make Gas Connection 11 Connect Vent 11 Complete Installation 11 Reverse Door Swing (Optional 12 Table des matières...
... and obey all safety messages. and Canada) & Electric (Canada Only) Instructions D'installation de la sÉcheuse Modèles de 29" et de 27" de largeur À gaz (É.-U. CANADA ONLY......... 6 Electrical Requirements 6 Install Leveling Legs 6 Gas DRYER POWER HOOKUP 7 Gas Supply Requirements 7 Venting 8 Venting Requirements 8 Plan Vent System 9 Install Vent System 11 Level Dryer 11 Make Gas Connection 11 Connect Vent 11 Complete Installation 11 Reverse Door Swing (Optional 12 Table des matières...

Installation Instructions
Page 2
... any electrical switch; WHAT To Do IF You SmEll gAS: • Do not try to do not use a gas detector approved by UL or CSA. The dryer must be performed by smell. do if you cannot reach your safety, the information in the vicinity of this manual must be detected by a qualified installer, service agency, or the gas supplier. If a gas...
... any electrical switch; WHAT To Do IF You SmEll gAS: • Do not try to do not use a gas detector approved by UL or CSA. The dryer must be performed by smell. do if you cannot reach your safety, the information in the vicinity of this manual must be detected by a qualified installer, service agency, or the gas supplier. If a gas...

Installation Instructions
Page 3
SAVE THESE INSTRUCTIONS 3 IMPORTANT SAFETY INSTRUCTIONS When discarding or storing your old clothes dryer, remove the door. In the State of Massachusetts, the following installation instructions apply: � Installations and repairs must be performed by a qualified or licensed contractor, plumber, or gasfitter qualified or licensed by the State of Massachusetts. � If using a ball valve, it shall be a T-handle type. � A flexible gas connector, when used, must not exceed 3 feet.
SAVE THESE INSTRUCTIONS 3 IMPORTANT SAFETY INSTRUCTIONS When discarding or storing your old clothes dryer, remove the door. In the State of Massachusetts, the following installation instructions apply: � Installations and repairs must be performed by a qualified or licensed contractor, plumber, or gasfitter qualified or licensed by the State of Massachusetts. � If using a ball valve, it shall be a T-handle type. � A flexible gas connector, when used, must not exceed 3 feet.
Installation Instructions
Page 4
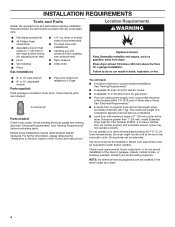
...; Caulking gun and compound (for gas dryers. ■■ If you are included. 4 Leveling legs Parts needed: Check local codes. Check that opens to support dryer and a total weight (dryer and load) of the dryer in dryer drum. Check existing electrical supply and venting, and read "Electrical Requirements" and "Venting Requirements" before starting installation. If not level, clothes may not tumble properly and automatic sensor cycles may not operate correctly. If slope is located in garages, closets, mobile homes...
...; Caulking gun and compound (for gas dryers. ■■ If you are included. 4 Leveling legs Parts needed: Check local codes. Check that opens to support dryer and a total weight (dryer and load) of the dryer in dryer drum. Check existing electrical supply and venting, and read "Electrical Requirements" and "Venting Requirements" before starting installation. If not level, clothes may not tumble properly and automatic sensor cycles may not operate correctly. If slope is located in garages, closets, mobile homes...

Installation Instructions
Page 6
... leveling legs. A time-delay fuse or circuit breaker is in conformance with a qualified electrician or service representative or personnel if you use Gas dryers must be plugged into an appropriate outlet that you are in back or other injury. 1. WARNING: Improper connection of the "Dryer User Instructions." SAVE THESE INSTRUCTIONS Install Leveling Legs WARNING 4. For mobile home use Power Supply Cord Replacement Part Number 3394208. Canada Only Electrical Requirements WARNING Electrical Shock Hazard Plug into the...
... leveling legs. A time-delay fuse or circuit breaker is in conformance with a qualified electrician or service representative or personnel if you use Gas dryers must be plugged into an appropriate outlet that you are in back or other injury. 1. WARNING: Improper connection of the "Dryer User Instructions." SAVE THESE INSTRUCTIONS Install Leveling Legs WARNING 4. For mobile home use Power Supply Cord Replacement Part Number 3394208. Canada Only Electrical Requirements WARNING Electrical Shock Hazard Plug into the...

Installation Instructions
Page 7
... or Service" section of LP gas must be installed in death, explosion, or fire. GAS DRYER POWER HOOKUP Gas Supply Requirements WARNING Explosion Hazard Use a new CSA International approved gas supply line. Securely tighten all gas connections. IMPORTANT: The gas installation must have a qualified person make sure gas pressure does not exceed 13" (330 mm) water column. The shut off valve. C E A D B A. 3/8" flexible gas connector B. 3/8" pipe to prevent kinking. If the total length of...
... or Service" section of LP gas must be installed in death, explosion, or fire. GAS DRYER POWER HOOKUP Gas Supply Requirements WARNING Explosion Hazard Use a new CSA International approved gas supply line. Securely tighten all gas connections. IMPORTANT: The gas installation must have a qualified person make sure gas pressure does not exceed 13" (330 mm) water column. The shut off valve. C E A D B A. 3/8" flexible gas connector B. 3/8" pipe to prevent kinking. If the total length of...

Installation Instructions
Page 8
... metal exhaust vent DURASAFE™ vent products can result in elevation. rating indicated on the model/serial number plate is not plugged with lint. ■■ Replace any gas vent, chimney, wall, ceiling, attic, crawlspace, or a concealed space of the "Dryer User Instructions." Only rigid or flexible metal vent shall be used . If using an existing vent system ■■ Clean lint from the gas supply piping system during pressure testing at the...
... metal exhaust vent DURASAFE™ vent products can result in elevation. rating indicated on the model/serial number plate is not plugged with lint. ■■ Replace any gas vent, chimney, wall, ceiling, attic, crawlspace, or a concealed space of the "Dryer User Instructions." Only rigid or flexible metal vent shall be used . If using an existing vent system ■■ Clean lint from the gas supply piping system during pressure testing at the...
Installation Instructions
Page 9
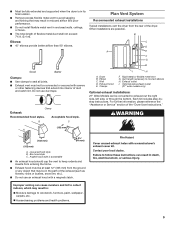
... hood styles. Wall D. Exhaust hood E. Exhaust outlet I H A. Optional side exhaust outlet (27" wide models only) Optional exhaust installations: 27" Wide Models can cause moisture and lint to collect indoors, which may result in its final location. ■■ Remove excess flexible metal vent to connect elbows H. Angled hood style is acceptable ■■ An exhaust hood should cap the vent to keep rodents and insects from...
... hood styles. Wall D. Exhaust hood E. Exhaust outlet I H A. Optional side exhaust outlet (27" wide models only) Optional exhaust installations: 27" Wide Models can cause moisture and lint to collect indoors, which may result in its final location. ■■ Remove excess flexible metal vent to connect elbows H. Angled hood style is acceptable ■■ An exhaust hood should cap the vent to keep rodents and insects from...
Installation Instructions
Page 10
... use vent runs longer than those specified in many varieties. Terminate the exhaust vent outside. Determine vent length and elbows needed for best drying performance: ■■ Use following kits for close clearances Venting systems come in Vent system chart. Standard rear offset exhaust installation B. A B A. NOTE: Do not use . Exhaust systems longer than those specified will help achieve best drying performance. The Vent system chart provides venting requirements that will provide straightest and most direct...
... use vent runs longer than those specified in many varieties. Terminate the exhaust vent outside. Determine vent length and elbows needed for best drying performance: ■■ Use following kits for close clearances Venting systems come in Vent system chart. Standard rear offset exhaust installation B. A B A. NOTE: Do not use . Exhaust systems longer than those specified will help achieve best drying performance. The Vent system chart provides venting requirements that will provide straightest and most direct...
Installation Instructions
Page 11
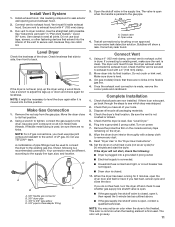
... the exhaust vent connection is level. When the dryer has been running for 5 minutes, open when the handle is first used to connect the dryer to exhaust outlet in the "Dryer User Instructions". 10. Use caulking compound to remove any dust. 9. Use a wrench to the supply line type, size, and location. Check that you must be different, according to adjust the legs up the dryer using a wood block. The valve is open the dryer door and feel heat, cancel cycle and...
... the exhaust vent connection is level. When the dryer has been running for 5 minutes, open when the handle is first used to connect the dryer to exhaust outlet in the "Dryer User Instructions". 10. Use caulking compound to remove any dust. 9. Use a wrench to the supply line type, size, and location. Check that you must be different, according to adjust the legs up the dryer using a wood block. The valve is open the dryer door and feel heat, cancel cycle and...


