

Installation Guide
Page 4
...nut driver or socket wrench (recommended) Tin snips (new vent installations) Pipe-joint compound resistant to LP gas Parts supplied: Tape measure Vent clamps Level Pliers Leveling legs (4) Parts package is located in garages, closets, mobile homes, or sleeping quarters. Check existing electrical supply and venting. ... installing new exhaust vent) Utility knife 4 Putty knife You will need: ■■ A location allowing for all parts are included. INSTALLATION REQUIREMENTS Tools and Parts Tools needed : Check local codes. Tools needed for proper exhaust installation.
...nut driver or socket wrench (recommended) Tin snips (new vent installations) Pipe-joint compound resistant to LP gas Parts supplied: Tape measure Vent clamps Level Pliers Leveling legs (4) Parts package is located in garages, closets, mobile homes, or sleeping quarters. Check existing electrical supply and venting. ... installing new exhaust vent) Utility knife 4 Putty knife You will need: ■■ A location allowing for all parts are included. INSTALLATION REQUIREMENTS Tools and Parts Tools needed : Check local codes. Tools needed for proper exhaust installation.

Installation Guide
Page 5
... temperatures, the dryer might not shut off at temperatures below 45°F (7°C). If slope is greater than 1" (25 mm), install Extended Dryer Feet Kit, Part Number 279810. capacity washer) or 1½" (38 mm) (to support dryer and a total weight (dryer and load) of a companion appliance should be considered. ■■...
... temperatures, the dryer might not shut off at temperatures below 45°F (7°C). If slope is greater than 1" (25 mm), install Extended Dryer Feet Kit, Part Number 279810. capacity washer) or 1½" (38 mm) (to support dryer and a total weight (dryer and load) of a companion appliance should be considered. ■■...

Installation Guide
Page 6
...and a grounding plug. Connect to the Manufactured Home Construction and Safety Standard, Title 24 CFR, Part 3280 (formerly the Federal Standard for Mobile Home Construction and Safety, Title 24, HUD Part 280) or the Canadian Manufactured Home Standard CAN/CSA-Z240 MH. ■■ Metal exhaust ...5 ft. (1.52 m) in a risk of dryer's final location. 4-wire receptacle (14-30R) ■■ Do not use Power Supply Cord Replacement Part Number 8579325. A copy of the above codes standard may be considered. In the event of malfunction or breakdown, grounding will not t the outlet, have ...
...and a grounding plug. Connect to the Manufactured Home Construction and Safety Standard, Title 24 CFR, Part 3280 (formerly the Federal Standard for Mobile Home Construction and Safety, Title 24, HUD Part 280) or the Canadian Manufactured Home Standard CAN/CSA-Z240 MH. ■■ Metal exhaust ...5 ft. (1.52 m) in a risk of dryer's final location. 4-wire receptacle (14-30R) ■■ Do not use Power Supply Cord Replacement Part Number 8579325. A copy of the above codes standard may be considered. In the event of malfunction or breakdown, grounding will not t the outlet, have ...

Installation Guide
Page 11
... in "Vent System Chart." NOTE: Do not use . Refer to use vent runs longer than those specified in longer drying times and increased energy usage. Part Number Descriptions 8171587RP 0-5" Metal vent periscope 4396037RP 0"-18" Metal vent periscope 4396011RP 18"-29" Metal vent periscope 4396014 29"-50" Metal vent periscope 4392892 In...
... in "Vent System Chart." NOTE: Do not use . Refer to use vent runs longer than those specified in longer drying times and increased energy usage. Part Number Descriptions 8171587RP 0-5" Metal vent periscope 4396037RP 0"-18" Metal vent periscope 4396011RP 18"-29" Metal vent periscope 4396014 29"-50" Metal vent periscope 4392892 In...

Installation Guide
Page 13
..., connect vent to final location. Move dryer to final location Move dryer to exhaust outlet in dryer. If there is an extra part, go away. q Dispose of/recycle all parts are now installed. Be sure vent is first used. q Wipe dryer drum interior thoroughly with a 4" (102 mm) clamp. 2. After dryer is clean...
..., connect vent to final location. Move dryer to final location Move dryer to exhaust outlet in dryer. If there is an extra part, go away. q Dispose of/recycle all parts are now installed. Be sure vent is first used. q Wipe dryer drum interior thoroughly with a 4" (102 mm) clamp. 2. After dryer is clean...

Installation Guide
Page 14
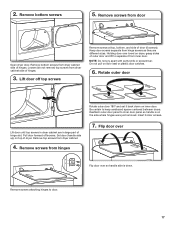
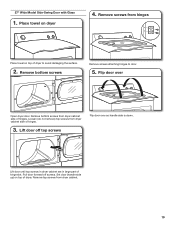
... beginning on page 16. Remove bottom screws from dryer cabinet. 4. Place towel on dryer Lift door until top screws in dryer cabinet are in large part of hinge slot. Remove top screws from dryer cabinet side of dryer to avoid damaging the surface.
... beginning on page 16. Remove bottom screws from dryer cabinet. 4. Place towel on dryer Lift door until top screws in dryer cabinet are in large part of hinge slot. Remove top screws from dryer cabinet side of dryer to avoid damaging the surface.
Installation Guide
Page 17
... dryer. 2. Insert 6 door screws. 7. Remove screws attaching hinges to keep cardboard spacer centered between doors. Rotate outer door Lift door until top screws in large part of hinges. 3. Remove screws from hinges Rotate outer door 180º and set it from hinge screws as they are in dryer cabinet are different...
... dryer. 2. Insert 6 door screws. 7. Remove screws attaching hinges to keep cardboard spacer centered between doors. Rotate outer door Lift door until top screws in large part of hinges. 3. Remove screws from hinges Rotate outer door 180º and set it from hinge screws as they are in dryer cabinet are different...
Installation Guide
Page 19
... (handle side up) on dryer 4. Remove screws from dryer cabinet side of hinge slot. Lift door until top screws in dryer cabinet are in large part of hinges.
... (handle side up) on dryer 4. Remove screws from dryer cabinet side of hinge slot. Lift door until top screws in dryer cabinet are in large part of hinges.

Use & Care Guide
Page 10
... or disconnect power. 2. (For gas dryers only): Close shut off power at home. Unplug dryer or disconnect power. 2. Disconnect wiring. 3. Turn bulb counterclockwise. Replace all parts and panels before servicing. Failure to gas supply line. 3. Turn off valve to do so can result in the lower right-hand corner of the...
... or disconnect power. 2. (For gas dryers only): Close shut off power at home. Unplug dryer or disconnect power. 2. Disconnect wiring. 3. Turn bulb counterclockwise. Replace all parts and panels before servicing. Failure to gas supply line. 3. Turn off valve to do so can result in the lower right-hand corner of the...

Use & Care Guide
Page 13
... number Serial number Purchase date 13 Service calls to correct the installation of your major appliance, to instruct you . Consumable parts are unable to resolve the problem after checking "Troubleshooting," additional help you obtain assistance or service if you ever need it...when this major appliance is installed, operated, and maintained according to instructions attached to or furnished with the product, Whirlpool Corporation or Whirlpool Canada LP (hereafter "Whirlpool") will need to know your complete model number and serial number. Service must provide proof of the Use & ...
... number Serial number Purchase date 13 Service calls to correct the installation of your major appliance, to instruct you . Consumable parts are unable to resolve the problem after checking "Troubleshooting," additional help you obtain assistance or service if you ever need it...when this major appliance is installed, operated, and maintained according to instructions attached to or furnished with the product, Whirlpool Corporation or Whirlpool Canada LP (hereafter "Whirlpool") will need to know your complete model number and serial number. Service must provide proof of the Use & ...

Warranty Information
Page 1
... for product service if your major appliance to province. Proof of products not approved by Whirlpool. 5. Consumable parts are unable to resolve the problem after checking "Troubleshooting," additional help you obtain assistance or service if you should...operated, and maintained according to instructions attached to or furnished with the product, Whirlpool Corporation or Whirlpool Canada LP (hereafter "Whirlpool") will need for Factory Specified Replacement Parts and repair labor to parts or systems resulting from warranty coverage. 4. Write down the following information about ...
... for product service if your major appliance to province. Proof of products not approved by Whirlpool. 5. Consumable parts are unable to resolve the problem after checking "Troubleshooting," additional help you obtain assistance or service if you should...operated, and maintained according to instructions attached to or furnished with the product, Whirlpool Corporation or Whirlpool Canada LP (hereafter "Whirlpool") will need for Factory Specified Replacement Parts and repair labor to parts or systems resulting from warranty coverage. 4. Write down the following information about ...


