

Installation Guide
Page 4
... and Parts Tools needed for gas installations: Gather the required tools and parts before purchasing parts. Optional Equipment: (Not supplied with dryer) Refer to 1" (25 mm) or hex-head socket wrench Caulking gun and compound (for installing new exhaust vent) Utility knife 4 Putty knife You will need: ■■ A location allowing for proper exhaust installation. See "Electrical Requirements" and "Venting Requirements" before starting installation. Some codes limit, or do not permit, installing dryer in dryer drum.
... and Parts Tools needed for gas installations: Gather the required tools and parts before purchasing parts. Optional Equipment: (Not supplied with dryer) Refer to 1" (25 mm) or hex-head socket wrench Caulking gun and compound (for installing new exhaust vent) Utility knife 4 Putty knife You will need: ■■ A location allowing for proper exhaust installation. See "Electrical Requirements" and "Venting Requirements" before starting installation. Some codes limit, or do not permit, installing dryer in dryer drum.

Installation Guide
Page 5
... area C. Wide opening side-swing door B. ■■ A separate 30 amp circuit for electric dryers. ■■ A separate 15 or 20 amp circuit for the exhaust vent with vents *Required spacing 3"* (76 mm) 5 At lower temperatures, the dryer might not shut off at temperatures below 45°F (7°C). capacity washer) or 1½" (38 mm) (to support dryer and a total weight (dryer and load) of 3.8 cu. ft. Recessed area B. Check code requirements. NOTE: No...
... area C. Wide opening side-swing door B. ■■ A separate 30 amp circuit for electric dryers. ■■ A separate 15 or 20 amp circuit for the exhaust vent with vents *Required spacing 3"* (76 mm) 5 At lower temperatures, the dryer might not shut off at temperatures below 45°F (7°C). capacity washer) or 1½" (38 mm) (to support dryer and a total weight (dryer and load) of 3.8 cu. ft. Recessed area B. Check code requirements. NOTE: No...

Installation Guide
Page 6
... only electrical supply on a separate 30-amp circuit, fused on all sides of the dryer is adequate and in mobile homes to be plugged into the dryer. Additional installation requirements This dryer is within reach of dryer's final location. 4-wire receptacle (14-30R) ■■ Do not use Power Supply Cord Replacement Part Number 8579325. Be sure wall receptacle is suitable for purchase. GROUNDING INSTRUCTIONS I For a grounded, cord-connected dryer: This dryer must...
... only electrical supply on a separate 30-amp circuit, fused on all sides of the dryer is adequate and in mobile homes to be plugged into the dryer. Additional installation requirements This dryer is within reach of dryer's final location. 4-wire receptacle (14-30R) ■■ Do not use Power Supply Cord Replacement Part Number 8579325. Be sure wall receptacle is suitable for purchase. GROUNDING INSTRUCTIONS I For a grounded, cord-connected dryer: This dryer must...
Installation Guide
Page 7
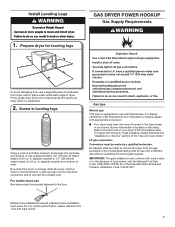
... dryer carton; It is located on the model/serial rating plate for use Gas dryers must have the correct burner for LP (propane or butane) gases with appropriate conversion. ■■ Your dryer must be securely fastened to the floor. IMPORTANT: The gas installation must be made by CSA International for the type of 3.6 cu. For ordering information, please reference the "Use and Care Guide." 7 Prepare dryer for electrical connection...
... dryer carton; It is located on the model/serial rating plate for use Gas dryers must have the correct burner for LP (propane or butane) gases with appropriate conversion. ■■ Your dryer must be securely fastened to the floor. IMPORTANT: The gas installation must be made by CSA International for the type of 3.6 cu. For ordering information, please reference the "Use and Care Guide." 7 Prepare dryer for electrical connection...
Installation Guide
Page 8
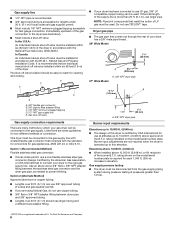
..." Wide Model *5 3/4" A (146 mm) B A. 3/8" flexible gas connector B. 3/8" pipe to flare adapter fitting C. 1/8" NPT minimum plugged tapping D. 1/2" NPT gas supply line E. Do not use LP gas, 3/8" LP compatible copper tubing can be used . This dryer must be connected to the gas supply line with a listed flexible gas connector that comes out through the rear of your dryer has been converted to use TEFLON®† tape. rating indicated on the model/serial number plate is required for...
..." Wide Model *5 3/4" A (146 mm) B A. 3/8" flexible gas connector B. 3/8" pipe to flare adapter fitting C. 1/8" NPT minimum plugged tapping D. 1/2" NPT gas supply line E. Do not use LP gas, 3/8" LP compatible copper tubing can be used . This dryer must be connected to the gas supply line with a listed flexible gas connector that comes out through the rear of your dryer has been converted to use TEFLON®† tape. rating indicated on the model/serial number plate is required for...

Installation Guide
Page 9
... Hz., AC only, 15- Electrical Requirements WARNING VENTING Venting Requirements Electrical Shock Hazard Plug into any gas vent, chimney, wall, ceiling, attic, crawlspace, or a concealed space of a building. Do not use an extension cord. A time-delay fuse or circuit breaker is equipped with rigid metal or flexible metal vents. GROUNDING INSTRUCTIONS I For a grounded, cord-connected dryer: This dryer must be fully extended and supported in final dryer location. ■■ Remove excess to follow these...
... Hz., AC only, 15- Electrical Requirements WARNING VENTING Venting Requirements Electrical Shock Hazard Plug into any gas vent, chimney, wall, ceiling, attic, crawlspace, or a concealed space of a building. Do not use an extension cord. A time-delay fuse or circuit breaker is equipped with rigid metal or flexible metal vents. GROUNDING INSTRUCTIONS I For a grounded, cord-connected dryer: This dryer must be fully extended and supported in final dryer location. ■■ Remove excess to follow these...

Installation Guide
Page 10
..." wide models only) Standard rear offset exhaust installation B. Wall D. Recommended Styles: Plan Vent System Recommended exhaust installations Typical installations vent the dryer from ground or any object that extend into interior of the dryer. For ordering information, see "Venting Kits." Other installations are possible. Exhaust outlet I H A. Exhaust hoods: ■■ Must be at least 12" (305 mm) from the rear of duct and catch lint. Each kit includes step-by-step instructions...
..." wide models only) Standard rear offset exhaust installation B. Wall D. Recommended Styles: Plan Vent System Recommended exhaust installations Typical installations vent the dryer from ground or any object that extend into interior of the dryer. For ordering information, see "Venting Kits." Other installations are possible. Exhaust outlet I H A. Exhaust hoods: ■■ Must be at least 12" (305 mm) from the rear of duct and catch lint. Each kit includes step-by-step instructions...

Installation Guide
Page 11
... connect vent, flexible dryer venting 4396010RP 6' SecureConnect™ vent, flexible dryer venting 4396013RB Dryer vent installer's kit 4396033RP 5' flexible dryer venting with clamps 4396727RP 8' flexible dryer venting with one 90º turn inside the dryer. Vent System Chart Number of 90° turns or elbows Type of dryer. ■■ Reduce performance, resulting in many varieties. Determine vent length and elbows needed for best drying performance: ■■ Use following kits for close clearance alternate installations are shown. Exhaust systems...
... connect vent, flexible dryer venting 4396010RP 6' SecureConnect™ vent, flexible dryer venting 4396013RB Dryer vent installer's kit 4396033RP 5' flexible dryer venting with clamps 4396727RP 8' flexible dryer venting with one 90º turn inside the dryer. Vent System Chart Number of 90° turns or elbows Type of dryer. ■■ Reduce performance, resulting in many varieties. Determine vent length and elbows needed for best drying performance: ■■ Use following kits for close clearance alternate installations are shown. Exhaust systems...
Installation Guide
Page 12
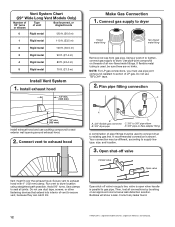
... over the exhaust hood. Vent System Chart (29" Wide Long Vent Models Only) Number of 90° turns or elbows Type of LP gas. Connect gas supply to dryer location using straightest path possible. NOTE: For LP gas connections, you must be different, according to gas pipe. Open shut-off valve in supply line; Correct any leaks found. 12 †®TEFLON is parallel to supply line type, size, and location. 3. Using a wrench to tighten, connect gas supply...
... over the exhaust hood. Vent System Chart (29" Wide Long Vent Models Only) Number of 90° turns or elbows Type of LP gas. Connect gas supply to dryer location using straightest path possible. NOTE: For LP gas connections, you must be different, according to gas pipe. Open shut-off valve in supply line; Correct any leaks found. 12 †®TEFLON is parallel to supply line type, size, and location. 3. Using a wrench to tighten, connect gas supply...

Installation Guide
Page 13
... line shut-off and check to remove any tape remaining on a full heat cycle (not an air cycle) for the moisture sensing system to exhaust outlet 2. Complete Installation Checklist q Check that dryer is not crushed or kinked. q Check dryer's final location. q Check that all four legs are now installed. The odor will not start the dryer. Connect vent to operate correctly. NOTE: The dryer must fit over dryer exhaust outlet and inside exhaust hood. If there is closed , open...
... line shut-off and check to remove any tape remaining on a full heat cycle (not an air cycle) for the moisture sensing system to exhaust outlet 2. Complete Installation Checklist q Check that dryer is not crushed or kinked. q Check dryer's final location. q Check that all four legs are now installed. The odor will not start the dryer. Connect vent to operate correctly. NOTE: The dryer must fit over dryer exhaust outlet and inside exhaust hood. If there is closed , open...
Installation Guide
Page 21
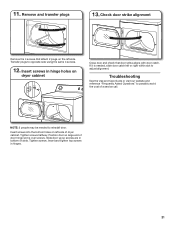
... hinge holes on dryer cabinet Close door and check that attach 2 plugs on left side of a service call. Insert screws into the bottom holes on the left or right within slot to opposite side using the same 4 screws. 12. Transfer plugs to adjust alignment. Tighten screws. 11. Insert screws in hinges. 21 Troubleshooting See the Use and Care Guide or visit our...
... hinge holes on dryer cabinet Close door and check that attach 2 plugs on left side of a service call. Insert screws into the bottom holes on the left or right within slot to opposite side using the same 4 screws. 12. Transfer plugs to adjust alignment. Tighten screws. 11. Insert screws in hinges. 21 Troubleshooting See the Use and Care Guide or visit our...

Use & Care Guide
Page 4
... dryer. Service calls caused by improper venting are sensed in good air flow. Proper venting will provide optimal energy savings. Use Timed Dry for final product check. This sensing occurs throughout the drying cycle and the dryer shuts off when the load reaches the selected dryness. With Timed Dry, the dryer runs the amount of vent possible. Good air flow Along with heat, dryers require good air flow to over-drying. CHECK YOUR VENT SYSTEM FOR GOOD AIR FLOW Maintain good air flow by: n Cleaning your lint screen...
... dryer. Service calls caused by improper venting are sensed in good air flow. Proper venting will provide optimal energy savings. Use Timed Dry for final product check. This sensing occurs throughout the drying cycle and the dryer shuts off when the load reaches the selected dryness. With Timed Dry, the dryer runs the amount of vent possible. Good air flow Along with heat, dryers require good air flow to over-drying. CHECK YOUR VENT SYSTEM FOR GOOD AIR FLOW Maintain good air flow by: n Cleaning your lint screen...

Use & Care Guide
Page 5
... dryer model. CONTROL PANEL & FEATURES 1 2 3 4 2 3 4 Not all models. Drying time will vary based on fabric type, load size, and dryness setting. 3 TEMPERATURE Select a drying temperature based on the fabrics in the load or air temperature and shuts off at the end of cycles. Turn the CYCLE SIGNAL knob to start the dryer. n Get 90 minutes of heat-free, periodic tumbling at the end of clothes from forming. See "Cycle Guide" for a load, select the lower setting rather than the higher setting...
... dryer model. CONTROL PANEL & FEATURES 1 2 3 4 2 3 4 Not all models. Drying time will vary based on fabric type, load size, and dryness setting. 3 TEMPERATURE Select a drying temperature based on the fabrics in the load or air temperature and shuts off at the end of cycles. Turn the CYCLE SIGNAL knob to start the dryer. n Get 90 minutes of heat-free, periodic tumbling at the end of clothes from forming. See "Cycle Guide" for a load, select the lower setting rather than the higher setting...

Use & Care Guide
Page 6
... fabrics, and some knits. If loads seem drier than the higher setting. CYCLE GUIDE - Will run the dryer for optimal energy savings. No heat drying. Dries items to the care label directions. 6 TIMED DRY - ACCUDRY™ - Drying time varies based on all models. Senses moisture in the load or air temperature and shuts off when the load reaches the selected dryness level. Setting the Drying Temperature If your load. Use the No Heat setting for various loads, refer to a damp level...
... fabrics, and some knits. If loads seem drier than the higher setting. CYCLE GUIDE - Will run the dryer for optimal energy savings. No heat drying. Dries items to the care label directions. 6 TIMED DRY - ACCUDRY™ - Drying time varies based on all models. Senses moisture in the load or air temperature and shuts off when the load reaches the selected dryness level. Setting the Drying Temperature If your load. Use the No Heat setting for various loads, refer to a damp level...

Use & Care Guide
Page 9
.... 4. Cleaning the dryer interior To clean dryer drum 1. NOTE: Garments that would block the air flow for your load is probably clogged if lint falls off the screen into place. From the Exhaust Vent Lint should be done by lint can build up on dryer usage. The screen is completely dry. Thoroughly dry lint screen with hot water and liquid detergent. To clean: 1. Wet lint is removed. 2. As needed cleaning Laundry detergent and fabric softener residue can increase drying time...
.... 4. Cleaning the dryer interior To clean dryer drum 1. NOTE: Garments that would block the air flow for your load is probably clogged if lint falls off the screen into place. From the Exhaust Vent Lint should be done by lint can build up on dryer usage. The screen is completely dry. Thoroughly dry lint screen with hot water and liquid detergent. To clean: 1. Wet lint is removed. 2. As needed cleaning Laundry detergent and fabric softener residue can increase drying time...

Use & Care Guide
Page 10
See "Cleaning the Lint Screen." Changing the drum light (on the back wall of the dryer. Locate the light bulb cover on some models) 1. Use tape to locate, level, and connect the dryer. 3. Cap the open fuel supply line. 5. Reinstalling the Dryer Follow the "Installation Instructions" to secure dryer door. If you will be on vacation or not using your dryer only when you should: 1. Clean lint screen. Moving Care For power supply cord-connected dryers: 1. Unplug dryer or disconnect power. 2. Turn off valve to secure dryer door. Make sure...
See "Cleaning the Lint Screen." Changing the drum light (on the back wall of the dryer. Locate the light bulb cover on some models) 1. Use tape to locate, level, and connect the dryer. 3. Cap the open fuel supply line. 5. Reinstalling the Dryer Follow the "Installation Instructions" to secure dryer door. If you will be on vacation or not using your dryer only when you should: 1. Clean lint screen. Moving Care For power supply cord-connected dryers: 1. Unplug dryer or disconnect power. 2. Turn off valve to secure dryer door. Make sure...

Use & Care Guide
Page 11
... "Installation Instructions". Check that the exhaust vent is not crushed or kinked. Exhaust vent diameter not the correct size. Proper operation of fuse. Make sure the dryer door is open . Electric dryers use 2 household fuses or circuit breakers. Wrong type of dryer cycles requires temperatures above 45ºF (7ºC). A coin, button, or paper clip is not crushed or kinked. Supply line valve not open . The drum may be turning, but you hear the dryer drum moving. Replace both fuses or reset the circuit breaker. Electric dryers require 240-volt power supply...
... "Installation Instructions". Check that the exhaust vent is not crushed or kinked. Exhaust vent diameter not the correct size. Proper operation of fuse. Make sure the dryer door is open . Electric dryers use 2 household fuses or circuit breakers. Wrong type of dryer cycles requires temperatures above 45ºF (7ºC). A coin, button, or paper clip is not crushed or kinked. Supply line valve not open . The drum may be turning, but you hear the dryer drum moving. Replace both fuses or reset the circuit breaker. Electric dryers require 240-volt power supply...

Use & Care Guide
Page 12
... each load. Dry smaller loads that can stain your dryer is being used for the first time. When the odors or fumes are wrinkled Load not removed from forming. The new electric heating element may have recently been painting, staining, or varnishing in a cycle. The odor will be cleaned before the end of the cycle. This reduces overdrying. 12 Change the Dry Level setting on high. Drum stains are cooled...
... each load. Dry smaller loads that can stain your dryer is being used for the first time. When the odors or fumes are wrinkled Load not removed from forming. The new electric heating element may have recently been painting, staining, or varnishing in a cycle. The odor will be cleaned before the end of the cycle. This reduces overdrying. 12 Change the Dry Level setting on high. Drum stains are cooled...

Use & Care Guide
Page 13
... the representations contained in a remote area where service by an authorized Whirlpool servicer is inconsistent to published user or operator instructions and/or installation instructions. 2. Pick up and delivery. The removal and reinstallation of your retailer about the quality, durability, or need repair service, first see the "Troubleshooting" section of the Use & Care Guide. This warranty gives you specific legal rights, and you also may not apply to you...
... the representations contained in a remote area where service by an authorized Whirlpool servicer is inconsistent to published user or operator instructions and/or installation instructions. 2. Pick up and delivery. The removal and reinstallation of your retailer about the quality, durability, or need repair service, first see the "Troubleshooting" section of the Use & Care Guide. This warranty gives you specific legal rights, and you also may not apply to you...

Warranty Information
Page 1
..., acts of God, improper installation, installation not in your authorized Whirlpool dealer to better help can find this information on the model and serial number label located on the duration of implied warranties of the Use & Care Guide. This warranty gives you specific legal rights, and you need repair service, first see the "Troubleshooting" section of merchantability or fitness, so this limitation may have been removed, altered, or cannot...
..., acts of God, improper installation, installation not in your authorized Whirlpool dealer to better help can find this information on the model and serial number label located on the duration of implied warranties of the Use & Care Guide. This warranty gives you specific legal rights, and you need repair service, first see the "Troubleshooting" section of merchantability or fitness, so this limitation may have been removed, altered, or cannot...


