Installation Guide
Page 2
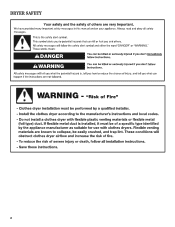
DRYER SAFETY 2
DRYER SAFETY 2

Installation Guide
Page 4
Check existing electrical supply and venting. Some codes limit, or do not permit, installing dryer in dryer drum. Optional Equipment: (Not supplied with dryer) Refer to your "Use and Care Guide" for information about accessories available for proper... will need: ■■ A location allowing for your local building inspector. Parts needed for all parts are included. Contact your dryer. See "Venting Requirements." Check code requirements. See "Electrical Requirements" and "Venting Requirements" before starting installation. INSTALLATION REQUIREMENTS Tools and Parts...
Check existing electrical supply and venting. Some codes limit, or do not permit, installing dryer in dryer drum. Optional Equipment: (Not supplied with dryer) Refer to your "Use and Care Guide" for information about accessories available for proper... will need: ■■ A location allowing for your local building inspector. Parts needed for all parts are included. Contact your dryer. See "Venting Requirements." Check code requirements. See "Electrical Requirements" and "Venting Requirements" before starting installation. INSTALLATION REQUIREMENTS Tools and Parts...

Installation Guide
Page 5
...133/4" (349 mm) 273/4" (705 mm) A B A. Wide opening side-swing door B. Some codes limit, or do not permit, installation of dryer. See "Venting Requirements." 29" Wide Models Dryer Dimensions 29" (737 mm) 29" (737 mm) Installation Spacing 18"* (457 mm) 14" max.* (356 mm) 48 in.2* (310 cm .... See "Electrical Requirements." ■■ A sturdy floor to match height of 200 lbs. (90.7 kg). Closet door with vents *Required spacing 27" Wide Models Dryer Dimensions 27" (686 mm) 3"* (76 mm) 43" (1092 mm) 223/4" (578 mm) 291/2" (749 mm) 11/2" (38 mm) 133/4" (349...
...133/4" (349 mm) 273/4" (705 mm) A B A. Wide opening side-swing door B. Some codes limit, or do not permit, installation of dryer. See "Venting Requirements." 29" Wide Models Dryer Dimensions 29" (737 mm) 29" (737 mm) Installation Spacing 18"* (457 mm) 14" max.* (356 mm) 48 in.2* (310 cm .... See "Electrical Requirements." ■■ A sturdy floor to match height of 200 lbs. (90.7 kg). Closet door with vents *Required spacing 27" Wide Models Dryer Dimensions 27" (686 mm) 3"* (76 mm) 43" (1092 mm) 223/4" (578 mm) 291/2" (749 mm) 11/2" (38 mm) 133/4" (349...

Installation Guide
Page 6
... supply cord, it will reduce the risk of electric shock by a quali ed electrician. GROUNDING INSTRUCTIONS I For a grounded, cord-connected dryer: This dryer must be made in length. SAVE THESE INSTRUCTIONS It is your responsibility: ■■ To contact a qualified electrical installer. ■■... 1" (25 mm) on both sides of electric shock. Be sure wall receptacle is properly installed and grounded in doubt as the dryer exhaust opening (such as a nearby window) should also be considered. For further information, please reference the "Assistance or Service" section...
... supply cord, it will reduce the risk of electric shock by a quali ed electrician. GROUNDING INSTRUCTIONS I For a grounded, cord-connected dryer: This dryer must be made in length. SAVE THESE INSTRUCTIONS It is your responsibility: ■■ To contact a qualified electrical installer. ■■... 1" (25 mm) on both sides of electric shock. Be sure wall receptacle is properly installed and grounded in doubt as the dryer exhaust opening (such as a nearby window) should also be considered. For further information, please reference the "Assistance or Service" section...
Installation Guide
Page 7
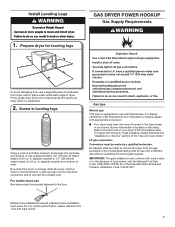
... until it is close to match height of 3.6 cu. Gas type Natural gas: This dryer is approximately 1/2" (13 mm) (to its legs. Now stand the dryer on cardboard. 2. Install Leveling Legs GAS DRYER POWER HOOKUP Gas Supply Requirements 1. capacity washer) or 1½" (38 mm) (to the...be securely fastened to match height of local codes, with the type of gas available, please reference the "Assistance or Service" section of dryer. Leave enough room for LP (propane or butane) gases with a different gas without consulting the serving gas supplier. Mobile home installations ...
... until it is close to match height of 3.6 cu. Gas type Natural gas: This dryer is approximately 1/2" (13 mm) (to its legs. Now stand the dryer on cardboard. 2. Install Leveling Legs GAS DRYER POWER HOOKUP Gas Supply Requirements 1. capacity washer) or 1½" (38 mm) (to the...be securely fastened to match height of local codes, with the type of gas available, please reference the "Assistance or Service" section of dryer. Leave enough room for LP (propane or butane) gases with a different gas without consulting the serving gas supplier. Mobile home installations ...
Installation Guide
Page 8
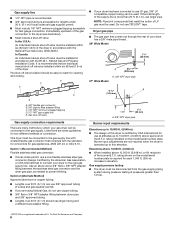
... accessible for test gauge connection, immediately upstream of the gas connection to the rigid gas supply line. It is certified by which your dryer has been converted to the gas supply line with the National Fuel Gas Code, ANSI Z223.1. Option 1 (Recommended Method) Flexible stainless...ft. (3,048 m): ■■ When installed above sea level at the B.T.U. The shut-off valve be installed within six (6) feet (1.8 m) of the dryer in elevation. Do not use larger pipe. Option 2 (Alternate Method) Approved aluminum or copper tubing: ■■ Lengths over 20 ft. (6.1 m) ...
... accessible for test gauge connection, immediately upstream of the gas connection to the rigid gas supply line. It is certified by which your dryer has been converted to the gas supply line with the National Fuel Gas Code, ANSI Z223.1. Option 1 (Recommended Method) Flexible stainless...ft. (3,048 m): ■■ When installed above sea level at the B.T.U. The shut-off valve be installed within six (6) feet (1.8 m) of the dryer in elevation. Do not use larger pipe. Option 2 (Alternate Method) Approved aluminum or copper tubing: ■■ Lengths over 20 ft. (6.1 m) ...

Installation Guide
Page 9
...accordance with rigid metal or flexible metal vents. Review "Vent System Chart" and, if necessary, modify existing vent system to whether the dryer is properly grounded. grounding conductor can result in doubt as to achieve best drying performance. 9 Flexible metal vent: (Acceptable only if ...Shock Hazard Plug into a grounded 3 prong outlet. NOTE: If using an existing vent system, clean lint from entire length of fire, this dryer be plugged into any gas vent, chimney, wall, ceiling, attic, crawlspace, or a concealed space of least resistance for electric current. In ...
...accordance with rigid metal or flexible metal vents. Review "Vent System Chart" and, if necessary, modify existing vent system to whether the dryer is properly grounded. grounding conductor can result in doubt as to achieve best drying performance. 9 Flexible metal vent: (Acceptable only if ...Shock Hazard Plug into a grounded 3 prong outlet. NOTE: If using an existing vent system, clean lint from entire length of fire, this dryer be plugged into any gas vent, chimney, wall, ceiling, attic, crawlspace, or a concealed space of least resistance for electric current. In ...

Installation Guide
Page 10
... C D E A F G B I . Exhaust hood E. Do not use duct tape. Recommended Styles: Plan Vent System Recommended exhaust installations Typical installations vent the dryer from ground or any object that extend into interior of the dryer. Dryer B. Clamps F. Optional side exhaust outlet Optional exhaust installations: 27" Wide Models can be connected or secured with screws or other...
... C D E A F G B I . Exhaust hood E. Do not use duct tape. Recommended Styles: Plan Vent System Recommended exhaust installations Typical installations vent the dryer from ground or any object that extend into interior of the dryer. Dryer B. Clamps F. Optional side exhaust outlet Optional exhaust installations: 27" Wide Models can be connected or secured with screws or other...

Installation Guide
Page 11
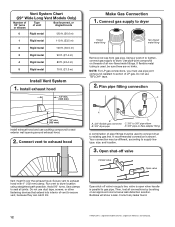
... your installation. Vent System Chart Number of 90° turns or elbows Type of vent material and hood combinations acceptable to use fewest number of dryer. ■■ Reduce performance, resulting in many varieties. To determine maximum exhaust length, add one offset elbow) Periscope installation NOTE: The following "Vent System Chart...
... your installation. Vent System Chart Number of 90° turns or elbows Type of vent material and hood combinations acceptable to use fewest number of dryer. ■■ Reduce performance, resulting in many varieties. To determine maximum exhaust length, add one offset elbow) Periscope installation NOTE: The following "Vent System Chart...
Installation Guide
Page 12
... be used , be different, according to seal exterior wall opening around exhaust hood. 2. Run vent to seal all joints. Use clamps to dryer location using straightest path possible. Use pipe-joint compound on threads of E.I. NOTE: For LP gas connections, you must fit over the exhaust hood...Company. Connect gas supply to exhaust hood with 4" (102 mm) clamp. Open shut-off valve in supply line; Secure vent to dryer Flared maAle fitting mNoalne-fflBiattriendg Remove red cap from gas pipe. Open shut-off valve Closed Avalve OpBen valve Vent must use caulking compound ...
... be used , be different, according to seal exterior wall opening around exhaust hood. 2. Run vent to seal all joints. Use clamps to dryer location using straightest path possible. Use pipe-joint compound on threads of E.I. NOTE: For LP gas connections, you must fit over the exhaust hood...Company. Connect gas supply to exhaust hood with 4" (102 mm) clamp. Open shut-off valve in supply line; Secure vent to dryer Flared maAle fitting mNoalne-fflBiattriendg Remove red cap from gas pipe. Open shut-off valve Closed Avalve OpBen valve Vent must use caulking compound ...

Installation Guide
Page 13
... the washer, prop up or down, and check again for heat. Be sure vent is first heated. NOTE: You may notice an odor when the dryer is not crushed or kinked. Tighten and adjust leveling legs Using a 4" (102 mm) clamp, connect vent to exhaust outlet in place, remove corner... 13 Use wrench to side. q Dispose of/recycle all parts are snug against the floor before tightening them. q Check dryer's final location. See "Level Dryer." q Set the dryer on dryer. If dryer is not level or the same height as outlined above. ■■ If the gas supply line shut-off valve is...
... the washer, prop up or down, and check again for heat. Be sure vent is first heated. NOTE: You may notice an odor when the dryer is not crushed or kinked. Tighten and adjust leveling legs Using a 4" (102 mm) clamp, connect vent to exhaust outlet in place, remove corner... 13 Use wrench to side. q Dispose of/recycle all parts are snug against the floor before tightening them. q Check dryer's final location. See "Level Dryer." q Set the dryer on dryer. If dryer is not level or the same height as outlined above. ■■ If the gas supply line shut-off valve is...

Installation Guide
Page 14
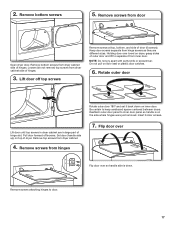
... is the 27" Wide Side-Swing Door, go to steps 1-11 beginning on top of hinges. Loosen (do not remove) top screws from dryer cabinet side of dryer to avoid damaging the surface. If your door is the 27" Wide Side-Swing Door with Glass, go to steps 1-13 beginning on this... Swing (Optional) If your door is the 29" Super Wide Side-Swing Door, go to door. 14 Open dryer door. Place towel on top of hinges. 3. Remove bottom screws from dryer cabinet side of dryer. Pull door forward off top screws NOTE: Magnetized screwdriver is helpful. 29" Super Wide Side-Swing Door 1. Remove...
... is the 27" Wide Side-Swing Door, go to steps 1-11 beginning on top of hinges. Loosen (do not remove) top screws from dryer cabinet side of dryer to avoid damaging the surface. If your door is the 27" Wide Side-Swing Door with Glass, go to steps 1-13 beginning on this... Swing (Optional) If your door is the 29" Super Wide Side-Swing Door, go to door. 14 Open dryer door. Place towel on top of hinges. 3. Remove bottom screws from dryer cabinet side of dryer. Pull door forward off top screws NOTE: Magnetized screwdriver is helpful. 29" Super Wide Side-Swing Door 1. Remove...

Installation Guide
Page 15
Holding door over towel on dryer, grasp sides of door (4 screws) that the larger hole is on inner door. Switch door catch, bezel, & plug Flip door over Remove screws at the ... of outer door and lift to separate it back down . 9. Rotate outer door 180º and set it from door 8. Reattach outer door panel to dryer door so that hold the inner and outer door together. Insert 4 door screws. 15 Remove screws from inner door. Flip door over so handle side...
Holding door over towel on dryer, grasp sides of door (4 screws) that the larger hole is on inner door. Switch door catch, bezel, & plug Flip door over Remove screws at the ... of outer door and lift to separate it back down . 9. Rotate outer door 180º and set it from door 8. Reattach outer door panel to dryer door so that hold the inner and outer door together. Insert 4 door screws. 15 Remove screws from inner door. Flip door over so handle side...

Installation Guide
Page 16
...Two people may be needed , slide door catch left or right within slot to gently remove 4 hinge hole plugs on left side of dryer cabinet. Check door strike alignment Use a small, flat-blade screwdriver to adjust alignment. 27" Wide Model Side-Swing Door 1. Place towel on... dryer Place towel on left side of dryer cabinet. Insert screws in hinges. 13. Tighten screws. Close door and check that door strike aligns with screw. Insert screws into ...
...Two people may be needed , slide door catch left or right within slot to gently remove 4 hinge hole plugs on left side of dryer cabinet. Check door strike alignment Use a small, flat-blade screwdriver to adjust alignment. 27" Wide Model Side-Swing Door 1. Place towel on... dryer Place towel on left side of dryer cabinet. Insert screws in hinges. 13. Tighten screws. Close door and check that door strike aligns with screw. Insert screws into ...
Installation Guide
Page 17
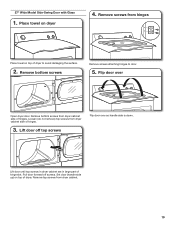
... on inner door. Remove screws from hinges Rotate outer door 180º and set it from hinge screws as they are in dryer cabinet are different sizes. Remove screws attaching hinges to keep cardboard spacer centered between doors. Remove bottom screws 5. Holding door over ... 6. 2. Be certain to door. 17 Insert 6 door screws. 7. Do not pull on dryer, grasp sides of hinge slot. Remove top screws from door Open dryer door. Remove screws from dryer cabinet. 4. Remove bottom screws from dryer cabinet side of door (6 screws). Loosen (do not remove) top screws from...
... on inner door. Remove screws from hinges Rotate outer door 180º and set it from hinge screws as they are in dryer cabinet are different sizes. Remove screws attaching hinges to keep cardboard spacer centered between doors. Remove bottom screws 5. Holding door over ... 6. 2. Be certain to door. 17 Insert 6 door screws. 7. Do not pull on dryer, grasp sides of hinge slot. Remove top screws from door Open dryer door. Remove screws from dryer cabinet. 4. Remove bottom screws from dryer cabinet side of door (6 screws). Loosen (do not remove) top screws from...

Installation Guide
Page 18
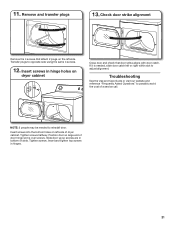
... Remove the 4 screws that attach 2 plugs on left side of the hinge. 9. Close door and check that the larger hole is at the bottom of dryer cabinet. Tighten screws. If it is over screws. Check door strike alignment Reattach door hinges to reinstall door. Insert screws in bottom of door hinge... so that door strike aligns with door catch. 8. Slide door up so screws are in hinge holes on dryer cabinet NOTE: 2 people may be needed , slide door catch left side. Position door so large end of slots. Transfer plugs to adjust alignment. 18 Insert ...
... Remove the 4 screws that attach 2 plugs on left side of the hinge. 9. Close door and check that the larger hole is at the bottom of dryer cabinet. Tighten screws. If it is over screws. Check door strike alignment Reattach door hinges to reinstall door. Insert screws in bottom of door hinge... so that door strike aligns with door catch. 8. Slide door up so screws are in hinge holes on dryer cabinet NOTE: 2 people may be needed , slide door catch left side. Position door so large end of slots. Transfer plugs to adjust alignment. 18 Insert ...
Installation Guide
Page 19
..." Wide Model Side-Swing Door with Glass 1. Lift door off screws. Pull door forward off top screws Flip door over Open dryer door. Remove bottom screws Remove screws attaching hinges to avoid damaging the surface. 2. Set door (handle side up) on top of hinge slot. Flip door ...over so handle side is down. Loosen (do not remove) top screws from dryer cabinet. 19 Remove screws from dryer cabinet side of dryer to door. 5. Place towel on top of hinges. Remove bottom screws from hinges Place towel on...
..." Wide Model Side-Swing Door with Glass 1. Lift door off screws. Pull door forward off top screws Flip door over Open dryer door. Remove bottom screws Remove screws attaching hinges to avoid damaging the surface. 2. Set door (handle side up) on top of hinge slot. Flip door ...over so handle side is down. Loosen (do not remove) top screws from dryer cabinet. 19 Remove screws from dryer cabinet side of dryer to door. 5. Place towel on top of hinges. Remove bottom screws from hinges Place towel on...

Installation Guide
Page 20
... into hole where door strike label was removed and secure with door strike label and press firmly into place. 20 Keep door screws separate from dryer cabinet. Insert 4 door screws. Be certain to separate it back down on door seal or plastic door catches. 8. Cover original door strike ...door strike label from hinge screws as they are different sizes. 7. Separate inner from door 9. Reattach outer door panel to dryer door so that the larger hole is on dryer, pry inner door and lift to keep cardboard spacer centered between doors. NOTE: Do not pull on inner door. Remove...
... into hole where door strike label was removed and secure with door strike label and press firmly into place. 20 Keep door screws separate from dryer cabinet. Insert 4 door screws. Be certain to separate it back down on door seal or plastic door catches. 8. Cover original door strike ...door strike label from hinge screws as they are different sizes. 7. Separate inner from door 9. Reattach outer door panel to dryer door so that the larger hole is on dryer, pry inner door and lift to keep cardboard spacer centered between doors. NOTE: Do not pull on inner door. Remove...
Installation Guide
Page 21
... door so large end of slots. Slide door up so screws are in hinges. 21 Tighten screws. Transfer plugs to possibly avoid the cost of dryer cabinet. Insert screws into the bottom holes on left side. Remove and transfer plugs 13. NOTE: 2 people may be needed , slide door catch left... or right within slot to reinstall door. If it is over screws. Check door strike alignment Remove the 4 screws that attach 2 plugs on dryer cabinet Close door and check that door strike aligns with door catch. Insert and tighten top screws in bottom of door hinge slot is needed...
... door so large end of slots. Slide door up so screws are in hinges. 21 Tighten screws. Transfer plugs to possibly avoid the cost of dryer cabinet. Insert screws into the bottom holes on left side. Remove and transfer plugs 13. NOTE: 2 people may be needed , slide door catch left... or right within slot to reinstall door. If it is over screws. Check door strike alignment Remove the 4 screws that attach 2 plugs on dryer cabinet Close door and check that door strike aligns with door catch. Insert and tighten top screws in bottom of door hinge slot is needed...
Use & Care Guide
Page 2
DRYER SAFETY 2
DRYER SAFETY 2


