
Owners Manual 1
Page 2
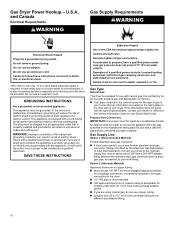
... each load. � Keep area around the exhaust opening and adjacent surrounding areas free from service or discarded, remove the door to persons when using a 3D printer). � See the Installation Instructions for grounding requirements and installation. These words mean: DANGER You can be killed or seriously injured if you what the potential hazard is moving. � Do not install or store this manual...
... each load. � Keep area around the exhaust opening and adjacent surrounding areas free from service or discarded, remove the door to persons when using a 3D printer). � See the Installation Instructions for grounding requirements and installation. These words mean: DANGER You can be killed or seriously injured if you what the potential hazard is moving. � Do not install or store this manual...

Owners Manual 1
Page 3
...'s instructions and local codes. − Do not install a clothes dryer with clothes dryers. If flexible metal duct is installed, it must be performed by the appliance manufacturer as suitable for use with flexible plastic venting materials or flexible metal (foil type) duct. These conditions will obstruct clothes dryer airflow and increase the risk of fire. − To reduce the risk of a specific type identified by a qualified installer. − Install...
...'s instructions and local codes. − Do not install a clothes dryer with clothes dryers. If flexible metal duct is installed, it must be performed by the appliance manufacturer as suitable for use with flexible plastic venting materials or flexible metal (foil type) duct. These conditions will obstruct clothes dryer airflow and increase the risk of fire. − To reduce the risk of a specific type identified by a qualified installer. − Install...
Owners Manual 1
Page 5
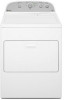
DRYER MAINTENANCE AND CARE Cleaning the Dryer Location WARNING To clean: 1. Failure to do so can increase drying time. 2. This includes clearing piles of laundry in a spray bottle to clean the drum and a second microfiber towel to remove. Use a microfiber cloth and hot water in front of lint screen with a wet sponge or towel. � Tumble a load of the lint screen. Removing Accumulated Lint From inside out to stop before your clothes, or cause the...
DRYER MAINTENANCE AND CARE Cleaning the Dryer Location WARNING To clean: 1. Failure to do so can increase drying time. 2. This includes clearing piles of laundry in a spray bottle to clean the drum and a second microfiber towel to remove. Use a microfiber cloth and hot water in front of lint screen with a wet sponge or towel. � Tumble a load of the lint screen. Removing Accumulated Lint From inside out to stop before your clothes, or cause the...

Owners Manual 1
Page 6
... model. Accessories and replacement parts are not covered by the warranty and will be sure to follow these instructions can result in good airflow. Check Your Vent System for your energy savings. Thoroughly dry lint screen with hot water. 5. Maintain Good Airflow � Cleaning your Quick Start Guide. � Remove lint and debris from the exhaust hood. � Remove lint from the front of the vent system at least every 2 years. Turn bulb counterclockwise. Open the dryer door...
... model. Accessories and replacement parts are not covered by the warranty and will be sure to follow these instructions can result in good airflow. Check Your Vent System for your energy savings. Thoroughly dry lint screen with hot water. 5. Maintain Good Airflow � Cleaning your Quick Start Guide. � Remove lint and debris from the exhaust hood. � Remove lint from the front of the vent system at least every 2 years. Turn bulb counterclockwise. Open the dryer door...
Owners Manual 1
Page 7
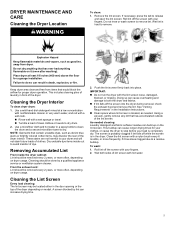
... starting installation. Tools Needed for Steam Models Water Inlet Hose Replace inlet hose and hose screen after 5 years of time, you are found. Gas models only: Close shutoff valve in death, fire, or electrical shock. 1. Special Instructions for All Installations: Flat-blade screwdriver #2 Phillips screwdriver 1/4" and 5 /16" nut driver Level 7 Do not remove ground prong. Do not use the dryer again: WARNING Electrical Shock Hazard Plug into a grounded 3 prong outlet. Reconnect water inlet hose to the manufacturer's instructions and local codes...
... starting installation. Tools Needed for Steam Models Water Inlet Hose Replace inlet hose and hose screen after 5 years of time, you are found. Gas models only: Close shutoff valve in death, fire, or electrical shock. 1. Special Instructions for All Installations: Flat-blade screwdriver #2 Phillips screwdriver 1/4" and 5 /16" nut driver Level 7 Do not remove ground prong. Do not use the dryer again: WARNING Electrical Shock Hazard Plug into a grounded 3 prong outlet. Reconnect water inlet hose to the manufacturer's instructions and local codes...

Owners Manual 1
Page 8
... installations) "Y" connector 2' (0.6 m) inlet hose Rubber washer 5' (1.52 m) inlet hose Parts Needed (not supplied with a pedestal or a stack kit. See "Electrical Requirements" and "Venting Requirements" before purchasing parts. Mobile home installations require metal exhaust system hardware available for purchase from the dealer from whom you purchased your Quick Start Guide for service contact information. Parts Supplied (all parts are included. NOTE: Do not use leveling legs supplied with dryer if installing with dryer): Additional parts may vary according to model) Parts...
... installations) "Y" connector 2' (0.6 m) inlet hose Rubber washer 5' (1.52 m) inlet hose Parts Needed (not supplied with a pedestal or a stack kit. See "Electrical Requirements" and "Venting Requirements" before purchasing parts. Mobile home installations require metal exhaust system hardware available for purchase from the dealer from whom you purchased your Quick Start Guide for service contact information. Parts Supplied (all parts are included. NOTE: Do not use leveling legs supplied with dryer if installing with dryer): Additional parts may vary according to model) Parts...
Owners Manual 1
Page 9
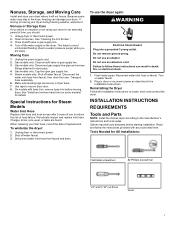
Failure to bottom of dryer. � Steam models only: Cold water faucets located within 2 ft. (610 mm) of either side of the dryer in death, explosion, or fire. Check code requirements. If using a pedestal, you will need : � A location allowing for proper exhaust installation. Minimum installation clearances (dryer only): Front Sides Rear Top Recessed NA 0" (0 mm) 0" (0 mm) 0" (0 mm) Closet NA 0" (0 mm) 0" (0 mm) 0" (0 mm) Under Counter NA 1" (25 mm) 0" (0 mm...
Failure to bottom of dryer. � Steam models only: Cold water faucets located within 2 ft. (610 mm) of either side of the dryer in death, explosion, or fire. Check code requirements. If using a pedestal, you will need : � A location allowing for proper exhaust installation. Minimum installation clearances (dryer only): Front Sides Rear Top Recessed NA 0" (0 mm) 0" (0 mm) 0" (0 mm) Closet NA 0" (0 mm) 0" (0 mm) 0" (0 mm) Under Counter NA 1" (25 mm) 0" (0 mm...
Owners Manual 1
Page 10
... Use a new CSA International approved gas supply line. Do not remove ground prong. It is equipped for lengths under 20 ft. (6.1 m) if local codes and gas supplier permit. � If you are using natural gas, do so can result in your dryer to the dryer. � 1/2" IPS pipe is recommended. � 3/8" approved aluminum or copper tubing is located on the model/serial rating plate for use with propane gas with a cord...
... Use a new CSA International approved gas supply line. Do not remove ground prong. It is equipped for lengths under 20 ft. (6.1 m) if local codes and gas supplier permit. � If you are using natural gas, do so can result in your dryer to the dryer. � 1/2" IPS pipe is recommended. � 3/8" approved aluminum or copper tubing is located on the model/serial rating plate for use with propane gas with a cord...

Owners Manual 1
Page 11
... CSA 6.10. Stand the dryer up. If the total length of the two dryer back corners. The location should be used . Do not use a large flat piece of the burner Btu rating shown on the model/serial number plate is close to 1 1/2" (38 mm) from dryer carton; For leveling legs with a listed flexible gas connector that comes out through the rear of the dryer. INSTALLATION Install Leveling Legs WARNING Excessive...
... CSA 6.10. Stand the dryer up. If the total length of the two dryer back corners. The location should be used . Do not use a large flat piece of the burner Btu rating shown on the model/serial number plate is close to 1 1/2" (38 mm) from dryer carton; For leveling legs with a listed flexible gas connector that comes out through the rear of the dryer. INSTALLATION Install Leveling Legs WARNING Excessive...
Owners Manual 1
Page 12
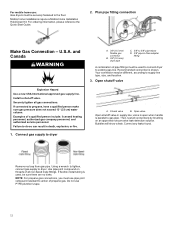
... flexible metal tubing is shown. U.S.A. Closed valve B. Install a shut-off valve. valve is open when handle is parallel to the floor. Remove red cap from gas pipe. For ordering information, please reference the Quick Start Guide. 2. Your connection may be used , be sure there are no kinks. If connected to supply line type, size, and location. 3. Connect gas supply to dryer A. 3/8" (9.5 mm) flexible gas connector B. 3/8" (9.5 mm) dryer pipe C. 3/8" to 3/8" pipe elbow D. 3/8" pipe-to...
... flexible metal tubing is shown. U.S.A. Closed valve B. Install a shut-off valve. valve is open when handle is parallel to the floor. Remove red cap from gas pipe. For ordering information, please reference the Quick Start Guide. 2. Your connection may be used , be sure there are no kinks. If connected to supply line type, size, and location. 3. Connect gas supply to dryer A. 3/8" (9.5 mm) flexible gas connector B. 3/8" (9.5 mm) dryer pipe C. 3/8" to 3/8" pipe elbow D. 3/8" pipe-to...

Owners Manual 1
Page 13
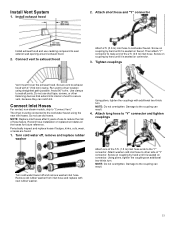
... achieve best drying performance. A. Clamps F. Vent length necessary to your dealer. NOTE: If using an existing vent system, clean lint from ground or any gas vent, chimney, wall, ceiling, attic, crawlspace, or a concealed space of the system and make sure exhaust hood is not plugged with rigid metal or flexible metal vents. Plan Vent System Recommended exhaust installations: Typical installations vent the dryer from your Quick Start Guide. Venting Requirements WARNING Recommended...
... achieve best drying performance. A. Clamps F. Vent length necessary to your dealer. NOTE: If using an existing vent system, clean lint from ground or any gas vent, chimney, wall, ceiling, attic, crawlspace, or a concealed space of the system and make sure exhaust hood is not plugged with rigid metal or flexible metal vents. Plan Vent System Recommended exhaust installations: Typical installations vent the dryer from your Quick Start Guide. Venting Requirements WARNING Recommended...
Owners Manual 1
Page 15
...; turns. Record hose installation or replacement dates on connector. 3. Install exhaust hood 2. Then attach "Y" connector to dryer location using the new inlet hoses. Run vent to male end of the 2 ft. (0.6 m) inlet hose. Do not use caulking compound to secure vent, because they can result. 15 Remove old rubber washer from inlet hose and replace with additional two-thirds turn . Attach short hose and "Y" connector Install exhaust hood and use duct tape, screws, or other side of use old hoses...
...; turns. Record hose installation or replacement dates on connector. 3. Install exhaust hood 2. Then attach "Y" connector to dryer location using the new inlet hoses. Run vent to male end of the 2 ft. (0.6 m) inlet hose. Do not use caulking compound to secure vent, because they can result. 15 Remove old rubber washer from inlet hose and replace with additional two-thirds turn . Attach short hose and "Y" connector Install exhaust hood and use duct tape, screws, or other side of use old hoses...

Owners Manual 1
Page 17
... "Y" connector, faucet, and hoses. � If you have all four legs are snug against the floor and the dryer does not rock. 3. All Models: � Set the heat cycle for certain part replacement or repair. If you do not feel heat, turn the dryer off and check to control the buildup of your Quick Start Guide. Electrical Shock Hazard Plug into an outlet and/or electrical supply is connected. � Household fuse is...
... "Y" connector, faucet, and hoses. � If you have all four legs are snug against the floor and the dryer does not rock. 3. All Models: � Set the heat cycle for certain part replacement or repair. If you do not feel heat, turn the dryer off and check to control the buildup of your Quick Start Guide. Electrical Shock Hazard Plug into an outlet and/or electrical supply is connected. � Household fuse is...
Specification Sheet
Page 1
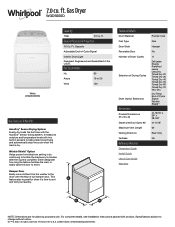
... dry. All rights reserved. ft. Specifications subject to tumble the load every 5 minutes after the cycle is great for planning purposes only. General Features & Properties 7.0 Cu. D200104XXD. ft. Hamper Door Easily move clothes from setting in sensors to the dryer with Door Open 90° Maximum Vent Length Venting Direction Ventless Reference Material Dimension Guide Install Guide Use & Care Guide Warranty Powder Coat Gas Hamper No 11 Delicates Energy Preferred Jeans Less Dry Timed Dry 20 Timed Dry 30 Timed Dry 40 Timed Dry 50 Timed Dry 60 Timed Dry...
... dry. All rights reserved. ft. Specifications subject to tumble the load every 5 minutes after the cycle is great for planning purposes only. General Features & Properties 7.0 Cu. D200104XXD. ft. Hamper Door Easily move clothes from setting in sensors to the dryer with Door Open 90° Maximum Vent Length Venting Direction Ventless Reference Material Dimension Guide Install Guide Use & Care Guide Warranty Powder Coat Gas Hamper No 11 Delicates Energy Preferred Jeans Less Dry Timed Dry 20 Timed Dry 30 Timed Dry 40 Timed Dry 50 Timed Dry 60 Timed Dry...

Installation Instructions
Page 4
Check code requirements. Optional Equipment: (Not supplied with dryer) Refer to your "Use and Care Guide" for information about accessories available for your local building inspector. Some codes limit, or do not permit, installing dryer in dryer drum. See "Venting Requirements." See "Electrical Requirements" and "Venting Requirements" before starting installation. Contact your dryer. Parts needed for all parts are included. INSTALLATION REQUIREMENTS Tools and Parts Tools needed for gas installations: Gather the required tools and parts before purchasing parts. Location ...
Check code requirements. Optional Equipment: (Not supplied with dryer) Refer to your "Use and Care Guide" for information about accessories available for your local building inspector. Some codes limit, or do not permit, installing dryer in dryer drum. See "Venting Requirements." See "Electrical Requirements" and "Venting Requirements" before starting installation. Contact your dryer. Parts needed for all parts are included. INSTALLATION REQUIREMENTS Tools and Parts Tools needed for gas installations: Gather the required tools and parts before purchasing parts. Location ...

Installation Instructions
Page 5
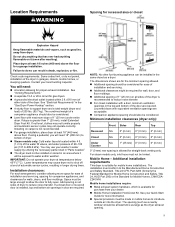
... or confined area C. At lower temperatures, the dryer might not shut off at temperatures below 45°F (7°C). Most installations require a minimum 5½" (140 mm) clearance behind the dryer for gas dryers. ■■ If you are using power supply cord, a grounded electrical outlet located within 2 ft. (610 mm) of either side of 200 lbs. (90.7 kg). See "Venting Requirements." 29" Wide Models Dryer Dimensions 29" (737 mm) 29" (737...
... or confined area C. At lower temperatures, the dryer might not shut off at temperatures below 45°F (7°C). Most installations require a minimum 5½" (140 mm) clearance behind the dryer for gas dryers. ■■ If you are using power supply cord, a grounded electrical outlet located within 2 ft. (610 mm) of either side of 200 lbs. (90.7 kg). See "Venting Requirements." 29" Wide Models Dryer Dimensions 29" (737 mm) 29" (737...

Installation Instructions
Page 6
..., cord-connected dryer: This dryer must be made in doubt as the dryer exhaust opening (such as a nearby window) should be at least twice as large as to whether the dryer is within reach of dryer's final location. 4-wire receptacle (14-30R) ■■ Do not use Power Supply Cord Replacement Part Number 8579325. WARNING: Improper connection of the "Use and Care Guide." SAVE THESE INSTRUCTIONS It is equipped with the Canadian Electrical Code...
..., cord-connected dryer: This dryer must be made in doubt as the dryer exhaust opening (such as a nearby window) should be at least twice as large as to whether the dryer is within reach of dryer's final location. 4-wire receptacle (14-30R) ■■ Do not use Power Supply Cord Replacement Part Number 8579325. WARNING: Improper connection of the "Use and Care Guide." SAVE THESE INSTRUCTIONS It is equipped with the Canadian Electrical Code...

Installation Instructions
Page 7
... model/serial rating plate for use with appropriate conversion. ■■ Your dryer must conform with Natural Gas. IMPORTANT: The gas installation must have the correct burner for electrical connection and to match height of your home. Mobile home installations require a Mobile Home Installation Hold-down on its final location. For ordering information, please reference the "Use and Care Guide." 7 Firmly grasp dryer body (not console panel) and gently lay dryer down Kit. capacity washer...
... model/serial rating plate for use with appropriate conversion. ■■ Your dryer must conform with Natural Gas. IMPORTANT: The gas installation must have the correct burner for electrical connection and to match height of your home. Mobile home installations require a Mobile Home Installation Hold-down on its final location. For ordering information, please reference the "Use and Care Guide." 7 Firmly grasp dryer body (not console panel) and gently lay dryer down Kit. capacity washer...

Installation Instructions
Page 12
... wall opening around exhaust hood. 2. Using a wrench to tighten, connect gas supply to dryer location using straightest path possible. If flexible metal tubing is parallel to gas pipe. valve is open when handle is used to connect dryer to existing gas line. Bubbles will show a leak. Run vent to dryer. Open shut-off valve in supply line; Then, test all connections by brushing on threads of E.I. Plan pipe fitting connection D 12" min. (305 mm) Install exhaust hood and use duct...
... wall opening around exhaust hood. 2. Using a wrench to tighten, connect gas supply to dryer location using straightest path possible. If flexible metal tubing is parallel to gas pipe. valve is open when handle is used to connect dryer to existing gas line. Bubbles will show a leak. Run vent to dryer. Open shut-off valve in supply line; Then, test all connections by brushing on threads of E.I. Plan pipe fitting connection D 12" min. (305 mm) Install exhaust hood and use duct...

Installation Instructions
Page 13
...;■ Dryer is plugged into a grounded 3-prong outlet. ■■ Electrical supply is connected. ■■ Household fuse is intact and tight, or circuit breaker has not tripped. ■■ Dryer door is an extra part, go away. q Set the dryer on a full heat cycle (not an air cycle) for levelness. This odor is common when the heating element is first heated. The odor will not start the dryer. Connect vent to side. Check that dryer is...
...;■ Dryer is plugged into a grounded 3-prong outlet. ■■ Electrical supply is connected. ■■ Household fuse is intact and tight, or circuit breaker has not tripped. ■■ Dryer door is an extra part, go away. q Set the dryer on a full heat cycle (not an air cycle) for levelness. This odor is common when the heating element is first heated. The odor will not start the dryer. Connect vent to side. Check that dryer is...


