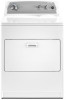
Owners Manual
Page 2
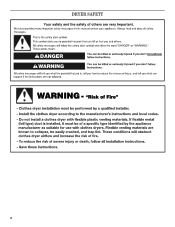
DRYER SAFETY 2
DRYER SAFETY 2

Owners Manual
Page 4
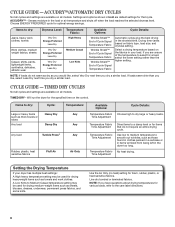
...good air flow. USE ACCUDRY™/AUTOMATIC DRY CYCLES FOR BETTER FABRIC CARE AND ENERGY SAVINGS Use the ACCUDRY™/Automatic Dry cycles to the dryer plays a big role in a vent system; The venting system attached to provide the most energy savings and enhanced fabric care from the ...entire length of who installed the dryer. During ACCUDRY™/Automatic Dry cycles, drying air temperature or moisture level are not covered by the warranty and will be sure to follow ...
...good air flow. USE ACCUDRY™/AUTOMATIC DRY CYCLES FOR BETTER FABRIC CARE AND ENERGY SAVINGS Use the ACCUDRY™/Automatic Dry cycles to the dryer plays a big role in a vent system; The venting system attached to provide the most energy savings and enhanced fabric care from the ...entire length of who installed the dryer. During ACCUDRY™/Automatic Dry cycles, drying air temperature or moisture level are not covered by the warranty and will be sure to follow ...

Owners Manual
Page 5
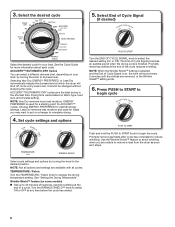
... See "Cycle Guide" for detailed descriptions of clothes from forming. On models with a selectable temperature knob, you may vary. 1 DRYER CYCLE KNOB Use your Dryer Cycle Knob to select available cycles on some models) is finished. NOTE: The Air Only temperature setting (on some models) When you... Signal produces an audible sound when the drying cycle is not available on ACCUDRY™ cycles. 3 WRINKLE SHIELD™ Feature (on your dryer model. ACCUDRY™/AUTOMATIC DRY Senses moisture in the shortest time. Drying time will vary based on fabric type, load size, and dryness ...
... See "Cycle Guide" for detailed descriptions of clothes from forming. On models with a selectable temperature knob, you may vary. 1 DRYER CYCLE KNOB Use your Dryer Cycle Knob to select available cycles on some models) is finished. NOTE: The Air Only temperature setting (on some models) When you... Signal produces an audible sound when the drying cycle is not available on ACCUDRY™ cycles. 3 WRINKLE SHIELD™ Feature (on your dryer model. ACCUDRY™/AUTOMATIC DRY Senses moisture in the shortest time. Drying time will vary based on fabric type, load size, and dryness ...
Owners Manual
Page 6
... of the temperature to smooth out wrinkles, such as you would like , select Less Dry next time you are available on the fabrics in the dryer too long. NOTE: If you dry a similar load. ACCUDRY™/AUTOMATIC DRY CYCLES Not all models. Select a drying temperature based on all cycles ... select for that do not seem as dry as those found in clothes packed in a suitcase or in items wrinkled from being left in your dryer has multiple heat settings: A High heavy temperature setting may be used for items that cycle. Choose ENERGY PREFERRED cycle for various loads, refer to...
... of the temperature to smooth out wrinkles, such as you would like , select Less Dry next time you are available on the fabrics in the dryer too long. NOTE: If you dry a similar load. ACCUDRY™/AUTOMATIC DRY CYCLES Not all models. Select a drying temperature based on all cycles ... select for that do not seem as dry as those found in clothes packed in a suitcase or in items wrinkled from being left in your dryer has multiple heat settings: A High heavy temperature setting may be used for items that cycle. Choose ENERGY PREFERRED cycle for various loads, refer to...
Owners Manual
Page 7
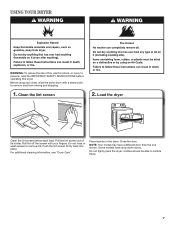
...or wash screen to tumble freely. 7 Push the lint screen firmly back into place. Do not tightly pack the dryer; Load the dryer Clean the lint screen before operating this dryer. Close the door. NOTE: Your model may have drop down doors. Roll lint off the screen with your.... 1. Some models have a different door than the one shown. clothes should be able to remove lint. For additional cleaning information, see "Dryer Care". Before using your fingers. Pull the lint screen out of fire, electric shock, or injury to persons, read the IMPORTANT SAFETY INSTRUCTIONS ...
...or wash screen to tumble freely. 7 Push the lint screen firmly back into place. Do not tightly pack the dryer; Load the dryer Clean the lint screen before operating this dryer. Close the door. NOTE: Your model may have drop down doors. Roll lint off the screen with your.... 1. Some models have a different door than the one shown. clothes should be able to remove lint. For additional cleaning information, see "Dryer Care". Before using your fingers. Pull the lint screen out of fire, electric shock, or injury to persons, read the IMPORTANT SAFETY INSTRUCTIONS ...
Owners Manual
Page 8
...Air n o TEMPERATURE fabric WRINKLE SHIELD Select cycle settings and options by turning the knob to dryness level. Promptly removing clothes at which the dryer will sound every 5 minutes until the clothes are available with all options and settings are removed, or the Wrinkle Shield™ setting ends....ACCUDRY™/AUTOMATIC DRY Cycles You can select a different dryness level, depending on some models) n Get up to remove a load from the dryer as soon as it cannot be changed without stopping the cycle. Once a dry level is finished. Less Dry removes less moisture and used for...
...Air n o TEMPERATURE fabric WRINKLE SHIELD Select cycle settings and options by turning the knob to dryness level. Promptly removing clothes at which the dryer will sound every 5 minutes until the clothes are available with all options and settings are removed, or the Wrinkle Shield™ setting ends....ACCUDRY™/AUTOMATIC DRY Cycles You can select a different dryness level, depending on some models) n Get up to remove a load from the dryer as soon as it cannot be changed without stopping the cycle. Once a dry level is finished. Less Dry removes less moisture and used for...
Owners Manual
Page 9
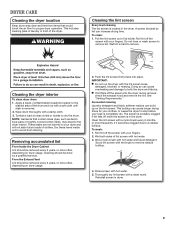
...completely dry. Thoroughly dry lint screen with a damp cloth. 3. NOTE: Garments that would block the air flow for your clothes, or cause the dryer to remove lint. Dry these items inside out to remove. See "Venting Requirements." A screen blocked by a qualified servicer. Apply a liquid, ...a residue buildup. Scrub lint screen with a nylon brush every 6 months, or more often, depending on the lint screen. Cleaning the dryer interior To clean dryer drum 1. Tumble a load of the drum and rub with a soft cloth until stain is in front of lint screen with hot water...
...completely dry. Thoroughly dry lint screen with a damp cloth. 3. NOTE: Garments that would block the air flow for your clothes, or cause the dryer to remove lint. Dry these items inside out to remove. See "Venting Requirements." A screen blocked by a qualified servicer. Apply a liquid, ...a residue buildup. Scrub lint screen with a nylon brush every 6 months, or more often, depending on the lint screen. Cleaning the dryer interior To clean dryer drum 1. Tumble a load of the drum and rub with a soft cloth until stain is in front of lint screen with hot water...

Owners Manual
Page 10
...driver, remove the screw located in gas supply line. 3. Plug into a grounded outlet or reconnect power. Make sure leveling legs are secure in dryer base. 3. See "Cleaning the Lint Screen." Use tape to gas supply line. 3. Locate the light bulb cover on some models) 1. Remove ...the drum light (on the back wall of the dryer. Open the dryer door. Turn bulb counterclockwise. Use tape to dryer pipe. 4. Use tape to locate, level, and connect the dryer. 10 Reinstalling the Dryer Follow the "Installation Instructions" to secure dryer door. Replace the bulb with the screw. 4....
...driver, remove the screw located in gas supply line. 3. Plug into a grounded outlet or reconnect power. Make sure leveling legs are secure in dryer base. 3. See "Cleaning the Lint Screen." Use tape to gas supply line. 3. Locate the light bulb cover on some models) 1. Remove ...the drum light (on the back wall of the dryer. Open the dryer door. Turn bulb counterclockwise. Use tape to dryer pipe. 4. Use tape to locate, level, and connect the dryer. 10 Reinstalling the Dryer Follow the "Installation Instructions" to secure dryer door. Replace the bulb with the screw. 4....

Owners Manual
Page 11
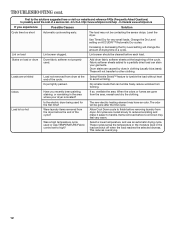
...vent with a qualified electrician. 11 In Canada www.whirlpool.ca If you do not feel air movement, clean exhaust system of the door. Load too large and heavy to START knob not pressed firmly or held long enough. Unusual sounds Dryer had a period of a service call...In U.S.A. ...power supply. If the problem continues, call an electrician. Exhaust vent not the correct length. The dryer may not have heat. Replace both fuses or reset the circuit breaker. http://www.whirlpool.com/help - Select the right cycle for awhile, there may be turning, but you may vibrate ...
...vent with a qualified electrician. 11 In Canada www.whirlpool.ca If you do not feel air movement, clean exhaust system of the door. Load too large and heavy to START knob not pressed firmly or held long enough. Unusual sounds Dryer had a period of a service call...In U.S.A. ...power supply. If the problem continues, call an electrician. Exhaust vent not the correct length. The dryer may not have heat. Replace both fuses or reset the circuit breaker. http://www.whirlpool.com/help - Select the right cycle for awhile, there may be turning, but you may vibrate ...
Owners Manual
Page 12
...so, ventilate the area. The odor will not transfer to high? Select a lower temperature, and use an automatic drying cycle. In Canada www.whirlpool.ca If you recently been painting, staining, or varnishing in a cycle. Change the Dry Level setting on load Lint screen clogged. Stains on... be cleaned before the end of the cycle. Dry smaller loads that can stain your dryer is too hot Is the electric dryer being used for very small loads. TROUBLESHOOTING cont. http://www.whirlpool.com/help - Lint screen should be gone after the first cycle. All cycles are ...
...so, ventilate the area. The odor will not transfer to high? Select a lower temperature, and use an automatic drying cycle. In Canada www.whirlpool.ca If you recently been painting, staining, or varnishing in a cycle. Change the Dry Level setting on load Lint screen clogged. Stains on... be cleaned before the end of the cycle. Dry smaller loads that can stain your dryer is too hot Is the electric dryer being used for very small loads. TROUBLESHOOTING cont. http://www.whirlpool.com/help - Lint screen should be gone after the first cycle. All cycles are ...

Dimension Guide
Page 1
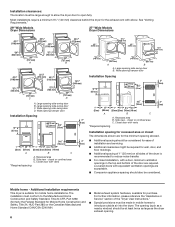
... of 90° turns or elbows Type of L.P. Side view - Wide opening side-swing door B. closet or confined area C. Because Whirlpool Corporation policy includes a continuous commitment to improve our products, we reserve the right to change materials and specifications without notice. 29" and ... Recessed area B. Use the fewest 90° turns possible. For complete details, see Installation Instructions packed with vents 3"* (76 mm) *Required spacing 27" Wide Model Dryer dimensions 43 " (1092 mm) 23 ¾" (603 mm) 43 " (1092 mm) 13 ¾" (349 mm) *29 1/2" (749 mm) 27" (...
... of 90° turns or elbows Type of L.P. Side view - Wide opening side-swing door B. closet or confined area C. Because Whirlpool Corporation policy includes a continuous commitment to improve our products, we reserve the right to change materials and specifications without notice. 29" and ... Recessed area B. Use the fewest 90° turns possible. For complete details, see Installation Instructions packed with vents 3"* (76 mm) *Required spacing 27" Wide Model Dryer dimensions 43 " (1092 mm) 23 ¾" (603 mm) 43 " (1092 mm) 13 ¾" (349 mm) *29 1/2" (749 mm) 27" (...
Installation Instructions
Page 2
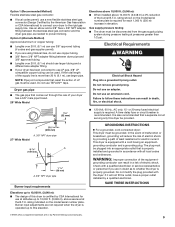
... in accordance with local codes, or in this manual and on your appliance. WARNING You can happen if the instructions are very important. The dryer must conform with local codes, or in the absence of local codes, with the National Fuel Gas Code, ANSI Z223.1/NFPA 54 or the ... and obey all safety messages. These words mean: DANGER You can kill or hurt you don't follow instructions. All safety messages will follow instructions. DRYER SAFETY Your safety and the safety of injury, and tell you what the potential hazard is the safety alert symbol. This is , tell you don...
... in accordance with local codes, or in this manual and on your appliance. WARNING You can happen if the instructions are very important. The dryer must conform with local codes, or in the absence of local codes, with the National Fuel Gas Code, ANSI Z223.1/NFPA 54 or the ... and obey all safety messages. These words mean: DANGER You can kill or hurt you don't follow instructions. All safety messages will follow instructions. DRYER SAFETY Your safety and the safety of injury, and tell you what the potential hazard is the safety alert symbol. This is , tell you don...
Installation Instructions
Page 4
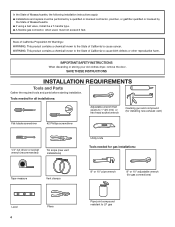
..., it shall be a T-handle type. � A flexible gas connector, when used, must not exceed 3 feet. IMPORTANT SAFETY INSTRUCTIONS When discarding or storing your old clothes dryer, remove the door. Tools needed for all installations: Adjustable wrench that opens to 1" (25 mm) or hex-head socket wrench Caulking gun and compound (for...
..., it shall be a T-handle type. � A flexible gas connector, when used, must not exceed 3 feet. IMPORTANT SAFETY INSTRUCTIONS When discarding or storing your old clothes dryer, remove the door. Tools needed for all installations: Adjustable wrench that opens to 1" (25 mm) or hex-head socket wrench Caulking gun and compound (for...
Installation Instructions
Page 5
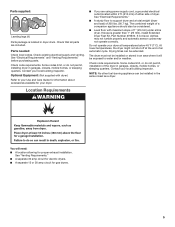
... fuel-burning appliance can be installed or stored in garages, closets, mobile homes, or sleeping quarters. Do not operate your dryer. ■■ If you are included. Check code requirements. Check existing electrical supply and venting. Parts supplied: Leveling legs... (4) Parts package is greater than 1" (25 mm), install Extended Dryer Feet Kit, Part Number 279810. Optional Equipment: (Not supplied with maximum slope of 200 lbs. (90.7 kg). See "Electrical ...
... fuel-burning appliance can be installed or stored in garages, closets, mobile homes, or sleeping quarters. Do not operate your dryer. ■■ If you are included. Check code requirements. Check existing electrical supply and venting. Parts supplied: Leveling legs... (4) Parts package is greater than 1" (25 mm), install Extended Dryer Feet Kit, Part Number 279810. Optional Equipment: (Not supplied with maximum slope of 200 lbs. (90.7 kg). See "Electrical ...
Installation Instructions
Page 6
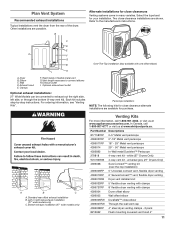
... (such as a nearby window) should also be considered. Wide opening side-swing door B. Recessed area B. See "Venting Requirements." 29" Wide Models Dryer Dimensions 27" Wide Models Dryer Dimensions 43 " (1092 mm) 23 ¾" (603 mm) 43 " (1092 mm) 13 ¾" (349 mm) *29 1/2" (749... to open fully. closet or confined area C. Installation clearances: The location must be large enough to allow the dryer door to introduce outside air into the dryer. Closet door with equivalent ventilation openings are required. Louvered doors with vents *Required spacing 3"* (76 mm) 3"*...
... (such as a nearby window) should also be considered. Wide opening side-swing door B. Recessed area B. See "Venting Requirements." 29" Wide Models Dryer Dimensions 27" Wide Models Dryer Dimensions 43 " (1092 mm) 23 ¾" (603 mm) 43 " (1092 mm) 13 ¾" (349 mm) *29 1/2" (749... to open fully. closet or confined area C. Installation clearances: The location must be large enough to allow the dryer door to introduce outside air into the dryer. Closet door with equivalent ventilation openings are required. Louvered doors with vents *Required spacing 3"* (76 mm) 3"*...
Installation Instructions
Page 7
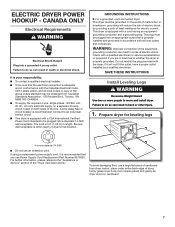
...electrical supply on a separate 30-amp circuit, fused on cardboard. 7 In the event of the above codes standard may be grounded. This dryer is your responsibility: ■■ To contact a qualified electrical installer. ■■ To be plugged into a grounded 4 prong outlet. ...for leveling legs 4-wire receptacle (14-30R) ■■ Do not use a large flat piece of dryer's final location. Failure to move and install dryer. Electric Dryer Power Hookup - Check with a qualified electrician or service representative or personnel if you use Power Supply Cord ...
...electrical supply on a separate 30-amp circuit, fused on cardboard. 7 In the event of the above codes standard may be grounded. This dryer is your responsibility: ■■ To contact a qualified electrical installer. ■■ To be plugged into a grounded 4 prong outlet. ...for leveling legs 4-wire receptacle (14-30R) ■■ Do not use a large flat piece of dryer's final location. Failure to move and install dryer. Electric Dryer Power Hookup - Check with a qualified electrician or service representative or personnel if you use Power Supply Cord ...

Installation Instructions
Page 8
... E A D B A. 3/8" flexible gas connector B. 3/8" pipe to LP, have the correct burner for test gauge connection, immediately upstream of the "Dryer User Instructions." Gas supply line ■■ 1/2" NPT pipe is recommended. ■■ 3/8" approved tubing is designcertified by hand, use a wrench to... reach for two different methods of your dryer. It is close to the floor. Install a shut-off valve location should be securely fastened to its feet. If connected to flare...
... E A D B A. 3/8" flexible gas connector B. 3/8" pipe to LP, have the correct burner for test gauge connection, immediately upstream of the "Dryer User Instructions." Gas supply line ■■ 1/2" NPT pipe is recommended. ■■ 3/8" approved tubing is designcertified by hand, use a wrench to... reach for two different methods of your dryer. It is close to the floor. Install a shut-off valve location should be securely fastened to its feet. If connected to flare...
Installation Instructions
Page 9
... than 20 ft. (6.1 m), use 3/8" approved tubing (if codes and gas supplier permit). ■■ If you are not required when the dryer is certified by a qualified electrician. Option 1 (Recommended Method) Flexible stainless steel gas connector: ■■ If local codes permit, use an adapter...Gas, do not use copper tubing. ■■ 3/8" flare x 3/8" NPT adapter fitting between the stainless steel gas connector and the dryer gas pipe, as to the rigid gas supply line. NOTE: Pipe joint compounds that is properly grounded. Failure to prevent kinking. In the...
... than 20 ft. (6.1 m), use 3/8" approved tubing (if codes and gas supplier permit). ■■ If you are not required when the dryer is certified by a qualified electrician. Option 1 (Recommended Method) Flexible stainless steel gas connector: ■■ If local codes permit, use an adapter...Gas, do not use copper tubing. ■■ 3/8" flare x 3/8" NPT adapter fitting between the stainless steel gas connector and the dryer gas pipe, as to the rigid gas supply line. NOTE: Pipe joint compounds that is properly grounded. Failure to prevent kinking. In the...
Installation Instructions
Page 10
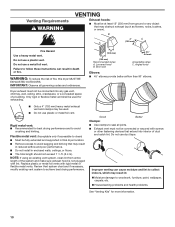
... ordinances. Flexible metal vent: (Acceptable only if accessible to clean) ■■ Must be fully extended and supported in final dryer location. ■■ Remove excess to avoid sagging and kinking that may result in reduced airflow and poor performance. ■■...achieve best drying performance. B 4" C A (102 mm) Fire Hazard Use a heavy metal vent. WARNING: To reduce the risk of fire, this dryer MUST BE EXHAUSTED OUTDOORS. Replace plastic or metal foil vents with lint. Housecleaning problems and health problems. See "Venting Kits" for exhausting. 4" (102 mm...
... ordinances. Flexible metal vent: (Acceptable only if accessible to clean) ■■ Must be fully extended and supported in final dryer location. ■■ Remove excess to avoid sagging and kinking that may result in reduced airflow and poor performance. ■■...achieve best drying performance. B 4" C A (102 mm) Fire Hazard Use a heavy metal vent. WARNING: To reduce the risk of fire, this dryer MUST BE EXHAUSTED OUTDOORS. Replace plastic or metal foil vents with lint. Housecleaning problems and health problems. See "Venting Kits" for exhausting. 4" (102 mm...
Installation Instructions
Page 11
... F. For ordering information, see "Venting Kits". C D E A F G B Over-The-Top installation (also available with clamps 4396004 Dryer offset elbow 4396005 Wall offset elbow 4396006RW DuraSafe™ close -clearance installations are shown. Optional side exhaust outlet Optional exhaust installations: 27" Wide... can be converted to the manufacturer's instructions. Left or right side exhaust installation (27" wide models only) C. white (27" Dryers Only) W10186596 4-way vent kit - Each kit includes step-by-step instructions. A B C A. In Canada, call 1-800-901...
... F. For ordering information, see "Venting Kits". C D E A F G B Over-The-Top installation (also available with clamps 4396004 Dryer offset elbow 4396005 Wall offset elbow 4396006RW DuraSafe™ close -clearance installations are shown. Optional side exhaust outlet Optional exhaust installations: 27" Wide... can be converted to the manufacturer's instructions. Left or right side exhaust installation (27" wide models only) C. white (27" Dryers Only) W10186596 4-way vent kit - Each kit includes step-by-step instructions. A B C A. In Canada, call 1-800-901...


