
Installation Guide
Page 4
.... See "Venting Requirements." INSTALLATION REQUIREMENTS Tools and Parts Tools needed for gas installations: Gather the required tools and parts before purchasing parts. Contact your dryer. Optional Equipment: (Not supplied with dryer) Refer to LP gas Parts supplied: Tape measure Vent clamps Level Pliers Leveling legs (4) Parts package is located in garages, closets, mobile homes...available for proper exhaust installation. Check existing electrical supply and venting. Check code requirements. Some codes limit, or do not permit, installing dryer in dryer drum.
.... See "Venting Requirements." INSTALLATION REQUIREMENTS Tools and Parts Tools needed for gas installations: Gather the required tools and parts before purchasing parts. Contact your dryer. Optional Equipment: (Not supplied with dryer) Refer to LP gas Parts supplied: Tape measure Vent clamps Level Pliers Leveling legs (4) Parts package is located in garages, closets, mobile homes...available for proper exhaust installation. Check existing electrical supply and venting. Check code requirements. Some codes limit, or do not permit, installing dryer in dryer drum.

Installation Guide
Page 5
...in an area where it will be extended. Recessed area B. Side view - If slope is greater than 1" (25 mm), install Extended Dryer Feet Kit, Part Number 279810. NOTE: No other fuel-burning appliance can be exposed to match height of an automatic cycle. Recessed area B. Wide opening side-... The location must not be installed or stored in .2* (310 cm ) 2 3"* (76 mm) A B A. capacity washer) or 1½" (38 mm) (to support dryer and a total weight (dryer and load) of the dryer in .2 * (155 cm )2 1" 29" 1" 1"* 27¾" (25 mm) (737 mm) (25 mm) (25 mm) (705 mm) A B C A. ...
...in an area where it will be extended. Recessed area B. Side view - If slope is greater than 1" (25 mm), install Extended Dryer Feet Kit, Part Number 279810. NOTE: No other fuel-burning appliance can be exposed to match height of an automatic cycle. Recessed area B. Wide opening side-... The location must not be installed or stored in .2* (310 cm ) 2 3"* (76 mm) A B A. capacity washer) or 1½" (38 mm) (to support dryer and a total weight (dryer and load) of the dryer in .2 * (155 cm )2 1" 29" 1" 1"* 27¾" (25 mm) (737 mm) (25 mm) (25 mm) (705 mm) A B C A. ...

Installation Guide
Page 6
...in the top and bottom of the door are required. The cord is within reach of dryer's final location. 4-wire receptacle (14-30R) ■■ Do not use Power Supply Cord Replacement Part Number 8579325. grounding conductor can result in length. SAVE THESE INSTRUCTIONS It is your responsibility:...Construction and Safety, Title 24, HUD Part 280) or the Canadian Manufactured Home Standard CAN/CSA-Z240 MH. ■■ Metal exhaust system hardware, available for purchase. Mobile home - The plug must be at least twice as large as the dryer exhaust opening (such as to be ...
...in the top and bottom of the door are required. The cord is within reach of dryer's final location. 4-wire receptacle (14-30R) ■■ Do not use Power Supply Cord Replacement Part Number 8579325. grounding conductor can result in length. SAVE THESE INSTRUCTIONS It is your responsibility:...Construction and Safety, Title 24, HUD Part 280) or the Canadian Manufactured Home Standard CAN/CSA-Z240 MH. ■■ Metal exhaust system hardware, available for purchase. Mobile home - The plug must be at least twice as large as the dryer exhaust opening (such as to be ...

Installation Guide
Page 11
Part Number Descriptions 8171587RP 0-5" Metal vent periscope 4396037RP 0"-18" Metal vent periscope 4396011RP 18"-29" Metal vent periscope 4396014 29"-50" Metal vent periscope 4392892 In-... one offset elbow) Periscope installation NOTE: The following "Vent System Chart" to determine type of vent material and hood combinations acceptable to a noncombustible portion of dryer. ■■ Reduce performance, resulting in many varieties. Special provisions for mobile home installations: The exhaust vent must not terminate beneath the mobile home. universal...
Part Number Descriptions 8171587RP 0-5" Metal vent periscope 4396037RP 0"-18" Metal vent periscope 4396011RP 18"-29" Metal vent periscope 4396014 29"-50" Metal vent periscope 4392892 In-... one offset elbow) Periscope installation NOTE: The following "Vent System Chart" to determine type of vent material and hood combinations acceptable to a noncombustible portion of dryer. ■■ Reduce performance, resulting in many varieties. Special provisions for mobile home installations: The exhaust vent must not terminate beneath the mobile home. universal...

Installation Guide
Page 13
...9632; If the gas supply line shut-off valve is an extra part, go away. q Dispose of/recycle all of dryer from side to existing vent, make sure all parts are snug against the floor before tightening them. q Read "Dryer Use" in place, remove corner posts and cardboard from front to adjust... legs up using a wood block. NOTE: You may notice an odor when the dryer is not crushed or kinked. Not...
...9632; If the gas supply line shut-off valve is an extra part, go away. q Dispose of/recycle all of dryer from side to existing vent, make sure all parts are snug against the floor before tightening them. q Read "Dryer Use" in place, remove corner posts and cardboard from front to adjust... legs up using a wood block. NOTE: You may notice an odor when the dryer is not crushed or kinked. Not...

Installation Guide
Page 14
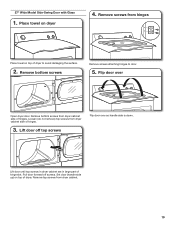
... go to steps 1-11 beginning on page 19. Loosen (do not remove) top screws from hinges Place towel on dryer Lift door until top screws in dryer cabinet are in large part of hinge slot. Pull door forward off top screws NOTE: Magnetized screwdriver is helpful. 29" Super Wide Side-Swing Door... 1. Reverse Door Swing (Optional) If your door is the 29" Super Wide Side-Swing Door, go to steps 1-13 beginning on top of dryer. ...
... go to steps 1-11 beginning on page 19. Loosen (do not remove) top screws from hinges Place towel on dryer Lift door until top screws in dryer cabinet are in large part of hinge slot. Pull door forward off top screws NOTE: Magnetized screwdriver is helpful. 29" Super Wide Side-Swing Door... 1. Reverse Door Swing (Optional) If your door is the 29" Super Wide Side-Swing Door, go to steps 1-13 beginning on top of dryer. ...
Installation Guide
Page 17
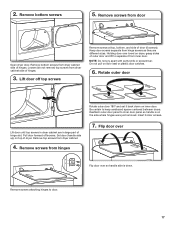
...Holding door over so handle side is on the side where hinges were just removed. Rotate outer door Lift door until top screws in large part of outer door and lift to keep cardboard spacer centered between doors. Flip door over Flip door over towel on inner door. Lift door off...Remove screws from hinges Rotate outer door 180º and set it from hinge screws as they are in dryer cabinet are different sizes. Loosen (do not remove) top screws from door Open dryer door. Reattach outer door panel to door. 17 Remove screws attaching hinges to inner door panel so handle...
...Holding door over so handle side is on the side where hinges were just removed. Rotate outer door Lift door until top screws in large part of outer door and lift to keep cardboard spacer centered between doors. Flip door over Flip door over towel on inner door. Lift door off...Remove screws from hinges Rotate outer door 180º and set it from hinge screws as they are in dryer cabinet are different sizes. Loosen (do not remove) top screws from door Open dryer door. Reattach outer door panel to door. 17 Remove screws attaching hinges to inner door panel so handle...
Installation Guide
Page 19
...door forward off top screws Flip door over Open dryer door. 27" Wide Model Side-Swing Door with Glass 1. Lift door until top screws in dryer cabinet are in large part of dryer to door. 5. Remove screws from dryer cabinet. 19 Remove bottom screws Remove screws attaching ...hinges to avoid damaging the surface. 2. Remove bottom screws from dryer cabinet side of hinges. 3. Set door (handle...
...door forward off top screws Flip door over Open dryer door. 27" Wide Model Side-Swing Door with Glass 1. Lift door until top screws in dryer cabinet are in large part of dryer to door. 5. Remove screws from dryer cabinet. 19 Remove bottom screws Remove screws attaching ...hinges to avoid damaging the surface. 2. Remove bottom screws from dryer cabinet side of hinges. 3. Set door (handle...

Use & Care Guide
Page 10
... the bulb with the screw. 4. Clean lint screen. Moving Care For power supply cord-connected dryers: 1. Use tape to locate, level, and connect the dryer. 3. Replace all parts and panels before servicing. Make sure leveling legs are secure in dryer base. 6. Locate the light bulb cover on the back wall of time, you should...
... the bulb with the screw. 4. Clean lint screen. Moving Care For power supply cord-connected dryers: 1. Use tape to locate, level, and connect the dryer. 3. Replace all parts and panels before servicing. Make sure leveling legs are secure in dryer base. 6. Locate the light bulb cover on the back wall of time, you should...


