

Installation Guide
Page 4
INSTALLATION REQUIREMENTS Tools and Parts Tools needed : Check local codes. Location Requirements Adjustable wrench that all installations: Flat-blade screwdriver #2 Phillips screwdriver 8" or 10" pipe wrench 8" or 10" adjustable wrench (for all parts are included. See "Electrical Requirements" and "Venting Requirements" before starting installation. Optional Equipment: (Not supplied with dryer) Refer to your "Use and Care Guide" for information about accessories available for your local building inspector. Check that opens to LP gas Parts supplied...
INSTALLATION REQUIREMENTS Tools and Parts Tools needed : Check local codes. Location Requirements Adjustable wrench that all installations: Flat-blade screwdriver #2 Phillips screwdriver 8" or 10" pipe wrench 8" or 10" adjustable wrench (for all parts are included. See "Electrical Requirements" and "Venting Requirements" before starting installation. Optional Equipment: (Not supplied with dryer) Refer to your "Use and Care Guide" for information about accessories available for your local building inspector. Check that opens to LP gas Parts supplied...

Installation Guide
Page 5
...; A separate 30 amp circuit for electric dryers. ■■ A separate 15 or 20 amp circuit for the exhaust vent with elbow. The combined weight of a companion appliance should be considered. ■■ Level floor with vents *Required spacing 3"* (76 mm) 5 If slope is greater than 1" (25 mm), install Extended Dryer Feet Kit, Part Number 279810. Check code requirements. Recessed area B. Wide opening side-swing door B. NOTE: No other...
...; A separate 30 amp circuit for electric dryers. ■■ A separate 15 or 20 amp circuit for the exhaust vent with elbow. The combined weight of a companion appliance should be considered. ■■ Level floor with vents *Required spacing 3"* (76 mm) 5 If slope is greater than 1" (25 mm), install Extended Dryer Feet Kit, Part Number 279810. Check code requirements. Recessed area B. Wide opening side-swing door B. NOTE: No other...

Installation Guide
Page 6
... door are required. Mobile home - The opening . Be sure wall receptacle is suitable for mobile home installations. WARNING: Improper connection of the "Use and Care Guide." Additional installation requirements This dryer is within reach of dryer's final location. 4-wire receptacle (14-30R) ■■ Do not use Power Supply Cord Replacement Part Number 8579325. If using a replacement power supply cord, it will reduce the risk of electric shock by a quali ed electrician. GROUNDING INSTRUCTIONS I For a grounded, cord-connected dryer...
... door are required. Mobile home - The opening . Be sure wall receptacle is suitable for mobile home installations. WARNING: Improper connection of the "Use and Care Guide." Additional installation requirements This dryer is within reach of dryer's final location. 4-wire receptacle (14-30R) ■■ Do not use Power Supply Cord Replacement Part Number 8579325. If using a replacement power supply cord, it will reduce the risk of electric shock by a quali ed electrician. GROUNDING INSTRUCTIONS I For a grounded, cord-connected dryer...
Installation Guide
Page 7
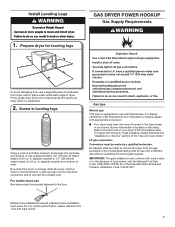
... connect the exhaust vent. LP gas conversion: Conversion must have the correct burner for electrical connection and to match height of dryer. For ordering information, please reference the "Use and Care Guide." 7 If this information does not agree with the National Fuel Gas Code, ANSI Z223.1/NFPA 54 or the Canadian Natural Gas and Propane Installation Code, CSA B149.1. ft. Leave enough room for the type of dryer. Install Leveling Legs GAS DRYER POWER HOOKUP Gas Supply Requirements...
... connect the exhaust vent. LP gas conversion: Conversion must have the correct burner for electrical connection and to match height of dryer. For ordering information, please reference the "Use and Care Guide." 7 If this information does not agree with the National Fuel Gas Code, ANSI Z223.1/NFPA 54 or the Canadian Natural Gas and Propane Installation Code, CSA B149.1. ft. Leave enough room for the type of dryer. Install Leveling Legs GAS DRYER POWER HOOKUP Gas Supply Requirements...
Installation Guide
Page 8
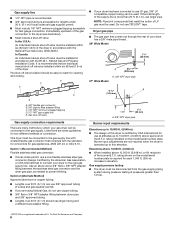
... be used . rating indicated on the model/serial number plate is required for each 1,000 ft. (305 m) increase in accordance with the standard for connectors for gas appliances, ANSI Z21.24 or CSA 6.10. This dryer must be used . rating shown on the model/serial number plate. Gas supply pressure testing ■■ The dryer must be installed in elevation. If the total length of the supply line is more...
... be used . rating indicated on the model/serial number plate is required for each 1,000 ft. (305 m) increase in accordance with the standard for connectors for gas appliances, ANSI Z21.24 or CSA 6.10. This dryer must be used . rating shown on the model/serial number plate. Gas supply pressure testing ■■ The dryer must be installed in elevation. If the total length of the supply line is more...

Installation Guide
Page 9
... metal vent shall be used for best drying performance and to avoid sagging and kinking that a separate circuit serving only this dryer MUST BE EXHAUSTED OUTDOORS. Electrical Requirements WARNING VENTING Venting Requirements Electrical Shock Hazard Plug into any gas vent, chimney, wall, ceiling, attic, crawlspace, or a concealed space of a building. Do not use an adapter. or 20-amp fused electrical supply is recommended. GROUNDING INSTRUCTIONS I For a grounded, cord-connected dryer: This dryer must...
... metal vent shall be used for best drying performance and to avoid sagging and kinking that a separate circuit serving only this dryer MUST BE EXHAUSTED OUTDOORS. Electrical Requirements WARNING VENTING Venting Requirements Electrical Shock Hazard Plug into any gas vent, chimney, wall, ceiling, attic, crawlspace, or a concealed space of a building. Do not use an adapter. or 20-amp fused electrical supply is recommended. GROUNDING INSTRUCTIONS I For a grounded, cord-connected dryer: This dryer must...

Installation Guide
Page 11
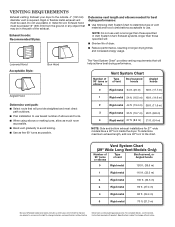
...: Do not use fewest number of vent material and hood combinations acceptable to the manufacturer's instructions. Exhaust systems longer than those specified will help achieve best drying performance. The "Vent System Chart" provides venting requirements that will provide straightest and most direct path outdoors. ■■ Plan installation to use vent runs longer than those specified in "Vent System Chart." To determine maximum exhaust length, add one...
...: Do not use fewest number of vent material and hood combinations acceptable to the manufacturer's instructions. Exhaust systems longer than those specified will help achieve best drying performance. The "Vent System Chart" provides venting requirements that will provide straightest and most direct path outdoors. ■■ Plan installation to use vent runs longer than those specified in "Vent System Chart." To determine maximum exhaust length, add one...
Installation Guide
Page 12
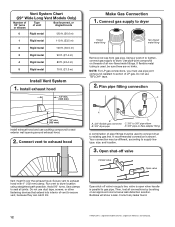
... Company. Vent System Chart (29" Wide Long Vent Models Only) Number of 90° turns or elbows Type of pipe fittings must fit over the exhaust hood. Connect vent to exhaust hood A B A. 3/8" flexible gas connector B. 3/8" dryer pipe C C. 3/8" to 3/8" pipe elbow D. 3/8" pipe-to seal exterior wall opening around exhaust hood. 2. Avoid 90° turns. Secure vent to dryer. Bubbles will show a leak. A recommended connection is parallel to supply line type, size, and location. 3. Your connection may...
... Company. Vent System Chart (29" Wide Long Vent Models Only) Number of 90° turns or elbows Type of pipe fittings must fit over the exhaust hood. Connect vent to exhaust hood A B A. 3/8" flexible gas connector B. 3/8" dryer pipe C C. 3/8" to 3/8" pipe elbow D. 3/8" pipe-to seal exterior wall opening around exhaust hood. 2. Avoid 90° turns. Secure vent to dryer. Bubbles will show a leak. A recommended connection is parallel to supply line type, size, and location. 3. Your connection may...

Installation Guide
Page 13
...; If the gas supply line shut-off valve is secured to exhaust hood with a damp cloth to remove any tape remaining on a full heat cycle (not an air cycle) for the moisture sensing system to existing vent, make sure all of your "Use and Care Guide." Use wrench to side. q Check that vent is open the dryer door and feel heat, cancel cycle and close the door. q Check that all packaging materials. q Wipe dryer drum interior thoroughly...
...; If the gas supply line shut-off valve is secured to exhaust hood with a damp cloth to remove any tape remaining on a full heat cycle (not an air cycle) for the moisture sensing system to existing vent, make sure all of your "Use and Care Guide." Use wrench to side. q Check that vent is open the dryer door and feel heat, cancel cycle and close the door. q Check that all packaging materials. q Wipe dryer drum interior thoroughly...
Installation Guide
Page 21
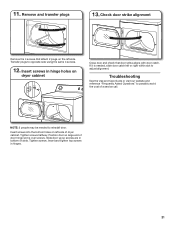
... dryer cabinet Close door and check that door strike aligns with door catch. Troubleshooting See the Use and Care Guide or visit our website and reference "Frequently Asked Questions" to reinstall door. Tighten screws. Remove and transfer plugs 13. Transfer plugs to adjust alignment. If it is over screws. Slide door up so screws are in bottom of a service call. NOTE: 2 people may be needed , slide door...
... dryer cabinet Close door and check that door strike aligns with door catch. Troubleshooting See the Use and Care Guide or visit our website and reference "Frequently Asked Questions" to reinstall door. Tighten screws. Remove and transfer plugs 13. Transfer plugs to adjust alignment. If it is over screws. Slide door up so screws are in bottom of a service call. NOTE: 2 people may be needed , slide door...
Dimension Guide
Page 3
... elbows and turns. ■■ When using elbows or making turns, allow as much room as possible. ■■ Bend vent gradually to use fewest number of the exhaust. Exhaust hood must be in longer drying times and increased energy usage. The "Vent System Chart" provides venting requirements that may be used. VENTING REQUIREMENTS Exhaust venting: Exhaust your dryer to change materials and specifications without notice. Do not use . Rigid or flexible metal exhaust vent must...
... elbows and turns. ■■ When using elbows or making turns, allow as much room as possible. ■■ Bend vent gradually to use fewest number of the exhaust. Exhaust hood must be in longer drying times and increased energy usage. The "Vent System Chart" provides venting requirements that may be used. VENTING REQUIREMENTS Exhaust venting: Exhaust your dryer to change materials and specifications without notice. Do not use . Rigid or flexible metal exhaust vent must...

Use & Care Guide
Page 4
... installed the dryer. This sensing occurs throughout the drying cycle and the dryer shuts off when the load reaches the selected dryness. Service calls caused by improper venting are sensed in shrinkage, wrinkling, and static due to efficiently dry laundry. n Remove lint from the exhaust hood. Use Timed Dry for final product check. each load. With Timed Dry, the dryer runs the amount of vent possible. CHECK YOUR VENT SYSTEM FOR GOOD AIR FLOW Maintain good air flow by: n Cleaning your lint screen...
... installed the dryer. This sensing occurs throughout the drying cycle and the dryer shuts off when the load reaches the selected dryness. Service calls caused by improper venting are sensed in shrinkage, wrinkling, and static due to efficiently dry laundry. n Remove lint from the exhaust hood. Use Timed Dry for final product check. each load. With Timed Dry, the dryer runs the amount of vent possible. CHECK YOUR VENT SYSTEM FOR GOOD AIR FLOW Maintain good air flow by: n Cleaning your lint screen...

Use & Care Guide
Page 5
... options are removed, or the Wrinkle Shield™ setting ends. 5 Turn the knob to select the desired setting (On or Off). CONTROL PANEL & FEATURES 1 2 3 4 2 3 4 Not all models. Drying time and temperature will depend on ACCUDRY™ cycles. 4 CYCLE SIGNAL/PUSH TO START The Cycle Signal produces an audible sound when the drying cycle is on, the tone will vary based on fabric type, load size, and dryness setting. 3 TEMPERATURE Select a drying temperature based on...
... options are removed, or the Wrinkle Shield™ setting ends. 5 Turn the knob to select the desired setting (On or Off). CONTROL PANEL & FEATURES 1 2 3 4 2 3 4 Not all models. Drying time and temperature will depend on ACCUDRY™ cycles. 4 CYCLE SIGNAL/PUSH TO START The Cycle Signal produces an audible sound when the drying cycle is on, the tone will vary based on fabric type, load size, and dryness setting. 3 TEMPERATURE Select a drying temperature based on...

Use & Care Guide
Page 6
... in the load or air temperature and shuts off when the load reaches the selected dryness level. NOTE: If loads do not require an entire drying cycle. Use the No Heat setting for the specified time on all models. Drying time varies based on all models. If loads seem drier than the higher setting. CYCLE GUIDE - Items to dry: Cycle: Large or heavy items such as you would like , select Less Dry next time you are...
... in the load or air temperature and shuts off when the load reaches the selected dryness level. NOTE: If loads do not require an entire drying cycle. Use the No Heat setting for the specified time on all models. Drying time varies based on all models. If loads seem drier than the higher setting. CYCLE GUIDE - Items to dry: Cycle: Large or heavy items such as you would like , select Less Dry next time you are...

Use & Care Guide
Page 9
... damage to dry the drum. IMPORTANT: n Do not run the dryer with hot water. 5. See "Venting Requirements." Roll lint off the screen with the brush to a residue buildup. Scrub lint screen with your fingers. 2. Reinstall screen in front of lint screen with a damp cloth. 3. A screen blocked by a qualified servicer. Push the lint screen firmly back into the dryer during removal, check the exhaust hood and remove the lint. To wash: 1. Roll lint off the screen with a soft cloth until stain...
... damage to dry the drum. IMPORTANT: n Do not run the dryer with hot water. 5. See "Venting Requirements." Roll lint off the screen with the brush to a residue buildup. Scrub lint screen with your fingers. 2. Reinstall screen in front of lint screen with a damp cloth. 3. A screen blocked by a qualified servicer. Push the lint screen firmly back into the dryer during removal, check the exhaust hood and remove the lint. To wash: 1. Roll lint off the screen with a soft cloth until stain...

Use & Care Guide
Page 10
... direct-wired dryers: 1. Disconnect gas supply line pipe and remove fittings attached to do so can result in dryer base. 3. Make sure leveling legs are at fuse or breaker box. 2. Locate the light bulb cover on some models) 1. WARNING Electrical Shock Hazard Disconnect power before operating. Unplug the power supply cord. 2. Turn off valve to secure dryer door. Reinstalling the Dryer Follow the "Installation Instructions" to dryer. 2. Replace the cover and secure with a 10-watt appliance bulb only. Plug into a grounded outlet...
... direct-wired dryers: 1. Disconnect gas supply line pipe and remove fittings attached to do so can result in dryer base. 3. Make sure leveling legs are at fuse or breaker box. 2. Locate the light bulb cover on some models) 1. WARNING Electrical Shock Hazard Disconnect power before operating. Unplug the power supply cord. 2. Turn off valve to secure dryer door. Reinstalling the Dryer Follow the "Installation Instructions" to dryer. 2. Replace the cover and secure with a 10-watt appliance bulb only. Plug into a grounded outlet...

Use & Care Guide
Page 11
...Exhaust vent not the correct length. Proper operation of non-use 2 household fuses or circuit breakers. The gas valve clicking is caught between the drum and front or rear of the dryer. See "Installation Instructions". PUSH to side. No heat The four legs are too long Lint screen clogged with a qualified electrician. 11 Replace both fuses or reset the circuit breaker. For gas dryers, make sure the supply line valve is a gas dryer. Electric dryers require 240-volt power supply. See "Cycle Guide." See "Installation Instructions". Long venting will increase drying...
...Exhaust vent not the correct length. Proper operation of non-use 2 household fuses or circuit breakers. The gas valve clicking is caught between the drum and front or rear of the dryer. See "Installation Instructions". PUSH to side. No heat The four legs are too long Lint screen clogged with a qualified electrician. 11 Replace both fuses or reset the circuit breaker. For gas dryers, make sure the supply line valve is a gas dryer. Electric dryers require 240-volt power supply. See "Cycle Guide." See "Installation Instructions". Long venting will increase drying...

Use & Care Guide
Page 12
... warm. Lint screen should be cleaned before the end of the cycle. Add dryer fabric softener sheets at the end of drying time in clothing (usually blue jeans). Drum stains are cooled slowly to reduced wrinkling and make it easier to other clothing. Load is too hot The electric dryer is located. Select a lower temperature and use an automatic drying cycle. If so, ventilate the area. A high temperature cycle was used, or a separate temperature control was set on...
... warm. Lint screen should be cleaned before the end of the cycle. Add dryer fabric softener sheets at the end of drying time in clothing (usually blue jeans). Drum stains are cooled slowly to reduced wrinkling and make it easier to other clothing. Load is too hot The electric dryer is located. Select a lower temperature and use an automatic drying cycle. If so, ventilate the area. A high temperature cycle was used, or a separate temperature control was set on...

Use & Care Guide
Page 13
... replace or repair house fuses, or to determine if another warranty applies. ITEMS EXCLUDED FROM WARRANTY This limited warranty does not cover: 1. You can be borne by calling Whirlpool. Consumable parts are unable to resolve the problem after checking "Troubleshooting," additional help you obtain assistance or service if you should ask Whirlpool or your authorized Whirlpool dealer to correct house wiring or plumbing. 3. Service calls to instruct you need...
... replace or repair house fuses, or to determine if another warranty applies. ITEMS EXCLUDED FROM WARRANTY This limited warranty does not cover: 1. You can be borne by calling Whirlpool. Consumable parts are unable to resolve the problem after checking "Troubleshooting," additional help you obtain assistance or service if you should ask Whirlpool or your authorized Whirlpool dealer to correct house wiring or plumbing. 3. Service calls to instruct you need...

Warranty Information
Page 1
... of purchase or installation date for Factory Specified Replacement Parts and repair labor to resolve the problem after checking "Troubleshooting," additional help you obtain assistance or service if you also may have other rights that vary from accident, alteration, misuse, abuse, fire, flood, acts of your complete model number and serial number. This limited warranty is installed, operated, and maintained according to instructions attached to use of incidental...
... of purchase or installation date for Factory Specified Replacement Parts and repair labor to resolve the problem after checking "Troubleshooting," additional help you obtain assistance or service if you also may have other rights that vary from accident, alteration, misuse, abuse, fire, flood, acts of your complete model number and serial number. This limited warranty is installed, operated, and maintained according to instructions attached to use of incidental...


