
Owners Manual
Page 5
...is selected and the End of Cycle Signal is not available on ACCUDRY™ cycles. 3 WRINKLE SHIELD™ Feature (on your dryer model. TIMED DRY Will run the dryer for detailed descriptions of the cycle reduces wrinkling. ACCUDRY™/AUTOMATIC DRY Senses moisture in the shortest time. CONTROL PANEL & FEATURES ...shuts off when the load reaches the selected dryness level. n Get up to select available cycles on some models) is on your dryer. Promptly removing clothes at the end of clothes from forming. Appearance may choose a setting based on the fabrics in ...
...is selected and the End of Cycle Signal is not available on ACCUDRY™ cycles. 3 WRINKLE SHIELD™ Feature (on your dryer model. TIMED DRY Will run the dryer for detailed descriptions of the cycle reduces wrinkling. ACCUDRY™/AUTOMATIC DRY Senses moisture in the shortest time. CONTROL PANEL & FEATURES ...shuts off when the load reaches the selected dryness level. n Get up to select available cycles on some models) is on your dryer. Promptly removing clothes at the end of clothes from forming. Appearance may choose a setting based on the fabrics in ...
Owners Manual
Page 6
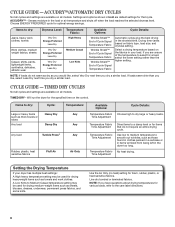
...time on fabric type, load size, and dryness setting. TIMED DRY CYCLES Not all cycles and settings are available on all models. Will run the dryer for various loads, refer to dry: Dryness Level: Temperature Fabric: Available Options: Cycle Details: Jeans, heavy work clothes. ACCUDRY...™/AUTOMATIC DRY CYCLES Not all cycles and settings are available on all models. Items to the care label directions. 6 Drying time ...
...time on fabric type, load size, and dryness setting. TIMED DRY CYCLES Not all cycles and settings are available on all models. Will run the dryer for various loads, refer to dry: Dryness Level: Temperature Fabric: Available Options: Cycle Details: Jeans, heavy work clothes. ACCUDRY...™/AUTOMATIC DRY CYCLES Not all cycles and settings are available on all models. Items to the care label directions. 6 Drying time ...
Owners Manual
Page 7
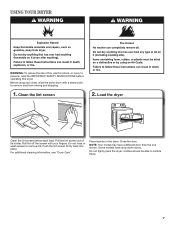
... before each load. Do not rinse or wash screen to tumble freely. 7 Place laundry in the dryer. Clean the lint screen 2. Load the dryer Clean the lint screen before operating this dryer. Push the lint screen firmly back into place. Close the door. clothes should be able to remove...the lint screen out of fire, electric shock, or injury to remove dust from storing and shipping. 1. For additional cleaning information, see "Dryer Care". Do not tightly pack the dryer; NOTE: Your model may have drop down doors. Some models have a different door than the one shown.
... before each load. Do not rinse or wash screen to tumble freely. 7 Place laundry in the dryer. Clean the lint screen 2. Load the dryer Clean the lint screen before operating this dryer. Push the lint screen firmly back into place. Close the door. clothes should be able to remove...the lint screen out of fire, electric shock, or injury to remove dust from storing and shipping. 1. For additional cleaning information, see "Dryer Care". Do not tightly pack the dryer; NOTE: Your model may have drop down doors. Some models have a different door than the one shown.
Owners Manual
Page 8
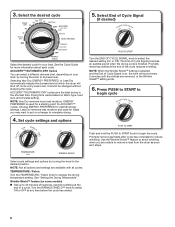
...(on your load. 3. ACCUDRY™/AUTOMATIC DRY Cycles You can select a different dryness level, depending on some models) n Get up to 40 minutes of heat-free, periodic tumbling at which the dryer will sound every 5 minutes until the clothes are removed, or the Wrinkle Shield™ setting ends. 6. .... Select the desired cycle TIMED DRY 50 40 Damp Dry Tumble Press 20 60 70 Heavy Dry Cool Down OFF ACCUDRY sensor dryer Jeans Very Dry ENERGY PREFERRED OFF Delicate WP_WEGD4900XW Less Dry Cool Down OFF WRINKLE SHIELD Select the desired cycle for loads you are...
...(on your load. 3. ACCUDRY™/AUTOMATIC DRY Cycles You can select a different dryness level, depending on some models) n Get up to 40 minutes of heat-free, periodic tumbling at which the dryer will sound every 5 minutes until the clothes are removed, or the Wrinkle Shield™ setting ends. 6. .... Select the desired cycle TIMED DRY 50 40 Damp Dry Tumble Press 20 60 70 Heavy Dry Cool Down OFF ACCUDRY sensor dryer Jeans Very Dry ENERGY PREFERRED OFF Delicate WP_WEGD4900XW Less Dry Cool Down OFF WRINKLE SHIELD Select the desired cycle for loads you are...

Owners Manual
Page 10
...into a grounded outlet or reconnect power. For gas dryers: 1. Cap the open fuel supply line. 5. Clean lint screen. Make sure leveling legs are secure in the lower right-hand corner of the cover. Locate the light bulb cover on some models) 1. Turn bulb counterclockwise. Replace the cover and secure... with a 10-watt appliance bulb only. Turn off valve to locate, level, and connect the dryer. 10 Disconnect wiring. 3. Make sure leveling legs are secure in...
...into a grounded outlet or reconnect power. For gas dryers: 1. Cap the open fuel supply line. 5. Clean lint screen. Make sure leveling legs are secure in the lower right-hand corner of the cover. Locate the light bulb cover on some models) 1. Turn bulb counterclockwise. Replace the cover and secure... with a 10-watt appliance bulb only. Turn off valve to locate, level, and connect the dryer. 10 Disconnect wiring. 3. Make sure leveling legs are secure in...

Dimension Guide
Page 1
...Type of the dryer in .2* (310 cm ) 2 A. Large opening hamper door 3"* (76 mm) Vent System Chart (29" Wide Long Vent Models Only) Number of 90° turns or elbows Type of the door are acceptable. Side view - Because Whirlpool Corporation policy includes...11.6 m) 3 Rigid metal 35 ft. (10.7 m) 29 ft. (8.8 m) 4 Rigid metal 27 ft. (8.2 m) 21 ft. (6.4 m) OVERALL DIMENSIONS 29" Wide Model Dryer dimensions For closet installation, with equivalent air ventilation openings are required. Box hood C. Louvered doors with a door, the minimum ventilation openings in the path of...
...Type of the dryer in .2* (310 cm ) 2 A. Large opening hamper door 3"* (76 mm) Vent System Chart (29" Wide Long Vent Models Only) Number of 90° turns or elbows Type of the door are acceptable. Side view - Because Whirlpool Corporation policy includes...11.6 m) 3 Rigid metal 35 ft. (10.7 m) 29 ft. (8.8 m) 4 Rigid metal 27 ft. (8.2 m) 21 ft. (6.4 m) OVERALL DIMENSIONS 29" Wide Model Dryer dimensions For closet installation, with equivalent air ventilation openings are required. Box hood C. Louvered doors with a door, the minimum ventilation openings in the path of...
Installation Instructions
Page 6
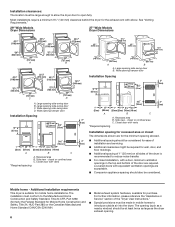
... wall, door, and floor moldings. ■■ Additional spacing of 1" (25 mm) on all sides of the dryer is suitable for the exhaust vent with elbow. See "Venting Requirements." 29" Wide Models Dryer Dimensions 27" Wide Models Dryer Dimensions 43 " (1092 mm) 23 ¾" (603 mm) 43 " (1092 mm) 13 ¾" (349 mm) *29 1/2" (749...
... wall, door, and floor moldings. ■■ Additional spacing of 1" (25 mm) on all sides of the dryer is suitable for the exhaust vent with elbow. See "Venting Requirements." 29" Wide Models Dryer Dimensions 27" Wide Models Dryer Dimensions 43 " (1092 mm) 23 ¾" (603 mm) 43 " (1092 mm) 13 ¾" (349 mm) *29 1/2" (749...

Installation Instructions
Page 8
... all gas connections. If this information does not agree with appropriate conversion. ■■ Your dryer must be connected to convert the dryer from the gas specified on its final location. Now stand the dryer on the model/serial rating plate for use a wrench to finish turning legs until it is acceptable for lengths...
... all gas connections. If this information does not agree with appropriate conversion. ■■ Your dryer must be connected to convert the dryer from the gas specified on its final location. Now stand the dryer on the model/serial rating plate for use a wrench to finish turning legs until it is acceptable for lengths...
Installation Instructions
Page 9
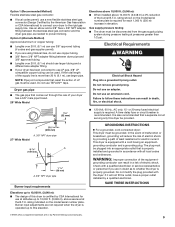
... INSTRUCTIONS � For a grounded, cord-connected dryer: This dryer must be plugged into a grounded 3 prong outlet. This dryer is also recommended that is more than 1/2 psi. The plug must be grounded. rating indicated on the model/serial number plate is properly grounded. Do not ...9632; Lengths over 20 ft. (6.1 m) should use larger tubing and a different size adapter fitting. ■■ If your dryer has a 3/8" male pipe thread. 29" Wide Model Elevations above 10,000 ft. (3,048 m): ■■ When installed above sea level at pressures greater than 20 ft. ...
... INSTRUCTIONS � For a grounded, cord-connected dryer: This dryer must be plugged into a grounded 3 prong outlet. This dryer is also recommended that is more than 1/2 psi. The plug must be grounded. rating indicated on the model/serial number plate is properly grounded. Do not ...9632; Lengths over 20 ft. (6.1 m) should use larger tubing and a different size adapter fitting. ■■ If your dryer has a 3/8" male pipe thread. 29" Wide Model Elevations above 10,000 ft. (3,048 m): ■■ When installed above sea level at pressures greater than 20 ft. ...
Installation Instructions
Page 11
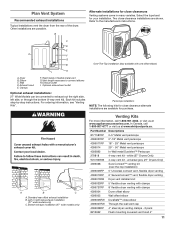
... vent G. For ordering information, see "Venting Kits". white (27" Dryers Only) W10186596 4-way vent kit - Exhaust hood E. A B C A. Elbow C. Exhaust outlet I H A. Bottom exhaust installation (27" wide models only) Venting Kits For more information, call 1-800-807-6777 or ... systems come in many varieties. Left or right side exhaust installation (27" wide models only) C. C D E A F G B Over-The-Top installation (also available with clamps 4396004 Dryer offset elbow 4396005 Wall offset elbow 4396006RW DuraSafe™ close -clearance installations are shown...
... vent G. For ordering information, see "Venting Kits". white (27" Dryers Only) W10186596 4-way vent kit - Exhaust hood E. A B C A. Elbow C. Exhaust outlet I H A. Bottom exhaust installation (27" wide models only) Venting Kits For more information, call 1-800-807-6777 or ... systems come in many varieties. Left or right side exhaust installation (27" wide models only) C. C D E A F G B Over-The-Top installation (also available with clamps 4396004 Dryer offset elbow 4396005 Wall offset elbow 4396006RW DuraSafe™ close -clearance installations are shown...
Installation Instructions
Page 12
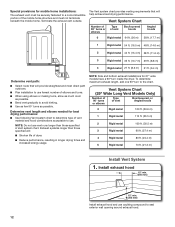
... ■■ Use as few 90° turns as possible. NOTE: Side and bottom exhaust installations for 27" wide models have a 90º turn to a noncombustible portion of dryer. ■■ Reduce performance, resulting in Vent system chart. To determine maximum exhaust length, add one 90º turn... The exhaust vent must not terminate beneath the mobile home. NOTE: Do not use caulking compound to use . Vent System Chart (29" Wide Long Vent Models Only) Number of 90° turns or elbows Type of vent Box/louvered hoods Angled hoods 0 Rigid metal 64 ft. (20 m) 58 ft. ...
... ■■ Use as few 90° turns as possible. NOTE: Side and bottom exhaust installations for 27" wide models have a 90º turn to a noncombustible portion of dryer. ■■ Reduce performance, resulting in Vent system chart. To determine maximum exhaust length, add one 90º turn... The exhaust vent must not terminate beneath the mobile home. NOTE: Do not use caulking compound to use . Vent System Chart (29" Wide Long Vent Models Only) Number of 90° turns or elbows Type of vent Box/louvered hoods Angled hoods 0 Rigid metal 64 ft. (20 m) 58 ft. ...

Installation Instructions
Page 15
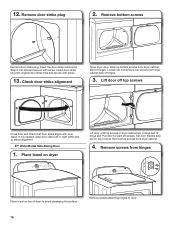
... so large end of dryer. Loosen (do not remove) top screws from dryer cabinet side of hinges. 3. Lift door off screws. Remove bottom screws from dryer cabinet side of hinges.... If needed to reinstall door. Remove top screws from dryer cabinet. Set door on left side of dryer to adjust alignment. 15 ...door catch left side of slots. Place towel on top of dryer cabinet. Insert plugs into bottom holes on dryer cabinet Open dryer door. Insert screws in hinges. 6. Tighten screws halfway. ...
... so large end of dryer. Loosen (do not remove) top screws from dryer cabinet side of hinges. 3. Lift door off screws. Remove bottom screws from dryer cabinet side of hinges.... If needed to reinstall door. Remove top screws from dryer cabinet. Set door on left side of dryer to adjust alignment. 15 ...door catch left side of slots. Place towel on top of dryer cabinet. Insert plugs into bottom holes on dryer cabinet Open dryer door. Insert screws in hinges. 6. Tighten screws halfway. ...
Installation Instructions
Page 18
... door strike plug. Check door strike alignment Open dryer door. Remove top screws from dryer cabinet side of hinges. Remove screws attaching hinges to adjust alignment. 27" Wide Model Side-Swing Door 1. Lift door off screws. Remove screws from dryer cabinet side of hinges. 3. Insert the door ...strike removed in large part of dryer to avoid damaging the surface. Place towel on top of dryer. Pull door forward off top screws...
... door strike plug. Check door strike alignment Open dryer door. Remove top screws from dryer cabinet side of hinges. Remove screws attaching hinges to adjust alignment. 27" Wide Model Side-Swing Door 1. Lift door off screws. Remove screws from dryer cabinet side of hinges. 3. Insert the door ...strike removed in large part of dryer to avoid damaging the surface. Place towel on top of dryer. Pull door forward off top screws...


