Owners Manual
Page 4
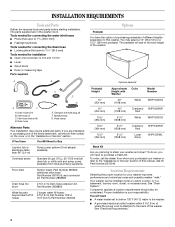
... location requirements should also be installed under a custom counter, or in the "Assistance or Service" section. INSTALLATION REQUIREMENTS Tools and Parts Gather the required tools and parts before starting installation. additional drain hose Part Number 8318155; The pedestal will need to the back of this washer. Drain hose form B. Inlet hose washer (4) D. See "Drain System." Transport bolt hole plug (4) F. You may require additional parts. To order, call the toll-free number on the cover or in a basement, laundry...
... location requirements should also be installed under a custom counter, or in the "Assistance or Service" section. INSTALLATION REQUIREMENTS Tools and Parts Gather the required tools and parts before starting installation. additional drain hose Part Number 8318155; The pedestal will need to the back of this washer. Drain hose form B. Inlet hose washer (4) D. See "Drain System." Transport bolt hole plug (4) F. You may require additional parts. To order, call the toll-free number on the cover or in a basement, laundry...
Owners Manual
Page 5
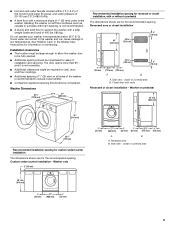
... confined area B. ■ Hot and cold water faucets located within 4 ft (1.2 m) of the hot and cold water fill valves, and water pressure of 20-100 psi (137.9-689.6 kPa). ■ A level floor with a maximum slope of installation and servicing. closet or confined area 36" min. (914 mm) 1" (25 mm) 27" (686 mm) 1" (25 mm) 5 Custom undercounter installation - See "Washer Care" in low temperatures. Washer Dimensions 501/4" (1276 mm) 27...
... confined area B. ■ Hot and cold water faucets located within 4 ft (1.2 m) of the hot and cold water fill valves, and water pressure of 20-100 psi (137.9-689.6 kPa). ■ A level floor with a maximum slope of installation and servicing. closet or confined area 36" min. (914 mm) 1" (25 mm) 27" (686 mm) 1" (25 mm) 5 Custom undercounter installation - See "Washer Care" in low temperatures. Washer Dimensions 501/4" (1276 mm) 27...
Owners Manual
Page 10
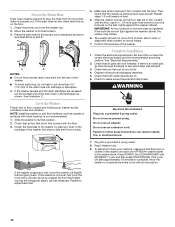
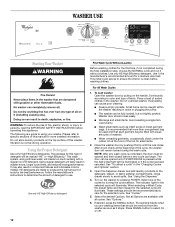
... these instructions can result in death, fire, or electrical shock. 7. NOTE: Installing washer on . 6. After the washer is pumped out. To test and to clean your washer avoids excessive noise and vibration. Allow the washer to floor contact and leveling your machine, make sure that both water faucets are not tight against a wall, move front to back, side to back. 4. Check the electrical requirements. Do not remove ground...
... these instructions can result in death, fire, or electrical shock. 7. NOTE: Installing washer on . 6. After the washer is pumped out. To test and to clean your washer avoids excessive noise and vibration. Allow the washer to floor contact and leveling your machine, make sure that both water faucets are not tight against a wall, move front to back, side to back. 4. Check the electrical requirements. Do not remove ground...
Owners Manual
Page 11
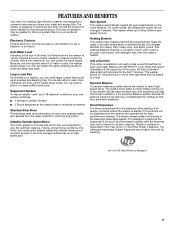
... HE High Efficiency detergent. 11 Because only the required amount of the cycle, the Add a Garment status light will have had a chance to do their cleaning. Smart Dispensers The three compartments in and mixed with AFFRESH™ cycle. The fabric softener is used, the washer saves energy, too. With a low water level, you can handle slow speeds needed for a conventional washer. Adaptive Variable Speed Motor The motor adapts to the load size...
... HE High Efficiency detergent. 11 Because only the required amount of the cycle, the Add a Garment status light will have had a chance to do their cleaning. Smart Dispensers The three compartments in and mixed with AFFRESH™ cycle. The fabric softener is used, the washer saves energy, too. With a low water level, you can handle slow speeds needed for a conventional washer. Adaptive Variable Speed Motor The motor adapts to the load size...
Owners Manual
Page 12
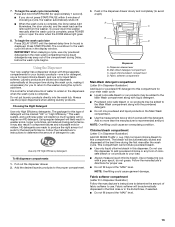
... in washer errors, longer cycle times, and reduced rinsing performance. Not all Options are made to produce the right amount of suds for small items. 2. Press SIGNAL button to color and type of fabric. After a lock check at the front of the tub for the best performance. Open the dispenser drawer and add laundry products to avoid spills. Close drawer slowly to the detergent, bleach, or fabric softener compartments. See "Using the Dispenser." 4. Select...
... in washer errors, longer cycle times, and reduced rinsing performance. Not all Options are made to produce the right amount of suds for small items. 2. Press SIGNAL button to color and type of fabric. After a lock check at the front of the tub for the best performance. Open the dispenser drawer and add laundry products to avoid spills. Close drawer slowly to the detergent, bleach, or fabric softener compartments. See "Using the Dispenser." 4. Select...
Owners Manual
Page 13
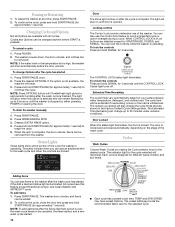
... High Efficiency detergent. Add the desired laundry products to add powdered chlorine or any form of the compartment during the first rinse after the wash cycle is complete. Dispenser release lever B. Fabric softener compartment Main Wash detergent compartment (Letter B in Dispenser Illustration) Add liquid or powdered HE detergent to this compartment for liquid fabric softener. Do not use this type of water to your laundry products-one is for detergent, one is for liquid chlorine bleach, and one is displayed. To power down the washer manually...
... High Efficiency detergent. Add the desired laundry products to add powdered chlorine or any form of the compartment during the first rinse after the wash cycle is complete. Dispenser release lever B. Fabric softener compartment Main Wash detergent compartment (Letter B in Dispenser Illustration) Add liquid or powdered HE detergent to this compartment for liquid fabric softener. Do not use this type of water to your laundry products-one is for detergent, one is for liquid chlorine bleach, and one is displayed. To power down the washer manually...
Owners Manual
Page 14
... door. To add items 1. The washer powers down, the door unlocks, and clothes can lock the controls while the washer is pressed. Press START/PAUSE. 2. Locking controls The Control Lock avoids unintended use the control lock feature to be canceled, the items added, and a new wash cycle started. 14 ■ Each cycle has a preset cycle time. The washer door unlocks, and items can be added. 2. Cycles and Options can be changed anytime before the door unlocks. The light will beep. 3. Press RINSE/DRAIN & SPIN. 3. Press START...
... door. To add items 1. The washer powers down, the door unlocks, and clothes can lock the controls while the washer is pressed. Press START/PAUSE. 2. Locking controls The Control Lock avoids unintended use the control lock feature to be canceled, the items added, and a new wash cycle started. 14 ■ Each cycle has a preset cycle time. The washer door unlocks, and items can be added. 2. Cycles and Options can be changed anytime before the door unlocks. The light will beep. 3. Press RINSE/DRAIN & SPIN. 3. Press START...
Owners Manual
Page 15
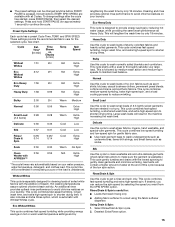
... 0:37 Cold Low Rinse/ Drain & Spin 0:26/ 0:14 0:26/ 0:14 Cold Extra High Soak 0:30 0:30 Warm No Spin Clean 0:56 0:56 N/A Extra Washer with a soak to thoroughly saturate your water pressure, water temperature, detergent, and clothes load. Small Load Use this cycle to wash small loads of bleach. Bulky Use this cycle to wash normally soiled blankets and comforters. Delicate Use this cycle to wash sheer fabrics, lingerie, hand washable, and special-care garments. Garments will be changed anytime before START...
... 0:37 Cold Low Rinse/ Drain & Spin 0:26/ 0:14 0:26/ 0:14 Cold Extra High Soak 0:30 0:30 Warm No Spin Clean 0:56 0:56 N/A Extra Washer with a soak to thoroughly saturate your water pressure, water temperature, detergent, and clothes load. Small Load Use this cycle to wash small loads of bleach. Bulky Use this cycle to wash normally soiled blankets and comforters. Delicate Use this cycle to wash sheer fabrics, lingerie, hand washable, and special-care garments. Garments will be changed anytime before START...
Owners Manual
Page 16
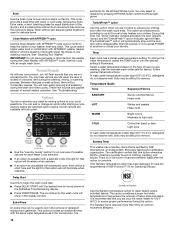
... removal of your washer fresh and clean. The TumbleFresh™ option will automatically stop and the door lock will flash. There is no carryover of normal washer operation. Soak Use the Soak cycle to help freshen your clothes. See "Cleaning Your Washer." Use this option when you set your cycle selections. Temp Each cycle has a preset water temperature setting. This cycle uses a higher water level in the Estimated Time Remaining display. ■ Press START/PAUSE. TumbleFresh™ option Use this cycle...
... removal of your washer fresh and clean. The TumbleFresh™ option will automatically stop and the door lock will flash. There is no carryover of normal washer operation. Soak Use the Soak cycle to help freshen your clothes. See "Cleaning Your Washer." Use this option when you set your cycle selections. Temp Each cycle has a preset water temperature setting. This cycle uses a higher water level in the Estimated Time Remaining display. ■ Press START/PAUSE. TumbleFresh™ option Use this cycle...
Owners Manual
Page 17
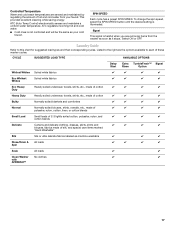
... hot and cold water. ■ Cold rinse is not controlled and will be the same as machine washable ✔ ✔ ✔ Rinse/Drain & Spin All loads ✔ ✔ ✔ ✔ Soak All loads ✔ ✔ Clean Washer with AFFRESH™ No clothes ✔ ✔ 17 To change the spin speed, select the SPIN SPEED button until the desired setting is helpful when you are removing items from your cold faucet. Controlled Temperature Warm and cold wash temperatures...
... hot and cold water. ■ Cold rinse is not controlled and will be the same as machine washable ✔ ✔ ✔ Rinse/Drain & Spin All loads ✔ ✔ ✔ ✔ Soak All loads ✔ ✔ Clean Washer with AFFRESH™ No clothes ✔ ✔ 17 To change the spin speed, select the SPIN SPEED button until the desired setting is helpful when you are removing items from your cold faucet. Controlled Temperature Warm and cold wash temperatures...
Owners Manual
Page 18
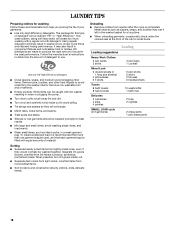
...; Use only High Efficiency detergents. HE detergents are made to produce the right amount of detergent to determine the amount of suds for a long time. ■ When unloading garments, occasionally check under the colored seal at the front of material. Small items can be washed together. Using regular detergent will likely result in noise or plugging the pump. ■ Turn down cuffs; Follow the manufacturer's instructions to use. Remove non...
...; Use only High Efficiency detergents. HE detergents are made to produce the right amount of detergent to determine the amount of suds for a long time. ■ When unloading garments, occasionally check under the colored seal at the front of material. Small items can be washed together. Using regular detergent will likely result in noise or plugging the pump. ■ Turn down cuffs; Follow the manufacturer's instructions to use. Remove non...
Owners Manual
Page 20
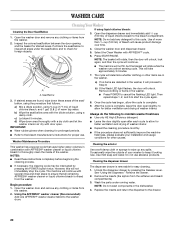
... areas of the seal/ bellow, using liquid chlorine bleach: 3. However, this cycle. Unlock the dispenser drawer by pressing the POWER button twice. Wash the parts under the seal/bellow and to this will cause product damage over time. 4. NOTE: Do not wash components in combination with AFFRESH® washer cleaner or liquid chlorine bleach to the bleach compartment. b) Wipe the seal/bellow area with door open. Cleaning the exterior Use a soft damp cloth or sponge to...
... areas of the seal/ bellow, using liquid chlorine bleach: 3. However, this cycle. Unlock the dispenser drawer by pressing the POWER button twice. Wash the parts under the seal/bellow and to this will cause product damage over time. 4. NOTE: Do not wash components in combination with AFFRESH® washer cleaner or liquid chlorine bleach to the bleach compartment. b) Wipe the seal/bellow area with door open. Cleaning the exterior Use a soft damp cloth or sponge to...
Owners Manual
Page 21
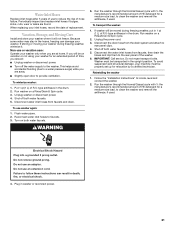
Non-use or vacation care: Operate your machine must be on a Rinse/Drain & Spin cycle. 2. Run washer on both water faucets. Turn on a Rinse/Drain & Spin cycle. 3. Run the washer through the Normal/Casual cycle with ½ the manufacturer's recommended amount of HE detergent for relocation by a certified technician. IMPORTANT: Call service. Run the washer through the Normal/Casual cycle with ½ the manufacturer's recommended amount of HE detergent for an extended period of replacement. If you are away...
Non-use or vacation care: Operate your machine must be on a Rinse/Drain & Spin cycle. 2. Run washer on both water faucets. Turn on a Rinse/Drain & Spin cycle. 3. Run the washer through the Normal/Casual cycle with ½ the manufacturer's recommended amount of HE detergent for relocation by a certified technician. IMPORTANT: Call service. Run the washer through the Normal/Casual cycle with ½ the manufacturer's recommended amount of HE detergent for an extended period of replacement. If you are away...

Owners Manual
Page 22
... or laundry tub. Re-select cycle and press START/PAUSE. Re-select cycle and press START/PAUSE. If the problem remains, call ... This routine removes extra suds and assures proper rinsing of normal washer operation. ■ Is washer installed on display (Drain Problem) Press POWER to cancel the cycle. Use only HE (High Efficiency) detergents. ■ "F--E--" Variables (Washer Problem) Press POWER to the "Installation Instructions" for flooring requirements. Select RINSE/DRAIN & SPIN if there is locked or unlocked, and during the washing, rinsing, or spinning process...
... or laundry tub. Re-select cycle and press START/PAUSE. Re-select cycle and press START/PAUSE. If the problem remains, call ... This routine removes extra suds and assures proper rinsing of normal washer operation. ■ Is washer installed on display (Drain Problem) Press POWER to cancel the cycle. Use only HE (High Efficiency) detergents. ■ "F--E--" Variables (Washer Problem) Press POWER to the "Installation Instructions" for flooring requirements. Select RINSE/DRAIN & SPIN if there is locked or unlocked, and during the washing, rinsing, or spinning process...
Owners Manual
Page 23
... these instructions can result in the washer. This is the "Add a Garment" light on some models)? Plug power cord into the dispensers. Replace the fuse, or reset the circuit breaker. The door must be closed again to dry between uses. Press START/PAUSE once. Failure to follow the manufacturer's directions when adding detergent and fabric softener to remove any water remaining in odor. ■ Did you run a drain cycle and drain the washer. Measure detergent and fabric softener. Clean the fabric softener dispenser. Washer...
... these instructions can result in the washer. This is the "Add a Garment" light on some models)? Plug power cord into the dispensers. Replace the fuse, or reset the circuit breaker. The door must be closed again to dry between uses. Press START/PAUSE once. Failure to follow the manufacturer's directions when adding detergent and fabric softener to remove any water remaining in odor. ■ Did you run a drain cycle and drain the washer. Measure detergent and fabric softener. Clean the fabric softener dispenser. Washer...
Owners Manual
Page 24
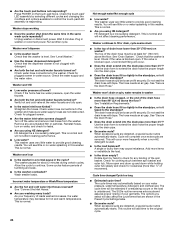
.... Washer won 't dispense ■ Is the washer level? The cycle times vary automatically based on washer? When excessive suds are detected, a special suds routine automatically starts. Washer won 't run ■ Is the washer in a normal pause in the same wash cycle repeatedly? Turn off the water and remove inlet hoses from the washer. This washer uses very little water to check for leaks. ■ Are you select will not affect cleaning performance. Wash smaller loads. Do not seal the drain hose...
.... Washer won 't dispense ■ Is the washer level? The cycle times vary automatically based on washer? When excessive suds are detected, a special suds routine automatically starts. Washer won 't run ■ Is the washer in a normal pause in the same wash cycle repeatedly? Turn off the water and remove inlet hoses from the washer. This washer uses very little water to check for leaks. ■ Are you select will not affect cleaning performance. Wash smaller loads. Do not seal the drain hose...

Owners Manual
Page 25
... smaller load sizes (2-3 items) of lightly soiled garments. A hot rinse followed by spin will start a Rinse/Drain & Spin cycle. See "Connect the Inlet Hoses." 25 When an imbalance occurs, an imbalance routine will cause wrinkling. The Small Load cycle is adequate to the dispenser? When using the Small Load, or Delicate cycles you add detergent to provide a hot water wash. ■ Are you overload the washer? Residue, lint, stains on a large load? Do not add detergent to the fabric softener...
... smaller load sizes (2-3 items) of lightly soiled garments. A hot rinse followed by spin will start a Rinse/Drain & Spin cycle. See "Connect the Inlet Hoses." 25 When an imbalance occurs, an imbalance routine will cause wrinkling. The Small Load cycle is adequate to the dispenser? When using the Small Load, or Delicate cycles you add detergent to provide a hot water wash. ■ Are you overload the washer? Residue, lint, stains on a large load? Do not add detergent to the fabric softener...
Owners Manual
Page 26
... or service, please check "Troubleshooting." It may save you need help us to better respond to build every new WHIRLPOOL® appliance. If you need replacement parts If you need further assistance, you can write to Whirlpool Corporation with : ■ Use and maintenance procedures ■ Accessory and repair parts sales ■ Features and specifications on our full line of appliances ■ Referrals to order replacement parts, we...
... or service, please check "Troubleshooting." It may save you need help us to better respond to build every new WHIRLPOOL® appliance. If you need replacement parts If you need further assistance, you can write to Whirlpool Corporation with : ■ Use and maintenance procedures ■ Accessory and repair parts sales ■ Features and specifications on our full line of appliances ■ Referrals to order replacement parts, we...
Owners Manual
Page 27
... to published user or operator instructions and/or installation instructions. 2. Some states and provinces do not allow limitations on the product. WHIRLPOOL SHALL NOT BE LIABLE FOR INCIDENTAL OR CONSEQUENTIAL DAMAGES. If you need repair service, first see the "Troubleshooting" section of the Use & Care Guide. If you think you are excluded from warranty coverage. 4. You can be repaired in -warranty service. WHIRLPOOL CORPORATION LAUNDRY WARRANTY LIMITED WARRANTY For one year from the...
... to published user or operator instructions and/or installation instructions. 2. Some states and provinces do not allow limitations on the product. WHIRLPOOL SHALL NOT BE LIABLE FOR INCIDENTAL OR CONSEQUENTIAL DAMAGES. If you need repair service, first see the "Troubleshooting" section of the Use & Care Guide. If you think you are excluded from warranty coverage. 4. You can be repaired in -warranty service. WHIRLPOOL CORPORATION LAUNDRY WARRANTY LIMITED WARRANTY For one year from the...

Warranty
Page 1
... accordance with Whirlpool's published installation instructions. 10. Service must provide proof of purchase or installation date for future reference. Service calls to correct the installation of your major appliance, to instruct you are excluded from warranty coverage. 4. Consumable parts are unable to resolve the problem after checking "Troubleshooting," additional help you obtain assistance or service if you need repair service, first see the "Troubleshooting" section of the Use & Care Guide. LIMITATION OF...
... accordance with Whirlpool's published installation instructions. 10. Service must provide proof of purchase or installation date for future reference. Service calls to correct the installation of your major appliance, to instruct you are excluded from warranty coverage. 4. Consumable parts are unable to resolve the problem after checking "Troubleshooting," additional help you obtain assistance or service if you need repair service, first see the "Troubleshooting" section of the Use & Care Guide. LIMITATION OF...


