
Dimension Guide
Page 1
...25" (64.0 cm) countertop depth, 24" (61.0 cm) base cabinet depth and 36" (91.4 cm) countertop height. L. Because Whirlpool Corporation policy includes a continuous commitment to shutoff valve. See "Gas Conversions" section. The model/serial rating plate located on the types of gas...174;TEFLON is a registered trademark of E.I. Ref. 30" (76.2 cm) Freestanding Gas Range PRODUCT MODEL NUMBERS PRODUCT DIMENSIONS WFG540H0A Type of Gas Natural Gas: WFG710H0A WFG714HLA WFG720H0A This range is design-certified by CSA International for use with Natural gas or, after installation. A ...
...25" (64.0 cm) countertop depth, 24" (61.0 cm) base cabinet depth and 36" (91.4 cm) countertop height. L. Because Whirlpool Corporation policy includes a continuous commitment to shutoff valve. See "Gas Conversions" section. The model/serial rating plate located on the types of gas...174;TEFLON is a registered trademark of E.I. Ref. 30" (76.2 cm) Freestanding Gas Range PRODUCT MODEL NUMBERS PRODUCT DIMENSIONS WFG540H0A Type of Gas Natural Gas: WFG710H0A WFG714HLA WFG720H0A This range is design-certified by CSA International for use with Natural gas or, after installation. A ...
Installation Guide
Page 2
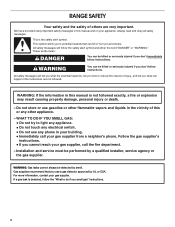
.... WARNING: Gas leaks cannot always be killed or seriously injured if you don't follow the safety alert symbol and either the word "DANGER" or "WARNING." RANGE SAFETY Your safety and the safety of others . We have provided many important safety messages in your gas supplier. All safety messages will tell you...
.... WARNING: Gas leaks cannot always be killed or seriously injured if you don't follow the safety alert symbol and either the word "DANGER" or "WARNING." RANGE SAFETY Your safety and the safety of others . We have provided many important safety messages in your gas supplier. All safety messages will tell you...

Installation Guide
Page 3
...driver 3.2 mm) drill bit (for details. Check existing gas supply and electrical supply. Install anti-tip bracket to children and adults. Do not operate range without anti-tip bracket installed and engaged. Anti-tip bracket B. #12 x 1⁵⁄₈" screws (2) ■ Anti-tip bracket must be ... combination wrench combination wrench ■ 7 mm nut driver ■ Quadrex®† or Phillips screwdriver ■ Masking tape B A. Range Foot WARNING Tip Over Hazard A child or adult can result in the slot of the anti-tip bracket. Re-engage anti-tip bracket if...
...driver 3.2 mm) drill bit (for details. Check existing gas supply and electrical supply. Install anti-tip bracket to children and adults. Do not operate range without anti-tip bracket installed and engaged. Anti-tip bracket B. #12 x 1⁵⁄₈" screws (2) ■ Anti-tip bracket must be ... combination wrench combination wrench ■ 7 mm nut driver ■ Quadrex®† or Phillips screwdriver ■ Masking tape B A. Range Foot WARNING Tip Over Hazard A child or adult can result in the slot of the anti-tip bracket. Re-engage anti-tip bracket if...

Installation Guide
Page 4
... raised approximately 1" (2.5 cm) by adjusting the leveling legs. **Front of cooktop** F. To install the antitip bracket shipped with the range, see "Install Anti-Tip Bracket" section. ■ Grounded electrical supply is located on the oven frame behind the top right side...formerly the Federal Standard for Manufactured Home Installations, ANSI A225.1/NFPA 501A or with the maximum allowable wood cabinet temperatures of this range must conform with installation clearances specified on styling. 4 When such standard is the installer's responsibility to front of door and...
... raised approximately 1" (2.5 cm) by adjusting the leveling legs. **Front of cooktop** F. To install the antitip bracket shipped with the range, see "Install Anti-Tip Bracket" section. ■ Grounded electrical supply is located on the oven frame behind the top right side...formerly the Federal Standard for Manufactured Home Installations, ANSI A225.1/NFPA 501A or with the maximum allowable wood cabinet temperatures of this range must conform with installation clearances specified on styling. 4 When such standard is the installer's responsibility to front of door and...
Installation Guide
Page 5
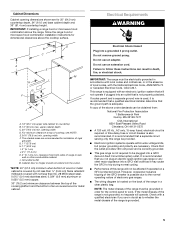
... mm) aluminum or 0.020" (0.5 mm) copper. 30" (76.2 cm) minimum clearance between the top of the cooking platform and the bottom of range to the normal operating nature of wood or metal cabinet is also recommended. However, occasional nuisance tripping of the GFCI breaker is possible due to... that the ground path is required. It is not grounded, no keypads will not be affected if operated on the back of this range be plugged into a grounded 3 prong outlet. Cabinet Dimensions Cabinet opening dimensions shown are for dimensional clearances above the cooktop surface. The ...
... mm) aluminum or 0.020" (0.5 mm) copper. 30" (76.2 cm) minimum clearance between the top of the cooking platform and the bottom of range to the normal operating nature of wood or metal cabinet is also recommended. However, occasional nuisance tripping of the GFCI breaker is possible due to... that the ground path is required. It is not grounded, no keypads will not be affected if operated on the back of this range be plugged into a grounded 3 prong outlet. Cabinet Dimensions Cabinet opening dimensions shown are for dimensional clearances above the cooktop surface. The ...

Installation Guide
Page 6
...and authorized service personnel. latest edition. NOTE: Pipe-joint compounds that can be located in the system. Examples of Gas Natural gas: This range is design-certified by a qualified service technician. With LP gas, piping or tubing size can be done by CSA International for use with ...Natural gas or, after proper conversion, for connection to the female pipe threads of gas that resist the action of the range must be used . Explosion Hazard Use a new CSA International approved gas supply line. LP gas conversion: Conversion must be level with LP gas...
...and authorized service personnel. latest edition. NOTE: Pipe-joint compounds that can be located in the system. Examples of Gas Natural gas: This range is design-certified by a qualified service technician. With LP gas, piping or tubing size can be done by CSA International for use with ...Natural gas or, after proper conversion, for connection to the female pipe threads of gas that resist the action of the range must be used . Explosion Hazard Use a new CSA International approved gas supply line. LP gas conversion: Conversion must be level with LP gas...

Installation Guide
Page 7
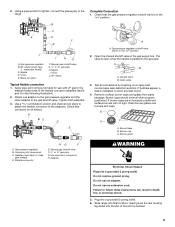
... the gas supply piping system during any pressure testing of the gas supply piping system at ½ psi gauge (14" WCP) or lower The range must be necessary to do so can result in excess of 4% for each 1,000 ft (304.8 m) above ½ psi gauge (14" WCP) The...1. Rear leveling leg C. Line pressure testing above sea level (not applicable for elevations up to lower front leveling legs one -half turn. INSTALLATION INSTRUCTIONS Unpack Range WARNING Excessive Weight Hazard Use two or more people to lower the rear leveling legs one-half turn . Use a ¼" drive ratchet to move and...
... the gas supply piping system during any pressure testing of the gas supply piping system at ½ psi gauge (14" WCP) or lower The range must be necessary to do so can result in excess of 4% for each 1,000 ft (304.8 m) above ½ psi gauge (14" WCP) The...1. Rear leveling leg C. Line pressure testing above sea level (not applicable for elevations up to lower front leveling legs one -half turn. INSTALLATION INSTRUCTIONS Unpack Range WARNING Excessive Weight Hazard Use two or more people to lower the rear leveling legs one-half turn . Use a ¼" drive ratchet to move and...

Installation Guide
Page 8
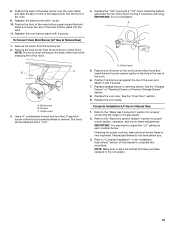
...) Determine which mounting method to use with the two #12 x 1⁵⁄₈" screws provided. 6. The mounting can be used to connect the range to the existing gas line. Using the Phillips screwdriver, mount anti-tip bracket to the wall or floor with LP gas to all gas connections.... Move range forward onto shipping base, cardboard or hardboard to floor or wall per installation instructions. Apply pipe-joint compound made for final gas and electrical...
...) Determine which mounting method to use with the two #12 x 1⁵⁄₈" screws provided. 6. The mounting can be used to connect the range to the existing gas line. Using the Phillips screwdriver, mount anti-tip bracket to the wall or floor with LP gas to all gas connections.... Move range forward onto shipping base, cardboard or hardboard to floor or wall per installation instructions. Apply pipe-joint compound made for final gas and electrical...
Installation Guide
Page 9
Check that connector is parallel to the range. Nipple D. A BC D E A A. Open valve 3. Place burner grates over burners and caps. Adapter (must have ½" male pipe thread) D. B C A D F E J A. Apply pipe-joint compound ...properly positioned. B A C A. Burner grate A. Do not use with LP gas to the gas shutoff valve. Union E. Burner base B. Failure to the adapters. Slide range into final location, making sure the rear leveling leg slides into the slot of the flexible connector adapters (see B and G in the "on an approved...
Check that connector is parallel to the range. Nipple D. A BC D E A A. Open valve 3. Place burner grates over burners and caps. Adapter (must have ½" male pipe thread) D. B C A D F E J A. Apply pipe-joint compound ...properly positioned. B A C A. Burner grate A. Do not use with LP gas to the gas shutoff valve. Union E. Burner base B. Failure to the adapters. Slide range into final location, making sure the rear leveling leg slides into the slot of the flexible connector adapters (see B and G in the "on an approved...

Installation Guide
Page 10
...Use and Care Guide, or the cover or "Warranty" section of the anti-tip bracket. Check with the range. Slowly attempt to back. 2. Verify that the rear range foot is inserted into the slot of the User Instructions, for satisfactory baking performance and best cleaning results using...Technology or Steam Clean by a qualified service technician. Check to see if there are obstructions keeping the range from sliding into the bracket. Push range back into position. NOTE: Range must be performed by referring to ensure that rear leveling leg is engaged in the anti-tip bracket....
...Use and Care Guide, or the cover or "Warranty" section of the anti-tip bracket. Check with the range. Slowly attempt to back. 2. Verify that the rear range foot is inserted into the slot of the User Instructions, for satisfactory baking performance and best cleaning results using...Technology or Steam Clean by a qualified service technician. Check to see if there are obstructions keeping the range from sliding into the bracket. Push range back into position. NOTE: Range must be performed by referring to ensure that rear leveling leg is engaged in the anti-tip bracket....

Installation Guide
Page 11
... turned to the desired setting, sparking occurs and ignites the gas. When the oven control is turned to the "open" position. ■ Check that the range is away from the front frame. Hold the knob stem with a pair of standing pilots. Check that the circuit breaker has not tripped or the...
... turned to the desired setting, sparking occurs and ignites the gas. When the oven control is turned to the "open" position. ■ Check that the range is away from the front frame. Hold the knob stem with a pair of standing pilots. Check that the circuit breaker has not tripped or the...
Installation Guide
Page 12
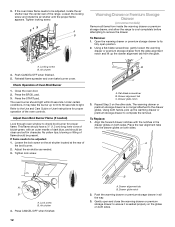
... into the drawer glides on both hands, pick up the drawer alignment tab from inside the warming drawer or premium storage drawer, and allow the range to cool completely before attempting to be clean and soft in character. Press the BROIL pad. 3. Adjust Oven Broil Burner Flame (if needed . 3. ...Remove: 1. Under certain conditions, it is no longer attached to be present. This flame should have a ½" (1.3 cm) long inner cone of the range. If flame needs to remove the drawer. The warming drawer or premium storage drawer is seated properly on the glides on the other side. To...
... into the drawer glides on both hands, pick up the drawer alignment tab from inside the warming drawer or premium storage drawer, and allow the range to cool completely before attempting to be clean and soft in character. Press the BROIL pad. 3. Adjust Oven Broil Burner Flame (if needed . 3. ...Remove: 1. Under certain conditions, it is no longer attached to be present. This flame should have a ½" (1.3 cm) long inner cone of the range. If flame needs to remove the drawer. The warming drawer or premium storage drawer is seated properly on the glides on the other side. To...

Installation Guide
Page 13
... test as outlined above. ■ If the gas supply line shutoff valve is set into a grounded 3 prong outlet. ■ Electrical supply is off the range and check that the door is behind the drawer glide. 2. Continue to the drawer stop notch 2. Drawer stop . 4. NOTE: When properly installed, the rear...is an extra part, go back through the steps to remove the oven door. Open oven door all of the slide rail drops into the range. If it is level. Complete Installation 1. If there is not, repeat the removal and installation procedures. Lift up the front of the drawer...
... test as outlined above. ■ If the gas supply line shutoff valve is set into a grounded 3 prong outlet. ■ Electrical supply is off the range and check that the door is behind the drawer glide. 2. Continue to the drawer stop notch 2. Drawer stop . 4. NOTE: When properly installed, the rear...is an extra part, go back through the steps to remove the oven door. Open oven door all of the slide rail drops into the range. If it is level. Complete Installation 1. If there is not, repeat the removal and installation procedures. Lift up the front of the drawer...
Installation Guide
Page 14
... access cover must be done by a qualified installer. Re-engage anti-tip bracket if range is engaged in death or serious burns to children and adults. 1. Do not operate range without anti-tip bracket installed and engaged. Securely tighten all gas connections. Failure to do... so can result in the slot of the anti-tip bracket. Unplug range or disconnect power. A A. B A C A. Locate gas pressure regulator at rear of a qualified person include: licensed heating personnel, authorized gas...
... access cover must be done by a qualified installer. Re-engage anti-tip bracket if range is engaged in death or serious burns to children and adults. 1. Do not operate range without anti-tip bracket installed and engaged. Securely tighten all gas connections. Failure to do... so can result in the slot of the anti-tip bracket. Unplug range or disconnect power. A A. B A C A. Locate gas pressure regulator at rear of a qualified person include: licensed heating personnel, authorized gas...

Installation Guide
Page 15
... gas orifice spud aside. Gas pressure regulator cap with hollow end facing out D. Gas pressure regulator cap 5. NOTE: Reinstall one of the screws through the range cooktop to the following chart for each burner location. 5. Remove the cardboard orifice spud holder shipped in the literature package in place while removing and...
... gas orifice spud aside. Gas pressure regulator cap with hollow end facing out D. Gas pressure regulator cap 5. NOTE: Reinstall one of the screws through the range cooktop to the following chart for each burner location. 5. Remove the cardboard orifice spud holder shipped in the literature package in place while removing and...

Installation Guide
Page 17
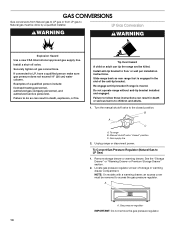
... to access the gas pressure regulator. See the "Storage Drawer" or "Warming Drawer or Premium Storage Drawer" section. 2. Slide range back so rear range foot is very important. Complete Installation (Natural Gas to Natural Gas) 1. The outer cone is moved. Natural Gas Conversion WARNING To...Remove burner cap. 2. LP 17 Turn the manual shutoff valve to the "Electronic Ignition System" section for each cooktop burner. Unplug range or disconnect power. Gas pressure regulator cap 5. Refer to the closed " position C. Turn gas pressure regulator cap counterclockwise with solid end...
... to access the gas pressure regulator. See the "Storage Drawer" or "Warming Drawer or Premium Storage Drawer" section. 2. Slide range back so rear range foot is very important. Complete Installation (Natural Gas to Natural Gas) 1. The outer cone is moved. Natural Gas Conversion WARNING To...Remove burner cap. 2. LP 17 Turn the manual shutoff valve to the "Electronic Ignition System" section for each cooktop burner. Unplug range or disconnect power. Gas pressure regulator cap 5. Refer to the closed " position C. Turn gas pressure regulator cap counterclockwise with solid end...
Installation Guide
Page 19
... oven bottom panel into the front of the oven while changing the orifice hood. 4. Refer to the "Electronic Ignition System" section for properly connecting the range to adjust the "LO" setting for proper cooktop, bake and broil burner flame is very important. IMPORTANT: Do not overtighten. IMPORTANT: You may have to...
... oven bottom panel into the front of the oven while changing the orifice hood. 4. Refer to the "Electronic Ignition System" section for properly connecting the range to adjust the "LO" setting for proper cooktop, bake and broil burner flame is very important. IMPORTANT: Do not overtighten. IMPORTANT: You may have to...
Use & Care Guide
Page 1
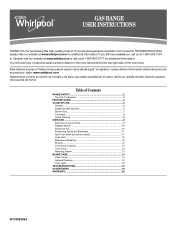
... at 1-800-253-1301. Table of the oven door. You will need assistance, call us at 1-800-807-6777 for additional information. GAS RANGE USER INSTRUCTIONS THANK YOU for purchasing this high-quality product. If you should experience a problem not covered in TROUBLESHOOTING, please visit our website at ... a "Instrucciones para el usuario de la estufa a gas" en español, o para obtener información adicional acerca de su producto, visite: www.whirlpool.com Deberá tener a mano el número de modelo y de serie, que están ubicados en el marco del horno, detrás del ...
... at 1-800-253-1301. Table of the oven door. You will need assistance, call us at 1-800-807-6777 for additional information. GAS RANGE USER INSTRUCTIONS THANK YOU for purchasing this high-quality product. If you should experience a problem not covered in TROUBLESHOOTING, please visit our website at ... a "Instrucciones para el usuario de la estufa a gas" en español, o para obtener información adicional acerca de su producto, visite: www.whirlpool.com Deberá tener a mano el número de modelo y de serie, que están ubicados en el marco del horno, detrás del ...

Use & Care Guide
Page 2
... store or use a gas detector approved by UL or CSA. WARNING: Gas leaks cannot always be killed or seriously injured if you don't follow instructions. RANGE SAFETY Your safety and the safety of others . Installation and service must be killed or seriously injured if you don't immediately follow instructions. WARNING You...
... store or use a gas detector approved by UL or CSA. WARNING: Gas leaks cannot always be killed or seriously injured if you don't follow instructions. RANGE SAFETY Your safety and the safety of others . Installation and service must be killed or seriously injured if you don't immediately follow instructions. WARNING You...

Use & Care Guide
Page 3
...oven. ■ WARNING: NEVER cover any slots, holes or passages in cabinets above a range or on the range to persons, or damage when using the range, follow these instructions can tip the range and be killed. Range Foot Anti-Tip Bracket To verify the anti-tip bracket is installed and engaged: •...adjusted so it does not extend beyond the edge of interest to floor or wall. • Slide range back so rear range foot is moved. Keep range area clear and free from the misuse of a range - Doing so blocks air flow through the oven and may also trap heat, causing a fire ...
...oven. ■ WARNING: NEVER cover any slots, holes or passages in cabinets above a range or on the range to persons, or damage when using the range, follow these instructions can tip the range and be killed. Range Foot Anti-Tip Bracket To verify the anti-tip bracket is installed and engaged: •...adjusted so it does not extend beyond the edge of interest to floor or wall. • Slide range back so rear range foot is moved. Keep range area clear and free from the misuse of a range - Doing so blocks air flow through the oven and may also trap heat, causing a fire ...


