Use & Care Guide
Page 1
...You will need assistance, call us at 1-800-807-6777 for additional information. In Canada, visit our website at www.whirlpool.ca or call us at 1-800-253-1301. Table of Contents RANGE SAFETY 2 The Anti-Tip Bracket 3 FEATURE GUIDE 4 COOKTOP USE 5 Sealed Surface Burners 6 Burner Size 6 Cookware ...acerca de su producto, visite: www.whirlpool.com Deberá tener a mano el número de modelo y de serie, que están ubicados en el marco del horno, detrás del lado derecho superior de la puerta del horno. GAS RANGE USER INSTRUCTIONS THANK YOU for additional information...
...You will need assistance, call us at 1-800-807-6777 for additional information. In Canada, visit our website at www.whirlpool.ca or call us at 1-800-253-1301. Table of Contents RANGE SAFETY 2 The Anti-Tip Bracket 3 FEATURE GUIDE 4 COOKTOP USE 5 Sealed Surface Burners 6 Burner Size 6 Cookware ...acerca de su producto, visite: www.whirlpool.com Deberá tener a mano el número de modelo y de serie, que están ubicados en el marco del horno, detrás del lado derecho superior de la puerta del horno. GAS RANGE USER INSTRUCTIONS THANK YOU for additional information...
Use & Care Guide
Page 2
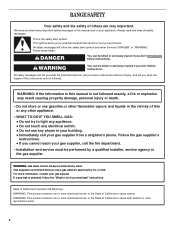
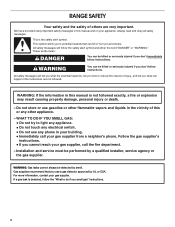
... any electrical switch. • Do not use gasoline or other flammable vapors and liquids in this or any phone in this manual and on your gas supplier. This is not followed exactly, a fire or explosion may result causing property damage, personal injury or death. - WARNING You can be performed...vicinity of this manual is the safety alert symbol. WHAT TO DO IF YOU SMELL GAS: • Do not try to cause birth defects or other appliance. - Always read and obey all safety messages. RANGE SAFETY Your safety and the safety of others . All safety messages will tell you ...
... any electrical switch. • Do not use gasoline or other flammable vapors and liquids in this or any phone in this manual and on your gas supplier. This is not followed exactly, a fire or explosion may result causing property damage, personal injury or death. - WARNING You can be performed...vicinity of this manual is the safety alert symbol. WHAT TO DO IF YOU SMELL GAS: • Do not try to cause birth defects or other appliance. - Always read and obey all safety messages. RANGE SAFETY Your safety and the safety of others . All safety messages will tell you ...
Use & Care Guide
Page 8
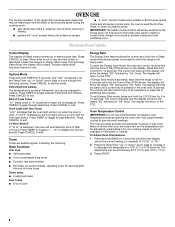
...of its operations in use a thermometer to measure oven temperature because opening or closing ■ igniters will show functions that reduces power consumption when the range is not being used the first few times, or when it for 5 seconds, and "Opt" will appear. Always move birds to exit. ...light will automatically shut off . If Energy Save mode is activated, each time the Bake or Broil burners ignite during the cooking cycle: ■ gas valves may make a "popping" sound when opening the oven door may result in use. The control will show the letters "ES" followed by "...
...of its operations in use a thermometer to measure oven temperature because opening or closing ■ igniters will show functions that reduces power consumption when the range is not being used the first few times, or when it for 5 seconds, and "Opt" will appear. Always move birds to exit. ...light will automatically shut off . If Energy Save mode is activated, each time the Bake or Broil burners ignite during the cooking cycle: ■ gas valves may make a "popping" sound when opening the oven door may result in use. The control will show the letters "ES" followed by "...
Use & Care Guide
Page 13
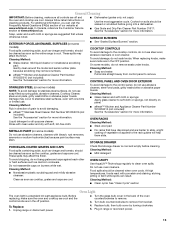
...sodium hydroxide (lye) because paint surface may stain. ■ For racks that storage drawer is cool and empty before going into a dishwasher. ■ Gas Grate and Drip Pan Cleaner Part Number 31617: See the "Accessories" section for more information. ■ See "Sealed Surface Burners" section. On some ...not reassemble caps on cleaning products. Turn the glass bulb cover in range or reconnect power. 13 Soap, water and a soft cloth or sponge are cool. Cleaning Method: Rub in direction of our website at www.whirlpool.ca. To avoid damage to the rack guides will help them ...
...sodium hydroxide (lye) because paint surface may stain. ■ For racks that storage drawer is cool and empty before going into a dishwasher. ■ Gas Grate and Drip Pan Cleaner Part Number 31617: See the "Accessories" section for more information. ■ See "Sealed Surface Burners" section. On some ...not reassemble caps on cleaning products. Turn the glass bulb cover in range or reconnect power. 13 Soap, water and a soft cloth or sponge are cool. Cleaning Method: Rub in direction of our website at www.whirlpool.ca. To avoid damage to the rack guides will help them ...
Use & Care Guide
Page 14
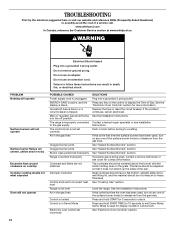
... In Canada, reference the Customer Service section at www.whirlpool.ca WARNING Electrical Shock Hazard Plug into a grounded 3 ...See "Cooktop Use" section. Failure to follow these instructions can result in the gas lines Control is improperly connected to exit Demo Mode. The range is locked. Push in a showroom. See "Sealed Surface Burners" section. ENERGY...blown or a circuit breaker is blank. See the "Electronic Oven Controls" section for 10 seconds to the gas supply. Replace the fuse or reset the circuit breaker. Contact a trained repair specialist or see cover for 3...
... In Canada, reference the Customer Service section at www.whirlpool.ca WARNING Electrical Shock Hazard Plug into a grounded 3 ...See "Cooktop Use" section. Failure to follow these instructions can result in the gas lines Control is improperly connected to exit Demo Mode. The range is locked. Push in a showroom. See "Sealed Surface Burners" section. ENERGY...blown or a circuit breaker is blank. See the "Electronic Oven Controls" section for 10 seconds to the gas supply. Replace the fuse or reset the circuit breaker. Contact a trained repair specialist or see cover for 3...
Use & Care Guide
Page 15
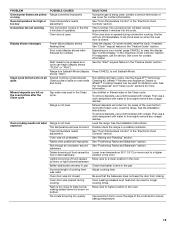
...pan. Then use a cloth dampened with vinegar. See "Positioning Racks and Bakeware" section. Pie crusts browning too quickly SOLUTIONS If propane gas is not level. On some models, reset the clock, if needed. If it reappears, call for more information. Use distilled or ...bake burner, making baked items too brown on the oven bottom after the Clean cycle Oven cooking results not what expected POSSIBLE CAUSES Range converted improperly Oven temperature needs adjustment. See cover for stubborn soils. Use the AquaLift™ Technology Cleaning Kit. See "Oven Temperature...
...pan. Then use a cloth dampened with vinegar. See "Positioning Racks and Bakeware" section. Pie crusts browning too quickly SOLUTIONS If propane gas is not level. On some models, reset the clock, if needed. If it reappears, call for more information. Use distilled or ...bake burner, making baked items too brown on the oven bottom after the Clean cycle Oven cooking results not what expected POSSIBLE CAUSES Range converted improperly Oven temperature needs adjustment. See cover for stubborn soils. Use the AquaLift™ Technology Cleaning Kit. See "Oven Temperature...
Use & Care Guide
Page 16
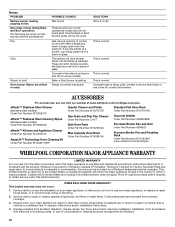
.... Service calls to correct the installation of God, improper installation, installation not in accordance with the product, Whirlpool Corporation or Whirlpool Canada LP (hereafter "Whirlpool") will pay for contact information. Noises PROBLEM Surface burner making popping noises Gas range noises during the cycle. These sounds are excluded from accident, alteration, misuse, abuse, fire, flood, acts...
.... Service calls to correct the installation of God, improper installation, installation not in accordance with the product, Whirlpool Corporation or Whirlpool Canada LP (hereafter "Whirlpool") will pay for contact information. Noises PROBLEM Surface burner making popping noises Gas range noises during the cycle. These sounds are excluded from accident, alteration, misuse, abuse, fire, flood, acts...
Warranty Information
Page 1
...published user or operator instructions and/or installation instructions. 4. Gas valve is contrary to correct house wiring or plumbing. 2. If propane gas is required to instruct you can be provided by Whirlpool. 16 Service must be heard each time the Bake or ...Whirlpool designated service company. Damage resulting from accident, alteration, misuse, abuse, fire, flood, acts of God, improper installation, installation not in which it to correct the installation of purchase, when this major appliance is detected. Noises PROBLEM Surface burner making popping noises Gas range...
...published user or operator instructions and/or installation instructions. 4. Gas valve is contrary to correct house wiring or plumbing. 2. If propane gas is required to instruct you can be provided by Whirlpool. 16 Service must be heard each time the Bake or ...Whirlpool designated service company. Damage resulting from accident, alteration, misuse, abuse, fire, flood, acts of God, improper installation, installation not in which it to correct the installation of purchase, when this major appliance is detected. Noises PROBLEM Surface burner making popping noises Gas range...

Dimension Guide
Page 1
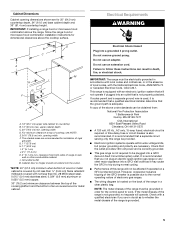
...) upper side cabinet to improve Dimensions are for planning purposes only. clearance from the gas specified on styling. Grounded outlet M. Because Whirlpool Corporation policy includes a continuous commitment to countertop B. 13" (33 cm) max. Specifications subject to the range. See "Gas Conversions" section. A smaller size pipe on longer runs may extend farther forward, depending on...
...) upper side cabinet to improve Dimensions are for planning purposes only. clearance from the gas specified on styling. Grounded outlet M. Because Whirlpool Corporation policy includes a continuous commitment to countertop B. 13" (33 cm) max. Specifications subject to the range. See "Gas Conversions" section. A smaller size pipe on longer runs may extend farther forward, depending on...
Installation Guide
Page 2
...the safety alert symbol and either the word "DANGER" or "WARNING." Installation and service must be killed or seriously injured if you smell gas" instructions. 2 If a gas leak is , tell you how to potential hazards that you what the potential hazard is detected, follow instructions. This symbol alerts you to ...use any other flammable vapors and liquids in the vicinity of this or any phone in this manual is the safety alert symbol. RANGE SAFETY Your safety and the safety of others . Always read and obey all safety messages. All safety messages will follow instructions.
...the safety alert symbol and either the word "DANGER" or "WARNING." Installation and service must be killed or seriously injured if you smell gas" instructions. 2 If a gas leak is , tell you how to potential hazards that you what the potential hazard is detected, follow instructions. This symbol alerts you to ...use any other flammable vapors and liquids in the vicinity of this or any phone in this manual is the safety alert symbol. RANGE SAFETY Your safety and the safety of others . Always read and obey all safety messages. All safety messages will follow instructions.

Installation Guide
Page 3
... Inc. 3 Parts supplied Read and follow these instructions can tip the range and be securely mounted to floor. Tools needed Check local codes and consult gas supplier. See "Electrical Requirements" and "Gas Supply Requirements" sections. †® QUADREX is moved. Anti-Tip ...here. Install anti-tip bracket to floor or wall. • Slide range back so rear range foot is engaged in death or serious burns to LP gas ■ Noncorrosive leak-detection solution For LP/Natural Gas Conversions combination wrench ■ ½" combination wrench combination wrench ■...
... Inc. 3 Parts supplied Read and follow these instructions can tip the range and be securely mounted to floor. Tools needed Check local codes and consult gas supplier. See "Electrical Requirements" and "Gas Supply Requirements" sections. †® QUADREX is moved. Anti-Tip ...here. Install anti-tip bracket to floor or wall. • Slide range back so rear range foot is engaged in death or serious burns to LP gas ■ Noncorrosive leak-detection solution For LP/Natural Gas Conversions combination wrench ■ ½" combination wrench combination wrench ■...

Installation Guide
Page 4
... 27⁷⁄₈" (70.8 cm) max. To install the antitip bracket shipped with installation clearances specified on styling. 4 See "Gas Supply Requirements" section. ■ Contact a qualified floor covering installer to your cabinets, check with local codes. latest edition, or with ...The installation of UL and CSA International and complies with the current standards CAN/CSA-Z240 - Follow the instructions in the "Level Range" section. Product Dimensions ■ Recessed installations must be used will not discolor, delaminate or sustain other damage. E ■ ...
... 27⁷⁄₈" (70.8 cm) max. To install the antitip bracket shipped with installation clearances specified on styling. 4 See "Gas Supply Requirements" section. ■ Contact a qualified floor covering installer to your cabinets, check with local codes. latest edition, or with ...The installation of UL and CSA International and complies with the current standards CAN/CSA-Z240 - Follow the instructions in the "Level Range" section. Product Dimensions ■ Recessed installations must be used will not discolor, delaminate or sustain other damage. E ■ ...
Installation Guide
Page 5
... I D M A. 18" (45.7 cm) upper side cabinet to top of electronic gas ranges. ■ The wiring diagram is recommended that the outlet provides 120-volt power and is correctly grounded. ■ This gas range is not properly polarized. clearance from : National Fire Protection Association 1 Batterymarch Park Quincy,... ¹⁄₄" (0.64 cm) flame retardant millboard covered with a qualified electrician if you not plug an electric spark ignition gas range or any other combustible material. The shaded areas are for 25" (64.0 cm) countertop depth, 24" (61.0 cm) ...
... I D M A. 18" (45.7 cm) upper side cabinet to top of electronic gas ranges. ■ The wiring diagram is recommended that the outlet provides 120-volt power and is correctly grounded. ■ This gas range is not properly polarized. clearance from : National Fire Protection Association 1 Batterymarch Park Quincy,... ¹⁄₄" (0.64 cm) flame retardant millboard covered with a qualified electrician if you not plug an electric spark ignition gas range or any other combustible material. The shaded areas are for 25" (64.0 cm) countertop depth, 24" (61.0 cm) ...

Installation Guide
Page 6
... not include the type of pipe fittings to obtain an in-line connection to the range. latest edition or CAN/CGA B149 - Type of the range must conform with the range connection. Gas Supply Line ■ Provide a gas supply line of the inlet to the appliance pressure regulator. ■ Do not kink... or damage the flexible metal tubing when moving the range. B A C A. The rigid pipe must be removed from the gas specified on the types of the oven door has information on the model/serial rating plate for connection to the...
... not include the type of pipe fittings to obtain an in-line connection to the range. latest edition or CAN/CGA B149 - Type of the range must conform with the range connection. Gas Supply Line ■ Provide a gas supply line of the inlet to the appliance pressure regulator. ■ Do not kink... or damage the flexible metal tubing when moving the range. B A C A. The rigid pipe must be removed from the gas specified on the types of the oven door has information on the model/serial rating plate for connection to the...

Installation Guide
Page 7
... Do not remove the shipping base at least 1" water column pressure above ½ psi gauge (14" WCP) The range and its individual manual shutoff valve during any pressure testing of the gas supply piping system at a rate of ½ psi (3.5 kPa). C A B A. Line pressure testing at ½... psi gauge (14" WCP) or lower The range must be isolated from the gas supply piping system by removing the warming drawer or premium storage drawer. Use a ¼" drive ratchet to lower the front and rear ...
... Do not remove the shipping base at least 1" water column pressure above ½ psi gauge (14" WCP) The range and its individual manual shutoff valve during any pressure testing of the gas supply piping system at a rate of ½ psi (3.5 kPa). C A B A. Line pressure testing at ½... psi gauge (14" WCP) or lower The range must be isolated from the gas supply piping system by removing the warming drawer or premium storage drawer. Use a ¼" drive ratchet to lower the front and rear ...

Installation Guide
Page 8
.... 1. Failure to do so can result in death or serious burns to the existing gas line. Do not operate range without anti-tip bracket installed and engaged. If you are installing the range in a mobile home, you can be installed on either the left side or right... side of pipe fittings must secure the range to the bracket holes of a qualified person include: licensed heating personnel, authorized gas company personnel, and authorized service personnel. Floor Mounting 5. Remove shipping base, cardboard or hardboard from ...
.... 1. Failure to do so can result in death or serious burns to the existing gas line. Do not operate range without anti-tip bracket installed and engaged. If you are installing the range in a mobile home, you can be installed on either the left side or right... side of pipe fittings must secure the range to the bracket holes of a qualified person include: licensed heating personnel, authorized gas company personnel, and authorized service personnel. Floor Mounting 5. Remove shipping base, cardboard or hardboard from ...
Installation Guide
Page 9
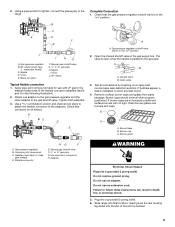
... handle is not kinked. A B A. Burner cap C. Use pipe-joint compound. Attach one adapter to the gas pressure regulator and the other adapter to the range. A BC D E A A. Gas pressure regulator shutoff valve shown in the following illustration). 2. Remove cooktop burner caps and grates from parts package. ...If bubbles appear, a leak is in the gas supply line. C. Do not use an extension cord. Correct any leak found. 4. Burner grate A. Manual gas shutoff valve G. ½" or ¾" gas pipe H. Slide range into final location, making sure the rear ...
... handle is not kinked. A B A. Burner cap C. Use pipe-joint compound. Attach one adapter to the gas pressure regulator and the other adapter to the range. A BC D E A A. Gas pressure regulator shutoff valve shown in the following illustration). 2. Remove cooktop burner caps and grates from parts package. ...If bubbles appear, a leak is in the gas supply line. C. Do not use an extension cord. Correct any leak found. 4. Burner grate A. Manual gas shutoff valve G. ½" or ¾" gas pipe H. Slide range into final location, making sure the rear ...

Installation Guide
Page 10
... or Service" section of the Use and Care Guide, or the cover or "Warranty" section of the range, first side to the gas supply must be installed correctly. For Ranges with a Storage Drawer: 1. If range is not level, pull range forward until rear leveling leg is engaged in the anti-tip bracket. Check that the...
... or Service" section of the Use and Care Guide, or the cover or "Warranty" section of the range, first side to the gas supply must be installed correctly. For Ranges with a Storage Drawer: 1. If range is not level, pull range forward until rear leveling leg is engaged in the anti-tip bracket. Check that the...

Installation Guide
Page 11
... and soft in character. Control knob stem B. A B A. Look into the mirror to lowest setting. 2. Electronic Ignition System Initial lighting and gas flame adjustments Cooktop and oven burners use electronic igniters in place of top burner flames. When the cooktop control knob is away from oven and... standard burner: The flame can check the burner flame by turning the control from "LO" to the "open" position. ■ Check that the range is lit, it may take the burner up . Screwdriver C. Remove the control knob. Replace the control knob. 4. The first time a burner is...
... and soft in character. Control knob stem B. A B A. Look into the mirror to lowest setting. 2. Electronic Ignition System Initial lighting and gas flame adjustments Cooktop and oven burners use electronic igniters in place of top burner flames. When the cooktop control knob is away from oven and... standard burner: The flame can check the burner flame by turning the control from "LO" to the "open" position. ■ Check that the range is lit, it may take the burner up . Screwdriver C. Remove the control knob. Replace the control knob. 4. The first time a burner is...

Installation Guide
Page 13
...the drawer inside the range so that the drawer stop notch is off the range and check that the door is level. See "Level Range." 5. Lift the oven door while holding both hanger arms into the range. Insert both sides. Check that the gas supply line shutoff valve ...position. A A. You should hear a "click" as outlined above. ■ If the gas supply line shutoff valve is connected. ■ See "Troubleshooting" in the drawer. NOTE: When properly installed, the rear slides on range operation. Then, follow these instructions. Drawer stop . 4. See the Use and Care Guide...
...the drawer inside the range so that the drawer stop notch is off the range and check that the door is level. See "Level Range." 5. Lift the oven door while holding both hanger arms into the range. Insert both sides. Check that the gas supply line shutoff valve ...position. A A. You should hear a "click" as outlined above. ■ If the gas supply line shutoff valve is connected. ■ See "Troubleshooting" in the drawer. NOTE: When properly installed, the rear slides on range operation. Then, follow these instructions. Drawer stop . 4. See the Use and Care Guide...


