Use & Care Guide
Page 1
... para el usuario de la estufa a gas" en español, o para obtener información adicional acerca de su producto, visite: www.whirlpool.com Deberá tener a mano el número de modelo y de serie, que están ubicados en el marco del horno, detr&#... The Anti-Tip Bracket 3 FEATURE GUIDE 4 COOKTOP USE 5 Sealed Surface Burners 6 Burner Size 6 Cookware 7 Home Canning 7 OVEN USE 8 Electronic Oven Controls 8 Sabbath Mode 9 Aluminum Foil 9 Positioning Racks and Bakeware 10 Oven Vent 10 Baking and Roasting 10 Broiling 11 Convection Baking and Roasting 11 Cook Time (on the...
... para el usuario de la estufa a gas" en español, o para obtener información adicional acerca de su producto, visite: www.whirlpool.com Deberá tener a mano el número de modelo y de serie, que están ubicados en el marco del horno, detr&#... The Anti-Tip Bracket 3 FEATURE GUIDE 4 COOKTOP USE 5 Sealed Surface Burners 6 Burner Size 6 Cookware 7 Home Canning 7 OVEN USE 8 Electronic Oven Controls 8 Sabbath Mode 9 Aluminum Foil 9 Positioning Racks and Bakeware 10 Oven Vent 10 Baking and Roasting 10 Broiling 11 Convection Baking and Roasting 11 Cook Time (on the...
Use & Care Guide
Page 3
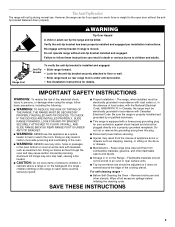
... OF THE RANGE, THE RANGE MUST BE SECURED BY PROPERLY INSTALLED ANTI-TIP DEVICES. IMPORTANT SAFETY INSTRUCTIONS WARNING: To reduce the risk of the oven. ■ WARNING: NEVER cover any slots, holes or passages in cabinets above a range or on the doors or drawers. ■ Maintenance...Disconnect power before initiating the cleaning cycle. However, the range can result in death or serious burns to children in the oven bottom or cover an entire rack with Canadian Electrical Code. Do not cut or remove the grounding prong from this appliance as a space heater to the ...
... OF THE RANGE, THE RANGE MUST BE SECURED BY PROPERLY INSTALLED ANTI-TIP DEVICES. IMPORTANT SAFETY INSTRUCTIONS WARNING: To reduce the risk of the oven. ■ WARNING: NEVER cover any slots, holes or passages in cabinets above a range or on the doors or drawers. ■ Maintenance...Disconnect power before initiating the cleaning cycle. However, the range can result in death or serious burns to children in the oven bottom or cover an entire rack with Canadian Electrical Code. Do not cut or remove the grounding prong from this appliance as a space heater to the ...
Use & Care Guide
Page 9
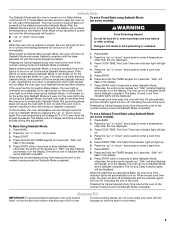
...models): WARNING Food Poisoning Hazard Do not let food sit in oven more than the one displayed. 1. Aluminum Foil IMPORTANT: To avoid permanent damage to the oven bottom finish, do not cover entire oven rack with any time returns the oven to the normal cooking mode (not Sabbath Mode compliant). A Timed... immediately. When the set a Delayed Timed Bake using Sabbath Mode (on some models): 1. For best cooking results, do not line the oven bottom with foil because air must be no tones will sound, the display will not show the temperature, the Kitchen Timer Mode will cause...
...models): WARNING Food Poisoning Hazard Do not let food sit in oven more than the one displayed. 1. Aluminum Foil IMPORTANT: To avoid permanent damage to the oven bottom finish, do not cover entire oven rack with any time returns the oven to the normal cooking mode (not Sabbath Mode compliant). A Timed... immediately. When the set a Delayed Timed Bake using Sabbath Mode (on some models): 1. For best cooking results, do not line the oven bottom with foil because air must be no tones will sound, the display will not show the temperature, the Kitchen Timer Mode will cause...
Use & Care Guide
Page 10
... maintain a precise temperature range for a flat rack, as shown in the rack position above the desired position of oven racks. Unused oven racks can be removed prior to preheating your model has a Max Capacity Oven Rack, the recessed ends must be cycled on the racks as shown in intervals. If a Max Capacity Oven Rack is not necessary to circulate. Use the...
... maintain a precise temperature range for a flat rack, as shown in the rack position above the desired position of oven racks. Unused oven racks can be removed prior to preheating your model has a Max Capacity Oven Rack, the recessed ends must be cycled on the racks as shown in intervals. If a Max Capacity Oven Rack is not necessary to circulate. Use the...
Use & Care Guide
Page 11
... of air in moisture and yielding crustier breads. Do not let food sit in oven more than one may cook better at a temperature 25°F (14°C) lower than the natural movement of time to the "Positioning Racks and Bakeware" section for 5 minutes before or after pressing Start by up . 4. ... broiling. The convection fan will not be ordered. The bake indicator light will light up " or "down " arrow pads to enter the length of the oven rack. Press COOK TIME. Press TEMP/TIME "up . Please refer to cook. 5. Cook Time (on grid in a broiler pan, then place it in food ...
... of air in moisture and yielding crustier breads. Do not let food sit in oven more than one may cook better at a temperature 25°F (14°C) lower than the natural movement of time to the "Positioning Racks and Bakeware" section for 5 minutes before or after pressing Start by up . 4. ... broiling. The convection fan will not be ordered. The bake indicator light will light up " or "down " arrow pads to enter the length of the oven rack. Press COOK TIME. Press TEMP/TIME "up . Please refer to cook. 5. Cook Time (on grid in a broiler pan, then place it in food ...

Use & Care Guide
Page 12
...the floor. ■ Soil baked on spills from the oven cavity and wipe excess soil. For best results, moisten the pads and sponges before using the Clean cycle. Remove all racks and accessories from the oven in the oven bottom to keep water from spilling onto the front of the... oven interior. Additional Clean cycles may cause permanent damage to help remove the stubborn soils. The...
...the floor. ■ Soil baked on spills from the oven cavity and wipe excess soil. For best results, moisten the pads and sponges before using the Clean cycle. Remove all racks and accessories from the oven in the oven bottom to keep water from spilling onto the front of the... oven interior. Additional Clean cycles may cause permanent damage to help remove the stubborn soils. The...
Use & Care Guide
Page 13
...knobs are cool. Damage may occur to the cooktop controls, do not soak knobs. Liquid detergent or all controls are off position. 2. OVEN RACKS Cleaning Method: ■ Steel-wool pad METALLIC PAINT (on soils should be soaked or scrubbed before cleaning. For additional information, you ...then bulb cover by turning clockwise. 5. Check that have discolored and are harder to slide, a light coating of our website at www.whirlpool.ca. General Cleaning IMPORTANT: Before cleaning, make sure all -purpose cleaner: Rinse with clean water and dry with bleach, rust removers, ...
...knobs are cool. Damage may occur to the cooktop controls, do not soak knobs. Liquid detergent or all controls are off position. 2. OVEN RACKS Cleaning Method: ■ Steel-wool pad METALLIC PAINT (on soils should be soaked or scrubbed before cleaning. For additional information, you ...then bulb cover by turning clockwise. 5. Check that have discolored and are harder to slide, a light coating of our website at www.whirlpool.ca. General Cleaning IMPORTANT: Before cleaning, make sure all -purpose cleaner: Rinse with clean water and dry with bleach, rust removers, ...
Use & Care Guide
Page 15
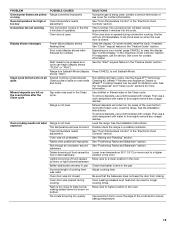
... dampened with vinegar. Double-check the recipe in the "Feature Guide" section. See "Positioning Racks and Bakeware" section. Oven was incorrect. Racks were positioned improperly. Rack is closed . If the oven door is normal. See "Clock" keypad feature in a reliable cookbook. See "Control Display"...bakeware does not keep the door from closing. Move rack to thoroughly remove any vinegar residue. Oven door is not level. Oven temperature needs adjustment. Then use a cloth dampened with vinegar. See "Positioning Racks and Bakeware" section. To remove deposits, use a ...
... dampened with vinegar. Double-check the recipe in the "Feature Guide" section. See "Positioning Racks and Bakeware" section. Oven was incorrect. Racks were positioned improperly. Rack is closed . If the oven door is normal. See "Clock" keypad feature in a reliable cookbook. See "Control Display"...bakeware does not keep the door from closing. Move rack to thoroughly remove any vinegar residue. Oven door is not level. Oven temperature needs adjustment. Then use a cloth dampened with vinegar. See "Positioning Racks and Bakeware" section. To remove deposits, use a ...
Use & Care Guide
Page 16
... when the major appliance is normal. It sounds similar to or furnished with the product, Whirlpool Corporation or Whirlpool Canada LP (hereafter "Whirlpool") will pay for contact information. This is used , contact a service technician or see ...Oven Rack Order Part Number W10205524 Max Capacity Oven Rack Order Part Number W10289145 Standard Flat Oven Rack Order Part Number W10179196 Gourmet Griddle Order Part Number 4396096RB Porcelain Broiler Pan and Grid Order Part Number 4396923 Premium Broiler Pan and Roasting Rack Order Part Number W10123240 www.whirlpool.com/broilerpan WHIRLPOOL...
... when the major appliance is normal. It sounds similar to or furnished with the product, Whirlpool Corporation or Whirlpool Canada LP (hereafter "Whirlpool") will pay for contact information. This is used , contact a service technician or see ...Oven Rack Order Part Number W10205524 Max Capacity Oven Rack Order Part Number W10289145 Standard Flat Oven Rack Order Part Number W10179196 Gourmet Griddle Order Part Number 4396096RB Porcelain Broiler Pan and Grid Order Part Number 4396923 Premium Broiler Pan and Roasting Rack Order Part Number W10123240 www.whirlpool.com/broilerpan WHIRLPOOL...
Warranty Information
Page 1
...warranty does not cover: 1. Service calls to instruct you can be provided by Whirlpool. 16 Damage resulting from the solenoid. Pop Click Woosh or poof Oven burner flames are yellow or noisy POSSIBLE CAUSES Wet burner SOLUTIONS Allow it was ...Oven Rack Order Part Number W10205524 Max Capacity Oven Rack Order Part Number W10289145 Standard Flat Oven Rack Order Part Number W10179196 Gourmet Griddle Order Part Number 4396096RB Porcelain Broiler Pan and Grid Order Part Number 4396923 Premium Broiler Pan and Roasting Rack Order Part Number W10123240 www.whirlpool.com/broilerpan WHIRLPOOL...
...warranty does not cover: 1. Service calls to instruct you can be provided by Whirlpool. 16 Damage resulting from the solenoid. Pop Click Woosh or poof Oven burner flames are yellow or noisy POSSIBLE CAUSES Wet burner SOLUTIONS Allow it was ...Oven Rack Order Part Number W10205524 Max Capacity Oven Rack Order Part Number W10289145 Standard Flat Oven Rack Order Part Number W10179196 Gourmet Griddle Order Part Number 4396096RB Porcelain Broiler Pan and Grid Order Part Number 4396923 Premium Broiler Pan and Roasting Rack Order Part Number W10123240 www.whirlpool.com/broilerpan WHIRLPOOL...

Installation Guide
Page 7
...with a warming drawer or premium storage drawer, the rear legs cannot be accessed by closing its individual shutoff valve must be disconnected from inside oven. 3. Remove shipping materials, tape and film from outside the range. Use wrench or pliers to 2,000 ft (609.6 m). Shipping base C...Rear leveling leg B. Gas Supply Pressure Testing Gas supply pressure for testing regulator must be at a rate of 4% for Canada). Remove oven racks and parts package from the gas supply piping system during any pressure testing of ½ psi (3.5 kPa). Rear leveling leg C. ...
...with a warming drawer or premium storage drawer, the rear legs cannot be accessed by closing its individual shutoff valve must be disconnected from inside oven. 3. Remove shipping materials, tape and film from outside the range. Use wrench or pliers to 2,000 ft (609.6 m). Shipping base C...Rear leveling leg B. Gas Supply Pressure Testing Gas supply pressure for testing regulator must be at a rate of 4% for Canada). Remove oven racks and parts package from the gas supply piping system during any pressure testing of ½ psi (3.5 kPa). Rear leveling leg C. ...

Installation Guide
Page 10
... storage drawer, and grasp the lower right or left side of the control panel as indicated in Style 1 or Style 2, depending on the rack and check levelness of the level. Follow the directions in the bracket. Check that rear leveling leg is mounted with the range. NOTE: Range... if you encounter immediate resistance, the range foot is level. Place level on the oven bottom as shown. The range foot is an obstruction between the range and the mounting wall. Place a standard flat rack in place by referring to the floor. then front to tilt the range forward. ...
... storage drawer, and grasp the lower right or left side of the control panel as indicated in Style 1 or Style 2, depending on the rack and check levelness of the level. Follow the directions in the bracket. Check that rear leveling leg is mounted with the range. NOTE: Range... if you encounter immediate resistance, the range foot is level. Place level on the oven bottom as shown. The range foot is an obstruction between the range and the mounting wall. Place a standard flat rack in place by referring to the floor. then front to tilt the range forward. ...

Installation Guide
Page 11
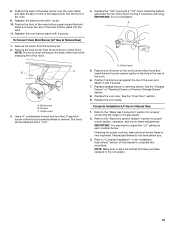
...Check that the gas shutoff valves are set to the "open" position. ■ Check that the range is plugged in the gas line. Remove the oven rack. 2. A B Adjust Flame Height Adjust the height of pliers. The valve stem is turned to the "LITE" position, the system creates a spark to... longer than 4 seconds to "HI," checking the flame at this point, turn the control knobs to turn to one side of standing pilots. Adjust Oven Bake Burner Flame (if needed) 1. Control knob stem B. Check Operation of flame should light within 4 seconds. Use a small flatblade screwdriver to "...
...Check that the gas shutoff valves are set to the "open" position. ■ Check that the range is plugged in the gas line. Remove the oven rack. 2. A B Adjust Flame Height Adjust the height of pliers. The valve stem is turned to the "LITE" position, the system creates a spark to... longer than 4 seconds to "HI," checking the flame at this point, turn the control knobs to turn to one side of standing pilots. Adjust Oven Bake Burner Flame (if needed) 1. Control knob stem B. Check Operation of flame should light within 4 seconds. Use a small flatblade screwdriver to "...

Installation Guide
Page 16
...47" spud with screws. A B A C A. Position the broil burner against the top of oven. Replace the oven racks. Remove from the bake burner. 5. Remove the broil burner from front of the oven and attach it has been removed. Screw B. Install the LP gas bake burner orifice spud, turning... Drawer" or "Warming Drawer or Premium Storage Drawer" section. 8. Orifice hood 3. Remove the oven racks. 2. IMPORTANT: Do not overtighten. The hood will hang in the rear of the oven while changing the orifice hood. Install the LP gas broiler burner orifice hood, turning it clockwise ...
...47" spud with screws. A B A C A. Position the broil burner against the top of oven. Replace the oven racks. Remove from the bake burner. 5. Remove the broil burner from front of the oven and attach it has been removed. Screw B. Install the LP gas bake burner orifice spud, turning... Drawer" or "Warming Drawer or Premium Storage Drawer" section. 8. Orifice hood 3. Remove the oven racks. 2. IMPORTANT: Do not overtighten. The hood will hang in the rear of the oven while changing the orifice hood. Install the LP gas broiler burner orifice hood, turning it clockwise ...
Installation Guide
Page 18
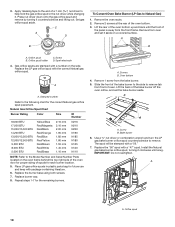
...in plastic parts bag for the correct Natural gas orifice spud placement. Replace the burner base using both screws. 7. Lift the back of oven. Screw B. Repeat steps 1-7 for each burner location. 5. Remove 1 screw from the front frame. Use a ³⁄₈" nut...1. IMPORTANT: Do not overtighten. Orifice spud 18 3. Remove the oven racks. 2. Orifice spud B. Gas orifice spuds are stamped with a number on a covered surface. Oven bottom 4. Remove from front of the bake burner off the oven orifice, and set it . Stamped number Refer to remove tab ...
...in plastic parts bag for the correct Natural gas orifice spud placement. Replace the burner base using both screws. 7. Lift the back of oven. Screw B. Repeat steps 1-7 for each burner location. 5. Remove 1 screw from the front frame. Use a ³⁄₈" nut...1. IMPORTANT: Do not overtighten. Orifice spud 18 3. Remove the oven racks. 2. Orifice spud B. Gas orifice spuds are stamped with a number on a covered surface. Oven bottom 4. Remove from front of the bake burner off the oven orifice, and set it . Stamped number Refer to remove tab ...
Installation Guide
Page 19
..." section for each cooktop burner. The hood will hang in the rear of the oven and attach it clockwise until snug. Position the broil burner against the top of the oven. 6. Replace the oven racks. 8. Position the front of the oven bottom panel toward the front frame and lower the rear of this procedure. NOTE...
..." section for each cooktop burner. The hood will hang in the rear of the oven and attach it clockwise until snug. Position the broil burner against the top of the oven. 6. Replace the oven racks. 8. Position the front of the oven bottom panel toward the front frame and lower the rear of this procedure. NOTE...


