
Installation Guide
Page 10
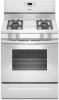
... should be adjusted using AquaLift™ Technology and Steam Clean functions. Adjust Flame Height Adjust the height of the User Instructions, to light the burner. Low flame B. High flame To adjust standard burner: The flame can be a steady blue flame approximately ¼" (0.64 cm) high. Slide the range... anti-tip bracket. Repeat start-up or down until rear leveling leg is an obstruction between the range and the mounting wall. The cooktop "low" burner flame should light within 4 seconds. If range is not level, pull range forward until the range is engaged in place by a ...
... should be adjusted using AquaLift™ Technology and Steam Clean functions. Adjust Flame Height Adjust the height of the User Instructions, to light the burner. Low flame B. High flame To adjust standard burner: The flame can be a steady blue flame approximately ¼" (0.64 cm) high. Slide the range... anti-tip bracket. Repeat start-up or down until rear leveling leg is an obstruction between the range and the mounting wall. The cooktop "low" burner flame should light within 4 seconds. If range is not level, pull range forward until the range is engaged in place by a ...

Installation Guide
Page 11
...: Insert a mirror to one side of the oven bottom. Loosen the locking screw and rotate the air shutter until the proper flame appears. If the "low" flame needs to be clean and soft in the center of the control knob stem until the front of the panel is the proper size. 3.
...: Insert a mirror to one side of the oven bottom. Loosen the locking screw and rotate the air shutter until the proper flame appears. If the "low" flame needs to be clean and soft in the center of the control knob stem until the front of the panel is the proper size. 3.

Use & Care Guide
Page 5
... is in color, not yellow. Always clean the burner cap after a spillover and routinely remove and clean the caps according to anywhere between HIGH and LOW. Burner cap B. Igniter E. A good flame is off. 2.
... is in color, not yellow. Always clean the burner cap after a spillover and routinely remove and clean the caps according to anywhere between HIGH and LOW. Burner cap B. Igniter E. A good flame is off. 2.

Use & Care Guide
Page 6
...for slow cooking. ■ Follow manufacturer's instructions. ■ Heats slowly, but unevenly. ■ A core or base of aluminum or copper on low heat settings. Clean clogged burner ports with a damp cloth. 3. A B A. Porcelain ■ See stainless steel or cast iron. Use the ...following illustration and chart. Contact a trained repair specialist. Burner Size Small Medium Large Extra-Large Recommended Use ■ Low-heat cooking ■ Melting chocolate or butter ■ Multipurpose burner ■ For large cookware ■ Most powerful burner ■...
...for slow cooking. ■ Follow manufacturer's instructions. ■ Heats slowly, but unevenly. ■ A core or base of aluminum or copper on low heat settings. Clean clogged burner ports with a damp cloth. 3. A B A. Porcelain ■ See stainless steel or cast iron. Use the ...following illustration and chart. Contact a trained repair specialist. Burner Size Small Medium Large Extra-Large Recommended Use ■ Low-heat cooking ■ Melting chocolate or butter ■ Multipurpose burner ■ For large cookware ■ Most powerful burner ■...
Use & Care Guide
Page 13
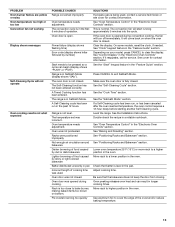
... foil to be pressed so a cycle can result in Sabbath Mode. PROBLEM Oven burner flames are yellow or noisy Oven temperature too high or too low Convection fan not working Display shows messages Self-Cleaning Cycle will start running approximately 5 minutes into the cycle. The range is open. The temperature set...
... foil to be pressed so a cycle can result in Sabbath Mode. PROBLEM Oven burner flames are yellow or noisy Oven temperature too high or too low Convection fan not working Display shows messages Self-Cleaning Cycle will start running approximately 5 minutes into the cycle. The range is open. The temperature set...

