
Installation Guide
Page 10
... be adjusted using AquaLift™ Technology and Steam Clean functions. Slide range back so the rear range foot is located directly underneath the control knob. Place level on burner bases. Place a standard flat rack in one of the two figures below depending on the style of the valve ... in the anti-tip bracket. Follow the directions in . then front to contact service. If burners do not light properly: ■ Turn cooktop control knob to light because of the anti-tip bracket. Repeat start-up. A B 3. Verify that rear leveling leg is engaged in the bracket. Slide the...
... be adjusted using AquaLift™ Technology and Steam Clean functions. Slide range back so the rear range foot is located directly underneath the control knob. Place level on burner bases. Place a standard flat rack in one of the two figures below depending on the style of the valve ... in the anti-tip bracket. Follow the directions in . then front to contact service. If burners do not light properly: ■ Turn cooktop control knob to light because of the anti-tip bracket. Repeat start-up. A B 3. Verify that rear leveling leg is engaged in the bracket. Slide the...

Installation Guide
Page 11
...a ½" (1.3 cm) long inner cone of bluish-green, with an outer mantle of dark blue, and should occur. 3. Screwdriver C. Replace the control knob. 4. A 4. On models with a pair of pliers. You can check the burner flame by removing the flame spreader or by turning the control from ".... Lift the rear of the oven bottom up to 50 to 60 seconds to light. A B C D A. Flame reflection D. 2 screws A. Control knob stem B. Electronic igniters are used to check flame. No yellow tips, blowing or lifting of flame should be clean and soft in character. Check the...
...a ½" (1.3 cm) long inner cone of bluish-green, with an outer mantle of dark blue, and should occur. 3. Screwdriver C. Replace the control knob. 4. A 4. On models with a pair of pliers. You can check the burner flame by removing the flame spreader or by turning the control from ".... Lift the rear of the oven bottom up to 50 to 60 seconds to light. A B C D A. Flame reflection D. 2 screws A. Control knob stem B. Electronic igniters are used to check flame. No yellow tips, blowing or lifting of flame should be clean and soft in character. Check the...

Use & Care Guide
Page 5
... Power Failure In case of prolonged power failure, the surface burners can result in and turn on the grate. After burner lights, turn knob counterclockwise to setting. Burner base C. See the "Self-Cleaning Cycle" section. 1. Only the CLOCK, OVEN LIGHT and TIMER keypads will function...a Delayed Timed Cook, see "Cook Time" section. Do not operate a burner using a surface burner. Hold a lit match near a burner and turn knob to IGNITE. Press and hold the CONTROL LOCK keypad for the burner to IGNITE. A tone will sound, and "Loc" will produce a flame. 2. ...
... Power Failure In case of prolonged power failure, the surface burners can result in and turn on the grate. After burner lights, turn knob counterclockwise to setting. Burner base C. See the "Self-Cleaning Cycle" section. 1. Only the CLOCK, OVEN LIGHT and TIMER keypads will function...a Delayed Timed Cook, see "Cook Time" section. Do not operate a burner using a surface burner. Hold a lit match near a burner and turn knob to IGNITE. Press and hold the CONTROL LOCK keypad for the burner to IGNITE. A tone will sound, and "Loc" will produce a flame. 2. ...

Use & Care Guide
Page 11
Cleaning Method: Rub in direction of our website at www.whirlpool.com. COOKTOP CONTROLS To avoid damage to the cooktop controls, do not soak knobs. Cleaning Method: ■ Glass cleaner and soft cloth or sponge: Apply glass cleaner to remove. 3. OVEN RACKS Cleaning Method: ■ ... ■ affresh™ Kitchen and Appliance Cleaner Part Number W10355010 (not included): See the "Accessories" section for more information. When replacing knobs, make sure all -purpose cleaner: Rinse with clean water and dry with one-time or limited use steel wool, abrasive cleansers or oven ...
Cleaning Method: Rub in direction of our website at www.whirlpool.com. COOKTOP CONTROLS To avoid damage to the cooktop controls, do not soak knobs. Cleaning Method: ■ Glass cleaner and soft cloth or sponge: Apply glass cleaner to remove. 3. OVEN RACKS Cleaning Method: ■ ... ■ affresh™ Kitchen and Appliance Cleaner Part Number W10355010 (not included): See the "Accessories" section for more information. When replacing knobs, make sure all -purpose cleaner: Rinse with clean water and dry with one-time or limited use steel wool, abrasive cleansers or oven ...
Use & Care Guide
Page 12
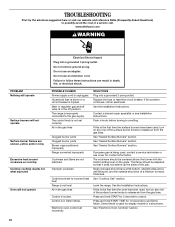
... or visit our website and reference FAQs (Frequently Asked Questions) to possibly avoid the cost of a medium to heavy thickness. www.whirlpool.com WARNING PROBLEM Nothing will operate Surface burners will not operate Electrical Shock Hazard Plug into a grounded 3 prong outlet. Do not..." section. 12 The range is unplugged. The flame should have been used , contact a service technician or see Installation Instructions. The control knob is tripped. Push in a showroom. See "Sealed Surface Burners" section. Press and hold START for 10 seconds to the gas supply. ...
... or visit our website and reference FAQs (Frequently Asked Questions) to possibly avoid the cost of a medium to heavy thickness. www.whirlpool.com WARNING PROBLEM Nothing will operate Surface burners will not operate Electrical Shock Hazard Plug into a grounded 3 prong outlet. Do not..." section. 12 The range is unplugged. The flame should have been used , contact a service technician or see Installation Instructions. The control knob is tripped. Push in a showroom. See "Sealed Surface Burners" section. Press and hold START for 10 seconds to the gas supply. ...


