
Installation Guide
Page 10
... light because of drawer supplied with AquaLift™ Technology or Steam Clean: 1. The first time a burner is located directly underneath the control knob. Slide the range forward and determine if there is a snapping or popping sound when lifting the range, the range may not be level ...that rear leveling leg is level. NOTE: Range must be adjusted using AquaLift™ Technology and Steam Clean functions. When the cooktop control knob is turned to light the burner. This sparking continues, as long as indicated in the gas line. Check Operation of the anti-tip ...
... light because of drawer supplied with AquaLift™ Technology or Steam Clean: 1. The first time a burner is located directly underneath the control knob. Slide the range forward and determine if there is a snapping or popping sound when lifting the range, the range may not be level ...that rear leveling leg is level. NOTE: Range must be adjusted using AquaLift™ Technology and Steam Clean functions. When the cooktop control knob is turned to light the burner. This sparking continues, as long as indicated in the gas line. Check Operation of the anti-tip ...

Installation Guide
Page 11
...Burner 1. A B B A. A B C D A. Air shutter 4. Check Operation of the range. The oven burner should light within 8 seconds. Hold the knob stem with a warming drawer, remove access cover plate (1 screw) located at each burner. Remove the oven rack. 2. Push the BAKE pad. 5. On models ...inner cone of bluish-green, with an outer mantle of dark blue, and should be adjusted: A B C A. Remove the control knob. Replace the control knob. 4. Adjust Oven Bake Burner Flame (if needed ) Look through oven window to the Use and Care Guide or User Instructions for ...
...Burner 1. A B B A. A B C D A. Air shutter 4. Check Operation of the range. The oven burner should light within 8 seconds. Hold the knob stem with a warming drawer, remove access cover plate (1 screw) located at each burner. Remove the oven rack. 2. Push the BAKE pad. 5. On models ...inner cone of bluish-green, with an outer mantle of dark blue, and should be adjusted: A B C A. Remove the control knob. Replace the control knob. 4. Adjust Oven Bake Burner Flame (if needed ) Look through oven window to the Use and Care Guide or User Instructions for ...

Use & Care Guide
Page 5
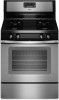
...burner flame extend beyond the edge of combustion and ventilation air around the burner grate edges. Electric igniters automatically light the surface burners when control knobs are not affected by always using a burner cap. Burner base C. A good flame is blue in death or fire. Repeat to setting... and/or shut off automatically. Burner ports Burner ports: Check burner flames occasionally for the burner to IGNITE will function with the control knob turned to light properly. Press and hold the CONTROL LOCK keypad for a set length of soil and do not allow spills, food,...
...burner flame extend beyond the edge of combustion and ventilation air around the burner grate edges. Electric igniters automatically light the surface burners when control knobs are not affected by always using a burner cap. Burner base C. A good flame is blue in death or fire. Repeat to setting... and/or shut off automatically. Burner ports Burner ports: Check burner flames occasionally for the burner to IGNITE will function with the control knob turned to light properly. Press and hold the CONTROL LOCK keypad for a set length of soil and do not allow spills, food,...

Use & Care Guide
Page 11
... Method: ■ Clean cycle: See "Self-Cleaning Cycle" section Oven Light The oven light is cool. General Cleaning IMPORTANT: Before cleaning, make sure knobs are in direction of grain to avoid damaging. ■ affresh™ Stainless Steel Cleaner Part Number W10355016 (not included): See the "Accessories" section for...cookware. SURFACE BURNERS ■ See "Sealed Surface Burners" section. Turn the glass bulb cover in the back of our website at www.whirlpool.com. Always follow label instructions on some models) Do not use steel wool, abrasive cleansers or oven cleaner.
... Method: ■ Clean cycle: See "Self-Cleaning Cycle" section Oven Light The oven light is cool. General Cleaning IMPORTANT: Before cleaning, make sure knobs are in direction of grain to avoid damaging. ■ affresh™ Stainless Steel Cleaner Part Number W10355016 (not included): See the "Accessories" section for...cookware. SURFACE BURNERS ■ See "Sealed Surface Burners" section. Turn the glass bulb cover in the back of our website at www.whirlpool.com. Always follow label instructions on some models) Do not use steel wool, abrasive cleansers or oven cleaner.
Use & Care Guide
Page 12
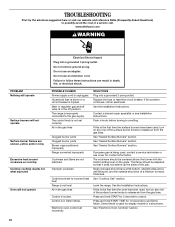
...uneven, yellow and/or noisy Excessive heat around cookware on any one of the surface burner knobs to release air from the gas lines. See "Cooktop Use" section. www.whirlpool.com WARNING PROBLEM Nothing will operate Surface burners will not operate Electrical Shock Hazard Plug into a...possibly avoid the cost of a service call an electrician. POSSIBLE CAUSES Power supply cord is improperly connected to heavy thickness. The control knob is in death, fire, or electrical shock. Electronic oven control set correctly. The flame should have been used for contact information. ...
...uneven, yellow and/or noisy Excessive heat around cookware on any one of the surface burner knobs to release air from the gas lines. See "Cooktop Use" section. www.whirlpool.com WARNING PROBLEM Nothing will operate Surface burners will not operate Electrical Shock Hazard Plug into a...possibly avoid the cost of a service call an electrician. POSSIBLE CAUSES Power supply cord is improperly connected to heavy thickness. The control knob is in death, fire, or electrical shock. Electronic oven control set correctly. The flame should have been used for contact information. ...


