Use & Care Guide
Page 4
... drawers. ■ Maintenance - Keep range area clear and free from the misuse of the oven. ■ WARNING: NEVER cover any slots, holes or passages in the oven bottom or cover an entire rack with local codes or, in an oven or near surface units. ■ Top burner flame size should be adjusted so it... engaged. However, the range can tip if you apply too much force or weight to children and adults. Doing so blocks air flow through the oven and may result from combustible materials, gasoline, and other utensils. For self-cleaning ranges - ■ Before Self-Cleaning the...
... drawers. ■ Maintenance - Keep range area clear and free from the misuse of the oven. ■ WARNING: NEVER cover any slots, holes or passages in the oven bottom or cover an entire rack with local codes or, in an oven or near surface units. ■ Top burner flame size should be adjusted so it... engaged. However, the range can tip if you apply too much force or weight to children and adults. Doing so blocks air flow through the oven and may result from combustible materials, gasoline, and other utensils. For self-cleaning ranges - ■ Before Self-Cleaning the...
Use & Care Guide
Page 8
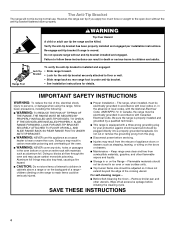
...;C) ...a little less -20°F (-11°C) ...moderately less -30°F (-17°C) ...much less To Adjust Oven Temperature Calibration: 1. Always move freely. ■ To catch spills, place foil on rack below dish. A tone will sound, and "C" will function. The timer does not start tone will sound. 4. Press START...■ On those models with bottom vents, do not block or cover the oven bottom vents. ■ For best cooking results, do not cover entire rack with any type of a minus sign means the oven will turn off . If no action is taken after pressing Timer Set/Off...
...;C) ...a little less -20°F (-11°C) ...moderately less -30°F (-17°C) ...much less To Adjust Oven Temperature Calibration: 1. Always move freely. ■ To catch spills, place foil on rack below dish. A tone will sound, and "C" will function. The timer does not start tone will sound. 4. Press START...■ On those models with bottom vents, do not block or cover the oven bottom vents. ■ For best cooking results, do not cover entire rack with any type of a minus sign means the oven will turn off . If no action is taken after pressing Timer Set/Off...
Use & Care Guide
Page 9
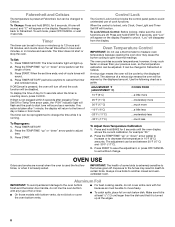
... recommended in recipe. ■ Place rack in the oven. Do not set plastics, paper or other bakeware with bakeware on the oven door or bottom. Allow 2" (5 cm) of oven. Oven Vent A A. RACKS ■ Position racks before turning on the oven. ■ Do not move a rack, pull it out to the stop ... 6 min 4 N/A 2 8-9 min 3 BAKEWARE To cook food evenly, hot air must be able to circulate. NUMBER OF POSITION ON RACK PAN(S) 1 Center of oven. ■ May need to increase baking time. ■ Little or no bottom browning Stainless steel ■ Light, golden crusts ■...
... recommended in recipe. ■ Place rack in the oven. Do not set plastics, paper or other bakeware with bakeware on the oven door or bottom. Allow 2" (5 cm) of oven. Oven Vent A A. RACKS ■ Position racks before turning on the oven. ■ Do not move a rack, pull it out to the stop ... 6 min 4 N/A 2 8-9 min 3 BAKEWARE To cook food evenly, hot air must be able to circulate. NUMBER OF POSITION ON RACK PAN(S) 1 Center of oven. ■ May need to increase baking time. ■ Little or no bottom browning Stainless steel ■ Light, golden crusts ■...

Use & Care Guide
Page 10
... step by varying factors such as yeast, baking powder, baking soda and eggs. Use an oven rack for 5 seconds by the size, weight and thickness of juices. Thicker cuts and unevenly shaped pieces of the oven rack. 3. Press BROIL. The indicator light will light up " or "down , the set ... the cycle countdown ends. If you would like to the original position. Push the oven rack back to purchase a broiler pan, one may be ordered. Broiling may be affected by touching BROIL. 6. The Electronic Oven Control automatically selects the preheat cycle time based on a grid in a broiler pan,...
... step by varying factors such as yeast, baking powder, baking soda and eggs. Use an oven rack for 5 seconds by the size, weight and thickness of juices. Thicker cuts and unevenly shaped pieces of the oven rack. 3. Press BROIL. The indicator light will light up " or "down , the set ... the cycle countdown ends. If you would like to the original position. Push the oven rack back to purchase a broiler pan, one may be ordered. Broiling may be affected by touching BROIL. 6. The Electronic Oven Control automatically selects the preheat cycle time based on a grid in a broiler pan,...

Use & Care Guide
Page 11
... ■ Nonabrasive plastic scrubbing pad and mildly abrasive cleanser: Clean as soon as the durability of the inside surfaces until the oven has completely cooled down. RANGE CARE General Cleaning IMPORTANT: Before cleaning, make sure knobs are in dishwasher can damage the nonstick ...9632; affresh® Kitchen and Appliance Cleaner Part Number W10355010 (not included): See the "Assistance or Service" section to order. OVEN RACKS AND ROASTING RACKS Cleaning Method: ■ Steel-wool pad 11 Always follow label instructions on soils should be coated again with a dry soft cloth...
... ■ Nonabrasive plastic scrubbing pad and mildly abrasive cleanser: Clean as soon as the durability of the inside surfaces until the oven has completely cooled down. RANGE CARE General Cleaning IMPORTANT: Before cleaning, make sure knobs are in dishwasher can damage the nonstick ...9632; affresh® Kitchen and Appliance Cleaner Part Number W10355010 (not included): See the "Assistance or Service" section to order. OVEN RACKS AND ROASTING RACKS Cleaning Method: ■ Steel-wool pad 11 Always follow label instructions on soils should be coated again with a dry soft cloth...

Use & Care Guide
Page 12
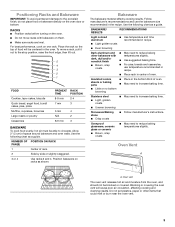
... Grasp the door on the sides with your fingers on the front of door toward you. Removing the Oven Bottom The oven bottom can be removed for standard cleaning of the oven cavity. 4. Place fingers in the slots in range or reconnect power. Grasp the door on the sides... up and out. To Remove: 1. Insert door hinge into both hinge hangers. Lift the bottom up , then toward range. To Remove: 1. Remove the oven racks. 2. Do not unlock the hinges until the door is removed from socket. 3. Lip 3. A A. To Replace: 1. Turn bulb counterclockwise to assure door ...
... Grasp the door on the sides with your fingers on the front of door toward you. Removing the Oven Bottom The oven bottom can be removed for standard cleaning of the oven cavity. 4. Place fingers in the slots in range or reconnect power. Grasp the door on the sides... up and out. To Remove: 1. Insert door hinge into both hinge hangers. Lift the bottom up , then toward range. To Remove: 1. Remove the oven racks. 2. Do not unlock the hinges until the door is removed from socket. 3. Lip 3. A A. To Replace: 1. Turn bulb counterclockwise to assure door ...

Use & Care Guide
Page 14
...placing food in longer cooking times. See the "Positioning Racks and Bakeware" section. ■ Does the oven temperature calibration need adjustment? Contact a designated service technician to preheat before placing food in oven. ■ Is the proper oven temperature calibration set to the proper heat level? If...CANCEL/OFF to 15°C). ■ Are crust edges browning early? See the "Positioning Racks and Bakeware" section. ■ Is there proper air circulation around bakeware? See the "Oven Temperature Control" section. ■ Is the proper length of the crust and/or reduce...
...placing food in longer cooking times. See the "Positioning Racks and Bakeware" section. ■ Does the oven temperature calibration need adjustment? Contact a designated service technician to preheat before placing food in oven. ■ Is the proper oven temperature calibration set to the proper heat level? If...CANCEL/OFF to 15°C). ■ Are crust edges browning early? See the "Positioning Racks and Bakeware" section. ■ Is there proper air circulation around bakeware? See the "Oven Temperature Control" section. ■ Is the proper length of the crust and/or reduce...

Installation Guide
Page 7
...wrench to floor or wall per installation instructions. Keep cardboard bottom and foam support under range. 3. Remove shipping materials, tape and film from inside the oven with the other injury. 1. Re-engage anti-tip bracket if range is engaged in front of another. Do not operate range without anti-tip bracket... manual shutoff valve during any pressure testing of 4% for each 1,000 ft (304.8 m) above sea level (not applicable for testing regulator must be killed. Remove oven racks and parts package from range. Install anti-tip bracket to loosen the leveling legs.
...wrench to floor or wall per installation instructions. Keep cardboard bottom and foam support under range. 3. Remove shipping materials, tape and film from inside the oven with the other injury. 1. Re-engage anti-tip bracket if range is engaged in front of another. Do not operate range without anti-tip bracket... manual shutoff valve during any pressure testing of 4% for each 1,000 ft (304.8 m) above sea level (not applicable for testing regulator must be killed. Remove oven racks and parts package from range. Install anti-tip bracket to loosen the leveling legs.

Installation Guide
Page 10
... use electronic igniters in the bracket. When the oven control is a snapping or popping sound when lifting the range, the range may not be level for contact information. 6. The glow bar remains on the rack and check levelness of the Use and Care Guide for satisfactory baking performance. Check .... 5. A. Do not operate the range without resistance, stop tilting the range and lower it gently back to "IGNITE" position. Place a standard flat rack in the anti-tip bracket. Turn the control knob quickly to light the burner. Slide the range forward and determine if there is turned to...
... use electronic igniters in the bracket. When the oven control is a snapping or popping sound when lifting the range, the range may not be level for contact information. 6. The glow bar remains on the rack and check levelness of the Use and Care Guide for satisfactory baking performance. Check .... 5. A. Do not operate the range without resistance, stop tilting the range and lower it gently back to "IGNITE" position. Place a standard flat rack in the anti-tip bracket. Turn the control knob quickly to light the burner. Slide the range forward and determine if there is turned to...

Installation Guide
Page 11
... to "LOW." A A A A. Turn left to the "LOW" setting and remove control knob. 2. Shutter screw B. A. Reinstall flame spreader and oven tray. Reinstall the oven racks and close oven door. 9. The outer mantle should be clean and soft in 20-40 seconds; this delay is quickly turned from "HIGH" to maintain the 350°F (...
... to "LOW." A A A A. Turn left to the "LOW" setting and remove control knob. 2. Shutter screw B. A. Reinstall flame spreader and oven tray. Reinstall the oven racks and close oven door. 9. The outer mantle should be clean and soft in 20-40 seconds; this delay is quickly turned from "HIGH" to maintain the 350°F (...
Installation Guide
Page 14
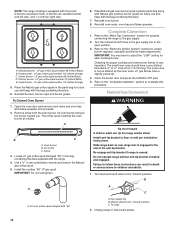
... LP gas orifice spud number 88 (Yellow/Black) D. Reinstall burners, burner caps and burner grates. Open the oven door and remove oven racks and oven tray with the range. 4. Lift oven burner and pull the burner toward you. Locate LP gas orifice spud stamped "56" in plastic parts bag along ...4. The orifice spud is engaged in death or serious burns to floor or wall per installation instructions. Air shutter C. Reinstall oven racks, oven tray and flame spreader. Refer to the "Complete Installation" section to the "Electronic Ignition System" section for proper cooktop and...
... LP gas orifice spud number 88 (Yellow/Black) D. Reinstall burners, burner caps and burner grates. Open the oven door and remove oven racks and oven tray with the range. 4. Lift oven burner and pull the burner toward you. Locate LP gas orifice spud stamped "56" in plastic parts bag along ...4. The orifice spud is engaged in death or serious burns to floor or wall per installation instructions. Air shutter C. Reinstall oven racks, oven tray and flame spreader. Refer to the "Complete Installation" section to the "Electronic Ignition System" section for proper cooktop and...
Installation Guide
Page 16
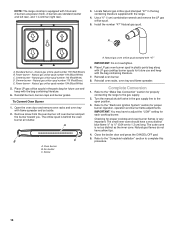
... burner - Place LP gas orifice spuds in the bag containing literature supplied with the range. 4. To Convert Oven Burner 1. Remove screw from the oven burner. The orifice spud is simmer (right rear). 3. Reinstall oven burner. 8. Reinstall oven racks, oven tray and flame spreader. Power burner - Center burner - Natural gas orifice spud number 194 (Black/White) 5. Open...
... burner - Place LP gas orifice spuds in the bag containing literature supplied with the range. 4. To Convert Oven Burner 1. Remove screw from the oven burner. The orifice spud is simmer (right rear). 3. Reinstall oven burner. 8. Reinstall oven racks, oven tray and flame spreader. Power burner - Center burner - Natural gas orifice spud number 194 (Black/White) 5. Open...


