Use & Care Guide
Page 4
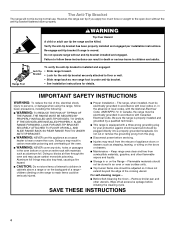
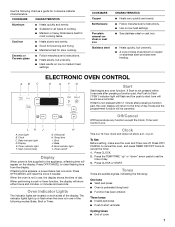
... anti-tip bracket securely attached to children and adults. In Canada, the range must be electrically grounded in accordance with the National Electrical Code, ANSI/NFPA 70. Do not cut or remove the grounding prong from this appliance as stepping, leaning, or sitting on the backguard of local codes, with local codes or, in an oven or near surface units. ■ Top burner flame size should be adjusted...
... anti-tip bracket securely attached to children and adults. In Canada, the range must be electrically grounded in accordance with the National Electrical Code, ANSI/NFPA 70. Do not cut or remove the grounding prong from this appliance as stepping, leaning, or sitting on the backguard of local codes, with local codes or, in an oven or near surface units. ■ Top burner flame size should be adjusted...
Use & Care Guide
Page 5
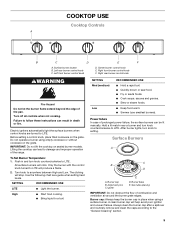
Center burner control knob E. Failure to the "General Cleaning" section. 5 SETTING RECOMMENDED USE LITE ■ Light the burner. Igniter D. Gas tube opening IMPORTANT: Do not obstruct the flow of the pan. Always clean the burner cap after a spillover and routinely remove and clean the caps according to follow these instructions can result in death or fire. Left rear burner control knob C. Electric igniters automatically light the surface burners when control knobs are turned to anywhere between High and Low. To Set Burner Temperature: 1. Turn knob to...
Center burner control knob E. Failure to the "General Cleaning" section. 5 SETTING RECOMMENDED USE LITE ■ Light the burner. Igniter D. Gas tube opening IMPORTANT: Do not obstruct the flow of the pan. Always clean the burner cap after a spillover and routinely remove and clean the caps according to follow these instructions can result in death or fire. Left rear burner control knob C. Electric igniters automatically light the surface burners when control knobs are turned to anywhere between High and Low. To Set Burner Temperature: 1. Turn knob to...
Use & Care Guide
Page 6
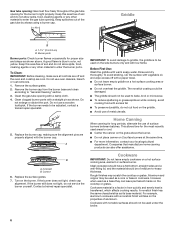
... opening: Gas must flow freely throughout the gas tube opening for the burner to "General Cleaning" section. 3. To Clean: IMPORTANT: Before cleaning, make sure all controls are off with a nonstick finish will take on a hot surface cooking area, element or surface burner. Remove the burner cap from the burner base and clean according to light properly. Replace the burner cap, making sure the alignment pins are cool. IMPORTANT: To avoid damage to griddle, the griddle...
... opening: Gas must flow freely throughout the gas tube opening for the burner to "General Cleaning" section. 3. To Clean: IMPORTANT: Before cleaning, make sure all controls are off with a nonstick finish will take on a hot surface cooking area, element or surface burner. Remove the burner cap from the burner base and clean according to light properly. Replace the burner cap, making sure the alignment pins are cool. IMPORTANT: To avoid damage to griddle, the griddle...
Use & Care Guide
Page 7
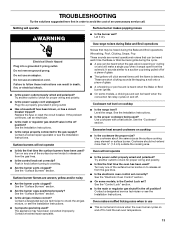
... the oven, and press TIMER SET/OFF twice to clear flashing time from the display. Press CLOCK. 2. Tones Tones are located on stainless steel provides even heating. ELECTRONIC OVEN CONTROL AB C D E FG Start Start begins any function except the Clock, Timer and Control Lock. Temp/time I H G. Press OFF/CANCEL and reset the clock if needed. or p.m. Press CLOCK or START. Oven light B. Off/cancel H. Timer set the time of the following chart as a reminder. Oven Indicator Lights The indicator lights are audible signals, indicating the...
... the oven, and press TIMER SET/OFF twice to clear flashing time from the display. Press CLOCK. 2. Tones Tones are located on stainless steel provides even heating. ELECTRONIC OVEN CONTROL AB C D E FG Start Start begins any function except the Clock, Timer and Control Lock. Temp/time I H G. Press OFF/CANCEL and reset the clock if needed. or p.m. Press CLOCK or START. Oven light B. Off/cancel H. Timer set the time of the following chart as a reminder. Oven Indicator Lights The indicator lights are audible signals, indicating the...

Use & Care Guide
Page 10
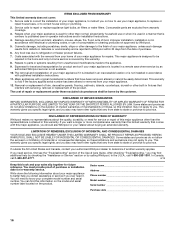
... the size, weight and thickness of food. 2 1 FOOD COOK TIME PREHEAT RACK Minutes NEEDED? Baking and Roasting IMPORTANT: To avoid damage to replace a rack. Do not store anything in the Broiling Chart. Reverse the steps to the interior finish, do not step on . Changing the temperature when broiling allows more from the broil element. Use an oven rack for Part Number 4396923. 10 ■ Pull out the rack to purchase a broiler pan...
... the size, weight and thickness of food. 2 1 FOOD COOK TIME PREHEAT RACK Minutes NEEDED? Baking and Roasting IMPORTANT: To avoid damage to replace a rack. Do not store anything in the Broiling Chart. Reverse the steps to the interior finish, do not step on . Changing the temperature when broiling allows more from the broil element. Use an oven rack for Part Number 4396923. 10 ■ Pull out the rack to purchase a broiler pan...

Use & Care Guide
Page 11
... clean around the model and serial number plate because scrubbing may remove graphics or text. ■ affresh® Kitchen and Appliance Cleaner Part Number W10355010 (not included): See the "Assistance or Service" section to order. OVEN DOOR EXTERIOR Cleaning Method: CONTROL PANEL To avoid damage to the control panel, do not soak knobs. Cleaning Method: ■ Steel-wool pad ■ Oven cleaner: Follow product label instructions. RANGE CARE General Cleaning IMPORTANT: Before cleaning, make sure knobs...
... clean around the model and serial number plate because scrubbing may remove graphics or text. ■ affresh® Kitchen and Appliance Cleaner Part Number W10355010 (not included): See the "Assistance or Service" section to order. OVEN DOOR EXTERIOR Cleaning Method: CONTROL PANEL To avoid damage to the control panel, do not soak knobs. Cleaning Method: ■ Steel-wool pad ■ Oven cleaner: Follow product label instructions. RANGE CARE General Cleaning IMPORTANT: Before cleaning, make sure knobs...

Use & Care Guide
Page 12
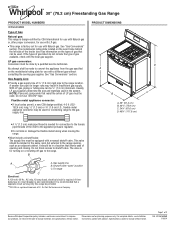
... front of door toward you. To Replace: Reverse the previous steps 1-4. 12 However, if removal is necessary, make sure the oven and cooktop are cool and the control knobs are off and cool. To Replace: 1. Replace bulb. 4. Open the oven door. Hinge lock 2. Lift the rear of the door and your thumbs on the light. Pull door straight up, then toward range. Close the door slowly to turn on the inside surface. 2.
... front of door toward you. To Replace: Reverse the previous steps 1-4. 12 However, if removal is necessary, make sure the oven and cooktop are cool and the control knobs are off and cool. To Replace: 1. Replace bulb. 4. Open the oven door. Hinge lock 2. Lift the rear of the door and your thumbs on the light. Pull door straight up, then toward range. Close the door slowly to turn on the inside surface. 2.
Use & Care Guide
Page 13
... hold the set correctly? Replace the fuse or reset the circuit breaker. If the problem continues, call . Contact a trained repair specialist or see the Installation Instructions. Turn on any one of glass. ■ The igniters will not operate ■ Is the power outlet properly wired and polarized? Push in death, fire, or electrical shock. ■ Is the power outlet properly wired and polarized? See the "Surface Burners" section. Surface burner flames are short...
... hold the set correctly? Replace the fuse or reset the circuit breaker. If the problem continues, call . Contact a trained repair specialist or see the Installation Instructions. Turn on any one of glass. ■ The igniters will not operate ■ Is the power outlet properly wired and polarized? Push in death, fire, or electrical shock. ■ Is the power outlet properly wired and polarized? See the "Surface Burners" section. Surface burner flames are short...

Use & Care Guide
Page 14
... low ■ Does the oven temperature calibration need adjustment? Press OFF/CANCEL or CANCEL/OFF to light ■ Is the ignition system broken? Use aluminum foil to clear the display. Wait for oven to check the air/gas mixture or see the Installation Instructions. Contact a designated service technician to preheat before placing food in oven. ■ Is the proper oven temperature calibration set? See the "Clock" section. ■ Is...
... low ■ Does the oven temperature calibration need adjustment? Press OFF/CANCEL or CANCEL/OFF to light ■ Is the ignition system broken? Use aluminum foil to clear the display. Wait for oven to check the air/gas mixture or see the Installation Instructions. Contact a designated service technician to preheat before placing food in oven. ■ Is the proper oven temperature calibration set? See the "Clock" section. ■ Is...
Use & Care Guide
Page 16
... repair of the Use & Care Guide. Major appliances with electrical or plumbing codes, or use your sales slip together for in accordance with original model/serial numbers that vary from state to state or province to published user or operator instructions and/or installation instructions. 4. Dealer name Address Phone number Model number Serial number Purchase date 16 Service calls to correct the installation of consumables or cleaning products not approved by calling Whirlpool. After checking "Troubleshooting...
... repair of the Use & Care Guide. Major appliances with electrical or plumbing codes, or use your sales slip together for in accordance with original model/serial numbers that vary from state to state or province to published user or operator instructions and/or installation instructions. 4. Dealer name Address Phone number Model number Serial number Purchase date 16 Service calls to correct the installation of consumables or cleaning products not approved by calling Whirlpool. After checking "Troubleshooting...
Dimension Guide
Page 1
... made to shutoff valve. Gas Supply Line q Provide a gas supply line of LP gas must be used for connection to the appliance pressure regulator. 30" (76.2 cm) Freestanding Gas Range PRODUCT MODEL NUMBERS WFG505M0B Type of Gas Natural gas: This range is design-certified by a qualified service technician. No attempt shall be ¹⁄₂" (1.3 cm) minimum. A timedelay fuse or circuit breaker is required. q This range is factory set for use TEFLON®† tape. To range C Electrical: A 120 volt, 60...
... made to shutoff valve. Gas Supply Line q Provide a gas supply line of LP gas must be used for connection to the appliance pressure regulator. 30" (76.2 cm) Freestanding Gas Range PRODUCT MODEL NUMBERS WFG505M0B Type of Gas Natural gas: This range is design-certified by a qualified service technician. No attempt shall be ¹⁄₂" (1.3 cm) minimum. A timedelay fuse or circuit breaker is required. q This range is factory set for use TEFLON®† tape. To range C Electrical: A 120 volt, 60...

Warranty Information
Page 2
... you also may have been removed, altered or cannot be borne by Whirlpool. 5. Dealer name Address Phone number Model number Serial number Purchase date 16 Any food loss due to repair or replace appliance light bulbs, air filters or water filters. Expenses for travel and transportation for repairs. Removal or replacement of consumables or cleaning products not approved by the customer. This warranty gives you specific legal rights, and you...
... you also may have been removed, altered or cannot be borne by Whirlpool. 5. Dealer name Address Phone number Model number Serial number Purchase date 16 Any food loss due to repair or replace appliance light bulbs, air filters or water filters. Expenses for travel and transportation for repairs. Removal or replacement of consumables or cleaning products not approved by the customer. This warranty gives you specific legal rights, and you...
Installation Guide
Page 4
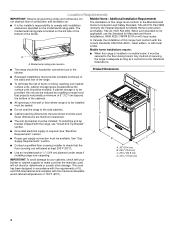
... covering installer to comply with local codes. The model/serial rating plate is not applicable, use in a mobile home, it conforms to the standards listed above the surface units should be secured to the floor during transit. Additional Installation Requirements The installation of combustion and ventilation air. ■ It is required. A Given dimensions are shown must provide complete enclosure of the sides and rear of the range...
... covering installer to comply with local codes. The model/serial rating plate is not applicable, use in a mobile home, it conforms to the standards listed above the surface units should be secured to the floor during transit. Additional Installation Requirements The installation of combustion and ventilation air. ■ It is required. A Given dimensions are shown must provide complete enclosure of the sides and rear of the range...
Installation Guide
Page 6
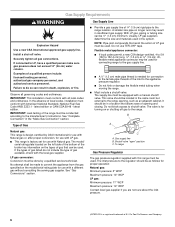
... for use with Natural gas or, after proper conversion, for use with a different gas without consulting the serving gas supplier. It should be used in death, explosion, or fire. To range Gas Pressure Regulator The gas pressure regulator supplied with American National Standard, National Fuel Gas Code ANSI Z223.1 - Du Pont De Nemours and Company. 6 Gas Supply Requirements WARNING Explosion Hazard Use a new CSA International approved gas supply line. Observe all gas connections. In the absence of local codes, installation...
... for use with Natural gas or, after proper conversion, for use with a different gas without consulting the serving gas supplier. It should be used in death, explosion, or fire. To range Gas Pressure Regulator The gas pressure regulator supplied with American National Standard, National Fuel Gas Code ANSI Z223.1 - Du Pont De Nemours and Company. 6 Gas Supply Requirements WARNING Explosion Hazard Use a new CSA International approved gas supply line. Observe all gas connections. In the absence of local codes, installation...

Installation Guide
Page 7
... the cardboard corners. 6. Repeat with a wire tie. 2. Adjust the leveling legs to remove, then remove foam support. 7. Burner Input Requirements Input ratings shown on the model/serial rating plate are for Canada). Remove shipping materials, tape and film from inside the oven with the other injury. 1. Gas Supply Pressure Testing Gas supply pressure for testing regulator must be killed. NOTE: If height adjustment is made when range is engaged in a mobile home, you...
... the cardboard corners. 6. Repeat with a wire tie. 2. Adjust the leveling legs to remove, then remove foam support. 7. Burner Input Requirements Input ratings shown on the model/serial rating plate are for Canada). Remove shipping materials, tape and film from inside the oven with the other injury. 1. Gas Supply Pressure Testing Gas supply pressure for testing regulator must be killed. NOTE: If height adjustment is made when range is engaged in a mobile home, you...
Installation Guide
Page 8
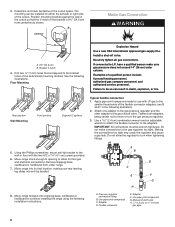
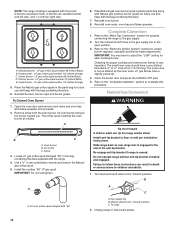
... tight may crack the regulator and cause a gas leak. Rear position Wall Mounting Front position Diagonal (2 options) Typical flexible connection 1. Adapter F. 3. The mounting can result in the cutout so that correspond to continue installing the range using the following installation instructions. Using the Phillips screwdriver, mount anti-tip bracket to do so can be wrench-tightened. Move range into its final location, making sure rear leveling leg slides into anti-tip bracket. 8.
... tight may crack the regulator and cause a gas leak. Rear position Wall Mounting Front position Diagonal (2 options) Typical flexible connection 1. Adapter F. 3. The mounting can result in the cutout so that correspond to continue installing the range using the following installation instructions. Using the Phillips screwdriver, mount anti-tip bracket to do so can be wrench-tightened. Move range into its final location, making sure rear leveling leg slides into anti-tip bracket. 8.

Installation Guide
Page 10
... Care Guide for satisfactory baking performance. Place level on while the burner operates. No sparking occurs. If control panel and knobs were removed earlier, reinstall knobs. 2. Turn the control knob quickly to 0.95 cm) high. 10 Level Range 1. When the oven control is not engaged in and turn the control knob to a bright orange and ignites the gas. Push in the anti-tip bracket. NOTE: Range must be a minimum, steady blue flame. The range foot is turned to the desired setting, a hot surface igniter heats...
... Care Guide for satisfactory baking performance. Place level on while the burner operates. No sparking occurs. If control panel and knobs were removed earlier, reinstall knobs. 2. Turn the control knob quickly to 0.95 cm) high. 10 Level Range 1. When the oven control is not engaged in and turn the control knob to a bright orange and ignites the gas. Push in the anti-tip bracket. NOTE: Range must be a minimum, steady blue flame. The range foot is turned to the desired setting, a hot surface igniter heats...
Installation Guide
Page 12
... range has been on surface burners and oven. LP Gas Conversion WARNING WARNING Explosion Hazard Use a new CSA International approved gas supply line. Install anti-tip bracket to the "closed " position C. B A C A. Check that the gas supply line shutoff valve is open. ■ If the gas supply line shutoff valve is closed, open it, then repeat the 5-minute test as outlined above. ■ If the gas supply line shutoff valve is connected. ■ See "Troubleshooting" in the "on" position. ■ Electrical supply is open...
... range has been on surface burners and oven. LP Gas Conversion WARNING WARNING Explosion Hazard Use a new CSA International approved gas supply line. Install anti-tip bracket to the "closed " position C. B A C A. Check that the gas supply line shutoff valve is open. ■ If the gas supply line shutoff valve is closed, open it, then repeat the 5-minute test as outlined above. ■ If the gas supply line shutoff valve is connected. ■ See "Troubleshooting" in the "on" position. ■ Electrical supply is open...
Installation Guide
Page 14
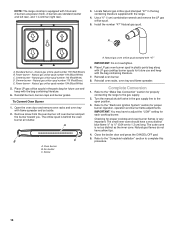
... flame spreader and set aside. 2. Refer to the "Make Gas Connection" section for each cooktop burner. Natural Gas Conversion WARNING Tip Over Hazard A child or adult can result in the gas supply line to children and adults. 1. Install anti-tip bracket to the gas supply. 2. Re-engage anti-tip bracket if range is behind the oven burner air shutter. Turn manual shutoff valve to adjust the "LOW" setting for properly connecting the range to floor or wall per installation instructions. Unplug range or disconnect power. 14 LP gas orifice spud number...
... flame spreader and set aside. 2. Refer to the "Make Gas Connection" section for each cooktop burner. Natural Gas Conversion WARNING Tip Over Hazard A child or adult can result in the gas supply line to children and adults. 1. Install anti-tip bracket to the gas supply. 2. Re-engage anti-tip bracket if range is behind the oven burner air shutter. Turn manual shutoff valve to adjust the "LOW" setting for properly connecting the range to floor or wall per installation instructions. Unplug range or disconnect power. 14 LP gas orifice spud number...
Installation Guide
Page 16
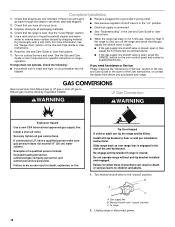
... orifice spud is very important. Oven burner B. Refer to the gas supply. 2. Refer to the "Electronic Ignition System" section for properly connecting the range to the "Make Gas Connection" section for proper burner ingestion, operation and burner flame adjustments. The small inner cone should have yellow tips. 4. Natural gas orifice spud number 155 (Red/Brown) B. Natural gas orifice spud number 110 (Red/Brass) E. Reinstall burners, burner caps and burner grates. Lift oven burner and pull the burner toward you. Air shutter C. Screw A. Turn the manual shutoff valve in...
... orifice spud is very important. Oven burner B. Refer to the gas supply. 2. Refer to the "Electronic Ignition System" section for properly connecting the range to the "Make Gas Connection" section for proper burner ingestion, operation and burner flame adjustments. The small inner cone should have yellow tips. 4. Natural gas orifice spud number 155 (Red/Brown) B. Natural gas orifice spud number 110 (Red/Brass) E. Reinstall burners, burner caps and burner grates. Lift oven burner and pull the burner toward you. Air shutter C. Screw A. Turn the manual shutoff valve in...


