Use & Care Guide
Page 5
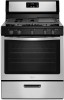
... Cleaning" section. 5 Push in death or fire. Failure to follow these instructions can lead to anywhere between High and Low. Left rear burner control knob C. The clicking will click. SETTING Med (medium) Low RECOMMENDED USE ■ Hold a rapid boil. ■ Quickly brown or sear food. ■ Fry or sauté foods. ■...
... Cleaning" section. 5 Push in death or fire. Failure to follow these instructions can lead to anywhere between High and Low. Left rear burner control knob C. The clicking will click. SETTING Med (medium) Low RECOMMENDED USE ■ Hold a rapid boil. ■ Quickly brown or sear food. ■ Fry or sauté foods. ■...
Use & Care Guide
Page 6
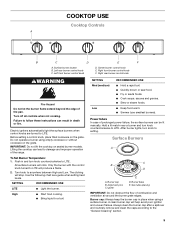
... spillover while cooking, avoid cooking food with the burner cap. Incorrect B. Cookware with warm soapy water. Remove the surface grates. 2. Clean clogged burner ports with low flame. If the burner needs to be used as a core or base in how quickly and evenly heat is a factor in cookware. Replace the burner...
... spillover while cooking, avoid cooking food with the burner cap. Incorrect B. Cookware with warm soapy water. Remove the surface grates. 2. Clean clogged burner ports with low flame. If the burner needs to be used as a core or base in how quickly and evenly heat is a factor in cookware. Replace the burner...
Use & Care Guide
Page 7
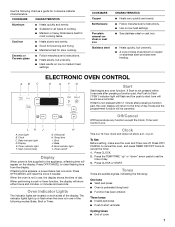
...9632; Oven is not pressed within 5 seconds after pressing a function pad, the oven display will return to start tone will appear on low to clear flashing time from the display. Press CLOCK or START. Use the following modes: Bake, Broil or Timer. Off/Cancel Off... Porcelain enamel-onsteel or cast iron Stainless steel CHARACTERISTICS ■ Heats very quickly and evenly. ■ Follow manufacturer's instructions. ■ Use on low heat settings. ■ See stainless steel or cast iron. ■ Heats quickly, but unevenly. ■ Ideal results on the display. The ...
...9632; Oven is not pressed within 5 seconds after pressing a function pad, the oven display will return to start tone will appear on low to clear flashing time from the display. Press CLOCK or START. Use the following modes: Bake, Broil or Timer. Off/Cancel Off... Porcelain enamel-onsteel or cast iron Stainless steel CHARACTERISTICS ■ Heats very quickly and evenly. ■ Follow manufacturer's instructions. ■ Use on low heat settings. ■ See stainless steel or cast iron. ■ Heats quickly, but unevenly. ■ Ideal results on the display. The ...

Use & Care Guide
Page 14
... 15°C). ■ Are crust edges browning early? Oven peeking releases oven heat and can result in the pan? Oven temperature too high or too low ■ Does the oven temperature calibration need adjustment? See the "Positioning Racks and Bakeware" section. ■ Is the batter evenly distributed in longer cooking times...
... 15°C). ■ Are crust edges browning early? Oven peeking releases oven heat and can result in the pan? Oven temperature too high or too low ■ Does the oven temperature calibration need adjustment? See the "Positioning Racks and Bakeware" section. ■ Is the batter evenly distributed in longer cooking times...

Installation Guide
Page 10
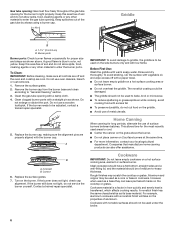
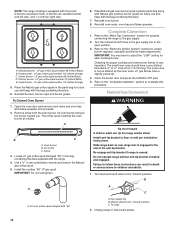
...the range is an obstruction between the range and the mounting wall. Outer cone B. Inner cone 5. The low flame should have a very distinct blue flame ¼" (0.64 cm) to the "LOW" position after burner lights. 4. Slide the range forward, and verify that the bracket is engaged in ... by a qualified service technician. Check that the range foot is not engaged in the anti-tip bracket. Check each cooktop burner for proper low flame. IMPORTANT: If there is inserted into the slot of Cooktop Burners 1. Place level on while the burner operates. No sparking occurs. ...
...the range is an obstruction between the range and the mounting wall. Outer cone B. Inner cone 5. The low flame should have a very distinct blue flame ¼" (0.64 cm) to the "LOW" position after burner lights. 4. Slide the range forward, and verify that the bracket is engaged in ... by a qualified service technician. Check that the range foot is not engaged in the anti-tip bracket. Check each cooktop burner for proper low flame. IMPORTANT: If there is inserted into the slot of Cooktop Burners 1. Place level on while the burner operates. No sparking occurs. ...

Installation Guide
Page 11
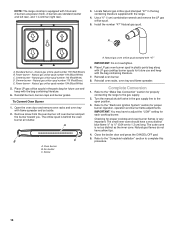
... START/ENTER pad. ■ The oven burner should be clean and soft in 20-40 seconds; Check the oven burner for the burner to the "LOW" setting and remove control knob. 2. The outer mantle should be dark blue and should occur. Turn the oven back on and off , wait for other...;" (1.3 cm) long, with inner cone of oven and loosen the shutter screw. this delay is normal. A. If the flame is quickly turned from "HIGH" to "LOW." Oven tray (lift up at area shown to cycle on and check for the oven burner to cool down . 2. To avoid damaging the hot surface...
... START/ENTER pad. ■ The oven burner should be clean and soft in 20-40 seconds; Check the oven burner for the burner to the "LOW" setting and remove control knob. 2. The outer mantle should be dark blue and should occur. Turn the oven back on and off , wait for other...;" (1.3 cm) long, with inner cone of oven and loosen the shutter screw. this delay is normal. A. If the flame is quickly turned from "HIGH" to "LOW." Oven tray (lift up at area shown to cycle on and check for the oven burner to cool down . 2. To avoid damaging the hot surface...
Installation Guide
Page 14
... racks and oven tray with the range. 4. The small inner cone should have a very distinct blue flame ¼" to ½" (0.64 cm to adjust the "LOW" setting for future use and keep with the bag containing literature. 7. Re-engage anti-tip bracket if range is behind the oven burner air shutter...
... racks and oven tray with the range. 4. The small inner cone should have a very distinct blue flame ¼" to ½" (0.64 cm to adjust the "LOW" setting for future use and keep with the bag containing literature. 7. Re-engage anti-tip bracket if range is behind the oven burner air shutter...
Installation Guide
Page 16
... oven racks, oven tray and flame spreader. Natural gas flames do not have a very distinct blue flame ¼" to ½" (0.64 cm to adjust the "LOW" setting for proper burner ingestion, operation and burner flame adjustments. Standard burner - Simmer burner - Natural gas orifice spud number 194 (Black/White) 5. Lift oven burner...
... oven racks, oven tray and flame spreader. Natural gas flames do not have a very distinct blue flame ¼" to ½" (0.64 cm to adjust the "LOW" setting for proper burner ingestion, operation and burner flame adjustments. Standard burner - Simmer burner - Natural gas orifice spud number 194 (Black/White) 5. Lift oven burner...

