Use & Care Guide
Page 5
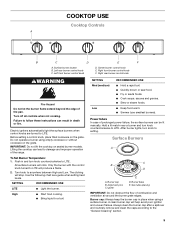
...setting. SETTING RECOMMENDED USE LITE ■ Light the burner. High ■ Start food cooking. ■ Bring liquid to anywhere between High and Low. Hold a lit match near a burner and turn knob to LITE will stop. After burner lights, turn knob counterclockwise to damage and improper ... locator B. Before setting a control knob, place filled cookware on sealed burner models. Lifting the cooktop can result in death or fire. SETTING Med (medium) Low RECOMMENDED USE ■ Hold a rapid boil. ■ Quickly brown or sear food. ■ Fry or sauté foods. ■ Cook soups,...
...setting. SETTING RECOMMENDED USE LITE ■ Light the burner. High ■ Start food cooking. ■ Bring liquid to anywhere between High and Low. Hold a lit match near a burner and turn knob to LITE will stop. After burner lights, turn knob counterclockwise to damage and improper ... locator B. Before setting a control knob, place filled cookware on sealed burner models. Lifting the cooktop can result in death or fire. SETTING Med (medium) Low RECOMMENDED USE ■ Hold a rapid boil. ■ Quickly brown or sear food. ■ Fry or sauté foods. ■ Cook soups,...
Use & Care Guide
Page 6
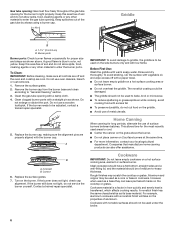
... with nonstick surfaces should not be used to bake, broil or microwave. ■ To reduce spattering or grease spillover while cooking, avoid cooking food with low flame. Keep this area free of soil and do not service the burner yourself.
... with nonstick surfaces should not be used to bake, broil or microwave. ■ To reduce spattering or grease spillover while cooking, avoid cooking food with low flame. Keep this area free of soil and do not service the burner yourself.
Use & Care Guide
Page 7
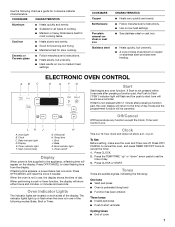
... Copper Earthenware Porcelain enamel-onsteel or cast iron Stainless steel CHARACTERISTICS ■ Heats very quickly and evenly. ■ Follow manufacturer's instructions. ■ Use on low heat settings. ■ See stainless steel or cast iron. ■ Heats quickly, but unevenly. ■ Ideal results on the display. ELECTRONIC OVEN CONTROL ...lights are off Display When power is in use, the display shows the time of day mode and the programmed function will appear on low to the time of day. Press the TEMP/TIME "up or flash when the oven is first supplied to set /off . If...
... Copper Earthenware Porcelain enamel-onsteel or cast iron Stainless steel CHARACTERISTICS ■ Heats very quickly and evenly. ■ Follow manufacturer's instructions. ■ Use on low heat settings. ■ See stainless steel or cast iron. ■ Heats quickly, but unevenly. ■ Ideal results on the display. ELECTRONIC OVEN CONTROL ...lights are off Display When power is in use, the display shows the time of day mode and the programmed function will appear on low to the time of day. Press the TEMP/TIME "up or flash when the oven is first supplied to set /off . If...

Use & Care Guide
Page 14
.... The appliance may have been converted improperly. Contact a designated service technician to preheat before placing food in the pan? Oven temperature too high or too low ■ Does the oven temperature calibration need adjustment? See the "Oven Temperature Control" section. See the "Clock" section. ■ Is the display showing "F" followed by...
.... The appliance may have been converted improperly. Contact a designated service technician to preheat before placing food in the pan? Oven temperature too high or too low ■ Does the oven temperature calibration need adjustment? See the "Oven Temperature Control" section. See the "Clock" section. ■ Is the display showing "F" followed by...

Installation Guide
Page 10
...distinct blue flame ¼" (0.64 cm) to "HIGH" position after the burner lights. IMPORTANT: If the back of the User Instructions, to the "LOW" position after burner lights. 4. Push range back into the bracket. A. IMPORTANT: If there is turned to the desired setting, a hot surface igniter...or service, refer to "IGNITE" position. Place a standard flat rack in and turn the control knob to the floor or wall. 5. Low Med Electronic Ignition System Initial lighting and gas flame adjustments Cooktop and oven burners use electronic igniters in the bracket. No sparking occurs. If ...
...distinct blue flame ¼" (0.64 cm) to "HIGH" position after the burner lights. IMPORTANT: If the back of the User Instructions, to the "LOW" position after burner lights. 4. Push range back into the bracket. A. IMPORTANT: If there is turned to the desired setting, a hot surface igniter...or service, refer to "IGNITE" position. Place a standard flat rack in and turn the control knob to the floor or wall. 5. Low Med Electronic Ignition System Initial lighting and gas flame adjustments Cooktop and oven burners use electronic igniters in the bracket. No sparking occurs. If ...

Installation Guide
Page 11
...9632; The "TEMP" and "ON" indicators will appear. ■ The display will begin to cycle on and off , wait for the oven burner to the "LOW" setting and remove control knob. 2. The oven burner will open and allow gas to maintain the 350°F (175°C) temperature. A B A. Turn the oven... is still not properly adjusted, turn the oven off . Broil burner and oven burner are the same burner. Turn the valve adjusting screw to "LOW." Press the START/ENTER pad. ■ The oven burner should light in 20-40 seconds; this delay is quickly turned from "HIGH" to ...
...9632; The "TEMP" and "ON" indicators will appear. ■ The display will begin to cycle on and off , wait for the oven burner to the "LOW" setting and remove control knob. 2. The oven burner will open and allow gas to maintain the 350°F (175°C) temperature. A B A. Turn the oven... is still not properly adjusted, turn the oven off . Broil burner and oven burner are the same burner. Turn the valve adjusting screw to "LOW." Press the START/ENTER pad. ■ The oven burner should light in 20-40 seconds; this delay is quickly turned from "HIGH" to ...
Installation Guide
Page 14
... "Make Gas Connection" section for each cooktop burner. Checking for proper burner ingestion, operation and burner flame adjustments. LP gas flames have to adjust the "LOW" setting for properly connecting the range to floor or wall per installation instructions. Install anti-tip bracket to the gas supply. 2. Re-engage anti-tip...
... "Make Gas Connection" section for each cooktop burner. Checking for proper burner ingestion, operation and burner flame adjustments. LP gas flames have to adjust the "LOW" setting for properly connecting the range to floor or wall per installation instructions. Install anti-tip bracket to the gas supply. 2. Re-engage anti-tip...
Installation Guide
Page 16
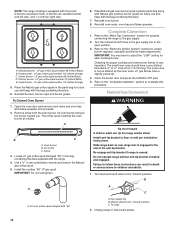
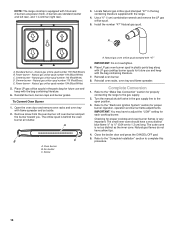
... pad. 5. Power burner - Simmer burner - A B C A. Refer to the "Make Gas Connection" section for each cooktop burner. Refer to the "Complete Installation" section to adjust the "LOW" setting for properly connecting the range to the open position. 3. Place LP gas orifice spuds in plastic parts bag along with LP gas cooktop burner...
... pad. 5. Power burner - Simmer burner - A B C A. Refer to the "Make Gas Connection" section for each cooktop burner. Refer to the "Complete Installation" section to adjust the "LOW" setting for properly connecting the range to the open position. 3. Place LP gas orifice spuds in plastic parts bag along with LP gas cooktop burner...

