Use & Care Guide
Page 5
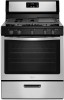
... to follow these instructions can result in place when using empty cookware or without cookware on the grate. Only the burner with the control knob turned to a boil. High ■ Start food cooking. ■ Bring liquid to LITE will click. SETTING Med (medium) Low ...Burner cap: Always keep the burner cap in death or fire. Surface burner locator B. Surface Burners A C B D E A. Before setting a control knob, place filled cookware on sealed burner models. All surface burners will produce a flame. 2. Use the following chart as a guide when setting heat levels. ...
... to follow these instructions can result in place when using empty cookware or without cookware on the grate. Only the burner with the control knob turned to a boil. High ■ Start food cooking. ■ Bring liquid to LITE will click. SETTING Med (medium) Low ...Burner cap: Always keep the burner cap in death or fire. Surface burner locator B. Surface Burners A C B D E A. Before setting a control knob, place filled cookware on sealed burner models. All surface burners will produce a flame. 2. Use the following chart as a guide when setting heat levels. ...

Use & Care Guide
Page 11
...apply a cool damp cloth to order. Cleaning Method: ■ Glass cleaner and soft cloth or sponge: Apply glass cleaner to accumulate under knobs. Cleaning Method: ■ Steel-wool pad ■ Oven cleaner: Follow product label instructions. Gently clean control panel because scrubbing may remove... affect the finish. RANGE CARE General Cleaning IMPORTANT: Before cleaning, make sure knobs are in dishwasher can damage the nonstick coating. Cleaning Method: ■ Warm, soapy water: Pull knobs straight away from control panel to soft cloth or sponge, not directly on burners...
...apply a cool damp cloth to order. Cleaning Method: ■ Glass cleaner and soft cloth or sponge: Apply glass cleaner to accumulate under knobs. Cleaning Method: ■ Steel-wool pad ■ Oven cleaner: Follow product label instructions. Gently clean control panel because scrubbing may remove... affect the finish. RANGE CARE General Cleaning IMPORTANT: Before cleaning, make sure knobs are in dishwasher can damage the nonstick coating. Cleaning Method: ■ Warm, soapy water: Pull knobs straight away from control panel to soft cloth or sponge, not directly on burners...

Use & Care Guide
Page 12
... edge. 4. To Remove: 1. To Replace: 1. To Replace: Reverse the previous steps 1-4. 12 Before replacing, make sure the oven and cooktop are cool and the control knobs are off and cool. The oven door is completely cool. Open the oven door. See following illustration. A A. Hinge lock 5. Before cleaning, make sure the oven...
... edge. 4. To Remove: 1. To Replace: 1. To Replace: Reverse the previous steps 1-4. 12 Before replacing, make sure the oven and cooktop are cool and the control knobs are off and cool. The oven door is completely cool. Open the oven door. See following illustration. A A. Hinge lock 5. Before cleaning, make sure the oven...
Use & Care Guide
Page 13
...Is the burner wet? See the "Cookware" section. See the "Control Lock" section. ■ Is the main or regulator gas shutoff in knob before turning to a setting. ■ Are the burner ports clogged? If the problem continues, call . Gas range noises during Bake and ...level? See the Installation Instructions. ■ Is the range properly connected to the gas supply? Turn any one of the surface burner knobs on and off to hold the set ? Contact a designated service technician or see the Installation Instructions. Contact a designated service technician to ...
...Is the burner wet? See the "Cookware" section. See the "Control Lock" section. ■ Is the main or regulator gas shutoff in knob before turning to a setting. ■ Are the burner ports clogged? If the problem continues, call . Gas range noises during Bake and ...level? See the Installation Instructions. ■ Is the range properly connected to the gas supply? Turn any one of the surface burner knobs on and off to hold the set ? Contact a designated service technician or see the Installation Instructions. Contact a designated service technician to ...

Use & Care Guide
Page 14
.../CANCEL or CANCEL/OFF to clear the display. If an "F" code appears again, contact a trained repair specialist. See the "Cookware" section. ■ Is the control knob set ? See the "Cooktop Controls" section. See the "Oven Temperature Control" section. ■ Was the oven preheated? Wait for oven to preheat before placing food...
.../CANCEL or CANCEL/OFF to clear the display. If an "F" code appears again, contact a trained repair specialist. See the "Cookware" section. ■ Is the control knob set ? See the "Cooktop Controls" section. See the "Oven Temperature Control" section. ■ Was the oven preheated? Wait for oven to preheat before placing food...

Installation Guide
Page 10
... Do not operate the range without resistance, the anti-tip bracket may not be level for proper low flame. If control panel and knobs were removed earlier, reinstall knobs. 2. If the rear of the anti-tip bracket. IMPORTANT: If the back of standing pilots. Changes to 0.95 cm) high. ...189;" (1.3 cm) long. The small inner cone should be a minimum, steady blue flame. If range is not level, pull range forward until the control knob is more than 2" (5.1 cm) from sliding into the bracket. Use a ³⁄₈" drive ratchet and slip-joint pliers to light the burner....
... Do not operate the range without resistance, the anti-tip bracket may not be level for proper low flame. If control panel and knobs were removed earlier, reinstall knobs. 2. If the rear of the anti-tip bracket. IMPORTANT: If the back of standing pilots. Changes to 0.95 cm) high. ...189;" (1.3 cm) long. The small inner cone should be a minimum, steady blue flame. If range is not level, pull range forward until the control knob is more than 2" (5.1 cm) from sliding into the bracket. Use a ³⁄₈" drive ratchet and slip-joint pliers to light the burner....

Installation Guide
Page 11
... the display. 3. Locate the air shutter near the rear wall of flame should light in 20-40 seconds; Tighten the shutter screw. 8. Turn control knob to decrease flame height. Open broiler door. 2. The oven burner will open and allow gas to cool down . 7. The flame should be ½...adjusting: 1. Insert a small flat-blade screwdriver into the openings of a cold burner is normal. Turn right to the "LOW" setting and remove control knob. 2. Turn left to cool down. 2. Repeat for proper flame. Wait for the burner to remove) 3. Open oven door and remove oven racks ...
... the display. 3. Locate the air shutter near the rear wall of flame should light in 20-40 seconds; Tighten the shutter screw. 8. Turn control knob to decrease flame height. Open broiler door. 2. The oven burner will open and allow gas to cool down . 7. The flame should be ½...adjusting: 1. Insert a small flat-blade screwdriver into the openings of a cold burner is normal. Turn right to the "LOW" setting and remove control knob. 2. Turn left to cool down. 2. Repeat for proper flame. Wait for the burner to remove) 3. Open oven door and remove oven racks ...


