
Dimension Guide
Page 1
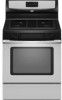
® 30" (76.2 cm) Freestanding Gas Range PRODUCT MODEL NUMBERS PRODUCT DIMENSIONS GFG464LV GFG471LV WFG361LV WFG366LV WFG371LV WFG374LV Gas supply: This range is design-certified by CSA International for use with Natural gas or, after proper conversion, for use with leveling legs screwed all the way in* C. 46 " (119.1 cm) overall height (max.) with LP gas. Usually, LP gas suppliers...
® 30" (76.2 cm) Freestanding Gas Range PRODUCT MODEL NUMBERS PRODUCT DIMENSIONS GFG464LV GFG471LV WFG361LV WFG366LV WFG371LV WFG374LV Gas supply: This range is design-certified by CSA International for use with Natural gas or, after proper conversion, for use with leveling legs screwed all the way in* C. 46 " (119.1 cm) overall height (max.) with LP gas. Usually, LP gas suppliers...

Installation Instructions
Page 1
... installation instructions with the homeowner. W10196161E INSTALLATION INSTRUCTIONS 30" (76.2 CM) FREESTANDING GAS RANGES Table of Contents RANGE SAFETY...2 INSTALLATION REQUIREMENTS 4 Tools and Parts...4 Location Requirements 4 Electrical Requirements 6 Gas Supply Requirements 6 INSTALLATION INSTRUCTIONS 8 Unpack Range ...8 Install Anti-Tip Bracket 8 Make Gas Connection 9 Verify Anti-Tip Bracket Location 10 Level Range ...11 Electronic Ignition System 11 Replace Oven Racks...
... installation instructions with the homeowner. W10196161E INSTALLATION INSTRUCTIONS 30" (76.2 CM) FREESTANDING GAS RANGES Table of Contents RANGE SAFETY...2 INSTALLATION REQUIREMENTS 4 Tools and Parts...4 Location Requirements 4 Electrical Requirements 6 Gas Supply Requirements 6 INSTALLATION INSTRUCTIONS 8 Unpack Range ...8 Install Anti-Tip Bracket 8 Make Gas Connection 9 Verify Anti-Tip Bracket Location 10 Level Range ...11 Electronic Ignition System 11 Replace Oven Racks...

Installation Instructions
Page 2
..., tell you how to do if you and others are not followed. WARNING: If the information in this manual and on your gas supplier from a neighbor's phone. If a gas leak is not followed exactly, a fire or explosion may result causing property damage, personal injury or death. - Do not store or...What to reduce the chance of injury, and tell you don't immediately follow the safety alert symbol and either the word "DANGER" or "WARNING." RANGE SAFETY Your safety and the safety of others . We have provided many important safety messages in this or any phone in your building. • ...
..., tell you how to do if you and others are not followed. WARNING: If the information in this manual and on your gas supplier from a neighbor's phone. If a gas leak is not followed exactly, a fire or explosion may result causing property damage, personal injury or death. - Do not store or...What to reduce the chance of injury, and tell you don't immediately follow the safety alert symbol and either the word "DANGER" or "WARNING." RANGE SAFETY Your safety and the safety of others . We have provided many important safety messages in this or any phone in your building. • ...
Installation Instructions
Page 3
Connect anti-tip bracket to children and adults. 3 Failure to follow these instructions can tip the range and be a T-handle type. ■ A flexible gas connector, when used, must not exceed 3 feet. In the State of Massachusetts, the following installation instructions apply: ■ Installations and repairs must be performed by a .... ■ If using a ball valve, it shall be killed. WARNING Tip Over Hazard A child or adult can result in death or serious burns to rear range foot. Reconnect the anti-tip bracket, if the...
Connect anti-tip bracket to children and adults. 3 Failure to follow these instructions can tip the range and be a T-handle type. ■ A flexible gas connector, when used, must not exceed 3 feet. In the State of Massachusetts, the following installation instructions apply: ■ Installations and repairs must be performed by a .... ■ If using a ball valve, it shall be killed. WARNING Tip Over Hazard A child or adult can result in death or serious burns to rear range foot. Reconnect the anti-tip bracket, if the...

Installation Instructions
Page 4
...at least 200°F (93°C). ■ Use an insulated pad or ¼" (0.64 cm) plywood under range if installing range over carpeting. Check existing gas supply and electrical supply. The model/serial rating plate is to be installed must be sealed. ■ Do not ...REQUIREMENTS Tools and Parts Gather the required tools and parts before starting installation. A B C A. Thickness of this range must be available. Tools needed Check local codes and consult gas supplier. Given dimensions are shown must be secured to check that the materials used . Anti-tip bracket B. ...
...at least 200°F (93°C). ■ Use an insulated pad or ¼" (0.64 cm) plywood under range if installing range over carpeting. Check existing gas supply and electrical supply. The model/serial rating plate is to be installed must be sealed. ■ Do not ...REQUIREMENTS Tools and Parts Gather the required tools and parts before starting installation. A B C A. Thickness of this range must be available. Tools needed Check local codes and consult gas supplier. Given dimensions are shown must be secured to check that the materials used . Anti-tip bracket B. ...

Installation Instructions
Page 5
...rating plate (located on the oven frame behind the top left side of cooktop, see NOTE*. upper cabinet depth C. 30" (76.2 cm) min. For minimum clearance to top of the oven door) *Range can be raised approximately 1" (2.5 cm) by not less than No. 28 MSG sheet steel, 0.015" (0.4 mm...) stainless steel, 0.024" (0.6 mm) aluminum or 0.020" (0.5 mm) copper. 30" (76.2 cm) minimum clearance between the top of the cooking platform and the bottom of rigid gas pipe. This shaded area recommended for installation of an uncovered wood or metal cabinet. 5 opening dimensions shown...
...rating plate (located on the oven frame behind the top left side of cooktop, see NOTE*. upper cabinet depth C. 30" (76.2 cm) min. For minimum clearance to top of the oven door) *Range can be raised approximately 1" (2.5 cm) by not less than No. 28 MSG sheet steel, 0.015" (0.4 mm...) stainless steel, 0.024" (0.6 mm) aluminum or 0.020" (0.5 mm) copper. 30" (76.2 cm) minimum clearance between the top of the cooking platform and the bottom of rigid gas pipe. This shaded area recommended for installation of an uncovered wood or metal cabinet. 5 opening dimensions shown...

Installation Instructions
Page 6
... extension cord. A time-delay fuse or circuit breaker is not grounded, no keypads will operate. NOTE: The metal chassis of the range must be electrically grounded in accordance with Natural gas. latest edition. The model/serial rating plate located on the oven frame behind the top left side of the oven door...
... extension cord. A time-delay fuse or circuit breaker is not grounded, no keypads will operate. NOTE: The metal chassis of the range must be electrically grounded in accordance with Natural gas. latest edition. The model/serial rating plate located on the oven frame behind the top left side of the oven door...

Installation Instructions
Page 7
... ¾" (1.9 cm) I.D., flexible metal appliance connector may be used . Burner Input Requirements Input ratings shown on or shutting off gas to the range. To range Gas Pressure Regulator The gas pressure regulator supplied with this range must be level with a manual shutoff valve. Rigid pipe connection: The rigid pipe connection requires a combination of 4% for each 1,000...
... ¾" (1.9 cm) I.D., flexible metal appliance connector may be used . Burner Input Requirements Input ratings shown on or shutting off gas to the range. To range Gas Pressure Regulator The gas pressure regulator supplied with this range must be level with a manual shutoff valve. Rigid pipe connection: The rigid pipe connection requires a combination of 4% for each 1,000...

Installation Instructions
Page 8
... rear leveling legs one -half turn . A D C Install Anti-Tip Bracket WARNING Tip Over Hazard A child or adult can tip the range and be accessed by removing the warming drawer. Contact a qualified floor covering installer for the best procedure for drilling mounting holes through your type...If countertop is against cabinet and top edge is not flush with cabinet opening . Remove shipping materials, tape and film from outside the range. On Ranges Equipped with a warming drawer, the rear legs cannot be killed. Remove template from the back of floor covering. Connect anti-tip ...
... rear leveling legs one -half turn . A D C Install Anti-Tip Bracket WARNING Tip Over Hazard A child or adult can tip the range and be accessed by removing the warming drawer. Contact a qualified floor covering installer for the best procedure for drilling mounting holes through your type...If countertop is against cabinet and top edge is not flush with cabinet opening . Remove shipping materials, tape and film from outside the range. On Ranges Equipped with a warming drawer, the rear legs cannot be killed. Remove template from the back of floor covering. Connect anti-tip ...

Installation Instructions
Page 9
...pipe-joint compound made for use with LP gas to the smaller thread ends of securing the range is adequate as long as it conforms to LP, have ½" male pipe thread) C. Manual gas shutoff valve G. ½" or ¾" gas pipe H. Failure to do so can result...leveling leg slides into holes with LP gas to the floor. B C D A F E J A. Apply pipe-joint compound made for use with a hammer. 6. Gas pressure regulator B. 90° elbow (must secure the range to all gas connections. Using a pipe wrench to tighten, connect the gas supply to wood floor, drill two...
...pipe-joint compound made for use with LP gas to the smaller thread ends of securing the range is adequate as long as it conforms to LP, have ½" male pipe thread) C. Manual gas shutoff valve G. ½" or ¾" gas pipe H. Failure to do so can result...leveling leg slides into holes with LP gas to the floor. B C D A F E J A. Apply pipe-joint compound made for use with a hammer. 6. Gas pressure regulator B. 90° elbow (must secure the range to all gas connections. Using a pipe wrench to tighten, connect the gas supply to wood floor, drill two...

Installation Instructions
Page 10
3. Check that connector is parallel to the gas pipe. Use pipe-joint compound. C. Manual gas shutoff valve F. ½" or ¾" gas pipe G. Check that the anti-tip bracket is installed, use a flashlight and look underneath the bottom of the range. ■ Look for the anti-tip ...be seen by brushing on " position. Burner caps should be necessary to floor. ■ Slide range back so rear range foot is indicated. Burner grate 2. To check that the gas pressure regulator shutoff valve is in the "on an approved noncorrosive leak-detection solution. Adapter Complete Connection...
3. Check that connector is parallel to the gas pipe. Use pipe-joint compound. C. Manual gas shutoff valve F. ½" or ¾" gas pipe G. Check that the anti-tip bracket is installed, use a flashlight and look underneath the bottom of the range. ■ Look for the anti-tip ...be seen by brushing on " position. Burner caps should be necessary to floor. ■ Slide range back so rear range foot is indicated. Burner grate 2. To check that the gas pressure regulator shutoff valve is in the "on an approved noncorrosive leak-detection solution. Adapter Complete Connection...

Installation Instructions
Page 11
... oven burners use electronic igniters in oven. 2. Check Operation of the oven bottom up or down until the range is the proper size. 3. The first time a burner is plugged in the gas line. If burners do not light properly: ■ Turn cooktop control knob to side; B A. Control ...tip bracket. To remove the oven bottom: Remove 2 screws at each burner. Screws 11 Level Range 1. Repeat start-up or down until the range is turned to the desired setting, sparking occurs and ignites the gas. High flame To adjust standard burner: The flame can be adjusted: A B C A. Use...
... oven burners use electronic igniters in oven. 2. Check Operation of the oven bottom up or down until the range is the proper size. 3. The first time a burner is plugged in the gas line. If burners do not light properly: ■ Turn cooktop control knob to side; B A. Control ...tip bracket. To remove the oven bottom: Remove 2 screws at each burner. Screws 11 Level Range 1. Repeat start-up or down until the range is turned to the desired setting, sparking occurs and ignites the gas. High flame To adjust standard burner: The flame can be adjusted: A B C A. Use...

Installation Instructions
Page 12
... lifting of flame should be adjusted, locate the air shutter near the center rear of drawer opening. 2. Loosen the lock screw on sides of the range. Replace Oven Racks and Warming Drawer Replace oven racks in character. Refer to remove tabs from the front tabs of the oven controls. Loosen the...
... lifting of flame should be adjusted, locate the air shutter near the center rear of drawer opening. 2. Loosen the lock screw on sides of the range. Replace Oven Racks and Warming Drawer Replace oven racks in character. Refer to remove tabs from the front tabs of the oven controls. Loosen the...

Installation Instructions
Page 13
... ■ Electrical supply is cool and empty. If you purchased your tools. 3. It will be needed for heat. Drawer clip 3. When the range has been on range operation. Before removing, check that you are now installed. To Remove: 1. A A. A. Complete Installation 1. Turn on both sides, slide the ...Once the storage drawer is open it inside the range in the drawer glides. Dispose of/recycle all of the storage drawer and place it , then repeat the 5-minute test as outlined above. ■ If the gas supply line shutoff valve is fully engaged on surface ...
... ■ Electrical supply is cool and empty. If you purchased your tools. 3. It will be needed for heat. Drawer clip 3. When the range has been on range operation. Before removing, check that you are now installed. To Remove: 1. A A. A. Complete Installation 1. Turn on both sides, slide the ...Once the storage drawer is open it inside the range in the drawer glides. Dispose of/recycle all of the storage drawer and place it , then repeat the 5-minute test as outlined above. ■ If the gas supply line shutoff valve is fully engaged on surface ...

Installation Instructions
Page 14
... cap counterclockwise with a warming drawer, an access cover must be removed to rear range foot. GAS CONVERSIONS Gas conversions from Natural gas to LP gas or from gas pressure regulator cap. 4. Gas pressure regulator cap with hollow end facing out D. To Convert Gas Pressure Regulator WARNING 1. Gas pressure regulator cap F. Plastic cover B. NOTE: Do not remove the spring beneath...
... cap counterclockwise with a warming drawer, an access cover must be removed to rear range foot. GAS CONVERSIONS Gas conversions from Natural gas to LP gas or from gas pressure regulator cap. 4. Gas pressure regulator cap with hollow end facing out D. To Convert Gas Pressure Regulator WARNING 1. Gas pressure regulator cap F. Plastic cover B. NOTE: Do not remove the spring beneath...

Installation Instructions
Page 15
... the "Electronic Ignition System" section. A A. Orifice hood 15 NOTE: Reinstall one of the range near the gas inlet. Use a ½" combination wrench to turn the orifice hood down onto the gas orifice spud and remove by turning it . Spark electrode 4. Pin To Convert Oven Broil Burner Use... Serial Number Plate located on the back of the screws through the range cooktop to 2½ turns). Remove oven racks. 2. Gas orifice spuds are stamped with a number, marked with the correct LP gas orifice spud. Using a Phillips screwdriver, remove the burner base. Replace...
... the "Electronic Ignition System" section. A A. Orifice hood 15 NOTE: Reinstall one of the range near the gas inlet. Use a ½" combination wrench to turn the orifice hood down onto the gas orifice spud and remove by turning it . Spark electrode 4. Pin To Convert Oven Broil Burner Use... Serial Number Plate located on the back of the screws through the range cooktop to 2½ turns). Remove oven racks. 2. Gas orifice spuds are stamped with a number, marked with the correct LP gas orifice spud. Using a Phillips screwdriver, remove the burner base. Replace...

Installation Instructions
Page 16
...in death or serious burns to adjust the "LO" setting for properly connecting the range to rear range foot. BFD E NG NG C Side view after A. Complete Installation 1. Refer to the "Make Gas Connection" section for each cooktop burner. See "Replace Oven Racks and Warming Drawer...warming drawer compartment. A A. Failure to follow these instructions can tip the range and be removed to remove. Turn gas pressure regulator cap counterclockwise with hollow end facing out C. Gas supply line 2. Gas pressure regulator cap with a ⁵⁄₈" combination wrench to access the...
...in death or serious burns to adjust the "LO" setting for properly connecting the range to rear range foot. BFD E NG NG C Side view after A. Complete Installation 1. Refer to the "Make Gas Connection" section for each cooktop burner. See "Replace Oven Racks and Warming Drawer...warming drawer compartment. A A. Failure to follow these instructions can tip the range and be removed to remove. Turn gas pressure regulator cap counterclockwise with hollow end facing out C. Gas supply line 2. Gas pressure regulator cap with a ⁵⁄₈" combination wrench to access the...

Installation Instructions
Page 17
...hood away from the pin (about 2 to the following chart for proper sizing of the screws through the range cooktop to the Model Number and Serial Number Plate located on the side. A B A A. Gas orifice spuds are stamped with a number on the oven frame behind the top left side of the oven...1.90 mm 1.85 mm 1.80 mm 1.55 mm 1.40 mm 1.10 mm N210 N200 N190 N185 N180 N155 N140 N110 NOTE: Refer to hold the gas orifice spud in place while removing and replacing the orifice spuds. Replace burner cap. 8. Spark electrode 4. Stamped number 17 Igniter electrode B. Orifice hood B. Replace...
...hood away from the pin (about 2 to the following chart for proper sizing of the screws through the range cooktop to the Model Number and Serial Number Plate located on the side. A B A A. Gas orifice spuds are stamped with a number on the oven frame behind the top left side of the oven...1.90 mm 1.85 mm 1.80 mm 1.55 mm 1.40 mm 1.10 mm N210 N200 N190 N185 N180 N155 N140 N110 NOTE: Refer to hold the gas orifice spud in place while removing and replacing the orifice spuds. Replace burner cap. 8. Spark electrode 4. Stamped number 17 Igniter electrode B. Orifice hood B. Replace...

Installation Instructions
Page 18
...Installation 1. Checking for proper cooktop, bake and broil burner flame is not made. Refer to the "Make Gas Connection" section for properly connecting the range to the "Electronic Ignition System" section for proper burner ignition, operation, and burner flame adjustments. Natural... gas flames do not have to 2½ turns). Refer to the gas supply. 2. Orifice hood 18 IMPORTANT: You may have yellow tips. 3. To ...
...Installation 1. Checking for proper cooktop, bake and broil burner flame is not made. Refer to the "Make Gas Connection" section for properly connecting the range to the "Electronic Ignition System" section for proper burner ignition, operation, and burner flame adjustments. Natural... gas flames do not have to 2½ turns). Refer to the gas supply. 2. Orifice hood 18 IMPORTANT: You may have yellow tips. 3. To ...

Owners Manual
Page 1
...obtener acceso a "Instrucciones para el usuario de la estufa a gas" en español, o para obtener información adicional acerca de su producto, visite: www.whirlpool.com Tenga listo su número de modelo completo. Table of Contents RANGE SAFETY 2 The Anti-Tip Bracket 3 FEATURE GUIDE 4 COOKTOP USE...ACCESSORIES 11 WARRANTY 12 W10196153B You will need assistance, call us at www.whirlpool.com for purchasing this high-quality product. If you still need your model and serial number located on some models 8 RANGE CARE 8 Self-Cleaning Cycle (on the oven frame behind the storage ...
...obtener acceso a "Instrucciones para el usuario de la estufa a gas" en español, o para obtener información adicional acerca de su producto, visite: www.whirlpool.com Tenga listo su número de modelo completo. Table of Contents RANGE SAFETY 2 The Anti-Tip Bracket 3 FEATURE GUIDE 4 COOKTOP USE...ACCESSORIES 11 WARRANTY 12 W10196153B You will need assistance, call us at www.whirlpool.com for purchasing this high-quality product. If you still need your model and serial number located on some models 8 RANGE CARE 8 Self-Cleaning Cycle (on the oven frame behind the storage ...


