
Dimension Guide
Page 1
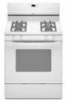
...E. 30¹⁄₈" (76.5 cm) min. Grounded outlet I . For complete details, see NOTE*. If the types of gas listed do not include the type of the oven door) *Range can be raised approximately 1" (2.5 cm) by adjusting the leveling legs. With LP gas, piping... action of gas that allows ease of E.I . 17" (43.2 cm) J. 4¹⁄₂" (11.4 cm) K. 2" (5.1 cm) L. 2" (5.1 cm) min. opening width F. opening width D. Cabinet opening and closing. This shaded area recommended for connecting range to the range. G. 8" (20.3 cm) H. Because Whirlpool Corporation policy ...
...E. 30¹⁄₈" (76.5 cm) min. Grounded outlet I . For complete details, see NOTE*. If the types of gas listed do not include the type of the oven door) *Range can be raised approximately 1" (2.5 cm) by adjusting the leveling legs. With LP gas, piping... action of gas that allows ease of E.I . 17" (43.2 cm) J. 4¹⁄₂" (11.4 cm) K. 2" (5.1 cm) L. 2" (5.1 cm) min. opening width F. opening width D. Cabinet opening and closing. This shaded area recommended for connecting range to the range. G. 8" (20.3 cm) H. Because Whirlpool Corporation policy ...

Owners Manual
Page 2
... "WARNING." For more information, contact your gas supplier from a neighbor's phone. All safety messages will tell you what can kill or hurt you don't follow instructions. RANGE SAFETY Your safety and the safety of others . WARNING You can cause low-level exposure to reduce the chance of injury,... and tell you to such substances. WHAT TO DO IF YOU SMELL GAS: • Do not try to cause...
... "WARNING." For more information, contact your gas supplier from a neighbor's phone. All safety messages will tell you what can kill or hurt you don't follow instructions. RANGE SAFETY Your safety and the safety of others . WARNING You can cause low-level exposure to reduce the chance of injury,... and tell you to such substances. WHAT TO DO IF YOU SMELL GAS: • Do not try to cause...

Owners Manual
Page 7
...® Temperature Management System (on some models) The ACCUBAKE® system electronically regulates the oven heat levels during preheat and bake to maintain a precise temperature range for baking. Position food on them. ■ Make sure racks are level. Make sure that could melt or burn near the oven vent. casseroles; Rack 6: Extra-large...
...® Temperature Management System (on some models) The ACCUBAKE® system electronically regulates the oven heat levels during preheat and bake to maintain a precise temperature range for baking. Position food on them. ■ Make sure racks are level. Make sure that could melt or burn near the oven vent. casseroles; Rack 6: Extra-large...

Owners Manual
Page 10
...visit our website and reference Frequently Asked Questions (FAQs) to possibly avoid the cost of the "Electronic Oven Controls" section. 10 www.whirlpool.com Nothing will make a single pop when it dry. Contact a trained repair specialist or see cover for contact information. Surface burner ...not what expected ■ Is the proper cookware being used ? See "Cooktop Use" section. ■ Is the range level? Oven burner flames are yellow or noisy ■ Is propane gas being used ? See "Oven Temperature Control" section of a service call an electrician. ■ Is the main or ...
...visit our website and reference Frequently Asked Questions (FAQs) to possibly avoid the cost of the "Electronic Oven Controls" section. 10 www.whirlpool.com Nothing will make a single pop when it dry. Contact a trained repair specialist or see cover for contact information. Surface burner ...not what expected ■ Is the proper cookware being used ? See "Cooktop Use" section. ■ Is the range level? Oven burner flames are yellow or noisy ■ Is propane gas being used ? See "Oven Temperature Control" section of a service call an electrician. ■ Is the main or ...

Owners Manual
Page 11
... set ? Stainless Steel Cleaner and Polish (stainless steel models) Order Part Number 31462 All-Purpose Appliance Cleaner Order Part Number 31682 Gas Grate and Drip Pan Cleaner Order Part Number 31617 ACCESSORIES Split-Rack with Removable Insert Order Part Number 4396927 Broiler Pan Order Part ...Number 4396923 11 There has been a power failure. Oven cooking results not what expected ■ Is the range level? Level the range. See the "Start" keypad feature in the pan? Move rack to restart. If it reappears, call for contact information. ■ ...
... set ? Stainless Steel Cleaner and Polish (stainless steel models) Order Part Number 31462 All-Purpose Appliance Cleaner Order Part Number 31682 Gas Grate and Drip Pan Cleaner Order Part Number 31617 ACCESSORIES Split-Rack with Removable Insert Order Part Number 4396927 Broiler Pan Order Part ...Number 4396923 11 There has been a power failure. Oven cooking results not what expected ■ Is the range level? Level the range. See the "Start" keypad feature in the pan? Move rack to restart. If it reappears, call for contact information. ■ ...

Installation Guide
Page 1
... you and others are not followed. W10413012A INSTALLATION INSTRUCTIONS 30" (76.2 CM) FREESTANDING GAS RANGES Table of Contents RANGE SAFETY 1 INSTALLATION REQUIREMENTS 3 Tools and Parts 3 Location Requirements 3 Electrical Requirements 5 Gas Supply Requirements 5 INSTALLATION INSTRUCTIONS 6 Unpack Range 6 Install Anti-Tip Bracket 7 Make Gas Connection 8 Verify Anti-Tip Bracket Location 9 Level Range 9 Electronic Ignition System 9 Warming Drawer 11 Storage Drawer 11...
... you and others are not followed. W10413012A INSTALLATION INSTRUCTIONS 30" (76.2 CM) FREESTANDING GAS RANGES Table of Contents RANGE SAFETY 1 INSTALLATION REQUIREMENTS 3 Tools and Parts 3 Location Requirements 3 Electrical Requirements 5 Gas Supply Requirements 5 INSTALLATION INSTRUCTIONS 6 Unpack Range 6 Install Anti-Tip Bracket 7 Make Gas Connection 8 Verify Anti-Tip Bracket Location 9 Level Range 9 Electronic Ignition System 9 Warming Drawer 11 Storage Drawer 11...

Installation Guide
Page 3
... ■ Flat-blade screwdriver ■ Phillips screwdriver ■ Level ■ Pipe-joint compound resistant to check that the materials used . See "Gas Supply Requirements" section. ■ Contact a qualified floor covering installer to LP gas 4.8 mm) carbide-tipped masonry drill bit (for concrete/ceramic ...Safety, Title 24, HUD Part 280). IMPORTANT: To avoid damage to subfloor. Additional Installation Requirements The installation of this range must provide complete enclosure of the sides and rear of NLW Holdings, Inc. 3 INSTALLATION REQUIREMENTS Tools and Parts Gather ...
... ■ Flat-blade screwdriver ■ Phillips screwdriver ■ Level ■ Pipe-joint compound resistant to check that the materials used . See "Gas Supply Requirements" section. ■ Contact a qualified floor covering installer to LP gas 4.8 mm) carbide-tipped masonry drill bit (for concrete/ceramic ...Safety, Title 24, HUD Part 280). IMPORTANT: To avoid damage to subfloor. Additional Installation Requirements The installation of this range must provide complete enclosure of the sides and rear of NLW Holdings, Inc. 3 INSTALLATION REQUIREMENTS Tools and Parts Gather ...

Installation Guide
Page 4
Product Dimensions Cabinet Dimensions Cabinet opening dimensions shown are recommended for installation of rigid gas pipe. G. 4¹⁄₂" (11.4 cm) H. 8" (20... leveling legs. For minimum clearance to top of an uncovered wood or metal cabinet. 4 M. IMPORTANT: If installing a range hood or microwave hood combination above the range, follow the range hood...28 MSG sheet steel, 0.015" (0.4 mm) stainless steel, 0.024" (0.6 mm) aluminum or 0.020" (0.5 mm) copper. 30" (76.2 cm) minimum clearance between the top of the cooking platform and the bottom of cooktop, see NOTE*. A D B...
Product Dimensions Cabinet Dimensions Cabinet opening dimensions shown are recommended for installation of rigid gas pipe. G. 4¹⁄₂" (11.4 cm) H. 8" (20... leveling legs. For minimum clearance to top of an uncovered wood or metal cabinet. 4 M. IMPORTANT: If installing a range hood or microwave hood combination above the range, follow the range hood...28 MSG sheet steel, 0.015" (0.4 mm) stainless steel, 0.024" (0.6 mm) aluminum or 0.020" (0.5 mm) copper. 30" (76.2 cm) minimum clearance between the top of the cooking platform and the bottom of cooktop, see NOTE*. A D B...

Installation Guide
Page 6
... range. 2. To range Gas Pressure Regulator The gas pressure regulator supplied with a manual shutoff valve. Rear leveling leg C. Line pressure testing at ½ psi gauge (14" WCP) or lower The range must be isolated from the gas supply piping system by closing . INSTALLATION INSTRUCTIONS Unpack Range ...shipping materials, tape and film from the gas supply piping system during any pressure testing of that allows ease of the gas supply piping system at this range must be level with Storage Drawers: Remove the storage drawer. Gas supply line B. Shutoff valve "open" position...
... range. 2. To range Gas Pressure Regulator The gas pressure regulator supplied with a manual shutoff valve. Rear leveling leg C. Line pressure testing at ½ psi gauge (14" WCP) or lower The range must be isolated from the gas supply piping system by closing . INSTALLATION INSTRUCTIONS Unpack Range ...shipping materials, tape and film from the gas supply piping system during any pressure testing of that allows ease of the gas supply piping system at this range must be level with Storage Drawers: Remove the storage drawer. Gas supply line B. Shutoff valve "open" position...

Installation Guide
Page 7
... in the "Location Requirements" section, adjust template so range will be killed. If installing the range in a mobile home, you must secure the range to lower the front and rear leveling legs one-half turn. Rear leveling leg B. Use wrench or pliers to the floor. ...allow for drilling mounting holes through your local hardware store. 7. Move range into its final location making sure rear leveling leg slides into place. 4. Front leveling leg C. On Ranges Equipped with Warming Drawers: On ranges equipped with holes in floor. Continue installing your flooring, longer screws ...
... in the "Location Requirements" section, adjust template so range will be killed. If installing the range in a mobile home, you must secure the range to lower the front and rear leveling legs one-half turn. Rear leveling leg B. Use wrench or pliers to the floor. ...allow for drilling mounting holes through your local hardware store. 7. Move range into its final location making sure rear leveling leg slides into place. 4. Front leveling leg C. On Ranges Equipped with Warming Drawers: On ranges equipped with holes in floor. Continue installing your flooring, longer screws ...

Installation Guide
Page 8
... and G in death, explosion, or fire. Use pipe-joint compound. Your connections may be level when properly positioned. Apply pipe-joint compound made for use with LP gas to the gas pipe. Closed valve B. Correct any leak found. 4. Securely tighten all connections by brushing on ... HG F E. B C A D F E J A. Union J. 90° elbow Typical flexible connection 1. Open valve 3. Nipple D. Attach one adapter to the gas pressure regulator and the other adapter to the range. The valve is open when the handle is not kinked. If bubbles appear, a leak is in the...
... and G in death, explosion, or fire. Use pipe-joint compound. Your connections may be level when properly positioned. Apply pipe-joint compound made for use with LP gas to the gas pipe. Closed valve B. Correct any leak found. 4. Securely tighten all connections by brushing on ... HG F E. B C A D F E J A. Union J. 90° elbow Typical flexible connection 1. Open valve 3. Nipple D. Attach one adapter to the gas pressure regulator and the other adapter to the range. The valve is open when the handle is not kinked. If bubbles appear, a leak is in the...

Installation Guide
Page 9
... because of standing pilots. This sparking continues, as long as the control knob is removed from outside the range. 2. Low flame B. A B A. See "Storage Drawer" section. Level Range 1. If range is not level, pull range forward until the range is plugged in the gas line. On Ranges Equipped with Storage Drawers: Use a ¼" drive ratchet, wrench or pliers to adjust...
... because of standing pilots. This sparking continues, as long as the control knob is removed from outside the range. 2. Low flame B. A B A. See "Storage Drawer" section. Level Range 1. If range is not level, pull range forward until the range is plugged in the gas line. On Ranges Equipped with Storage Drawers: Use a ¼" drive ratchet, wrench or pliers to adjust...

Installation Guide
Page 12
...shut. 12 2. Repeat on the storage drawer until the drawer side rails engage with a soft cloth. Dispose of the Use and Care Guide. 6. See "Level Range." 5. For more information, see which step was skipped. 2. If you purchased your tools. 3. A A. Open oven door all parts are removing and replacing... is necessary, make sure the oven is heavy. Then, follow these instructions. The oven door is off the range and check that the gas supply line shutoff valve is open. ■ If the gas supply line shutoff valve is an extra part, go back through the steps to see the...
...shut. 12 2. Repeat on the storage drawer until the drawer side rails engage with a soft cloth. Dispose of the Use and Care Guide. 6. See "Level Range." 5. For more information, see which step was skipped. 2. If you purchased your tools. 3. A A. Open oven door all parts are removing and replacing... is necessary, make sure the oven is heavy. Then, follow these instructions. The oven door is off the range and check that the gas supply line shutoff valve is open. ■ If the gas supply line shutoff valve is an extra part, go back through the steps to see the...


