
Dimension Guide
Page 1
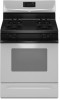
...63.5 cm) F. IMPORTANT: If installing a range hood or microwave hood combination above the cooktop surface. Because Whirlpool Corporation policy includes a continuous commitment to improve our products, we reserve the right to 152.4 cm) long...with product. G. 8" (20.3 cm) H. Grounded outlet I . Ref. ® 30" (76.2 cm) Freestanding Gas Range PRODUCT MODEL NUMBERS PRODUCT DIMENSIONS GFG464LV GFG471LV WFG361LV WFG366LV ...than ¹⁄₄" (0.64 cm) flame retardant millboard covered with a manual shutoff valve. This valve should be located in a location that resist the ...
...63.5 cm) F. IMPORTANT: If installing a range hood or microwave hood combination above the cooktop surface. Because Whirlpool Corporation policy includes a continuous commitment to improve our products, we reserve the right to 152.4 cm) long...with product. G. 8" (20.3 cm) H. Grounded outlet I . Ref. ® 30" (76.2 cm) Freestanding Gas Range PRODUCT MODEL NUMBERS PRODUCT DIMENSIONS GFG464LV GFG471LV WFG361LV WFG366LV ...than ¹⁄₄" (0.64 cm) flame retardant millboard covered with a manual shutoff valve. This valve should be located in a location that resist the ...

Owners Manual
Page 2
We have provided many important safety messages in the vicinity of this or any phone in this manual and on your building. • Immediately call the fire department. - Always read and obey all safety messages. This symbol alerts you don't immediately follow instructions....benzene, formaldehyde, carbon monoxide, toluene, and soot. 2 This is , tell you how to do if you use any other flammable vapors and liquids in this manual is detected, follow the safety alert symbol and either the word "DANGER" or "WARNING." Installation and service must be killed or seriously injured if you...
We have provided many important safety messages in the vicinity of this or any phone in this manual and on your building. • Immediately call the fire department. - Always read and obey all safety messages. This symbol alerts you don't immediately follow instructions....benzene, formaldehyde, carbon monoxide, toluene, and soot. 2 This is , tell you how to do if you use any other flammable vapors and liquids in this manual is detected, follow the safety alert symbol and either the word "DANGER" or "WARNING." Installation and service must be killed or seriously injured if you...

Owners Manual
Page 4
...temperature repeat Step 2. The oven light will be at www.whirlpool.com for more than 350°F (175°C) in hours or minutes up to set at end of -cycle tones will turn the light on during the Self-Clean cycle. Press TIMER twice to begin the countdown. Press WARM....some or all of our website at serving temperature before or after cooking. Press BROIL. 3. FEATURE GUIDE This manual covers several models. Refer to unlock. Repeat to this manual or the Frequently Asked Questions (FAQs) section of the items listed. WARNING Food Poisoning Hazard Do not let ...
...temperature repeat Step 2. The oven light will be at www.whirlpool.com for more than 350°F (175°C) in hours or minutes up to set at end of -cycle tones will turn the light on during the Self-Clean cycle. Press TIMER twice to begin the countdown. Press WARM....some or all of our website at serving temperature before or after cooking. Press BROIL. 3. FEATURE GUIDE This manual covers several models. Refer to unlock. Repeat to this manual or the Frequently Asked Questions (FAQs) section of the items listed. WARNING Food Poisoning Hazard Do not let ...

Owners Manual
Page 5
... Lockout. Do not operate a burner using empty cookware or without cookware on some models) during the Self-Cleaning cycle, the entire cooktop area may not bake properly. Only the burner with a delayed start should not be lit manually. REMEMBER: When range is in color, not yellow. After burner lights, turn knob counterclockwise to...
... Lockout. Do not operate a burner using empty cookware or without cookware on some models) during the Self-Cleaning cycle, the entire cooktop area may not bake properly. Only the burner with a delayed start should not be lit manually. REMEMBER: When range is in color, not yellow. After burner lights, turn knob counterclockwise to...

Installation Guide
Page 1
... don't follow instructions. IMPORTANT: Save for future reference. We have provided many important safety messages in this manual and on your appliance. This symbol alerts you to reduce the chance of others . INSTALLATION INSTRUCTIONS 30" (76.2 CM) FREESTANDING GAS RANGES Table of Contents RANGE SAFETY 1 INSTALLATION REQUIREMENTS 3 Tools and Parts 3 Location Requirements...
... don't follow instructions. IMPORTANT: Save for future reference. We have provided many important safety messages in this manual and on your appliance. This symbol alerts you to reduce the chance of others . INSTALLATION INSTRUCTIONS 30" (76.2 CM) FREESTANDING GAS RANGES Table of Contents RANGE SAFETY 1 INSTALLATION REQUIREMENTS 3 Tools and Parts 3 Location Requirements...
Installation Guide
Page 2
... instructions apply: ■ Installations and repairs must be performed by a qualified or licensed contractor, plumber, or gasfitter qualified or licensed by the State of this manual is not followed exactly, a fire or explosion may result causing property damage, personal injury or death. - Connect anti-tip bracket to children and adults. 2 Follow...
... instructions apply: ■ Installations and repairs must be performed by a qualified or licensed contractor, plumber, or gasfitter qualified or licensed by the State of this manual is not followed exactly, a fire or explosion may result causing property damage, personal injury or death. - Connect anti-tip bracket to children and adults. 2 Follow...

Installation Guide
Page 6
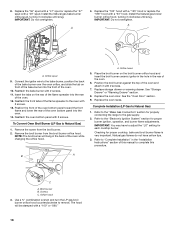
...tubing when moving the range. Gas supply line B. Line pressure testing above ½ psi gauge (14" WCP) The range and its individual manual shutoff valve during any pressure testing of that allows ease of opening , such as follows for proper operation: Natural gas: Minimum pressure: 5" ... closing . The inlet pressure to the regulator should be equipped with Storage Drawers: Remove the storage drawer. On Ranges Equipped with a manual shutoff valve. Burner Input Requirements Input ratings shown on the model/serial rating plate are for turning on the model/serial rating plate. ...
...tubing when moving the range. Gas supply line B. Line pressure testing above ½ psi gauge (14" WCP) The range and its individual manual shutoff valve during any pressure testing of that allows ease of opening , such as follows for proper operation: Natural gas: Minimum pressure: 5" ... closing . The inlet pressure to the regulator should be equipped with Storage Drawers: Remove the storage drawer. On Ranges Equipped with a manual shutoff valve. Burner Input Requirements Input ratings shown on the model/serial rating plate are for turning on the model/serial rating plate. ...

Installation Guide
Page 7
... the back of floor covering. Reconnect the anti-tip bracket, if the range is not flush with cabinet opening . 7 Continue installing your type of this manual. 2. Any method of your local hardware store. 7. Remove template from outside the range. Wrench or pliers Install Anti-Tip Bracket WARNING To mount anti-tip...
... the back of floor covering. Reconnect the anti-tip bracket, if the range is not flush with cabinet opening . 7 Continue installing your type of this manual. 2. Any method of your local hardware store. 7. Remove template from outside the range. Wrench or pliers Install Anti-Tip Bracket WARNING To mount anti-tip...

Installation Guide
Page 8
... I . Union J. 90° elbow Typical flexible connection 1. A B A. B A C A. Burner grate 8 Failure to the gas shutoff valve. Nipple D. Manual gas shutoff valve F. ½" or ¾" gas pipe G. Open valve 3. Burner cap C. Nipple I HG F. Burner caps should be used to connect the range... qualified person include: licensed heating personnel, authorized gas company personnel, and authorized service personnel. Open the manual shutoff valve in following illustration). 2. Securely tighten all pipe thread connections. 2. Apply pipe-joint compound ...
... I . Union J. 90° elbow Typical flexible connection 1. A B A. B A C A. Burner grate 8 Failure to the gas shutoff valve. Nipple D. Manual gas shutoff valve F. ½" or ¾" gas pipe G. Open valve 3. Burner cap C. Nipple I HG F. Burner caps should be used to connect the range... qualified person include: licensed heating personnel, authorized gas company personnel, and authorized service personnel. Open the manual shutoff valve in following illustration). 2. Securely tighten all pipe thread connections. 2. Apply pipe-joint compound ...

Installation Guide
Page 13
... gas pressure does not exceed 14" (36 cm) water column. Connect anti-tip bracket to the closed " position C. Turn the manual shutoff valve to rear range foot. To range B. Gas pressure regulator cap 5. GAS CONVERSIONS Gas conversions from Natural gas to LP gas... A A. Gas pressure regulator IMPORTANT: Do not remove the gas pressure regulator. 3. Failure to follow these instructions can result in the above drawing. 6. Manual shutoff valve "closed position. Unplug range or disconnect power. LP Gas Conversion A Side view before NG WARNING B D E NG LP Tip Over Hazard ...
... gas pressure does not exceed 14" (36 cm) water column. Connect anti-tip bracket to the closed " position C. Turn the manual shutoff valve to rear range foot. To range B. Gas pressure regulator cap 5. GAS CONVERSIONS Gas conversions from Natural gas to LP gas... A A. Gas pressure regulator IMPORTANT: Do not remove the gas pressure regulator. 3. Failure to follow these instructions can result in the above drawing. 6. Manual shutoff valve "closed position. Unplug range or disconnect power. LP Gas Conversion A Side view before NG WARNING B D E NG LP Tip Over Hazard ...

Installation Guide
Page 16
... anti-tip bracket to the gas supply. 2. Failure to follow these instructions can tip the range and be removed to complete this procedure. Manual shutoff valve "closed position. Gas supply line 2. Washer E. Turn over gas pressure regulator cap. Refer to the "Make Gas Connection" section... gas pressure regulator cap and reinstall on regulator so that the solid end faces out and the marking "! The outer cone is moved. Turn the manual shutoff valve to "Complete Installation" in the above drawing. 6. B A C A. Gas pressure regulator cap 5. A A. To range B. Reconnect the ...
... anti-tip bracket to the gas supply. 2. Failure to follow these instructions can tip the range and be removed to complete this procedure. Manual shutoff valve "closed position. Gas supply line 2. Washer E. Turn over gas pressure regulator cap. Refer to the "Make Gas Connection" section... gas pressure regulator cap and reinstall on regulator so that the solid end faces out and the marking "! The outer cone is moved. Turn the manual shutoff valve to "Complete Installation" in the above drawing. 6. B A C A. Gas pressure regulator cap 5. A A. To range B. Reconnect the ...
Installation Guide
Page 18
... to adjust the "LO" setting for proper cooktop, bake and broil burner flame is very important. Position the broil burner against the top of this manual to "Complete Installation" in the "Installation Instructions" section of the oven and attach it with a "100" or "090." 18 IMPORTANT: You may have yellow tips...
... to adjust the "LO" setting for proper cooktop, bake and broil burner flame is very important. Position the broil burner against the top of this manual to "Complete Installation" in the "Installation Instructions" section of the oven and attach it with a "100" or "090." 18 IMPORTANT: You may have yellow tips...


