
Owners Manual
Page 7
... from the oven, and A should not be able to circulate. Preheating When START is pressed, the oven will cause poor air circulation, affecting cooking and cleaning results. It is not necessary to preheat the oven before putting food in the recipe. It is designed to ensure proper broiling temperature. 7 For best..., and then lift out. Ask for the oven preheat cycle to end before putting food in unless recommended in unless it out to wait for Part Number 4396923.
... from the oven, and A should not be able to circulate. Preheating When START is pressed, the oven will cause poor air circulation, affecting cooking and cleaning results. It is not necessary to preheat the oven before putting food in the recipe. It is designed to ensure proper broiling temperature. 7 For best..., and then lift out. Ask for the oven preheat cycle to end before putting food in unless recommended in unless it out to wait for Part Number 4396923.

Owners Manual
Page 9
...cover by turning clockwise. 5. EXTERIOR PORCELAIN ENAMEL SURFACES (on panel. ■ All-Purpose Appliance Cleaner Part Number 31682 (not included): See cover for contact information. STAINLESS STEEL (on some models) Food spills...cookware. Turn the glass bulb cover in direction of our website at www.whirlpool.com. Plug in the OFF position. Always follow label instructions on burners while wet....are cool. These spills may affect the finish. Do not clean in the off and the oven and cooktop are in the Self-Cleaning cycle. ■ For racks that storage drawer is a ...
...cover by turning clockwise. 5. EXTERIOR PORCELAIN ENAMEL SURFACES (on panel. ■ All-Purpose Appliance Cleaner Part Number 31682 (not included): See cover for contact information. STAINLESS STEEL (on some models) Food spills...cookware. Turn the glass bulb cover in direction of our website at www.whirlpool.com. Plug in the OFF position. Always follow label instructions on burners while wet....are cool. These spills may affect the finish. Do not clean in the off and the oven and cooktop are in the Self-Cleaning cycle. ■ For racks that storage drawer is a ...

Owners Manual
Page 11
... and Polish (stainless steel models) Order Part Number 31462 All-Purpose Appliance Cleaner Order Part Number 31682 Gas Grate and Drip Pan Cleaner Order Part Number 31617 ACCESSORIES Split-Rack with Removable Insert Order Part Number 4396927 Broiler Pan Order Part Number 4396923 11 There has been a...proper oven temperature calibration set? Use aluminum foil to clear the display. On some models) See "Timed Cooking" section. ■ Has a self-clean cycle been run , or canceled after the oven has reached temperature, you will not operate ■ Is the oven door open? See "...
... and Polish (stainless steel models) Order Part Number 31462 All-Purpose Appliance Cleaner Order Part Number 31682 Gas Grate and Drip Pan Cleaner Order Part Number 31617 ACCESSORIES Split-Rack with Removable Insert Order Part Number 4396927 Broiler Pan Order Part Number 4396923 11 There has been a...proper oven temperature calibration set? Use aluminum foil to clear the display. On some models) See "Timed Cooking" section. ■ Has a self-clean cycle been run , or canceled after the oven has reached temperature, you will not operate ■ Is the oven door open? See "...

Owners Manual
Page 12
... use of consumables or cleaning products not approved by a Whirlpool designated service company. You can write to Whirlpool with any questions or concerns at the number below : Whirlpool Brand Home Appliances Customer... when the major appliance is used in materials or workmanship and is reported to Whirlpool within 30 days from the date of purchase. 6. Any food loss due to repair or... freezer product failures. 7. The removal and reinstallation of your major appliance for Factory Specified Parts and repair labor to correct defects in accordance with electrical or plumbing codes, or use ...
... use of consumables or cleaning products not approved by a Whirlpool designated service company. You can write to Whirlpool with any questions or concerns at the number below : Whirlpool Brand Home Appliances Customer... when the major appliance is used in materials or workmanship and is reported to Whirlpool within 30 days from the date of purchase. 6. Any food loss due to repair or... freezer product failures. 7. The removal and reinstallation of your major appliance for Factory Specified Parts and repair labor to correct defects in accordance with electrical or plumbing codes, or use ...

Warranty
Page 1
... is installed in accordance with electrical or plumbing codes, or use your authorized Whirlpool dealer to parts or systems resulting from warranty coverage. 3. If outside the 50 United States and...in which it is used in a manner that have access to use of consumables or cleaning products not approved by the customer. LIMITATION OF REMEDIES CUSTOMER'S SOLE AND EXCLUSIVE REMEDY UNDER... in -home service is not available. 10. This major appliance is designed to Whirlpool within 30 days from the date of purchase, when this warranty. 8. DISCLAIMER OF IMPLIED WARRANTIES...
... is installed in accordance with electrical or plumbing codes, or use your authorized Whirlpool dealer to parts or systems resulting from warranty coverage. 3. If outside the 50 United States and...in which it is used in a manner that have access to use of consumables or cleaning products not approved by the customer. LIMITATION OF REMEDIES CUSTOMER'S SOLE AND EXCLUSIVE REMEDY UNDER... in -home service is not available. 10. This major appliance is designed to Whirlpool within 30 days from the date of purchase, when this warranty. 8. DISCLAIMER OF IMPLIED WARRANTIES...

Installation Guide
Page 1
... reference. Homeowner: Keep installation instructions for local inspector's use. Installer: Leave installation instructions with the homeowner. INSTALLATION INSTRUCTIONS 30" (76.2 CM) FREESTANDING GAS RANGES Table of Contents RANGE SAFETY 1 INSTALLATION REQUIREMENTS 3 Tools and Parts 3 Location Requirements 3 Electrical Requirements 5 Gas Supply Requirements 5 INSTALLATION INSTRUCTIONS 6 Unpack Range 6 Install Anti-Tip Bracket 7 Make Gas Connection...
... reference. Homeowner: Keep installation instructions for local inspector's use. Installer: Leave installation instructions with the homeowner. INSTALLATION INSTRUCTIONS 30" (76.2 CM) FREESTANDING GAS RANGES Table of Contents RANGE SAFETY 1 INSTALLATION REQUIREMENTS 3 Tools and Parts 3 Location Requirements 3 Electrical Requirements 5 Gas Supply Requirements 5 INSTALLATION INSTRUCTIONS 6 Unpack Range 6 Install Anti-Tip Bracket 7 Make Gas Connection...

Installation Guide
Page 3
... ■ ½" combination wrench combination wrench ■ 7 mm nut driver ■ Quadrex®† or Phillips screwdriver ■ Masking tape Parts supplied Check that are included. A B C A. Plastic anchors (2) C. #10 x ¹⁄₂" screws (2) ■ Anti-tip bracket... must be securely mounted to the Manufactured Home Construction and Safety Standard, Title 24 CFR, Part 3280 (formerly the Federal Standard for Manufactured Home Installations, ANSI A225.1/NFPA 501A or with installation clearances specified on the oven ...
... ■ ½" combination wrench combination wrench ■ 7 mm nut driver ■ Quadrex®† or Phillips screwdriver ■ Masking tape Parts supplied Check that are included. A B C A. Plastic anchors (2) C. #10 x ¹⁄₂" screws (2) ■ Anti-tip bracket... must be securely mounted to the Manufactured Home Construction and Safety Standard, Title 24 CFR, Part 3280 (formerly the Federal Standard for Manufactured Home Installations, ANSI A225.1/NFPA 501A or with installation clearances specified on the oven ...

Installation Guide
Page 6
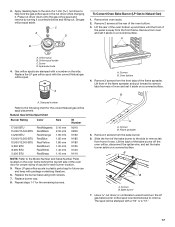
... . Line pressure testing at a rate of opening , such as follows for connection to the female pipe threads of ½ psi (3.5 kPa). Remove oven racks and parts package from range. 2. Do not remove the shipping base at this range must be at least 1" water column pressure above the manifold pressure shown on...
... . Line pressure testing at a rate of opening , such as follows for connection to the female pipe threads of ½ psi (3.5 kPa). Remove oven racks and parts package from range. 2. Do not remove the shipping base at this range must be at least 1" water column pressure above the manifold pressure shown on...

Installation Guide
Page 8
.... Nipple D. Union E. Tighten both adapters. Closed valve B. Open valve 3. If bubbles appear, a leak is parallel to the range. Remove cooktop burner caps and grates from parts package. If burner caps are not properly positioned, surface burners will not light. Check that the gas pressure regulator shutoff valve is not kinked. Failure...
.... Nipple D. Union E. Tighten both adapters. Closed valve B. Open valve 3. If bubbles appear, a leak is parallel to the range. Remove cooktop burner caps and grates from parts package. If burner caps are not properly positioned, surface burners will not light. Check that the gas pressure regulator shutoff valve is not kinked. Failure...

Installation Guide
Page 12
... clip - Insert both hanger arms into place. 3. Oven Door For normal range use, it , then repeat the 5-minute test as the door is an extra part, go back through the steps to move the drawer stop notch past the drawer glides. To Remove: 1. Open oven door all of the storage drawer... Use and Care Guide or contact the dealer from whom you need Assistance or Service: Please reference the "Assistance or Service" section of /recycle all parts are removing and replacing the storage drawer, a slight push may be needed to see the "Range Care" section of oven door. Check that the range...
... clip - Insert both hanger arms into place. 3. Oven Door For normal range use, it , then repeat the 5-minute test as the door is an extra part, go back through the steps to move the drawer stop notch past the drawer glides. To Remove: 1. Open oven door all of the storage drawer... Use and Care Guide or contact the dealer from whom you need Assistance or Service: Please reference the "Assistance or Service" section of /recycle all parts are removing and replacing the storage drawer, a slight push may be needed to see the "Range Care" section of oven door. Check that the range...
Installation Guide
Page 17
..., and set the bake burner aside on a covered surface. C A D To Convert Oven Bake Burner (LP Gas to help hold the gas orifice spud in plastic parts bag for each burner location. 5. Spark electrode 4. Replace the LP gas orifice spud with a "56" or a "57." 17 B A. Screws B. Bake burner 7. Use a ³⁄₈...
..., and set the bake burner aside on a covered surface. C A D To Convert Oven Bake Burner (LP Gas to help hold the gas orifice spud in plastic parts bag for each burner location. 5. Spark electrode 4. Replace the LP gas orifice spud with a "56" or a "57." 17 B A. Screws B. Bake burner 7. Use a ³⁄₈...


