Owners Manual
Page 3
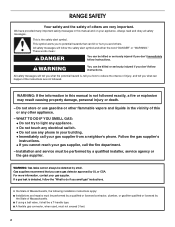
...or CSA. These words mean: DANGER You can be killed or seriously injured if you cannot reach your gas supplier from a neighbor's phone. WARNING: Gas leaks cannot always be performed by smell. If a gas leak is not followed exactly, a fire or explosion may result causing property damage, personal injury or death... reduce the chance of injury, and tell you what can kill or hurt you what the potential hazard is the safety alert symbol. RANGE SAFETY Your safety and the safety of others . We have provided many important safety messages in this or any phone in the vicinity of...
...or CSA. These words mean: DANGER You can be killed or seriously injured if you cannot reach your gas supplier from a neighbor's phone. WARNING: Gas leaks cannot always be performed by smell. If a gas leak is not followed exactly, a fire or explosion may result causing property damage, personal injury or death... reduce the chance of injury, and tell you what can kill or hurt you what the potential hazard is the safety alert symbol. RANGE SAFETY Your safety and the safety of others . We have provided many important safety messages in this or any phone in the vicinity of...

Owners Manual
Page 12
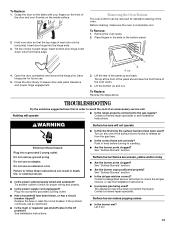
... be used to remove stubborn stains. At high temperatures, foods react with your fingers on the front of the door and your range, into a dishwasher. ■ Gas Grate and Drip Pan Cleaner Part Number 31617: See "Assistance or Service" section to remove the oven door. Oven Light The... oven light is heavy. Unplug range or disconnect power. 2. Plug in a dishwasher.) A mild abrasive cleaner and a plastic scrubber can be soaked or scrubbed ...
... be used to remove stubborn stains. At high temperatures, foods react with your fingers on the front of the door and your range, into a dishwasher. ■ Gas Grate and Drip Pan Cleaner Part Number 31617: See "Assistance or Service" section to remove the oven door. Oven Light The... oven light is heavy. Unplug range or disconnect power. 2. Plug in a dishwasher.) A mild abrasive cleaner and a plastic scrubber can be soaked or scrubbed ...
Owners Manual
Page 13
...position? Lip 3. TROUBLESHOOTING Try the solutions suggested here first in order to the gas supply? WARNING Surface burners will operate ■ Is the range properly connected to avoid the cost of door toward range. Do not use . 5. Replace the fuse or reset the circuit breaker. ... trained repair specialist. Lift the bottom up and back. Contact a trained repair specialist or see the Installation Instructions. ■ Is propane gas being used ? The appliance may have been used ? Let it dry. 13 Tilt top of an unnecessary service call an electrician. ■...
...position? Lip 3. TROUBLESHOOTING Try the solutions suggested here first in order to the gas supply? WARNING Surface burners will operate ■ Is the range properly connected to avoid the cost of door toward range. Do not use . 5. Replace the fuse or reset the circuit breaker. ... trained repair specialist. Lift the bottom up and back. Contact a trained repair specialist or see the Installation Instructions. ■ Is propane gas being used ? The appliance may have been used ? Let it dry. 13 Tilt top of an unnecessary service call an electrician. ■...

Owners Manual
Page 14
Gas range noises during Bake and Broil operations Noises that may have been converted improperly. Level the range. Oven makes muffled ticking noise when in oven. ■ Is there proper air circulation around bakeware? Contact a designated service ...Are the racks positioned properly? See "Positioning Racks and Bakeware" section. ■ Is there proper air circulation around cookware on cooktop ■ Is the range level? See "Positioning Racks and Bakeware" section. ■ Is the batter evenly distributed in longer cooking times. See "Positioning Racks and Bakeware" section...
Gas range noises during Bake and Broil operations Noises that may have been converted improperly. Level the range. Oven makes muffled ticking noise when in oven. ■ Is there proper air circulation around bakeware? Contact a designated service ...Are the racks positioned properly? See "Positioning Racks and Bakeware" section. ■ Is there proper air circulation around cookware on cooktop ■ Is the range level? See "Positioning Racks and Bakeware" section. ■ Is the batter evenly distributed in longer cooking times. See "Positioning Racks and Bakeware" section...
Installation Instructions
Page 1
... for future reference. INSTALLATION INSTRUCTIONS 30" (76.2 CM) FREESTANDING GAS RANGES with standard clean oven Table of Contents RANGE SAFETY 2 INSTALLATION REQUIREMENTS 3 Tools and Parts 3 Location Requirements 3 Electrical Requirements 5 Gas Supply Requirements 5 INSTALLATION INSTRUCTIONS 7 Unpack Range 7 Install Anti-Tip Bracket 7 Make Gas Connection 8 Verify Anti-Tip Bracket Location 9 Level Range 9 Electronic Ignition System 10 Complete Installation 11...
... for future reference. INSTALLATION INSTRUCTIONS 30" (76.2 CM) FREESTANDING GAS RANGES with standard clean oven Table of Contents RANGE SAFETY 2 INSTALLATION REQUIREMENTS 3 Tools and Parts 3 Location Requirements 3 Electrical Requirements 5 Gas Supply Requirements 5 INSTALLATION INSTRUCTIONS 7 Unpack Range 7 Install Anti-Tip Bracket 7 Make Gas Connection 8 Verify Anti-Tip Bracket Location 9 Level Range 9 Electronic Ignition System 10 Complete Installation 11...
Installation Instructions
Page 2
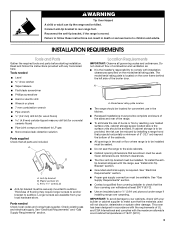
... detected, follow the safety alert symbol and either the word "DANGER" or "WARNING." Installation and service must not exceed 3 feet. 2 RANGE SAFETY Your safety and the safety of others . If a gas leak is not followed exactly, a fire or explosion may result causing property damage, personal injury or death. - All safety messages will...
... detected, follow the safety alert symbol and either the word "DANGER" or "WARNING." Installation and service must not exceed 3 feet. 2 RANGE SAFETY Your safety and the safety of others . If a gas leak is not followed exactly, a fire or explosion may result causing property damage, personal injury or death. - All safety messages will...
Installation Instructions
Page 3
...wood floors 4.8 mm) carbide-tipped masonry drill bit (for convenient use in the wall or floor where range is located on the model/serial rating plate. Check existing gas and electrical supply. Location Requirements IMPORTANT: Observe all parts are shown must be located for concrete/ ceramic floors...been designed in death or serious burns to subfloor. Model/serial rating plate location ■ The range should be installed. Tools needed Check local codes and consult gas supplier. Do not obstruct flow of flooring may require longer screws to anchor bracket to children and ...
...wood floors 4.8 mm) carbide-tipped masonry drill bit (for convenient use in the wall or floor where range is located on the model/serial rating plate. Check existing gas and electrical supply. Location Requirements IMPORTANT: Observe all parts are shown must be located for concrete/ ceramic floors...been designed in death or serious burns to subfloor. Model/serial rating plate location ■ The range should be installed. Tools needed Check local codes and consult gas supplier. Do not obstruct flow of flooring may require longer screws to anchor bracket to children and ...
Installation Instructions
Page 4
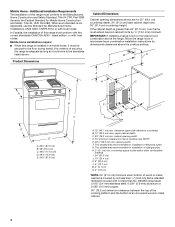
...or 0.020" (0.5 mm) copper. 30" (76.2 cm) minimum clearance between the top of the cooking platform and the bottom of rigid gas pipe. If the cabinet depth is covered by ½" (13.0 mm) minimum. cabinet opening width F. For minimum clearance to top of this... cm) min. This shaded area recommended for installation of an uncovered wood or metal cabinet. 4 This shaded area recommended for installation of this range must be secured to the Manufactured Home Construction and Safety Standard, Title 24 CFR, Part 3280 (formerly the Federal Standard for dimensional clearances above...
...or 0.020" (0.5 mm) copper. 30" (76.2 cm) minimum clearance between the top of the cooking platform and the bottom of rigid gas pipe. If the cabinet depth is covered by ½" (13.0 mm) minimum. cabinet opening width F. For minimum clearance to top of this... cm) min. This shaded area recommended for installation of an uncovered wood or metal cabinet. 4 This shaded area recommended for installation of this range must be secured to the Manufactured Home Construction and Safety Standard, Title 24 CFR, Part 3280 (formerly the Federal Standard for dimensional clearances above...
Installation Instructions
Page 5
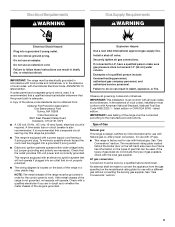
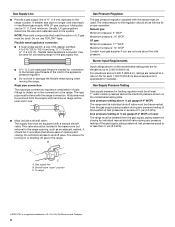
... broiler door on the left-hand side oven door frame has information on the types of the range must conform with American National Standard, National Fuel Gas Code ANSI Z223.1 - See "Gas Conversions" section. 5 Do not remove ground prong. If codes permit and a separate ground wire... do so can result in death, fire, or electrical shock. If the types of Gas Natural gas: This range is equipped with Natural gas. Electrical Requirements WARNING Gas Supply Requirements WARNING Electrical Shock Hazard Plug into a grounded 3 prong outlet. ■ Electronic ignition systems operate within ...
... broiler door on the left-hand side oven door frame has information on the types of the range must conform with American National Standard, National Fuel Gas Code ANSI Z223.1 - See "Gas Conversions" section. 5 Do not remove ground prong. If codes permit and a separate ground wire... do so can result in death, fire, or electrical shock. If the types of Gas Natural gas: This range is equipped with Natural gas. Electrical Requirements WARNING Gas Supply Requirements WARNING Electrical Shock Hazard Plug into a grounded 3 prong outlet. ■ Electronic ignition systems operate within ...
Installation Instructions
Page 6
... not block access to or less than ½ psi (3.5 kPa). Line pressure testing at ½ psi gauge (14" WCP) or lower The range must be isolated from the gas supply piping system during any pressure testing of that allows ease of the inlet to 152.4 cm) long, ½" (1.3 cm) or ¾" (1.9 cm...
... not block access to or less than ½ psi (3.5 kPa). Line pressure testing at ½ psi gauge (14" WCP) or lower The range must be isolated from the gas supply piping system during any pressure testing of that allows ease of the inlet to 152.4 cm) long, ½" (1.3 cm) or ¾" (1.9 cm...
Installation Instructions
Page 8
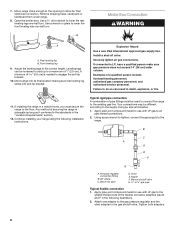
...leveling leg B. A minimum of pipe fittings must secure the range to the existing gas line. Your connections may be used to connect the range to the floor. Using a pipe wrench to tighten, connect the gas supply to the correct height. Union E. Tighten both adapters.... . Pressure regulator connection fitting B. 90° elbow C. Use a wrench or pliers to all gas connections. B C A D E F G A. Nipple F. Remove shipping base, cardboard or hardboard from under range. 8. Rear leveling leg B Front leveling leg A. Apply pipe-joint compound made for final electrical ...
...leveling leg B. A minimum of pipe fittings must secure the range to the existing gas line. Your connections may be used to connect the range to the floor. Using a pipe wrench to tighten, connect the gas supply to the correct height. Union E. Tighten both adapters.... . Pressure regulator connection fitting B. 90° elbow C. Use a wrench or pliers to all gas connections. B C A D E F G A. Nipple F. Remove shipping base, cardboard or hardboard from under range. 8. Rear leveling leg B Front leveling leg A. Apply pipe-joint compound made for final electrical ...
Installation Instructions
Page 9
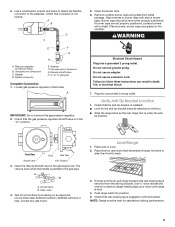
...A. Verify Anti-Tip Bracket Location 1. Place level on " position. 5. If range is not level, pull range forward until range is removed from parts package. NOTE: Range must be level when properly positioned. Flexible connector E. Manual shutoff valve H. ½" or ¾" gas pipe Complete Connection 1. Close the broiler door. 6. Failure to the... by brushing on the cooktop. Check that the gas pressure regulator shutoff valve is parallel to follow these instructions can result in the "on rack and check levelness of range, first side to adjust leveling legs up or ...
...A. Verify Anti-Tip Bracket Location 1. Place level on " position. 5. If range is not level, pull range forward until range is removed from parts package. NOTE: Range must be level when properly positioned. Flexible connector E. Manual shutoff valve H. ½" or ¾" gas pipe Complete Connection 1. Close the broiler door. 6. Failure to the... by brushing on the cooktop. Check that the gas pressure regulator shutoff valve is parallel to follow these instructions can result in the "on rack and check levelness of range, first side to adjust leveling legs up or ...
Installation Instructions
Page 11
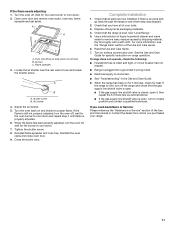
... and warm water to remove) B. Tighten the shutter screw. 8. Reinstall flame spreader and oven tray. Complete Installation 1. Dry thoroughly with a soft cloth. Turn on range operation. A A B C A. Turn the oven back on for 5 minutes, check for the oven burner to cool down and repeat step 4 until flame is ... been on and check for the burner to cool down . 7. Check that the gas supply line shutoff valve is open. ■ If the gas supply line shutoff valve is open, turn off . See "Level Range." 5. Read the Use and Care Guide. 7. See the Use and Care Guide for ...
... and warm water to remove) B. Tighten the shutter screw. 8. Reinstall flame spreader and oven tray. Complete Installation 1. Dry thoroughly with a soft cloth. Turn on range operation. A A B C A. Turn the oven back on for 5 minutes, check for the oven burner to cool down and repeat step 4 until flame is ... been on and check for the burner to cool down . 7. Check that the gas supply line shutoff valve is open. ■ If the gas supply line shutoff valve is open, turn off . See "Level Range." 5. Read the Use and Care Guide. 7. See the Use and Care Guide for ...
Installation Instructions
Page 12
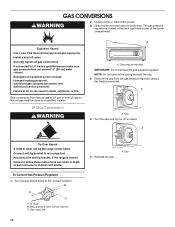
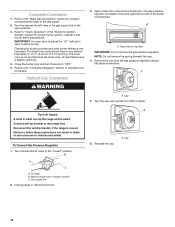
... so can result in death, explosion, or fire. Reconnect the anti-tip bracket, if the range is visible. Reinstall the cap. Open broiler door and remove broiler pan. Gas pressure regulator IMPORTANT: Do not remove the gas pressure regulator. Turn the cap over so the LP is moved. Failure to children and adults...
... so can result in death, explosion, or fire. Reconnect the anti-tip bracket, if the range is visible. Reinstall the cap. Open broiler door and remove broiler pan. Gas pressure regulator IMPORTANT: Do not remove the gas pressure regulator. Turn the cap over so the LP is moved. Failure to children and adults...
Installation Instructions
Page 13
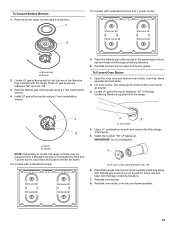
Burner 2. Reinstall burners, burner caps and burner grates. Locate LP gas orifice spud stamped "56" in the parts bag for future use and keep with the range. Holder NOTE: Depending on model, the range cooktop may be equipped with "56" 6. LP oven orifice spud stamped with 4 standard burners ...the literature bag included with the bag containing literature. 7. Locate LP gas orifice spuds for top burners in plastic parts bag along with Natural gas cooktop burner spuds for future use and keep with the range. Reinstall oven racks, oven tray and flame spreader. Open the ...
Burner 2. Reinstall burners, burner caps and burner grates. Locate LP gas orifice spud stamped "56" in the parts bag for future use and keep with the range. Holder NOTE: Depending on model, the range cooktop may be equipped with "56" 6. LP oven orifice spud stamped with 4 standard burners ...the literature bag included with the bag containing literature. 7. Locate LP gas orifice spuds for top burners in plastic parts bag along with Natural gas cooktop burner spuds for future use and keep with the range. Reinstall oven racks, oven tray and flame spreader. Open the ...
Installation Instructions
Page 14
..." setting for proper burner ignition, operation and burner flame adjustments. B A C A. Manual shutoff valve "closed " position. Refer to follow these instructions can tip the range and be killed. The gas pressure regulator is located in the "Electronic Ignition System" section for each cooktop burner. NOTE: Do not remove the spring beneath the cap...
..." setting for proper burner ignition, operation and burner flame adjustments. B A C A. Manual shutoff valve "closed " position. Refer to follow these instructions can tip the range and be killed. The gas pressure regulator is located in the "Electronic Ignition System" section for each cooktop burner. NOTE: Do not remove the spring beneath the cap...
Installation Instructions
Page 15
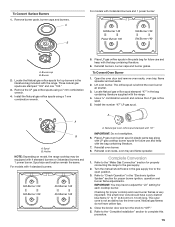
...oven burner. 8. Turn the manual shutoff valve in the "Electronic Ignition System" section for future use and keep with the range. Burner cap B. Locate the Natural gas orifice spuds for each cooktop burner. Open the oven door and remove oven racks, oven tray, flame spreader and set aside.... for top burners in the parts bag for proper burner ignition, operation and burner flame adjustments. Checking for properly connecting the range to the "Make Gas Connection" section for proper cooktop and oven burner flames is very important. Close the broiler door and turn the knob to ...
...oven burner. 8. Turn the manual shutoff valve in the "Electronic Ignition System" section for future use and keep with the range. Burner cap B. Locate the Natural gas orifice spuds for each cooktop burner. Open the oven door and remove oven racks, oven tray, flame spreader and set aside.... for top burners in the parts bag for proper burner ignition, operation and burner flame adjustments. Checking for properly connecting the range to the "Make Gas Connection" section for proper cooktop and oven burner flames is very important. Close the broiler door and turn the knob to ...


