Owners Manual
Page 3
... reduce the chance of injury, and tell you what the potential hazard is detected, follow the "What to potential hazards that you smell gas" instructions. RANGE SAFETY Your safety and the safety of others . We have provided many important safety messages in your building. • Immediately call the fire department. - These...
... reduce the chance of injury, and tell you what the potential hazard is detected, follow the "What to potential hazards that you smell gas" instructions. RANGE SAFETY Your safety and the safety of others . We have provided many important safety messages in your building. • Immediately call the fire department. - These...
Owners Manual
Page 4
..., or sitting on the backguard of the cooking utensil. Remove broiler pan and other flammable vapors and liquids. ■ Storage in cabinets above a range or on the doors or drawers. ■ Maintenance - Wipe off all excessive spillage before servicing. ■ Injuries may also trap heat, causing ...remove the grounding prong from combustible materials, gasoline, and other utensils. Connect anti-tip bracket to floor. • Slide range back so rear range foot is under anti-tip bracket. Flammable materials should be stored in the oven bottom or cover an entire rack with ...
..., or sitting on the backguard of the cooking utensil. Remove broiler pan and other flammable vapors and liquids. ■ Storage in cabinets above a range or on the doors or drawers. ■ Maintenance - Wipe off all excessive spillage before servicing. ■ Injuries may also trap heat, causing ...remove the grounding prong from combustible materials, gasoline, and other utensils. Connect anti-tip bracket to floor. • Slide range back so rear range foot is under anti-tip bracket. Flammable materials should be stored in the oven bottom or cover an entire rack with ...

Owners Manual
Page 5
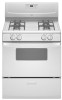
... grate C. Anti-tip bracket E. Control panel K. Model and serial number plate (behind left side of your model. Door gasket 5 Cooktop Control Panel A Range B C A. Left front burner control knob D. The range you have purchased may not match those of broiler door) F. Broiler door G. Right front surface burner and grate J. Right front burner control...
... grate C. Anti-tip bracket E. Control panel K. Model and serial number plate (behind left side of your model. Door gasket 5 Cooktop Control Panel A Range B C A. Left front burner control knob D. The range you have purchased may not match those of broiler door) F. Broiler door G. Right front surface burner and grate J. Right front burner control...
Owners Manual
Page 10
... oven, making cleaning more difficult. 10 Oven vent The oven vent releases hot air and moisture from the oven when removing the food. The bake range can be blocked or covered. Preheat is complete and the oven is ready to reduce spattering. Preheat temperatures are affected by pressing BAKE. 3. The broiler...
... oven, making cleaning more difficult. 10 Oven vent The oven vent releases hot air and moisture from the oven when removing the food. The bake range can be blocked or covered. Preheat is complete and the oven is ready to reduce spattering. Preheat temperatures are affected by pressing BAKE. 3. The broiler...
Owners Manual
Page 11
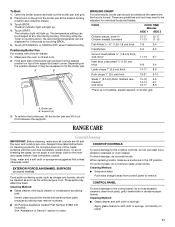
... Chicken pieces, bone-in the Off position. Cleaning Method: ■ Soap and water: Food spills containing acids, such as the entire range is counting down any time during broiling. To Broil: 1. To avoid damage, do not use abrasive cleaners, steel-wool pads, gritty ...washcloths or abrasive paper towels. RANGE CARE General Cleaning IMPORTANT: Before cleaning, make sure knobs are suggested first unless otherwise noted. The indicator light will light up to...
... Chicken pieces, bone-in the Off position. Cleaning Method: ■ Soap and water: Food spills containing acids, such as the entire range is counting down any time during broiling. To Broil: 1. To avoid damage, do not use abrasive cleaners, steel-wool pads, gritty ...washcloths or abrasive paper towels. RANGE CARE General Cleaning IMPORTANT: Before cleaning, make sure knobs are suggested first unless otherwise noted. The indicator light will light up to...

Owners Manual
Page 12
...the oven door is not suggested to order. Plug in a dishwasher.) A mild abrasive cleaner and a plastic scrubber can be used to remove from the range. 2. Do not remove hinge pins until the door is heavy. Cleaning Method: ■ Steel-wool pad ■ Oven cleaner: Follow product label ...instructions. Grasp the door on the range. 12 At high temperatures, foods react with your fingers on burners while they are cool. ■ Dishwasher (grates only, not caps): Use ...
...the oven door is not suggested to order. Plug in a dishwasher.) A mild abrasive cleaner and a plastic scrubber can be used to remove from the range. 2. Do not remove hinge pins until the door is heavy. Cleaning Method: ■ Steel-wool pad ■ Oven cleaner: Follow product label ...instructions. Grasp the door on the range. 12 At high temperatures, foods react with your fingers on burners while they are cool. ■ Dishwasher (grates only, not caps): Use ...
Owners Manual
Page 13
...trained repair specialist or see the Installation Instructions. ■ Is propane gas being used ? WARNING Surface burners will operate ■ Is the range properly connected to assure door side panel clearance and proper hinge engagement. Do not use an adapter. Plug into a grounded 3 prong outlet...check the air/gas mixture, or see Installation Instructions. Lift the bottom up and back. A A. Turn on the front of door toward range. See "Surface Burners" section. Grasp the door on the sides with your thumbs on the inside surface. 2. Contact a trained repair ...
...trained repair specialist or see the Installation Instructions. ■ Is propane gas being used ? WARNING Surface burners will operate ■ Is the range properly connected to assure door side panel clearance and proper hinge engagement. Do not use an adapter. Plug into a grounded 3 prong outlet...check the air/gas mixture, or see Installation Instructions. Lift the bottom up and back. A A. Turn on the front of door toward range. See "Surface Burners" section. Grasp the door on the sides with your thumbs on the inside surface. 2. Contact a trained repair ...

Owners Manual
Page 14
... Instructions. Contact a designated service technician to release air from the solenoid. Cooktop cooking results not what expected ■ Is the range level? See the Installation Instructions. ■ Was the oven preheated? Increase temperature by a number? See "Cookware" section. Contact...; Is the electronic oven control set ? Increase baking or roasting time. ■ Is the proper temperature set ? Level the range. If an "F" code appears again, contact a trained repair specialist. Contact a designated service technician to clear the display. Oven ...
... Instructions. Contact a designated service technician to release air from the solenoid. Cooktop cooking results not what expected ■ Is the range level? See the Installation Instructions. ■ Was the oven preheated? Increase temperature by a number? See "Cookware" section. Contact...; Is the electronic oven control set ? Increase baking or roasting time. ■ Is the proper temperature set ? Level the range. If an "F" code appears again, contact a trained repair specialist. Contact a designated service technician to clear the display. Oven ...


