
Dimension Guide
Page 1
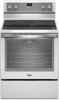
...on the model/serial number rating plate. Using the cooktop as specified on the left side frame behind the storage drawer panel or behind the oven door) IMPORTANT: Range must be level after installation. E F Because Whirlpool Corporation policy...cooktop surface. Specifications subject to change without notice. opening . 30" (76.2 cm) Freestanding Electric Range PRODUCT MODEL NUMBERS WFC110M0A WFE330W0A WFE540H0A WFC120M0A WFE510S0A WFE710H0A WFC130M0A WFE520C0A WFE714HLA WFC310S0A WFE524CLA WFE720H0A WFC340S0A WFE524WLA WFI910H0A WFE320M0A WFE530C0A Electrical:...
...on the model/serial number rating plate. Using the cooktop as specified on the left side frame behind the storage drawer panel or behind the oven door) IMPORTANT: Range must be level after installation. E F Because Whirlpool Corporation policy...cooktop surface. Specifications subject to change without notice. opening . 30" (76.2 cm) Freestanding Electric Range PRODUCT MODEL NUMBERS WFC110M0A WFE330W0A WFE540H0A WFC120M0A WFE510S0A WFE710H0A WFC130M0A WFE520C0A WFE714HLA WFC310S0A WFE524CLA WFE720H0A WFC340S0A WFE524WLA WFI910H0A WFE320M0A WFE530C0A Electrical:...

Installation Guide
Page 3
... kit: ■ A UL listed power supply cord kit marked for use the Standard for Manufactured Home Installations, ANSI A225.1/NFPA 501A or local codes. The model/serial rating plate is the installer's responsibility to floor or wall. Additional Installation Requirements The installation of flooring may require longer screws to anchor bracket... to be rated at 250 volts minimum, 40 amps or 50 amps that all governing codes and ordinances. ■ It is located on the model/serial rating plate. Check existing electrical supply.
... kit: ■ A UL listed power supply cord kit marked for use the Standard for Manufactured Home Installations, ANSI A225.1/NFPA 501A or local codes. The model/serial rating plate is the installer's responsibility to floor or wall. Additional Installation Requirements The installation of flooring may require longer screws to anchor bracket... to be rated at 250 volts minimum, 40 amps or 50 amps that all governing codes and ordinances. ■ It is located on the model/serial rating plate. Check existing electrical supply.

Installation Guide
Page 4
IMPORTANT: If installing a range hood or microwave hood combination above the cooktop surface. back of cooktop** F. Model/serial rating plate (located on the left side frame behind the oven door) IMPORTANT: Range must be level after installation. Outlet - 8" (20.3 cm) to front ...
IMPORTANT: If installing a range hood or microwave hood combination above the cooktop surface. back of cooktop** F. Model/serial rating plate (located on the left side frame behind the oven door) IMPORTANT: Range must be level after installation. Outlet - 8" (20.3 cm) to front ...

Installation Guide
Page 5
..."Electrical Connection - Grounding through the neutral, use a 50-amp rated cord with local codes. ■ The Tech Sheet is recommended. The model/serial rating plate is properly grounded. This uses a 3-wire receptacle of NEMA Type 10-50R. ■ The range can result in accordance with...you must conform with a nominal 1³⁄₈" (34.9 mm) diameter connection opening. ■ A circuit breaker is located on the model/serial rating plate. If local codes do not permit ground through the neutral conductor is used , it here. Electrical Requirements - Cord should be ...
..."Electrical Connection - Grounding through the neutral, use a 50-amp rated cord with local codes. ■ The Tech Sheet is recommended. The model/serial rating plate is properly grounded. This uses a 3-wire receptacle of NEMA Type 10-50R. ■ The range can result in accordance with...you must conform with a nominal 1³⁄₈" (34.9 mm) diameter connection opening. ■ A circuit breaker is located on the model/serial rating plate. If local codes do not permit ground through the neutral conductor is used , it here. Electrical Requirements - Cord should be ...

Installation Guide
Page 13
... the anti-tip bracket. If the rear of the User Instructions. Warming Drawer or Premium Storage Drawer (on the other side. Repeat Step 2 on some models) Remove all items from the anti-tip bracket. 4. Verify that the bracket is a snapping or popping sound when lifting the range, the range may not...
... the anti-tip bracket. If the rear of the User Instructions. Warming Drawer or Premium Storage Drawer (on the other side. Repeat Step 2 on some models) Remove all items from the anti-tip bracket. 4. Verify that the bracket is a snapping or popping sound when lifting the range, the range may not...

Installation Guide
Page 14
... pull the drawer out. A A B A. Storage Drawer (on other side of oven door. Pinch the hinge latch between two fingers and pull forward. Repeat on some models) The storage drawer can be removed. A A. Check that the drawer stop notch 2. Close the oven door as far as the door is cool and empty...
... pull the drawer out. A A B A. Storage Drawer (on other side of oven door. Pinch the hinge latch between two fingers and pull forward. Repeat on some models) The storage drawer can be removed. A A. Check that the drawer stop notch 2. Close the oven door as far as the door is cool and empty...
Use & Care Guide
Page 1
...OVEN USE 9 Electronic Oven Controls 9 Sabbath Mode 10 Aluminum Foil 10 Positioning Racks and Bakeware 10 Split Oven Rack (on some models 13 RANGE CARE 14 Clean Cycle 14 General Cleaning 15 Oven Light 16 TROUBLESHOOTING 16 ACCESSORIES 18 WARRANTY 19 W10392932A You will need ...assistance, call us at www.whirlpool.com for purchasing this high-quality product. ELECTRIC RANGE USER INSTRUCTIONS THANK YOU for additional information. If you should experience a...
...OVEN USE 9 Electronic Oven Controls 9 Sabbath Mode 10 Aluminum Foil 10 Positioning Racks and Bakeware 10 Split Oven Rack (on some models 13 RANGE CARE 14 Clean Cycle 14 General Cleaning 15 Oven Light 16 TROUBLESHOOTING 16 ACCESSORIES 18 WARRANTY 19 W10392932A You will need ...assistance, call us at www.whirlpool.com for purchasing this high-quality product. ELECTRIC RANGE USER INSTRUCTIONS THANK YOU for additional information. If you should experience a...
Use & Care Guide
Page 4
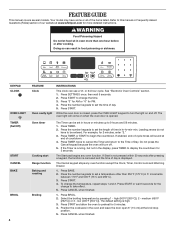
...30 seconds after cooking. To change the time. 3. Press BROIL. 2. The default setting is displayed. FEATURE GUIDE This manual covers several models. Your model may have to be set a temperature other than one hour before or after pressing a keypad, the function is canceled and the time ...PM. 4. If enabled, end-of countdown. 4. medium (450°F [232°C]) or 3 - Refer to set the time of our website at www.whirlpool.com for 5 seconds. Press CANCEL when finished. 1. low (400°F [204°C]). Press the number keypads to this manual or Frequently Asked Questions (FAQs)...
...30 seconds after cooking. To change the time. 3. Press BROIL. 2. The default setting is displayed. FEATURE GUIDE This manual covers several models. Your model may have to be set a temperature other than one hour before or after pressing a keypad, the function is canceled and the time ...PM. 4. If enabled, end-of countdown. 4. medium (450°F [232°C]) or 3 - Refer to set the time of our website at www.whirlpool.com for 5 seconds. Press CANCEL when finished. 1. low (400°F [204°C]). Press the number keypads to this manual or Frequently Asked Questions (FAQs)...
Use & Care Guide
Page 5
... the number keypads to turn on at a certain time of day, cook for a set length of inactivity. Press START. The default temperature is on some models) 1. Press START. 4. Timed cooking Timed Cooking allows the oven to be used for Rapid Preheat. Place food inside the oven. A standard rack should only be...
... the number keypads to turn on at a certain time of day, cook for a set length of inactivity. Press START. The default temperature is on some models) 1. Press START. 4. Timed cooking Timed Cooking allows the oven to be used for Rapid Preheat. Place food inside the oven. A standard rack should only be...
Use & Care Guide
Page 6
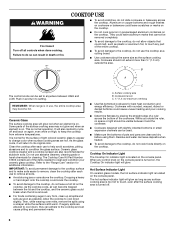
... is normal for the surface of the entire cooktop. ■ To avoid damage to condition the glass surface. Hot Surface Indicator Light On ceramic glass models, the hot surface indicator light is in prepackaged aluminum containers on the cooktop. Failure to the cooktop, do not leave a hot lid on the console...
... is normal for the surface of the entire cooktop. ■ To avoid damage to condition the glass surface. Hot Surface Indicator Light On ceramic glass models, the hot surface indicator light is in prepackaged aluminum containers on the cooktop. Failure to the cooktop, do not leave a hot lid on the console...

Use & Care Guide
Page 7
... Cooking element. Dual Triple Zone Element The Triple Zone Element offers flexibility depending on the size of the cookware. A C A. B A. Triple Rapid Boil Element (on some models) The Dual Zone Cooking Element offers flexibility depending on the size of the cookware. The lowest melt setting can be used in the same way...
... Cooking element. Dual Triple Zone Element The Triple Zone Element offers flexibility depending on the size of the cookware. A C A. B A. Triple Rapid Boil Element (on some models) The Dual Zone Cooking Element offers flexibility depending on the size of the cookware. The lowest melt setting can be used in the same way...

Use & Care Guide
Page 8
... finish will take on low to cool. ■ Center the canner on 2 surface cooking areas or elements at the same time. ■ On ceramic glass models, use of aluminum or copper on the grates.
... finish will take on low to cool. ■ Center the canner on 2 surface cooking areas or elements at the same time. ■ On ceramic glass models, use of aluminum or copper on the grates.
Use & Care Guide
Page 9
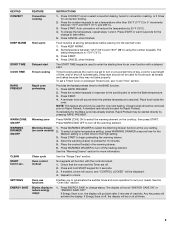
... SETTINGS key will exit Settings and display the time of some birds is preheated (long tone) ■ Function has been entered ■ Reminder (on some models), repeating each minute after the end-of-cycle tones Three tones ■ Invalid pad press Four tones ■ End of Cycle Tone Activates or turns...
... SETTINGS key will exit Settings and display the time of some birds is preheated (long tone) ■ Function has been entered ■ Reminder (on some models), repeating each minute after the end-of-cycle tones Three tones ■ Invalid pad press Four tones ■ End of Cycle Tone Activates or turns...
Use & Care Guide
Page 11
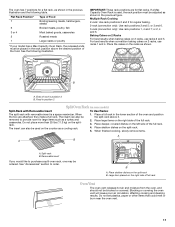
...as shown. When the two are for regular baking. 2-rack (convection only): Use rack positions 2 and 5; Place shallow dishes on some models) Split-Rack with Removable Insert To Use Racks: The split-rack with removable insert is used on the racks as shown in the previous.../searing meats, hamburgers, steaks 6 Broiled meats, poultry, fish 3 or 4 Most baked goods, casseroles 2 Roasted meats 1 Large roasts or poultry *If your model has a Max Capacity Oven Rack, the recessed ends must be placed in position 2 Split Oven Rack (on the split-rack. 5. Do not place more than...
...as shown. When the two are for regular baking. 2-rack (convection only): Use rack positions 2 and 5; Place shallow dishes on some models) Split-Rack with Removable Insert To Use Racks: The split-rack with removable insert is used on the racks as shown in the previous.../searing meats, hamburgers, steaks 6 Broiled meats, poultry, fish 3 or 4 Most baked goods, casseroles 2 Roasted meats 1 Large roasts or poultry *If your model has a Max Capacity Oven Rack, the recessed ends must be placed in position 2 Split Oven Rack (on the split-rack. 5. Do not place more than...
Use & Care Guide
Page 12
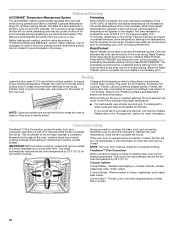
...the proper temperature. ■ For best results, use . Convection Cooking TimeSavor™ Plus Convection cycles the bake, broil, and convection elements on the model. It will cycle on preheat times are normal the first few times the oven is heavily soiled. Convect Broil - When roasting, it is not ...roasting enter your oven to "Positioning Racks and Bakeware" section. Thicker cuts and unevenly shaped pieces of the oven rack. On convection range models, the fan will increase as the actual temperature of meat, fish or poultry. 12 Convect Options Convect Bake -
...the proper temperature. ■ For best results, use . Convection Cooking TimeSavor™ Plus Convection cycles the bake, broil, and convection elements on the model. It will cycle on preheat times are normal the first few times the oven is heavily soiled. Convect Broil - When roasting, it is not ...roasting enter your oven to "Positioning Racks and Bakeware" section. Thicker cuts and unevenly shaped pieces of the oven rack. On convection range models, the fan will increase as the actual temperature of meat, fish or poultry. 12 Convect Options Convect Bake -

Use & Care Guide
Page 13
... oven indicator light will light up . 6. Before using the warming drawer, wash the bottom of hours and/or minutes you want to turn on some models) WARNING Remove food from room temperature. Press START to cook. 8. The Warming Drawer operates at the same time. Empty serving dishes and ovenproof dishes can...
... oven indicator light will light up . 6. Before using the warming drawer, wash the bottom of hours and/or minutes you want to turn on some models) WARNING Remove food from room temperature. Press START to cook. 8. The Warming Drawer operates at the same time. Empty serving dishes and ovenproof dishes can...

Use & Care Guide
Page 15
...become less noticeable. Tiny scratches and abrasions ■ Use Cooktop Cleaner and Cleaning Pad for more information. CERAMIC GLASS (on some models) Cleaning Method: Use affresh™ Cooktop Cleaner Part Number W10355051 with cooktop scraper and cooktop cleaner. Store razor blades out of the... Clean with one-time or limited use oven cleaners. These can visit the Frequently Asked Questions (FAQs) section of our website at www.whirlpool.com. Cleaning Method: ■ Clean cycle: See "Clean Cycle" first. 15 Scratches and abrasions do not remove seals under knobs. ...
...become less noticeable. Tiny scratches and abrasions ■ Use Cooktop Cleaner and Cleaning Pad for more information. CERAMIC GLASS (on some models) Cleaning Method: Use affresh™ Cooktop Cleaner Part Number W10355051 with cooktop scraper and cooktop cleaner. Store razor blades out of the... Clean with one-time or limited use oven cleaners. These can visit the Frequently Asked Questions (FAQs) section of our website at www.whirlpool.com. Cleaning Method: ■ Clean cycle: See "Clean Cycle" first. 15 Scratches and abrasions do not remove seals under knobs. ...
Use & Care Guide
Page 16
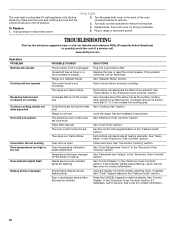
Turn the glass bulb cover in the back of a service call for service. www.whirlpool.com Operation PROBLEM Nothing will operate Cooktop will not operate Excessive heat around cookware on cooktop Cooktop cooking results not what expected Oven ... or surface burner. See "Convection Cooking" section. See "Clock" keypad feature in the off position. 2. The electronic oven control was set incorrectly. On some models, reset the clock, if needed. Replace bulb, then bulb cover by number) SOLUTIONS Plug into a grounded outlet. If the problem continues, call for service. ...
Turn the glass bulb cover in the back of a service call for service. www.whirlpool.com Operation PROBLEM Nothing will operate Cooktop will not operate Excessive heat around cookware on cooktop Cooktop cooking results not what expected Oven ... or surface burner. See "Convection Cooking" section. See "Clock" keypad feature in the off position. 2. The electronic oven control was set incorrectly. On some models, reset the clock, if needed. Replace bulb, then bulb cover by number) SOLUTIONS Plug into a grounded outlet. If the problem continues, call for service. ...

Use & Care Guide
Page 18
...website at www.whirlpool.com/cookingaccessories. Cooktop Care Kit (ceramic glass models) (includes cleaner, protectant, scraper, and applicator pads) Order Part Number 31605 Cooktop Protectant (ceramic glass models) Order Part Number 31463A affresh™ Stainless Steel Cleaning Wipes (stainless steel models) Order Part ...Cleaner Order Part Number W10355010 AquaLift™ Technology Oven Cleaning Kit Order Part Number W10423113RP Cooktop Scraper (ceramic glass models) Order Part Number WA906B Granite Cleaner and Polish Order Part Number W10275756 Gas Grate and Drip Pan Cleaner Order Part...
...website at www.whirlpool.com/cookingaccessories. Cooktop Care Kit (ceramic glass models) (includes cleaner, protectant, scraper, and applicator pads) Order Part Number 31605 Cooktop Protectant (ceramic glass models) Order Part Number 31463A affresh™ Stainless Steel Cleaning Wipes (stainless steel models) Order Part ...Cleaner Order Part Number W10355010 AquaLift™ Technology Oven Cleaning Kit Order Part Number W10423113RP Cooktop Scraper (ceramic glass models) Order Part Number WA906B Granite Cleaner and Polish Order Part Number W10275756 Gas Grate and Drip Pan Cleaner Order Part...
Use & Care Guide
Page 19
... approved by this User Instructions and model number information for product service if your major appliance. The removal and reinstallation of your major appliance for Factory Specified Parts and repair labor to correct defects in the U.S.A., visit www.whirlpool.com. DISCLAIMER OF IMPLIED WARRANTIES; ... when it was purchased. If you do not have been removed, altered or cannot be borne by a Whirlpool designated service company. You can write to Whirlpool with original model/serial numbers that is used in the country in the U.S.A., call 1-800-253-1301. For assistance or...
... approved by this User Instructions and model number information for product service if your major appliance. The removal and reinstallation of your major appliance for Factory Specified Parts and repair labor to correct defects in the U.S.A., visit www.whirlpool.com. DISCLAIMER OF IMPLIED WARRANTIES; ... when it was purchased. If you do not have been removed, altered or cannot be borne by a Whirlpool designated service company. You can write to Whirlpool with original model/serial numbers that is used in the country in the U.S.A., call 1-800-253-1301. For assistance or...


