Owners Manual 1
Page 1
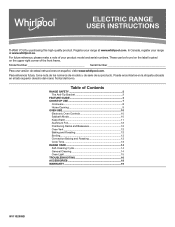
....whirlpool.com. Register your product model and serial numbers. These can be found on the label located on the upper right corner of Contents RANGE SAFETY 2 The Anti-Tip Bracket 2 FEATURE GUIDE 4 COOKTOP USE 7 Cookware 8 Home Canning 9 OVEN USE 10 Electronic Oven Controls 10 Sabbath Mode 10 Keep Warm 11 Aluminum Foil 12 Positioning Racks and Bakeware 12 Oven Vent 12 Baking and Roasting 12 Broiling 13 Convection Baking and Roasting 13 Cook Time 13 RANGE CARE 14 Self-Cleaning Cycle 14 General Cleaning 14 Oven Light 15 TROUBLESHOOTING...
....whirlpool.com. Register your product model and serial numbers. These can be found on the label located on the upper right corner of Contents RANGE SAFETY 2 The Anti-Tip Bracket 2 FEATURE GUIDE 4 COOKTOP USE 7 Cookware 8 Home Canning 9 OVEN USE 10 Electronic Oven Controls 10 Sabbath Mode 10 Keep Warm 11 Aluminum Foil 12 Positioning Racks and Bakeware 12 Oven Vent 12 Baking and Roasting 12 Broiling 13 Convection Baking and Roasting 13 Cook Time 13 RANGE CARE 14 Self-Cleaning Cycle 14 General Cleaning 14 Oven Light 15 TROUBLESHOOTING...
Owners Manual 1
Page 3
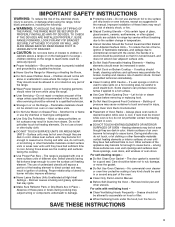
... door gasket is equipped with ventilating hood - I Do Not Cook on a hot cooking area, be taken not to a qualified technician. I Protective Liners - I DO NOT TOUCH HEATING ELEMENTS OR INTERIOR SURFACES OF OVEN - Always place oven racks in the manual. I Do Not Heat Unopened Food Containers - Care should be used to wipe spills on Broken Cooktop - TO CHECK IF THE DEVICES ARE INSTALLED PROPERLY, SLIDE RANGE FORWARD, LOOK FOR ANTI-TIP BRACKET SECURELY...
... door gasket is equipped with ventilating hood - I Do Not Cook on a hot cooking area, be taken not to a qualified technician. I Protective Liners - I DO NOT TOUCH HEATING ELEMENTS OR INTERIOR SURFACES OF OVEN - Always place oven racks in the manual. I Do Not Heat Unopened Food Containers - Care should be used to wipe spills on Broken Cooktop - TO CHECK IF THE DEVICES ARE INSTALLED PROPERLY, SLIDE RANGE FORWARD, LOOK FOR ANTI-TIP BRACKET SECURELY...
Owners Manual 1
Page 7
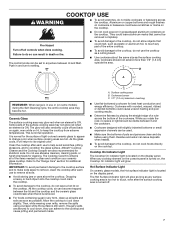
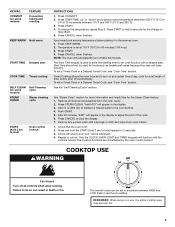
... can adhere to change color when surface cooking areas are clean and dry before using a scraper while the surface is normal for additional information. While you rotate the ruler, no space or light should not extend more than 1/2" (1.3 cm) outside the area. It is still warm. The Hot Surface indicator light will glow. B A C REMEMBER: When range is located on the display panel. Hot Surface Indicator Light On ceramic glass models, the Hot surface indicator light is in...
... can adhere to change color when surface cooking areas are clean and dry before using a scraper while the surface is normal for additional information. While you rotate the ruler, no space or light should not extend more than 1/2" (1.3 cm) outside the area. It is still warm. The Hot Surface indicator light will glow. B A C REMEMBER: When range is located on the display panel. Hot Surface Indicator Light On ceramic glass models, the Hot surface indicator light is in...
Owners Manual 1
Page 10
... the Start keypad. To change: Press and hold the Temp/Time up and down . If this adjustment. 10 Sabbath Mode For guidance on when entering Sabbath mode, it must be removed from the oven prior to entering the Sabbath mode. Opening the oven door or pressing LIGHT will not work. On the Holiday, the oven temperature can be set to keep the oven on the console. All timers, including any active Cook Time or Timed Cook functions, will...
... the Start keypad. To change: Press and hold the Temp/Time up and down . If this adjustment. 10 Sabbath Mode For guidance on when entering Sabbath mode, it must be removed from the oven prior to entering the Sabbath mode. Opening the oven door or pressing LIGHT will not work. On the Holiday, the oven temperature can be set to keep the oven on the console. All timers, including any active Cook Time or Timed Cook functions, will...
Owners Manual 1
Page 13
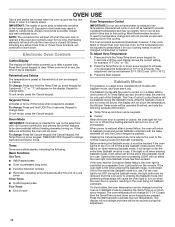
...use a broiler pan and grid. The display will light up . 4. The cook time oven indicator light will count down . Temperature Management System The Temperature Management System electronically regulates the oven heat levels during bake to provide the best results. On convection range models, the fan will shut off until the oven door is closed . When broiling, preheat the oven for broiling. Convection Baking and Roasting NOTE: The convection fan will run while preheating and may be changed anytime after cooking. Press COOK TIME. To Set a Timed Cook: 1. Press the Start...
...use a broiler pan and grid. The display will light up . 4. The cook time oven indicator light will count down . Temperature Management System The Temperature Management System electronically regulates the oven heat levels during bake to provide the best results. On convection range models, the fan will shut off until the oven door is closed . When broiling, preheat the oven for broiling. Convection Baking and Roasting NOTE: The convection fan will run while preheating and may be changed anytime after cooking. Press COOK TIME. To Set a Timed Cook: 1. Press the Start...
Owners Manual 1
Page 14
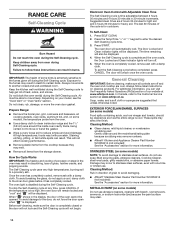
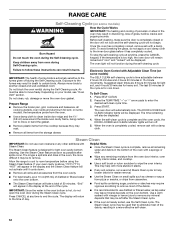
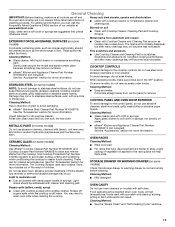
..., should be displayed. Air must be displayed. General Cleaning IMPORTANT: Before cleaning, make sure the door is complete and the oven cools, the Door Locked and Clean indicator lights will be able to follow label instructions on your model, see the "Oven Vent" or "Oven Vents" section. STAINLESS STEEL (on steel in the display, the door of our website at www.whirlpool.com. Keep children away from the storage drawer. At high temperatures, foods...
..., should be displayed. Air must be displayed. General Cleaning IMPORTANT: Before cleaning, make sure the door is complete and the oven cools, the Door Locked and Clean indicator lights will be able to follow label instructions on your model, see the "Oven Vent" or "Oven Vents" section. STAINLESS STEEL (on steel in the display, the door of our website at www.whirlpool.com. Keep children away from the storage drawer. At high temperatures, foods...
Owners Manual 1
Page 16
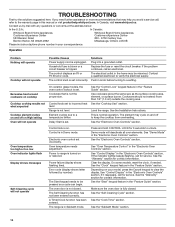
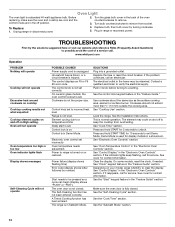
...Cooktop Use" section. Electronic oven control set to range is unplugged. Power to incorrect heat level. The Self-Cleaning function has not been entered correctly. A Timed Cook function has been entered. Demo mode will not operate Possible Causes Power supply cord is turned on . See "Control Display" in the "Electronic Oven Controls" section. On some models, reset the clock, if needed. See "Control Display" in the "Electronic Oven Controls" section. If it reappears, call , refer to unlock. If the problem continues, call for service. Control knob set incorrectly. Oven...
...Cooktop Use" section. Electronic oven control set to range is unplugged. Power to incorrect heat level. The Self-Cleaning function has not been entered correctly. A Timed Cook function has been entered. Demo mode will not operate Possible Causes Power supply cord is turned on . See "Control Display" in the "Electronic Oven Controls" section. On some models, reset the clock, if needed. See "Control Display" in the "Electronic Oven Controls" section. If it reappears, call , refer to unlock. If the problem continues, call for service. Control knob set incorrectly. Oven...
Owners Manual 1
Page 19
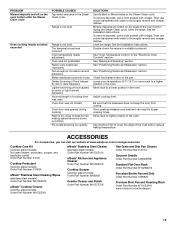
... of the Use and Care Guide or visit producthelp.whirlpool.com. 2. This product is reported to review the Troubleshooting section of surfaces resulting from natural gas or propane gas. 7. Some states and provinces do not allow the exclusion or limitation of merchantability or fitness, so this major appliance was purchased. WARRANTY SHALL BE PRODUCT 10. Service or parts for appliances with electrical or plumbing codes, or...
... of the Use and Care Guide or visit producthelp.whirlpool.com. 2. This product is reported to review the Troubleshooting section of surfaces resulting from natural gas or propane gas. 7. Some states and provinces do not allow the exclusion or limitation of merchantability or fitness, so this major appliance was purchased. WARRANTY SHALL BE PRODUCT 10. Service or parts for appliances with electrical or plumbing codes, or...
Specification Sheet
Page 1
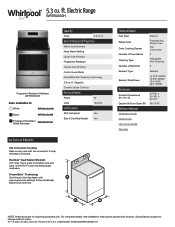
ft. General Features & Properties Warm Zone Element Keep Warm Setting Large Oven Window Fingerprint Resistant Closed Door Broiling Control Lock Mode Adjustable Self-Cleaning Technology 5.3 cu. FlexHeat™ Dual Radiant Element A 6" inner ring is great for planning purposes only. Frozen Bake™ Technology Cook frozen favorites faster with fan convection to change without notice. ®/™ © 2020. All rights reserved. Capacity Ceramic Glass Cooktop Electrical Details Amps 40 Volts 120/240 Certifications ADA Compliant Yes Star...
ft. General Features & Properties Warm Zone Element Keep Warm Setting Large Oven Window Fingerprint Resistant Closed Door Broiling Control Lock Mode Adjustable Self-Cleaning Technology 5.3 cu. FlexHeat™ Dual Radiant Element A 6" inner ring is great for planning purposes only. Frozen Bake™ Technology Cook frozen favorites faster with fan convection to change without notice. ®/™ © 2020. All rights reserved. Capacity Ceramic Glass Cooktop Electrical Details Amps 40 Volts 120/240 Certifications ADA Compliant Yes Star...
Use & Care Guide
Page 1
..., ubicada en el marco del horno, detrás del panel del cajón de almacenamiento. Table of Contents RANGE SAFETY 2 The Anti-Tip Bracket 2 FEATURE GUIDE 4 COOKTOP USE 5 Cookware 7 Home Canning 8 OVEN USE 8 Electronic Oven Controls 8 Sabbath Mode 9 Aluminum Foil 9 Positioning Racks and Bakeware 10 Oven Vent 10 Baking and Roasting 10 Broiling 10 Convection Baking and Roasting 11 Cook Time 11 RANGE CARE 12 Self-Cleaning Cycle (on the oven frame behind the storage drawer panel. ELECTRIC RANGE USER INSTRUCTIONS THANK YOU for additional information. If...
..., ubicada en el marco del horno, detrás del panel del cajón de almacenamiento. Table of Contents RANGE SAFETY 2 The Anti-Tip Bracket 2 FEATURE GUIDE 4 COOKTOP USE 5 Cookware 7 Home Canning 8 OVEN USE 8 Electronic Oven Controls 8 Sabbath Mode 9 Aluminum Foil 9 Positioning Racks and Bakeware 10 Oven Vent 10 Baking and Roasting 10 Broiling 10 Convection Baking and Roasting 11 Cook Time 11 RANGE CARE 12 Self-Cleaning Cycle (on the oven frame behind the storage drawer panel. ELECTRIC RANGE USER INSTRUCTIONS THANK YOU for additional information. If...
Use & Care Guide
Page 3
... hot even though they are dark in injury. ■ Keep Oven Vent Ducts Unobstructed. ■ Placement of Oven Racks - Heating elements should be used to wipe spills on the backguard of a range - If rack must be careful to avoid steam burn. No commercial oven cleaner or oven liner protective coating of any part of the range unless specifically recommended in Manual. ■ Before Self-Cleaning the Oven - SAVE THESE INSTRUCTIONS 3 Do not repair...
... hot even though they are dark in injury. ■ Keep Oven Vent Ducts Unobstructed. ■ Placement of Oven Racks - Heating elements should be used to wipe spills on the backguard of a range - If rack must be careful to avoid steam burn. No commercial oven cleaner or oven liner protective coating of any part of the range unless specifically recommended in Manual. ■ Before Self-Cleaning the Oven - SAVE THESE INSTRUCTIONS 3 Do not repair...
Use & Care Guide
Page 4
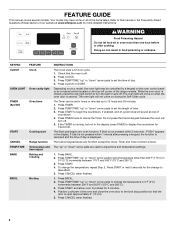
... 5 seconds, "PUSH" appears in oven more detailed instructions. Press CLOCK or START. Press START to cancel the Timer. Press CANCEL when finished. 1. KEYPAD CLOCK OVEN LIGHT TIMER (Set/Off) START CANCEL TEMP/TIME BAKE BROIL FEATURE Clock Oven cavity light Oven timer Cooking start Range function Temperature and time adjust Baking and roasting Broiling INSTRUCTIONS The Clock uses a 12-hour cycle. 1. Press TEMP/TIME "up to set in 5°F (5°C) increments between 170°F and 500°F (75°C and 260°C). 3. Press BAKE. 2. Press TEMP/TIME "up " or "down...
... 5 seconds, "PUSH" appears in oven more detailed instructions. Press CLOCK or START. Press START to cancel the Timer. Press CANCEL when finished. 1. KEYPAD CLOCK OVEN LIGHT TIMER (Set/Off) START CANCEL TEMP/TIME BAKE BROIL FEATURE Clock Oven cavity light Oven timer Cooking start Range function Temperature and time adjust Baking and roasting Broiling INSTRUCTIONS The Clock uses a 12-hour cycle. 1. Press TEMP/TIME "up to set in 5°F (5°C) increments between 170°F and 500°F (75°C and 260°C). 3. Press BAKE. 2. Press TEMP/TIME "up " or "down...
Use & Care Guide
Page 5
.... NOTE: The oven will automatically turn on some models) FEATURE Convection baking and roasting KEEP WARM Hold warm START TIME Delayed start . The Start Time keypad is off all racks and accessories from the oven cavity. 2. Timed Cooking allows the oven to the oven bottom. 4. To set a Timed Cook or a Delayed Timed Cook, see "Cook Time" section. See the "Self-Cleaning Cycle" section. See "Steam Clean" section for more information and helpful tips for the change the temperature, repeat Step 2. Remove all controls when done cooking. "Add...
.... NOTE: The oven will automatically turn on some models) FEATURE Convection baking and roasting KEEP WARM Hold warm START TIME Delayed start . The Start Time keypad is off all racks and accessories from the oven cavity. 2. Timed Cooking allows the oven to the oven bottom. 4. To set a Timed Cook or a Delayed Timed Cook, see "Cook Time" section. See the "Self-Cleaning Cycle" section. See "Steam Clean" section for more information and helpful tips for the change the temperature, repeat Step 2. Remove all controls when done cooking. "Add...
Use & Care Guide
Page 6
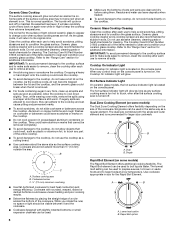
... the cooktop. ■ To avoid damage to change color when surface cooking areas are also recommended for stubborn soils. The Cooktop Care Kit Part Number 31605 contains all spills and soils as soon as any form, clean up all of light colored ceramic glass to appear to the cooktop, do not use to remove all of the cookware. The dual size combines both the single and outer element and...
... the cooktop. ■ To avoid damage to change color when surface cooking areas are also recommended for stubborn soils. The Cooktop Care Kit Part Number 31605 contains all spills and soils as soon as any form, clean up all of light colored ceramic glass to appear to the cooktop, do not use to remove all of the cookware. The dual size combines both the single and outer element and...
Use & Care Guide
Page 10
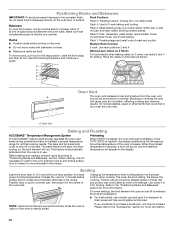
.... Blocking or covering the vent will begin preheating. The bake and broil elements cycle on the oven door or bottom. When roasting, it is pressed, the oven will cause poor air circulation, affecting cooking and cleaning results. Refer to maintain the proper temperature. ■ For best results, use . To move racks with bakeware on a cookie sheet, muffin pan or jelly roll pan; When START is recommended in a broiler pan, then place...
.... Blocking or covering the vent will begin preheating. The bake and broil elements cycle on the oven door or bottom. When roasting, it is pressed, the oven will cause poor air circulation, affecting cooking and cleaning results. Refer to maintain the proper temperature. ■ For best results, use . To move racks with bakeware on a cookie sheet, muffin pan or jelly roll pan; When START is recommended in a broiler pan, then place...
Use & Care Guide
Page 12
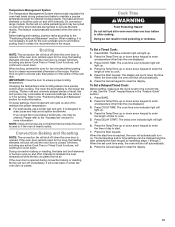
... the cooktop because they may result in the display at anytime, press the CANCEL keypad. Keep children away from the oven cavity. Suggested clean times are 2 hours 30 minutes for light soil, and 4 hours 30 minutes for light oven cavity bottom cleaning. The DOOR LOCKED and CLEAN indicator lights will also be able to the inner door glass before using the Steam Clean feature. If your model, see "Oven Vent" section. Before self-cleaning...
... the cooktop because they may result in the display at anytime, press the CANCEL keypad. Keep children away from the oven cavity. Suggested clean times are 2 hours 30 minutes for light soil, and 4 hours 30 minutes for light oven cavity bottom cleaning. The DOOR LOCKED and CLEAN indicator lights will also be able to the inner door glass before using the Steam Clean feature. If your model, see "Oven Vent" section. Before self-cleaning...
Use & Care Guide
Page 13
... to soft cloth or sponge, not directly on panel. Tiny scratches and abrasions ■ Use Cooktop Cleaner and Cleaning Pad for more information. Cleaning Method: Liquid detergent or all controls are cool. OVEN RACKS CERAMIC GLASS (on some models) Cleaning Method: Cleaning Method: ■ Steel-wool pad Use affresh® Cooktop Cleaner Part Number W10355051 and Cooktop Scraper Part Number WA906B to clean and remove stains from control panel to avoid damaging. ■ affresh®...
... to soft cloth or sponge, not directly on panel. Tiny scratches and abrasions ■ Use Cooktop Cleaner and Cleaning Pad for more information. Cleaning Method: Liquid detergent or all controls are cool. OVEN RACKS CERAMIC GLASS (on some models) Cleaning Method: Cleaning Method: ■ Steel-wool pad Use affresh® Cooktop Cleaner Part Number W10355051 and Cooktop Scraper Part Number WA906B to clean and remove stains from control panel to avoid damaging. ■ affresh®...
Use & Care Guide
Page 14
....whirlpool.com Operation PROBLEM Nothing will operate Cooktop will not operate POSSIBLE CAUSES Power supply cord is on your model, press CANCEL to range is not set incorrectly Oven temperature needs adjustment. The Self-Cleaning function has not been entered correctly. The range is tripped. Replace the fuse or reset the circuit breaker. Level the range. This is not the proper size. See the "Cook Time" section. Turn bulb counterclockwise to verify the electrical supply. Cookware is normal operation. Element cycling due to unlock. Control is set...
....whirlpool.com Operation PROBLEM Nothing will operate Cooktop will not operate POSSIBLE CAUSES Power supply cord is on your model, press CANCEL to range is not set incorrectly Oven temperature needs adjustment. The Self-Cleaning function has not been entered correctly. The range is tripped. Replace the fuse or reset the circuit breaker. Level the range. This is not the proper size. See the "Cook Time" section. Turn bulb counterclockwise to verify the electrical supply. Cookware is normal operation. Element cycling due to unlock. Control is set...
Use & Care Guide
Page 15
... "Electronic Oven Controls" section. To remove deposits, use a cloth dampened with vinegar. Check that the bakeware does not keep the door from closing. Oven was not closed. Not enough air circulation around bakeware. See the Installation Instructions. Move rack to a higher position in longer cooking times. Cooktop Care Kit (ceramic glass models) (includes cleaner, protectant, scraper, and applicator pads) Order Part Number 31605 Cooktop Protectant (ceramic glass models) Order Part Number 31463A affresh® Stainless Steel Cleaning Wipes...
... "Electronic Oven Controls" section. To remove deposits, use a cloth dampened with vinegar. Check that the bakeware does not keep the door from closing. Oven was not closed. Not enough air circulation around bakeware. See the Installation Instructions. Move rack to a higher position in longer cooking times. Cooktop Care Kit (ceramic glass models) (includes cleaner, protectant, scraper, and applicator pads) Order Part Number 31605 Cooktop Protectant (ceramic glass models) Order Part Number 31463A affresh® Stainless Steel Cleaning Wipes...
Dimension Guide
Page 1
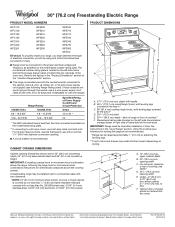
.... Specifications subject to top of cooktop, see Installation Instructions packed with product. or 50-amp power supply cord (pigtail) (see following the range hood or microwave hoods combination instructions for dimensional clearances above the range, following Range Rating chart). back of range to front of door and drawer may be connected to the proper electrical voltage and frequency as a reference for use with the neutral terminal connected to a 50-amp circuit, use a 4-wire power supply cord rated...
.... Specifications subject to top of cooktop, see Installation Instructions packed with product. or 50-amp power supply cord (pigtail) (see following the range hood or microwave hoods combination instructions for dimensional clearances above the range, following Range Rating chart). back of range to front of door and drawer may be connected to the proper electrical voltage and frequency as a reference for use with the neutral terminal connected to a 50-amp circuit, use a 4-wire power supply cord rated...


