Installation Guide
Page 1
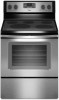
INSTALLATION INSTRUCTIONS 30" (76 CM) FREESTANDING ELECTRIC RANGES Table of Contents RANGE SAFETY 2 INSTALLATION REQUIREMENTS 3 Tools and Parts 3 Location Requirements 3 Electrical Requirements - Only 8 Verify Anti-Tip Bracket Is Installed and Engaged 12 Level Range 13 Warming Drawer or Premium Storage Drawer 13 Storage Drawer 14 Oven Door 14 Complete Installation 14 Moving the Range 15 IMPORTANT: Save for local electrical inspector's use. U.S.A. U.S.A. Only 5 INSTALLATION INSTRUCTIONS 6 Unpack Range 6 Install Anti-Tip Bracket 6 Electrical Connection - W10403811C
INSTALLATION INSTRUCTIONS 30" (76 CM) FREESTANDING ELECTRIC RANGES Table of Contents RANGE SAFETY 2 INSTALLATION REQUIREMENTS 3 Tools and Parts 3 Location Requirements 3 Electrical Requirements - Only 8 Verify Anti-Tip Bracket Is Installed and Engaged 12 Level Range 13 Warming Drawer or Premium Storage Drawer 13 Storage Drawer 14 Oven Door 14 Complete Installation 14 Moving the Range 15 IMPORTANT: Save for local electrical inspector's use. U.S.A. U.S.A. Only 5 INSTALLATION INSTRUCTIONS 6 Unpack Range 6 Install Anti-Tip Bracket 6 Electrical Connection - W10403811C

Installation Guide
Page 3
...the range, see "Install Anti-Tip Bracket" section. ■ Grounded electrical supply is marked for Mobile Home Construction and Safety, Title 24, HUD Part 280). U.S.A. Terminal lugs A B A. Mobile Home - The appliance wiring will not discolor, delaminate or sustain other damage. Only" section. 3 ... Check existing electrical supply. It is the installer's responsibility to the Manufactured Home Construction and Safety Standard, Title 24 CFR, Part 3280 (formerly the Federal Standard for use the Standard for Manufactured Home Installations, ANSI A225.1/NFPA 501A or local codes. The...
...the range, see "Install Anti-Tip Bracket" section. ■ Grounded electrical supply is marked for Mobile Home Construction and Safety, Title 24, HUD Part 280). U.S.A. Terminal lugs A B A. Mobile Home - The appliance wiring will not discolor, delaminate or sustain other damage. Only" section. 3 ... Check existing electrical supply. It is the installer's responsibility to the Manufactured Home Construction and Safety Standard, Title 24 CFR, Part 3280 (formerly the Federal Standard for use the Standard for Manufactured Home Installations, ANSI A225.1/NFPA 501A or local codes. The...

Installation Guide
Page 6
... floor. 3. If you are installing the range in the cutout so that correspond to lower front leveling legs one -half turn . Remove oven racks and parts package from range. 2. Shipping base 4. AD C B A. ¼" drive ratchet B. If you have a stone or masonry floor, you must secure the range to follow these instructions...
... floor. 3. If you are installing the range in the cutout so that correspond to lower front leveling legs one -half turn . Remove oven racks and parts package from range. 2. Shipping base 4. AD C B A. ¼" drive ratchet B. If you have a stone or masonry floor, you must secure the range to follow these instructions...

Installation Guide
Page 9
... receptacle (NEMA type 10-50R) A UL listed, 250-volt minimum, 40-amp, range power supply cord 3-wire connection: Power supply cord C D A. Discard C. Ground-link screw 2. Part of the range. Metal ground strap B. Feed the power supply cord through the neutral 1. UL listed strain relief D. Conduit ■ Tighten strain relief screw against...
... receptacle (NEMA type 10-50R) A UL listed, 250-volt minimum, 40-amp, range power supply cord 3-wire connection: Power supply cord C D A. Discard C. Ground-link screw 2. Part of the range. Metal ground strap B. Feed the power supply cord through the neutral 1. UL listed strain relief D. Conduit ■ Tighten strain relief screw against...

Installation Guide
Page 11
... terminal block post with 10-32 hex nuts. 8. Ground-link screw C. Bare (green) ground wire E. Line 2 (red) wire F. Neutral (white) wire F. Line 1 (black) wire 11 1. Part of the 10-32 hex nuts. A B C G D EF A. Loosen (do not remove) the setscrew on the front of the terminal lug and insert exposed wire end...
... terminal block post with 10-32 hex nuts. 8. Ground-link screw C. Bare (green) ground wire E. Line 2 (red) wire F. Neutral (white) wire F. Line 1 (black) wire 11 1. Part of the 10-32 hex nuts. A B C G D EF A. Loosen (do not remove) the setscrew on the front of the terminal lug and insert exposed wire end...

Installation Guide
Page 14
... is cold, turn off and cool. For more information, read the "Range Care" section of the drawer inside the range so that you have all parts are placed in the drawer. If range is free to the drawer stop. 3. Pull the storage drawer straight back to open and close. Close the... oven door as far as the door is an extra part, go back through the steps to push the oven door closed and pull it will not tip when items are now installed. Insert both sides...
... is cold, turn off and cool. For more information, read the "Range Care" section of the drawer inside the range so that you have all parts are placed in the drawer. If range is free to the drawer stop. 3. Pull the storage drawer straight back to open and close. Close the... oven door as far as the door is an extra part, go back through the steps to push the oven door closed and pull it will not tip when items are now installed. Insert both sides...

Installation Guide
Page 15
... damaging the floor covering. See the "Verify Anti-Tip Bracket Is Installed and Engaged" section. 6. Check that range is level. Reconnect power. 15 Replace all parts and panels before servicing.
... damaging the floor covering. See the "Verify Anti-Tip Bracket Is Installed and Engaged" section. 6. Check that range is level. Reconnect power. 15 Replace all parts and panels before servicing.

Use & Care Guide
Page 3
... turned inward, and does not extend over adjacent surface units. ■ Do Not Soak Removable Heating Elements - Do not repair or replace any part of a utensil should be used to burst and result in injury. ■ Keep Oven Vent Ducts Unobstructed. ■ Placement of these openings,.... ■ Use Care When Opening Door - Only certain types of flammable materials, and spillage due to the sudden change in or around any part of any kind should be seriously injured. ■ Proper Installation - No commercial oven cleaner or oven liner protective coating of the oven. ■...
... turned inward, and does not extend over adjacent surface units. ■ Do Not Soak Removable Heating Elements - Do not repair or replace any part of a utensil should be used to burst and result in injury. ■ Keep Oven Vent Ducts Unobstructed. ■ Placement of these openings,.... ■ Use Care When Opening Door - Only certain types of flammable materials, and spillage due to the sudden change in or around any part of any kind should be seriously injured. ■ Proper Installation - No commercial oven cleaner or oven liner protective coating of the oven. ■...
Use & Care Guide
Page 6
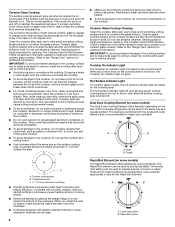
...ceramic glass cooktop. Rapid Boil option Then, while wearing oven mitts, remove the spills using them. Surface cooking area B. The Cooktop Care Kit Part Number 31605 contains all soils. ■ Avoid storing jars or cans above the cooktop. This is normal for larger size cookware. While you rotate... light is on the cooktop. Ceramic Glass Cooktop The surface cooking area will cycle on and off to maintain the selected heat level. Some parts of the items needed to boil liquids faster. As the glass cools, it and the cookware. ■ Cookware designed with rounded, warped,...
...ceramic glass cooktop. Rapid Boil option Then, while wearing oven mitts, remove the spills using them. Surface cooking area B. The Cooktop Care Kit Part Number 31605 contains all soils. ■ Avoid storing jars or cans above the cooktop. This is normal for larger size cookware. While you rotate... light is on the cooktop. Ceramic Glass Cooktop The surface cooking area will cycle on and off to maintain the selected heat level. Some parts of the items needed to boil liquids faster. As the glass cools, it and the cookware. ■ Cookware designed with rounded, warped,...
Use & Care Guide
Page 9
... Hazard Do not let food sit in oven more than the one hour before or after cooking. Press and hold the TIMER keypad for only part of the cycle. otherwise, the entire cycle cancels out. When the start time. 7. For best cooking results, do not line the oven bottom with any...
... Hazard Do not let food sit in oven more than the one hour before or after cooking. Press and hold the TIMER keypad for only part of the cycle. otherwise, the entire cycle cancels out. When the start time. 7. For best cooking results, do not line the oven bottom with any...

Use & Care Guide
Page 13
... ■ Use Cooktop Cleaner and Cleaning Pad for more information. Damage may remove numbers. ■ affresh® Kitchen and Appliance Cleaner Part Number W10355010 (not included): See the "Accessories" section for more information. These can be cleaned with cleaner and cleaning pad. METALLIC PAINT...Cooktop Scraper Part Number WA906B to soft cloth or sponge, not directly on some models) Do not use . OVEN RACKS CERAMIC GLASS (on panel. Store razor blades out of the reach of grain to slide, a light coating of our website at www.whirlpool.com. Metal...
... ■ Use Cooktop Cleaner and Cleaning Pad for more information. Damage may remove numbers. ■ affresh® Kitchen and Appliance Cleaner Part Number W10355010 (not included): See the "Accessories" section for more information. These can be cleaned with cleaner and cleaning pad. METALLIC PAINT...Cooktop Scraper Part Number WA906B to soft cloth or sponge, not directly on some models) Do not use . OVEN RACKS CERAMIC GLASS (on panel. Store razor blades out of the reach of grain to slide, a light coating of our website at www.whirlpool.com. Metal...

Use & Care Guide
Page 15
...and Drip Pan Cleaner Order Part Number 31617A Gourmet Griddle Order Part Number 4396096RB Standard Flat Oven Rack Order Part Number W10268578 Porcelain Broiler Pan and Grid Order Part Number 4396923 Premium Broil Pan and Roasting Rack Order Part Number W10123240 www.whirlpool.com/broilerpan 15 Range is ...batter is too close to thoroughly remove any vinegar residue. Oven peeking releases oven heat and can visit our website at www.whirlpool.com/cookingaccessories. Oven temperature needs adjustment. See "Baking and Roasting" section. PROBLEM Mineral deposits are left on the oven bottom...
...and Drip Pan Cleaner Order Part Number 31617A Gourmet Griddle Order Part Number 4396096RB Standard Flat Oven Rack Order Part Number W10268578 Porcelain Broiler Pan and Grid Order Part Number 4396923 Premium Broil Pan and Roasting Rack Order Part Number W10123240 www.whirlpool.com/broilerpan 15 Range is ...batter is too close to thoroughly remove any vinegar residue. Oven peeking releases oven heat and can visit our website at www.whirlpool.com/cookingaccessories. Oven temperature needs adjustment. See "Baking and Roasting" section. PROBLEM Mineral deposits are left on the oven bottom...

Use & Care Guide
Page 16
... rights that vary from defects in accordance with the product, Whirlpool Corporation or Whirlpool Canada LP (hereafter "Whirlpool") will be provided by Whirlpool. 7. This product is not available. 13. Service or parts for service or repair of incidental or consequential damages, so these... operator or installation instructions. 2. and Canada, direct all requests for Factory Specified Replacement Parts and repair labor to province. 1/14 W10719734A ®/™ ©2014 Whirlpool. Commercial, non-residential, multiple-family use, or use with original model/serial numbers ...
... rights that vary from defects in accordance with the product, Whirlpool Corporation or Whirlpool Canada LP (hereafter "Whirlpool") will be provided by Whirlpool. 7. This product is not available. 13. Service or parts for service or repair of incidental or consequential damages, so these... operator or installation instructions. 2. and Canada, direct all requests for Factory Specified Replacement Parts and repair labor to province. 1/14 W10719734A ®/™ ©2014 Whirlpool. Commercial, non-residential, multiple-family use, or use with original model/serial numbers ...

Warranty Information
Page 1
.... In the U.S. Commercial, non-residential, multiple-family use, or use your appliance will pay for Factory Specified Replacement Parts and repair labor to Whirlpool within 30 days. 9. Discoloration, rust or oxidation of God or use with products not approved by the customer. This...etc.). 5. Removal or reinstallation of household electrical or plumbing (i.e. Service or parts for warranty service to the appliance finishes unless such damage results from the date of the product. 14. WHIRLPOOL SHALL NOT BE LIABLE FOR INCIDENTAL OR CONSEQUENTIAL DAMAGES. and Canada, direct ...
.... In the U.S. Commercial, non-residential, multiple-family use, or use your appliance will pay for Factory Specified Replacement Parts and repair labor to Whirlpool within 30 days. 9. Discoloration, rust or oxidation of God or use with products not approved by the customer. This...etc.). 5. Removal or reinstallation of household electrical or plumbing (i.e. Service or parts for warranty service to the appliance finishes unless such damage results from the date of the product. 14. WHIRLPOOL SHALL NOT BE LIABLE FOR INCIDENTAL OR CONSEQUENTIAL DAMAGES. and Canada, direct ...


