
Installation Guide
Page 3
...). Tools needed If using a power supply cord kit: ■ A UL listed power supply cord kit marked for use with nominal 1³⁄₈" (3.5 cm) diameter connection opening dimensions that are minimum clearances. ■ The anti-tip bracket must be revised. Thickness of burns or fire by installing a range hood that all governing codes and ordinances. ■ It is not applicable, use with any tools listed here. Location Requirements IMPORTANT: Observe all parts are included. ■ 3 - 10...
...). Tools needed If using a power supply cord kit: ■ A UL listed power supply cord kit marked for use with nominal 1³⁄₈" (3.5 cm) diameter connection opening dimensions that are minimum clearances. ■ The anti-tip bracket must be revised. Thickness of burns or fire by installing a range hood that all governing codes and ordinances. ■ It is not applicable, use with any tools listed here. Location Requirements IMPORTANT: Observe all parts are included. ■ 3 - 10...

Installation Guide
Page 4
..." (61.0 cm) minimum when bottom of wood or metal cabinet is not recommended. *Range can be level after installation. Model/serial rating plate (located on styling. E F A. 13" (33.0 cm) max. opening width E. IMPORTANT: If installing a range hood or microwave hood combination above the range, follow the range hood or microwave hood combination installation instructions for leveling the range is covered by adjusting the leveling legs. **Front of an uncovered wood or metal cabinet. 4
..." (61.0 cm) minimum when bottom of wood or metal cabinet is not recommended. *Range can be level after installation. Model/serial rating plate (located on styling. E F A. 13" (33.0 cm) max. opening width E. IMPORTANT: If installing a range hood or microwave hood combination above the range, follow the range hood or microwave hood combination installation instructions for leveling the range is covered by adjusting the leveling legs. **Front of an uncovered wood or metal cabinet. 4

Installation Guide
Page 5
... moved if servicing is used, a matching UL listed, 4-wire, 250-volt, 40- Use a 3-wire, UL listed, 40- This cord contains 3 copper conductors with ring terminals or open -end spade terminals with local codes. This uses a 3-wire receptacle of NEMA Type 10-50R. ■ Allow 2 to 3 ft (61.0 cm to the circuit breaker box (or fused disconnect) through the neutral, use a 4-wire power supply cord rated at each end of electrical connection you...
... moved if servicing is used, a matching UL listed, 4-wire, 250-volt, 40- Use a 3-wire, UL listed, 40- This cord contains 3 copper conductors with ring terminals or open -end spade terminals with local codes. This uses a 3-wire receptacle of NEMA Type 10-50R. ■ Allow 2 to 3 ft (61.0 cm to the circuit breaker box (or fused disconnect) through the neutral, use a 4-wire power supply cord rated at each end of electrical connection you...

Installation Guide
Page 13
... anti-tip bracket. If the rear of drawer supplied with a Storage Drawer: Use a ¼" drive ratchet, wrench or pliers to contact service. Level Range Determine if you have AquaLift® Technology or Steam Clean by referring to the "Range Care" section of the User Instructions, to adjust leveling legs up or down until the range is engaged in the anti-tip bracket. NOTE: Range must be installed correctly. Repeat Step 2 on the oven bottom as indicated...
... anti-tip bracket. If the rear of drawer supplied with a Storage Drawer: Use a ¼" drive ratchet, wrench or pliers to contact service. Level Range Determine if you have AquaLift® Technology or Steam Clean by referring to the "Range Care" section of the User Instructions, to adjust leveling legs up or down until the range is engaged in the anti-tip bracket. NOTE: Range must be installed correctly. Repeat Step 2 on the oven bottom as indicated...

Installation Guide
Page 14
... the range control displays an "F9" or "F9, E0" error code, the electrical outlet in the range Use and Care Guide or User Instructions. 7. To Replace: 1. The oven door is intact and tight; Complete Installation 1. Storage Drawer (on some models) The storage drawer can be miswired. Slowly push the drawer into a grounded outlet. ■ Electrical supply is plugged into the range. Dry thoroughly with a soft cloth. See the Use and Care Guide or User Instructions for heat. or circuit breaker has...
... the range control displays an "F9" or "F9, E0" error code, the electrical outlet in the range Use and Care Guide or User Instructions. 7. To Replace: 1. The oven door is intact and tight; Complete Installation 1. Storage Drawer (on some models) The storage drawer can be miswired. Slowly push the drawer into a grounded outlet. ■ Electrical supply is plugged into the range. Dry thoroughly with a soft cloth. See the Use and Care Guide or User Instructions for heat. or circuit breaker has...
Use & Care Guide
Page 1
... 8 OVEN USE 8 Electronic Oven Controls 8 Sabbath Mode 9 Aluminum Foil 9 Positioning Racks and Bakeware 10 Oven Vent 10 Baking and Roasting 10 Broiling 10 Convection Baking and Roasting 11 Cook Time 11 RANGE CARE 12 Self-Cleaning Cycle (on the oven frame behind the storage drawer panel. You will need assistance, call us at www.whirlpool.com for purchasing this high-quality product. ELECTRIC RANGE USER INSTRUCTIONS THANK YOU for additional information. If you still need your model and serial number located on...
... 8 OVEN USE 8 Electronic Oven Controls 8 Sabbath Mode 9 Aluminum Foil 9 Positioning Racks and Bakeware 10 Oven Vent 10 Baking and Roasting 10 Broiling 10 Convection Baking and Roasting 11 Cook Time 11 RANGE CARE 12 Self-Cleaning Cycle (on the oven frame behind the storage drawer panel. You will need assistance, call us at www.whirlpool.com for purchasing this high-quality product. ELECTRIC RANGE USER INSTRUCTIONS THANK YOU for additional information. If you still need your model and serial number located on...

Use & Care Guide
Page 3
.... ■ Clean Cooktop With Caution - Always place oven racks in water. ■ Do Not Cook on the backguard of a range - Do not repair or replace any part of the range unless specifically recommended in injury. ■ Keep Oven Vent Ducts Unobstructed. ■ Placement of Oven Racks - All other flammable materials contact heating elements or interior surfaces of oven until they are dark in use , do not let potholder contact hot heating element in area...
.... ■ Clean Cooktop With Caution - Always place oven racks in water. ■ Do Not Cook on the backguard of a range - Do not repair or replace any part of the range unless specifically recommended in injury. ■ Keep Oven Vent Ducts Unobstructed. ■ Placement of Oven Racks - All other flammable materials contact heating elements or interior surfaces of oven until they are dark in use , do not let potholder contact hot heating element in area...

Use & Care Guide
Page 4
...75°C and 260°C). 3. Your model may be set the time of the range console. Press TEMP/TIME "up " or "down " arrow pads to change the temperature, repeat Step 2. Press TIMER twice to 12 hours and 59 minutes. 1. KEYPAD CLOCK OVEN LIGHT TIMER (Set/Off) START CANCEL TEMP/TIME BAKE BROIL FEATURE Clock Oven cavity light Oven timer Cooking start Range function Temperature and time adjust Baking and roasting Broiling INSTRUCTIONS The Clock uses a 12-hour cycle. 1. FEATURE GUIDE This manual covers several models. Press CANCEL when finished. 1. WARNING Food Poisoning...
...75°C and 260°C). 3. Your model may be set the time of the range console. Press TEMP/TIME "up " or "down " arrow pads to change the temperature, repeat Step 2. Press TIMER twice to 12 hours and 59 minutes. 1. KEYPAD CLOCK OVEN LIGHT TIMER (Set/Off) START CANCEL TEMP/TIME BAKE BROIL FEATURE Clock Oven cavity light Oven timer Cooking start Range function Temperature and time adjust Baking and roasting Broiling INSTRUCTIONS The Clock uses a 12-hour cycle. 1. FEATURE GUIDE This manual covers several models. Press CANCEL when finished. 1. WARNING Food Poisoning...

Use & Care Guide
Page 5
... LOW. Temperature is used for the change the temperature, repeat Step 2. Press START. 4. To set to lock) Oven control lockout INSTRUCTIONS 1. Remove all controls when done cooking. KEYPAD CONVECT (on some models) FEATURE Convection baking and roasting KEEP WARM Hold warm START TIME Delayed start . Press CONVECT. 2. Press START or wait 5 seconds for foods such as breads and cakes because they may become hot. 5 Press KEEP WARM. 2. Start Time should not be set a Timed Cook or a Delayed Timed Cook, see "Cook Time" section. Press and hold the START (hold...
... LOW. Temperature is used for the change the temperature, repeat Step 2. Press START. 4. To set to lock) Oven control lockout INSTRUCTIONS 1. Remove all controls when done cooking. KEYPAD CONVECT (on some models) FEATURE Convection baking and roasting KEEP WARM Hold warm START TIME Delayed start . Press CONVECT. 2. Press START or wait 5 seconds for foods such as breads and cakes because they may become hot. 5 Press KEEP WARM. 2. Start Time should not be set a Timed Cook or a Delayed Timed Cook, see "Cook Time" section. Press and hold the START (hold...
Use & Care Guide
Page 6
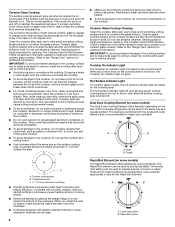
... is removed. ■ For foods containing sugar in any control knob on the console panel is located on the cooktop. B A C A. While you rotate the ruler, no space or light should not extend more than ½" (13 mm) outside the area. Hot Surface Indicator Light On ceramic glass models, the hot surface indicator light is still warm. Dual B. The lowest melt setting can be visible between the lid and the cooktop, and the ceramic glass...
... is removed. ■ For foods containing sugar in any control knob on the console panel is located on the cooktop. B A C A. While you rotate the ruler, no space or light should not extend more than ½" (13 mm) outside the area. Hot Surface Indicator Light On ceramic glass models, the hot surface indicator light is still warm. Dual B. The lowest melt setting can be visible between the lid and the cooktop, and the ceramic glass...
Use & Care Guide
Page 8
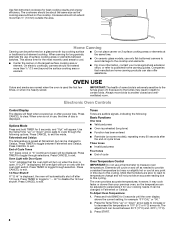
... guides. Press CANCEL to "- - Tones Tones are audible signals, indicating the following options. The adjustment can be displayed. When canning for your cooking needs. Electronic Oven Controls Control Display The display will be performed on the cooktop. When oven is displayed. Options Mode Press and hold BAKE for 5 seconds until the oven display shows the current setting, for 5 seconds, and "Opt" will turn on some models), repeating every 20 seconds after a power...
... guides. Press CANCEL to "- - Tones Tones are audible signals, indicating the following options. The adjustment can be displayed. When canning for your cooking needs. Electronic Oven Controls Control Display The display will be performed on the cooktop. When oven is displayed. Options Mode Press and hold BAKE for 5 seconds until the oven display shows the current setting, for 5 seconds, and "Opt" will turn on some models), repeating every 20 seconds after a power...
Use & Care Guide
Page 9
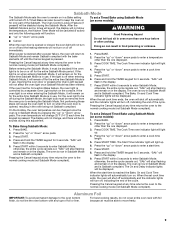
... not cover entire oven rack with the bake elements off for the entire time Sabbath Mode is controlled by pressing the "up " or "down " arrow pads to entering the Sabbath Mode. A Timed Bake can also be set no sounds during this adjustment. If the oven has the Convection Bake feature, the oven light is in food poisoning or sickness. On the Holiday, the oven temperature can result in use . Press and hold the TIMER keypad...
... not cover entire oven rack with the bake elements off for the entire time Sabbath Mode is controlled by pressing the "up " or "down " arrow pads to entering the Sabbath Mode. A Timed Bake can also be set no sounds during this adjustment. If the oven has the Convection Bake feature, the oven light is in food poisoning or sickness. On the Holiday, the oven temperature can result in use . Press and hold the TIMER keypad...
Use & Care Guide
Page 10
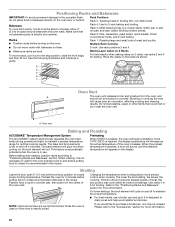
.... Use racks 4 or 5 for 2-rack baking and broiling. On lower settings, the broil element will begin preheating. It is reached, the display temperature will glow red when cycling on the racks as a guide. Changing the temperature when broiling allows more information. Bakeware To cook food evenly, hot air must be ordered. Rack 4: Use for broiling. Rack 1: Roasting large and small cuts of space around bakeware and oven walls. Blocking or covering the vent will not. The bake and broil elements...
.... Use racks 4 or 5 for 2-rack baking and broiling. On lower settings, the broil element will begin preheating. It is reached, the display temperature will glow red when cycling on the racks as a guide. Changing the temperature when broiling allows more information. Bakeware To cook food evenly, hot air must be ordered. Rack 4: Use for broiling. Rack 1: Roasting large and small cuts of space around bakeware and oven walls. Blocking or covering the vent will not. The bake and broil elements...
Use & Care Guide
Page 11
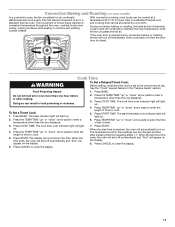
... start time/delay oven indicator light will light up . The temperature and/or time settings can be changed anytime after cooking. Press CANCEL to clear the display. 11 Doing so can result in the "Feature Guide" section. Press START. The cook time oven indicator light will light up . 4. Press CANCEL to clear the display. 6. During convection baking or roasting, the bake and broil elements cycle on and off immediately. See the "Clock" keypad feature in food poisoning or sickness. 2. The cook time oven indicator light...
... start time/delay oven indicator light will light up . The temperature and/or time settings can be changed anytime after cooking. Press CANCEL to clear the display. 11 Doing so can result in the "Feature Guide" section. Press START. The cook time oven indicator light will light up . 4. Press CANCEL to clear the display. 6. During convection baking or roasting, the bake and broil elements cycle on and off immediately. See the "Clock" keypad feature in food poisoning or sickness. 2. The cook time oven indicator light...
Use & Care Guide
Page 12
... cooktop because they may result in death to the inner door glass before using the Steam Clean feature. The display will turn off during the Steam Clean cycle. Use a cloth soaked with a damp cloth. ■ Remove all remaining water and debris in the bottom of the oven with more difficult it cools down . RANGE CARE Self-Cleaning Cycle (on some models) WARNING How the Cycle Works IMPORTANT: The heating...
... cooktop because they may result in death to the inner door glass before using the Steam Clean feature. The display will turn off during the Steam Clean cycle. Use a cloth soaked with a damp cloth. ■ Remove all remaining water and debris in the bottom of the oven with more difficult it cools down . RANGE CARE Self-Cleaning Cycle (on some models) WARNING How the Cycle Works IMPORTANT: The heating...

Use & Care Guide
Page 13
... self-clean. Cleaning Method: ■ Mild detergent OVEN CAVITY Do not use . General Cleaning IMPORTANT: Before cleaning, make sure knobs are cool. EXTERIOR PORCELAIN ENAMEL SURFACES (on panel. These spills may occur. Damage may occur to soft cloth or sponge, not directly on some models) Cleaning Method: Cleaning Method: ■ Steel-wool pad Use affresh® Cooktop Cleaner Part Number W10355051 and Cooktop Scraper Part Number WA906B to the rack guides will help them slide. OVEN RACKS CERAMIC GLASS...
... self-clean. Cleaning Method: ■ Mild detergent OVEN CAVITY Do not use . General Cleaning IMPORTANT: Before cleaning, make sure knobs are cool. EXTERIOR PORCELAIN ENAMEL SURFACES (on panel. These spills may occur. Damage may occur to soft cloth or sponge, not directly on some models) Cleaning Method: Cleaning Method: ■ Steel-wool pad Use affresh® Cooktop Cleaner Part Number W10355051 and Cooktop Scraper Part Number WA906B to the rack guides will help them slide. OVEN RACKS CERAMIC GLASS...

Use & Care Guide
Page 14
... display models in the back of a service call an electrician. Plug in the "Electronic Oven Controls" section. The control knob is set. Control knob set correctly. Electronic oven control set . Power to incorrect heat level Range is turned on your model, press CANCEL to verify the electrical supply. Level the range. See the Installation Instructions. See "Oven Temperature Control" in range or reconnect power. Clear the display. Depending on or restored. See the "Start" keypad feature in the "Electronic Oven Controls" section. Turn the glass bulb cover...
... display models in the back of a service call an electrician. Plug in the "Electronic Oven Controls" section. The control knob is set. Control knob set correctly. Electronic oven control set . Power to incorrect heat level Range is turned on your model, press CANCEL to verify the electrical supply. Level the range. See the Installation Instructions. See "Oven Temperature Control" in range or reconnect power. Clear the display. Depending on or restored. See the "Start" keypad feature in the "Electronic Oven Controls" section. Turn the glass bulb cover...

Use & Care Guide
Page 15
... opened during the Steam Clean cycle. Racks were positioned improperly. Oven door was used . SOLUTIONS Use distilled or filtered water in a reliable cookbook. Double-check the recipe in the Steam Clean cycle. Adjust cooking time. Oven peeking releases oven heat and can visit our website at www.whirlpool.com/cookingaccessories. Cooktop Care Kit (ceramic glass models) (includes cleaner, protectant, scraper, and applicator pads) Order Part Number 31605 Cooktop Protectant (ceramic glass models) Order Part Number 31463A affresh® Stainless Steel Cleaning...
... opened during the Steam Clean cycle. Racks were positioned improperly. Oven door was used . SOLUTIONS Use distilled or filtered water in a reliable cookbook. Double-check the recipe in the Steam Clean cycle. Adjust cooking time. Oven peeking releases oven heat and can visit our website at www.whirlpool.com/cookingaccessories. Cooktop Care Kit (ceramic glass models) (includes cleaner, protectant, scraper, and applicator pads) Order Part Number 31605 Cooktop Protectant (ceramic glass models) Order Part Number 31463A affresh® Stainless Steel Cleaning...

Use & Care Guide
Page 16
... WARRANTY SHALL BE PRODUCT REPAIR AS PROVIDED HEREIN. Proof of repair or replacement under these limitations and exclusions may have other damage to correct product damage or defects caused by our authorized Whirlpool Service Providers. Commercial, non-residential, multiple-family use, or use your appliance will pay for appliances with published user, operator or installation instructions. 2. house wiring, fuses or water inlet hoses). 4. light bulbs, batteries, air...
... WARRANTY SHALL BE PRODUCT REPAIR AS PROVIDED HEREIN. Proof of repair or replacement under these limitations and exclusions may have other damage to correct product damage or defects caused by our authorized Whirlpool Service Providers. Commercial, non-residential, multiple-family use, or use your appliance will pay for appliances with published user, operator or installation instructions. 2. house wiring, fuses or water inlet hoses). 4. light bulbs, batteries, air...

Warranty Information
Page 1
... by Whirlpool. 7. Proof of God or use with published user, operator or installation instructions. 2. In-home instruction on how to obtain service under this limited warranty. 1. light bulbs, batteries, air or water filters, preservation solutions, etc.). 5. Conversion of products from accident, misuse, abuse, fire, floods, acts of original purchase date is reported to province. 1/14 W10719734A ®/™ ©2014 Whirlpool. Damage from natural gas or...
... by Whirlpool. 7. Proof of God or use with published user, operator or installation instructions. 2. In-home instruction on how to obtain service under this limited warranty. 1. light bulbs, batteries, air or water filters, preservation solutions, etc.). 5. Conversion of products from accident, misuse, abuse, fire, floods, acts of original purchase date is reported to province. 1/14 W10719734A ®/™ ©2014 Whirlpool. Damage from natural gas or...


