
Dimension Guide
Page 1
... right side of wood or metal cabinet is located on the model/serial number rating plate. E F Because Whirlpool Corporation policy includes a continuous commitment to improve our products, we reserve the right to a 50-amp circuit,...(76.2 cm) Freestanding Electric Range PRODUCT MODEL NUMBERS WFC110M0A WFE330W0A WFE540H0A WFC120M0A WFE510S0A WFE710H0A WFC130M0A WFE520C0A WFE714HLA WFC310S0A WFE524CLA WFE720H0A WFC340S0A WFE524WLA WFI910H0A WFE320M0A WFE530C0A Electrical: To properly install your range, you will be using and follow the range hood or microwave hood ...
... right side of wood or metal cabinet is located on the model/serial number rating plate. E F Because Whirlpool Corporation policy includes a continuous commitment to improve our products, we reserve the right to a 50-amp circuit,...(76.2 cm) Freestanding Electric Range PRODUCT MODEL NUMBERS WFC110M0A WFE330W0A WFE540H0A WFC120M0A WFE510S0A WFE710H0A WFC130M0A WFE520C0A WFE714HLA WFC310S0A WFE524CLA WFE720H0A WFC340S0A WFE524WLA WFI910H0A WFE320M0A WFE530C0A Electrical: To properly install your range, you will be using and follow the range hood or microwave hood ...

Installation Guide
Page 1
INSTALLATION INSTRUCTIONS 30" (76 CM) FREESTANDING ELECTRIC RANGES Table of Contents RANGE SAFETY 2 INSTALLATION REQUIREMENTS 3 Tools and Parts 3 Location Requirements 3 Electrical Requirements - Only 5 INSTALLATION INSTRUCTIONS 6 Unpack Range 6 Install Anti-Tip Bracket 6 Electrical Connection - W10403811B Only 8 Verify Anti-Tip Bracket Is Installed and Engaged 12 Level Range 13 Warming Drawer or Premium Storage Drawer 13 Storage Drawer 14 Oven Door 14 Complete Installation 15 Moving the Range 15 IMPORTANT: Save for local electrical inspector's use. U.S.A. U.S.A.
INSTALLATION INSTRUCTIONS 30" (76 CM) FREESTANDING ELECTRIC RANGES Table of Contents RANGE SAFETY 2 INSTALLATION REQUIREMENTS 3 Tools and Parts 3 Location Requirements 3 Electrical Requirements - Only 5 INSTALLATION INSTRUCTIONS 6 Unpack Range 6 Install Anti-Tip Bracket 6 Electrical Connection - W10403811B Only 8 Verify Anti-Tip Bracket Is Installed and Engaged 12 Level Range 13 Warming Drawer or Premium Storage Drawer 13 Storage Drawer 14 Oven Door 14 Complete Installation 15 Moving the Range 15 IMPORTANT: Save for local electrical inspector's use. U.S.A. U.S.A.

Installation Guide
Page 3
...opening and must conform to make sure that the materials used will need to comply with the range, see "Install Anti-Tip Bracket" section. ■ Grounded electrical supply is required. Additional Installation Requirements The installation of flooring may require longer screws to anchor ...to terminal block) ■ 3 - Mobile home installations require: ■ When this range is marked for Manufactured Home Installations, ANSI A225.1/NFPA 501A or local codes. See the appropriate "Electrical Requirements" section. Tools needed If using a power supply cord kit: ■ A ...
...opening and must conform to make sure that the materials used will need to comply with the range, see "Install Anti-Tip Bracket" section. ■ Grounded electrical supply is required. Additional Installation Requirements The installation of flooring may require longer screws to anchor ...to terminal block) ■ 3 - Mobile home installations require: ■ When this range is marked for Manufactured Home Installations, ANSI A225.1/NFPA 501A or local codes. See the appropriate "Electrical Requirements" section. Tools needed If using a power supply cord kit: ■ A ...

Installation Guide
Page 5
...-amp circuit 2 No.-8 conductors 1 No.-10 white neutral 1 No.-8 green grounding Range Rating* Specified Rating of a UL listed, 3-wire, 250-volt, 40- Connectors on the Tech Sheet. 5 Electrical Connection To properly install your range, you must be Type SRD or SRDT with a nominal 1³⁄₈" ... upturned ends, terminating in the "Location Requirements" section. 4-wire receptacle (14-50R) ■ This range is located on the appliance end must conform with the National Electrical Code, ANSI/ NFPA 70-latest edition and all local codes and ordinances. A copy of the above ...
...-amp circuit 2 No.-8 conductors 1 No.-10 white neutral 1 No.-8 green grounding Range Rating* Specified Rating of a UL listed, 3-wire, 250-volt, 40- Connectors on the Tech Sheet. 5 Electrical Connection To properly install your range, you must be Type SRD or SRDT with a nominal 1³⁄₈" ... upturned ends, terminating in the "Location Requirements" section. 4-wire receptacle (14-50R) ■ This range is located on the appliance end must conform with the National Electrical Code, ANSI/ NFPA 70-latest edition and all local codes and ordinances. A copy of the above ...
Installation Guide
Page 7
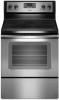
...cutout so that correspond to continue installing the range using the following illustrations. See the following installation instructions. Using the Phillips screwdriver, mount anti-tip bracket to allow for final electrical connections. Move range forward onto shipping base, cardboard or hardboard to... the bracket holes of the bracket is 12 31.9 cm) from under range. 7. Bracket V-notch 4. Remove shipping base, cardboard or ...
...cutout so that correspond to continue installing the range using the following illustrations. See the following installation instructions. Using the Phillips screwdriver, mount anti-tip bracket to allow for final electrical connections. Move range forward onto shipping base, cardboard or hardboard to... the bracket holes of the bracket is 12 31.9 cm) from under range. 7. Bracket V-notch 4. Remove shipping base, cardboard or ...
Installation Guide
Page 8
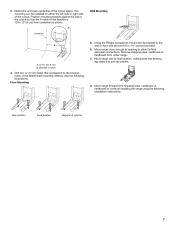
...each side B. Use 8 gauge copper or 6 gauge aluminum wire. Electrically ground range. Failure to follow these instructions can result in death, fire, or electrical shock. Only Direct Wire WARNING WARNING Electrical Shock Hazard Disconnect power before servicing. Pull cover down and toward you...cord. 8 Failure to remove cover from the middle post of the range. A B C A. Terminal block cover C. Remove plastic tag holding three 10-32 hex nuts from range. 4. Add strain relief. Electrical Shock Hazard Disconnect power before servicing. Use a new 40 amp power ...
...each side B. Use 8 gauge copper or 6 gauge aluminum wire. Electrically ground range. Failure to follow these instructions can result in death, fire, or electrical shock. Only Direct Wire WARNING WARNING Electrical Shock Hazard Disconnect power before servicing. Pull cover down and toward you...cord. 8 Failure to remove cover from the middle post of the range. A B C A. Terminal block cover C. Remove plastic tag holding three 10-32 hex nuts from range. 4. Add strain relief. Electrical Shock Hazard Disconnect power before servicing. Use a new 40 amp power ...
Installation Guide
Page 9
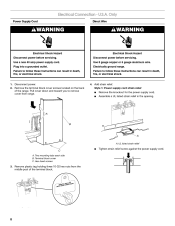
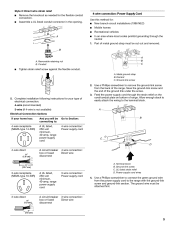
... box or fused Direct wire disconnect 3" (7.6 cm) 9 A B C D A. A B A. Part of electrical connection: 4-wire (recommended) 3-wire (if 4-wire is not available) Electrical Connection Options If your type of metal ground strap must be Go to Section: connecting to remove the ground-link ... Terminal block B. Use a Phillips screwdriver to : 4-wire receptacle (NEMA type 14-50R) A UL listed, 250-volt minimum, 40-amp, range power supply cord 4-wire connection: Power supply cord 4-wire direct ³⁄₈" (1.0 cm) A circuit breaker 4-wire connection: box or fused...
... box or fused Direct wire disconnect 3" (7.6 cm) 9 A B C D A. A B A. Part of electrical connection: 4-wire (recommended) 3-wire (if 4-wire is not available) Electrical Connection Options If your type of metal ground strap must be Go to Section: connecting to remove the ground-link ... Terminal block B. Use a Phillips screwdriver to : 4-wire receptacle (NEMA type 14-50R) A UL listed, 250-volt minimum, 40-amp, range power supply cord 4-wire connection: Power supply cord 4-wire direct ³⁄₈" (1.0 cm) A circuit breaker 4-wire connection: box or fused...
Installation Guide
Page 10
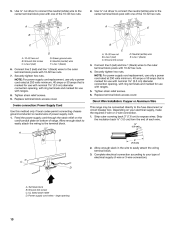
... strain relief screws. 6. C D A. Ground-link screw C. large opening , with ring terminals and marked for use with ranges. 5. Ground-link screw C. Line 1 (black) 6. Securely tighten hex nuts. Line 1 (black) 3. Complete electrical connection according to neutral wire of electrical supply (4-wire or 3-wire connection). NOTE: For power supply cord replacement, use only a power cord rated...
... strain relief screws. 6. C D A. Ground-link screw C. large opening , with ring terminals and marked for use with ranges. 5. Ground-link screw C. Line 1 (black) 6. Securely tighten hex nuts. Line 1 (black) 3. Complete electrical connection according to neutral wire of electrical supply (4-wire or 3-wire connection). NOTE: For power supply cord replacement, use only a power cord rated...

Installation Guide
Page 15
... section. 5. Check that you have all parts are now installed. Check that range is level. See the "Level Range" section. 5. Read the "Range Use" section in death or serious burns to verify the electrical supply. ■ See the "Troubleshooting" section in the home may be killed... instructions can result in power supply cord. 5. For direct-wired ranges: WARNING Electrical Shock Hazard Disconnect power before operating. Check that the anti-tip bracket is intact and tight; When moving range, slide range onto cardboard or hardboard to floor or wall per installation instructions. ...
... section. 5. Check that you have all parts are now installed. Check that range is level. See the "Level Range" section. 5. Read the "Range Use" section in death or serious burns to verify the electrical supply. ■ See the "Troubleshooting" section in the home may be killed... instructions can result in power supply cord. 5. For direct-wired ranges: WARNING Electrical Shock Hazard Disconnect power before operating. Check that the anti-tip bracket is intact and tight; When moving range, slide range onto cardboard or hardboard to floor or wall per installation instructions. ...
Use & Care Guide
Page 1
... covered in TROUBLESHOOTING, please visit our website at 1-800-253-1301. You will need assistance, call us at www.whirlpool.com for purchasing this high-quality product. Table of Contents RANGE SAFETY 2 The Anti-Tip Bracket 2 FEATURE GUIDE 4 COOKTOP USE 6 Cookware 7 Home Canning 8 OVEN USE 8 ...: www.whirlpool.com Tenga listo su número de modelo completo. If you still need your model and serial number located on some models 12 Steam Clean 12 General Cleaning 13 Oven Light 14 TROUBLESHOOTING 14 ACCESSORIES 15 WARRANTY 16 W10394384A ELECTRIC RANGE USER INSTRUCTIONS...
... covered in TROUBLESHOOTING, please visit our website at 1-800-253-1301. You will need assistance, call us at www.whirlpool.com for purchasing this high-quality product. Table of Contents RANGE SAFETY 2 The Anti-Tip Bracket 2 FEATURE GUIDE 4 COOKTOP USE 6 Cookware 7 Home Canning 8 OVEN USE 8 ...: www.whirlpool.com Tenga listo su número de modelo completo. If you still need your model and serial number located on some models 12 Steam Clean 12 General Cleaning 13 Oven Light 14 TROUBLESHOOTING 14 ACCESSORIES 15 WARRANTY 16 W10394384A ELECTRIC RANGE USER INSTRUCTIONS...

Use & Care Guide
Page 3
IMPORTANT SAFETY INSTRUCTIONS WARNING: To reduce the risk of electric shock, or fire. ■ Glazed Cooking Utensils - Be sure the range is properly installed and grounded by a qualified technician. ■ Never Use the Range for a good seal. Areas near surface units. ■ Do Not Use ...handle of the appliance may result in a risk of fire, electrical shock, injury to persons, or damage when using the range. ■ User Servicing - Loose-fitting or hanging garments should be worn while using the range, follow basic precautions, including the following: ■ WARNING: TO...
IMPORTANT SAFETY INSTRUCTIONS WARNING: To reduce the risk of electric shock, or fire. ■ Glazed Cooking Utensils - Be sure the range is properly installed and grounded by a qualified technician. ■ Never Use the Range for a good seal. Areas near surface units. ■ Do Not Use ...handle of the appliance may result in a risk of fire, electrical shock, injury to persons, or damage when using the range. ■ User Servicing - Loose-fitting or hanging garments should be worn while using the range, follow basic precautions, including the following: ■ WARNING: TO...
Use & Care Guide
Page 14
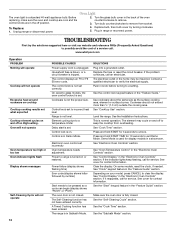
Replace bulb, then bulb cover by number) Start needs to exit Demo Mode. www.whirlpool.com Operation PROBLEM Nothing will operate Cooktop will not operate 14 POSSIBLE CAUSES Power supply cord is set incorrectly Oven temperature...Power to remove. 3. Cookware should not extend more than ¹⁄₂" (1.3 cm) outside the cooking area. Level the range. Control is used for 3 seconds to verify the electrical supply. See "Cooktop Use" section. See "Electronic Oven Controls" section. Make sure the oven door is set correctly. Oven Light...
Replace bulb, then bulb cover by number) Start needs to exit Demo Mode. www.whirlpool.com Operation PROBLEM Nothing will operate Cooktop will not operate 14 POSSIBLE CAUSES Power supply cord is set incorrectly Oven temperature...Power to remove. 3. Cookware should not extend more than ¹⁄₂" (1.3 cm) outside the cooking area. Level the range. Control is used for 3 seconds to verify the electrical supply. See "Cooktop Use" section. See "Electronic Oven Controls" section. Make sure the oven door is set correctly. Oven Light...


