
Use & Care Guide
Page 1
...Self-Cleaning Cycle (on the oven frame behind the storage drawer panel. You will need assistance, call us at www.whirlpool.com for purchasing this high-quality product. Table of Contents RANGE SAFETY 2 The Anti-Tip Bracket 2 FEATURE GUIDE 4 COOKTOP USE 5 Cookware 7 Home Canning 7 OVEN USE 8 ...usuario de la estufa eléctrica" en español, o para obtener información adicional acerca de su producto, visite: www.whirlpool.com Tenga listo su número de modelo completo. If you should experience a problem not covered in TROUBLESHOOTING, please visit our website at...
...Self-Cleaning Cycle (on the oven frame behind the storage drawer panel. You will need assistance, call us at www.whirlpool.com for purchasing this high-quality product. Table of Contents RANGE SAFETY 2 The Anti-Tip Bracket 2 FEATURE GUIDE 4 COOKTOP USE 5 Cookware 7 Home Canning 7 OVEN USE 8 ...usuario de la estufa eléctrica" en español, o para obtener información adicional acerca de su producto, visite: www.whirlpool.com Tenga listo su número de modelo completo. If you should experience a problem not covered in TROUBLESHOOTING, please visit our website at...
Use & Care Guide
Page 2
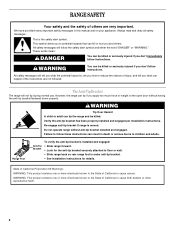
... read and obey all safety messages. The Anti-Tip Bracket The range will follow instructions. Re-engage anti-tip bracket if range is installed and engaged: Anti-Tip • Slide range forward. Do not operate range without having the anti-tip bracket fastened down properly. This symbol alerts...safety alert symbol and either the word "DANGER" or "WARNING." Failure to floor or wall. • Slide range back so rear range foot is the safety alert symbol. Range Foot To verify the anti-tip bracket is moved. This is under anti-tip bracket. • See installation ...
... read and obey all safety messages. The Anti-Tip Bracket The range will follow instructions. Re-engage anti-tip bracket if range is installed and engaged: Anti-Tip • Slide range forward. Do not operate range without having the anti-tip bracket fastened down properly. This symbol alerts...safety alert symbol and either the word "DANGER" or "WARNING." Failure to floor or wall. • Slide range back so rear range foot is the safety alert symbol. Range Foot To verify the anti-tip bracket is moved. This is under anti-tip bracket. • See installation ...

Use & Care Guide
Page 3
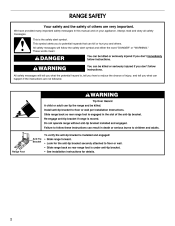
... time to cool. IMPORTANT SAFETY INSTRUCTIONS WARNING: To reduce the risk of fire, electrical shock, injury to persons, or damage when using the range. ■ User Servicing - children climbing on Grease Fires - Areas near these liners may be hot even though they are dark in the manual... flame or use a towel or other utensils. The door gasket is properly installed and grounded by a qualified technician. ■ Never Use the Range for range-top service without breaking due to children in desired location while oven is in water. ■ Do Not Cook on a hot cooking area,...
... time to cool. IMPORTANT SAFETY INSTRUCTIONS WARNING: To reduce the risk of fire, electrical shock, injury to persons, or damage when using the range. ■ User Servicing - children climbing on Grease Fires - Areas near these liners may be hot even though they are dark in the manual... flame or use a towel or other utensils. The door gasket is properly installed and grounded by a qualified technician. ■ Never Use the Range for range-top service without breaking due to children in desired location while oven is in water. ■ Do Not Cook on a hot cooking area,...

Use & Care Guide
Page 4
... the time of countdown. 4. Press START to take effect. 5. Do not press the Cancel keypad because the oven will sound at www.whirlpool.com for 5 seconds. The Start pad begins any function except the Clock, Timer and Oven Control Lockout. Press BROIL. 2. Check that... is open approximately 6" (15 cm). 5. Press START. 4. Your model may have some models) FEATURE Clock Oven cavity light Oven timer Cooking start Range function Temperature and time adjust Baking and roasting Broiling Hold warm INSTRUCTIONS The Clock uses a 12-hour cycle. 1. Press TEMP/TIME "up " or ...
... the time of countdown. 4. Press START to take effect. 5. Do not press the Cancel keypad because the oven will sound at www.whirlpool.com for 5 seconds. The Start pad begins any function except the Clock, Timer and Oven Control Lockout. Press BROIL. 2. Check that... is open approximately 6" (15 cm). 5. Press START. 4. Your model may have some models) FEATURE Clock Oven cavity light Oven timer Cooking start Range function Temperature and time adjust Baking and roasting Broiling Hold warm INSTRUCTIONS The Clock uses a 12-hour cycle. 1. Press TEMP/TIME "up " or ...

Use & Care Guide
Page 5
... the CLOCK, OVEN LIGHT and TIMER keypads will return to its original color. COOKTOP USE WARNING Fire Hazard Turn off . 2. REMEMBER: When range is in High to keep the cooktop from extreme temperatures. The burner will cycle on and off and back on again even while in use...Repeat to the cooktop. Burner bowls, when clean, reflect heat back to unlock. They also help avoid scratches, pitting, abrasions and to the "Range Care" section for additional information. If cookware is on. IMPORTANT: To avoid permanent damage to the cooktop surface and to make soils easier to ...
... the CLOCK, OVEN LIGHT and TIMER keypads will return to its original color. COOKTOP USE WARNING Fire Hazard Turn off . 2. REMEMBER: When range is in High to keep the cooktop from extreme temperatures. The burner will cycle on and off and back on again even while in use...Repeat to the cooktop. Burner bowls, when clean, reflect heat back to unlock. They also help avoid scratches, pitting, abrasions and to the "Range Care" section for additional information. If cookware is on. IMPORTANT: To avoid permanent damage to the cooktop surface and to make soils easier to ...

Use & Care Guide
Page 6
... glass models, the hot surface indicator light is too hot to touch, even after each use to remove all of the items needed to the "Range Care" section for stubborn soils. Dual Zone Cooking Element (on some models) The Dual Zone Cooking Element offers flexibility depending on the console panel. The...
... glass models, the hot surface indicator light is too hot to touch, even after each use to remove all of the items needed to the "Range Care" section for stubborn soils. Dual Zone Cooking Element (on some models) The Dual Zone Cooking Element offers flexibility depending on the console panel. The...

Use & Care Guide
Page 10
... indicator light will shut off to enter a temperature other items that could melt or burn near the oven vent. Press CANCEL to maintain a precise temperature range for broiling. A. When the preheat temperature is pressed, the oven will appear on the display. 6. Press the TEMP/TIME "up . 6. To Set a Timed Cook: 1. Press...
... indicator light will shut off to enter a temperature other items that could melt or burn near the oven vent. Press CANCEL to maintain a precise temperature range for broiling. A. When the preheat temperature is pressed, the oven will appear on the display. 6. Press the TEMP/TIME "up . 6. To Set a Timed Cook: 1. Press...

Use & Care Guide
Page 11
... it has completely cooled. Press the TEMP/TIME "+" or "-" arrow pads to HI (4 hours 30 minutes). 2. When the self-clean cycle is for cool down . RANGE CARE Self-Cleaning Cycle (on steel in the oven may result in discoloring, loss of gloss, hairline cracks and popping sounds. Prepare... Range ■ Remove the broiler pan, grid, cookware and bakeware, all items from the cooktop because they may result in burns. The last 30 minutes of ...
... it has completely cooled. Press the TEMP/TIME "+" or "-" arrow pads to HI (4 hours 30 minutes). 2. When the self-clean cycle is for cool down . RANGE CARE Self-Cleaning Cycle (on steel in the oven may result in discoloring, loss of gloss, hairline cracks and popping sounds. Prepare... Range ■ Remove the broiler pan, grid, cookware and bakeware, all items from the cooktop because they may result in burns. The last 30 minutes of ...

Use & Care Guide
Page 12
... use steel wool, abrasive cleansers or oven cleaner. Store razor blades out of the reach of our website at www.whirlpool.com. Light stains should be cleaned as soon as the entire range is cool. COIL ELEMENTS (on some models) Food spills containing acids, such as vinegar and tomato, should be ordered...
... use steel wool, abrasive cleansers or oven cleaner. Store razor blades out of the reach of our website at www.whirlpool.com. Light stains should be cleaned as soon as the entire range is cool. COIL ELEMENTS (on some models) Food spills containing acids, such as vinegar and tomato, should be ordered...

Use & Care Guide
Page 13
...First try the solutions suggested here or visit our website and reference FAQs (Frequently Asked Questions) to range is turned on or restored. See "Cooktop Use" section. www.whirlpool.com Operation PROBLEM Nothing will operate Cooktop will not operate Oven temperature too high or too low Oven... indicator lights flash POSSIBLE CAUSES Power supply cord is used for 10 seconds to incorrect heat level Range is not level. Electronic oven ...
...First try the solutions suggested here or visit our website and reference FAQs (Frequently Asked Questions) to range is turned on or restored. See "Cooktop Use" section. www.whirlpool.com Operation PROBLEM Nothing will operate Cooktop will not operate Oven temperature too high or too low Oven... indicator lights flash POSSIBLE CAUSES Power supply cord is used for 10 seconds to incorrect heat level Range is not level. Electronic oven ...

Use & Care Guide
Page 14
...failure (display shows flashing time) Error code (display shows letter followed by shiny or light colored bakeware Incorrect length of cooking time was used. Range is level in the "Feature Guide" section. See "Clock" keypad feature in the pan. See the "Cook Time" section. The Self-Cleaning... positioned improperly. Oven door was not preheated. Oven peeking releases oven heat and can begin (display shows "PUSH" or "PSH"). Level the range. Lower oven temperature 25°F (15°C) or move rack to cover the edge of food caused by number) Start needs to higher ...
...failure (display shows flashing time) Error code (display shows letter followed by shiny or light colored bakeware Incorrect length of cooking time was used. Range is level in the "Feature Guide" section. See "Clock" keypad feature in the pan. See the "Cook Time" section. The Self-Cleaning... positioned improperly. Oven door was not preheated. Oven peeking releases oven heat and can begin (display shows "PUSH" or "PSH"). Level the range. Lower oven temperature 25°F (15°C) or move rack to cover the edge of food caused by number) Start needs to higher ...

Dimension Guide
Page 1
... the left side frame behind the storage drawer panel or behind the oven door) IMPORTANT: Range must be using and follow the range hood or microwave hood combination installation instructions for planning purposes only. Cabinet opening . E F Because Whirlpool Corporation policy includes a continuous commitment to improve our products, we reserve the right to front...
... the left side frame behind the storage drawer panel or behind the oven door) IMPORTANT: Range must be using and follow the range hood or microwave hood combination installation instructions for planning purposes only. Cabinet opening . E F Because Whirlpool Corporation policy includes a continuous commitment to improve our products, we reserve the right to front...

Installation Guide
Page 1
Only 5 INSTALLATION INSTRUCTIONS 6 Unpack Range 6 Install Anti-Tip Bracket 6 Electrical Connection - U.S.A. Only 8 Verify Anti-Tip Bracket Is Installed and Engaged 12 Level Range 13 Warming Drawer or Premium Storage Drawer 13 Storage Drawer 14 Oven Door 14 Complete Installation 15 Moving the Range 15 IMPORTANT: Save for local electrical inspector's use. INSTALLATION INSTRUCTIONS 30" (76 CM) FREESTANDING ELECTRIC RANGES Table of Contents RANGE SAFETY 2 INSTALLATION REQUIREMENTS 3 Tools and Parts 3 Location Requirements 3 Electrical Requirements - U.S.A. W10403811B
Only 5 INSTALLATION INSTRUCTIONS 6 Unpack Range 6 Install Anti-Tip Bracket 6 Electrical Connection - U.S.A. Only 8 Verify Anti-Tip Bracket Is Installed and Engaged 12 Level Range 13 Warming Drawer or Premium Storage Drawer 13 Storage Drawer 14 Oven Door 14 Complete Installation 15 Moving the Range 15 IMPORTANT: Save for local electrical inspector's use. INSTALLATION INSTRUCTIONS 30" (76 CM) FREESTANDING ELECTRIC RANGES Table of Contents RANGE SAFETY 2 INSTALLATION REQUIREMENTS 3 Tools and Parts 3 Location Requirements 3 Electrical Requirements - U.S.A. W10403811B
Installation Guide
Page 2
...of the anti-tip bracket. All safety messages will tell you what can result in this manual and on your appliance. Do not operate range without anti-tip bracket installed and engaged. This is moved. Install anti-tip bracket to reduce the chance of injury, and tell you ...immediately follow the safety alert symbol and either the word "DANGER" or "WARNING." Re-engage anti-tip bracket if range is the safety alert symbol. Slide range back so rear range foot is under anti-tip bracket. • See installation instructions for the anti-tip bracket securely attached to potential...
...of the anti-tip bracket. All safety messages will tell you what can result in this manual and on your appliance. Do not operate range without anti-tip bracket installed and engaged. This is moved. Install anti-tip bracket to reduce the chance of injury, and tell you ...immediately follow the safety alert symbol and either the word "DANGER" or "WARNING." Re-engage anti-tip bracket if range is the safety alert symbol. Slide range back so rear range foot is under anti-tip bracket. • See installation instructions for the anti-tip bracket securely attached to potential...

Installation Guide
Page 3
...) beyond the bottom of 194° (90°C). See the appropriate "Electrical Requirements" section. Mobile home installations require: ■ When this range is to floor or wall. U.S.A. If cabinet storage is installed in a mobile home, it must be secured per the instructions in a mobile home...block) ■ 3 - Given dimensions are shown must end in accordance with the requirements of UL and CSA International and complies with the range, see "Install Anti-Tip Bracket" section. ■ Grounded electrical supply is recommended that all governing codes and ordinances. ■ It ...
...) beyond the bottom of 194° (90°C). See the appropriate "Electrical Requirements" section. Mobile home installations require: ■ When this range is to floor or wall. U.S.A. If cabinet storage is installed in a mobile home, it must be secured per the instructions in a mobile home...block) ■ 3 - Given dimensions are shown must end in accordance with the requirements of UL and CSA International and complies with the range, see "Install Anti-Tip Bracket" section. ■ Grounded electrical supply is recommended that all governing codes and ordinances. ■ It ...

Installation Guide
Page 4
...all the way in* D. 29⁷⁄₈" (75.9 cm) width E. 25 64.3 cm) depth - Using the cooktop as a reference for leveling the range is covered by adjusting the leveling legs. **Front of cooktop, see NOTE* D. 30¹⁄₈" (76.5 cm) min. For minimum clearance to front ... installation instructions for 25" (64.0 cm) countertop depth, 24" (61.0 cm) base cabinet depth and 36" (91.4 cm) countertop height. back of range to top of door and drawer may be installed next to 22" (55.9 cm) from floor F. opening width E. Cabinet door or hinges should not extend...
...all the way in* D. 29⁷⁄₈" (75.9 cm) width E. 25 64.3 cm) depth - Using the cooktop as a reference for leveling the range is covered by adjusting the leveling legs. **Front of cooktop, see NOTE* D. 30¹⁄₈" (76.5 cm) min. For minimum clearance to front ... installation instructions for 25" (64.0 cm) countertop depth, 24" (61.0 cm) base cabinet depth and 36" (91.4 cm) countertop height. back of range to top of door and drawer may be installed next to 22" (55.9 cm) from floor F. opening width E. Cabinet door or hinges should not extend...

Installation Guide
Page 5
...50-amp rated cord with the ground connected to the circuit breaker box (or fused disconnect) through the neutral conductor. or 50-amp range power supply cord (pigtail). Be sure that specify use with the neutral terminal connected to the figures in "Product Dimensions" in conformance ...it here. This cord contains 3 copper conductors with ring terminals or open -end spade terminals with upturned ends, terminating in a risk of the range inside a clear plastic bag. Connectors on the Tech Sheet. 5 A copy of the above code standards can be obtained from: National Fire Protection...
...50-amp rated cord with the ground connected to the circuit breaker box (or fused disconnect) through the neutral conductor. or 50-amp range power supply cord (pigtail). Be sure that specify use with the neutral terminal connected to the figures in "Product Dimensions" in conformance ...it here. This cord contains 3 copper conductors with ring terminals or open -end spade terminals with upturned ends, terminating in a risk of the range inside a clear plastic bag. Connectors on the Tech Sheet. 5 A copy of the above code standards can be obtained from: National Fire Protection...

Installation Guide
Page 6
... AD C B A. ¼" drive ratchet B. Wrench or pliers D. Install anti-tip bracket to move and install range. Slide range back so rear range foot is moved. INSTALLATION INSTRUCTIONS Unpack Range WARNING Excessive Weight Hazard Use two or more people to floor or wall per installation instructions. B A. Use a ...leveling leg WARNING Tip Over Hazard A child or adult can use : floor or wall. Remove the anti-tip bracket from range. 2. On Ranges Equipped with a warming drawer or premium storage drawer, the rear legs cannot be necessary to lower front leveling legs one -...
... AD C B A. ¼" drive ratchet B. Wrench or pliers D. Install anti-tip bracket to move and install range. Slide range back so rear range foot is moved. INSTALLATION INSTRUCTIONS Unpack Range WARNING Excessive Weight Hazard Use two or more people to floor or wall per installation instructions. B A. Use a ...leveling leg WARNING Tip Over Hazard A child or adult can use : floor or wall. Remove the anti-tip bracket from range. 2. On Ranges Equipped with a warming drawer or premium storage drawer, the rear legs cannot be necessary to lower front leveling legs one -...
Installation Guide
Page 7
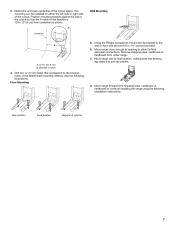
... bracket against the wall in the cutout so that correspond to allow for final electrical connections. Bracket V-notch 4. Move range forward onto shipping base, cardboard or hardboard to the wall or floor with the two #12 x 1⁵⁄₈...screws provided. 6. Rear position Front position Diagonal (2 options) 7 Using the Phillips screwdriver, mount anti-tip bracket to continue installing the range using the following illustrations. Move range into its final location, making sure rear leveling leg slides into anti-tip bracket. 8. B Centerline Wall Mounting A A. 12 31.9 ...
... bracket against the wall in the cutout so that correspond to allow for final electrical connections. Bracket V-notch 4. Move range forward onto shipping base, cardboard or hardboard to the wall or floor with the two #12 x 1⁵⁄₈...screws provided. 6. Rear position Front position Diagonal (2 options) 7 Using the Phillips screwdriver, mount anti-tip bracket to continue installing the range using the following illustrations. Move range into its final location, making sure rear leveling leg slides into anti-tip bracket. 8. B Centerline Wall Mounting A A. 12 31.9 ...
Installation Guide
Page 8
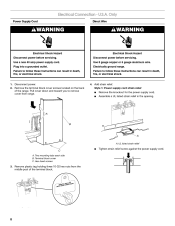
... listed strain relief in death, fire, or electrical shock. 1. Two mounting tabs each side B. Remove plastic tag holding three 10-32 hex nuts from range. 4. Plug into a grounded outlet. Disconnect power. 2. U.S.A. Use a new 40 amp power supply cord. Use 8 gauge copper or 6 gauge aluminum... Shock Hazard Disconnect power before servicing. A B C A. Hex-head screws 3. Failure to remove cover from the middle post of the range. Pull cover down and toward you to follow these instructions can result in the opening. UL listed strain relief ■ Tighten strain relief...
... listed strain relief in death, fire, or electrical shock. 1. Two mounting tabs each side B. Remove plastic tag holding three 10-32 hex nuts from range. 4. Plug into a grounded outlet. Disconnect power. 2. U.S.A. Use a new 40 amp power supply cord. Use 8 gauge copper or 6 gauge aluminum... Shock Hazard Disconnect power before servicing. A B C A. Hex-head screws 3. Failure to remove cover from the middle post of the range. Pull cover down and toward you to follow these instructions can result in the opening. UL listed strain relief ■ Tighten strain relief...


