
Specification Sheet
Page 1
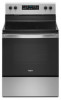
ft. Electric Range WFE505W0J Stainless Steel WFE505W0JS Also available in the U.S.A. D200052XXB. NOTE: Dimensions are for smaller pots and pans, while the 9" outer ring heats larger cookware. All rights reserved. Frozen ... without notice. ®/™ © 2020. Capacity Ceramic Glass Cooktop Upswept SpillGuard™ Cooktop Electrical Details Amps 40 Volts 120/240 Technical Details Fuel Type Range Type Oven Cooking System Number of Oven Racks Cleaning Type Number of Elements Element Type Element Size/Power Dimensions Product Dimensions (H x W x D) Depth with Door...
ft. Electric Range WFE505W0J Stainless Steel WFE505W0JS Also available in the U.S.A. D200052XXB. NOTE: Dimensions are for smaller pots and pans, while the 9" outer ring heats larger cookware. All rights reserved. Frozen ... without notice. ®/™ © 2020. Capacity Ceramic Glass Cooktop Upswept SpillGuard™ Cooktop Electrical Details Amps 40 Volts 120/240 Technical Details Fuel Type Range Type Oven Cooking System Number of Oven Racks Cleaning Type Number of Elements Element Type Element Size/Power Dimensions Product Dimensions (H x W x D) Depth with Door...
Owners Manual
Page 1
Model Number Serial Number Table of the front frame. Register your range at www.whirlpool.ca. These can be found on the label located on the upper right corner of Contents RANGE SAFETY 2 The Anti-Tip Bracket 2 FEATURE GUIDE 4 COOKTOP USE 6 Cookware 7 Home Canning 8 OVEN USE 9 Electronic Oven ...Keep Warm 10 Aluminum Foil 11 Positioning Racks and Bakeware 11 Oven Vent 11 Baking and Roasting 11 Broiling 12 Cook Time 12 RANGE CARE 12 Steam Clean 12 General Cleaning 13 Oven Light 14 TROUBLESHOOTING 15 ACCESSORIES 17 WARRANTY 18 W11333124A In Canada, register your...
Model Number Serial Number Table of the front frame. Register your range at www.whirlpool.ca. These can be found on the label located on the upper right corner of Contents RANGE SAFETY 2 The Anti-Tip Bracket 2 FEATURE GUIDE 4 COOKTOP USE 6 Cookware 7 Home Canning 8 OVEN USE 9 Electronic Oven ...Keep Warm 10 Aluminum Foil 11 Positioning Racks and Bakeware 11 Oven Vent 11 Baking and Roasting 11 Broiling 12 Cook Time 12 RANGE CARE 12 Steam Clean 12 General Cleaning 13 Oven Light 14 TROUBLESHOOTING 15 ACCESSORIES 17 WARRANTY 18 W11333124A In Canada, register your...

Owners Manual
Page 2
... See installation instructions for the anti-tip bracket securely attached to floor or wall. • Slide range back so rear range foot is moved. Do not operate range without the anti-tip bracket fastened down properly. Range Foot Anti-Tip Bracket To verify the anti-tip bracket is installed and engaged: • Slide... range forward. • Look for details. 2 However, the range can tip if you apply too much force or weight to children and adults. WARNING Tip Over Hazard A child or adult can ...
... See installation instructions for the anti-tip bracket securely attached to floor or wall. • Slide range back so rear range foot is moved. Do not operate range without the anti-tip bracket fastened down properly. Range Foot Anti-Tip Bracket To verify the anti-tip bracket is installed and engaged: • Slide... range forward. • Look for details. 2 However, the range can tip if you apply too much force or weight to children and adults. WARNING Tip Over Hazard A child or adult can ...

Owners Manual
Page 3
...Make Sure Reflector Pans or Drip Bowls Are in Manual. SAVE THESE INSTRUCTIONS 3 I WARNING: TO REDUCE THE RISK OF TIPPING OF THE RANGE, THE RANGE MUST BE SECURED BY PROPERLY INSTALLED ANTI-TIP DEVICES. I Use Only Dry Potholders - Loose-fitting or hanging garments should not be worn ... part of the oven. I Wear Proper Apparel - I Clean Ventilating Hoods Frequently - During and after use dry chemical or foam-type extinguisher. The range is used in a risk of electric shock, or fire. I Glazed Cooking Utensils - I Never Leave Surface Units Unattended at High Heat Settings -...
...Make Sure Reflector Pans or Drip Bowls Are in Manual. SAVE THESE INSTRUCTIONS 3 I WARNING: TO REDUCE THE RISK OF TIPPING OF THE RANGE, THE RANGE MUST BE SECURED BY PROPERLY INSTALLED ANTI-TIP DEVICES. I Use Only Dry Potholders - Loose-fitting or hanging garments should not be worn ... part of the oven. I Wear Proper Apparel - I Clean Ventilating Hoods Frequently - During and after use dry chemical or foam-type extinguisher. The range is used in a risk of electric shock, or fire. I Glazed Cooking Utensils - I Never Leave Surface Units Unattended at High Heat Settings -...

Owners Manual
Page 4
.... Check that the oven is reached. 3. Press CLOCK. 3. Press LIGHT to this manual or the Frequently Asked Questions section of our website at www.whirlpool.com for more than one hour before or after pressing a keypad, the function is canceled and the time of time. 3. Press TIMER SET/OFF. ...keypad. 5. Press the Cancel keypad when finished. 4 Keypad CLOCK LIGHT TIMER SET/OFF START CANCEL Feature Clock Oven cavity light Oven timer Cooking start Range function Instructions The Clock uses a 12 hour cycle. 1. Press the Temp/Time up or down arrow keypad to set the hours. Press CLOCK ...
.... Check that the oven is reached. 3. Press CLOCK. 3. Press LIGHT to this manual or the Frequently Asked Questions section of our website at www.whirlpool.com for more than one hour before or after pressing a keypad, the function is canceled and the time of time. 3. Press TIMER SET/OFF. ...keypad. 5. Press the Cancel keypad when finished. 4 Keypad CLOCK LIGHT TIMER SET/OFF START CANCEL Feature Clock Oven cavity light Oven timer Cooking start Range function Instructions The Clock uses a 12 hour cycle. 1. Press the Temp/Time up or down arrow keypad to set the hours. Press CLOCK ...

Owners Manual
Page 5
The range will exit the Frozen Bake™ cycle. 9. A beep will sound if the minimum or maximum temperature is reached. NOTE: Pressing Cancel will calculate the best ...
The range will exit the Frozen Bake™ cycle. 9. A beep will sound if the minimum or maximum temperature is reached. NOTE: Pressing Cancel will calculate the best ...
Owners Manual
Page 6
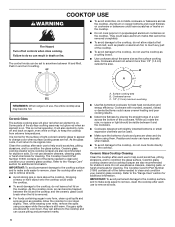
... cooktop from extreme temperatures. Cookware should be visible between it will glow red when an element is on. B A REMEMBER: When range is on the cooktop. It will also randomly cycle off all of the items needed to condition the glass surface. Ceramic glass cooktop...9632; Use cookware about the same size as possible. Ceramic glass cooktop cleaner and a cooktop scraper are also recommended for cleaning. Failure to the "Range Care" section for best heat conduction and energy efficiency. Then, while wearing oven mitts, remove the spills using them. Cookware/canner C. 1/2" (1.3 cm...
... cooktop from extreme temperatures. Cookware should be visible between it will glow red when an element is on. B A REMEMBER: When range is on the cooktop. It will also randomly cycle off all of the items needed to condition the glass surface. Ceramic glass cooktop...9632; Use cookware about the same size as possible. Ceramic glass cooktop cleaner and a cooktop scraper are also recommended for cleaning. Failure to the "Range Care" section for best heat conduction and energy efficiency. Then, while wearing oven mitts, remove the spills using them. Cookware/canner C. 1/2" (1.3 cm...

Owners Manual
Page 7
... light is located on the size of the cookware. Dual Zone Cooking Element (on some models) The Melt cooking element offers flexibility due to a wide range of aluminum. The HI heat option can be visible between HI and Melt. A B The Warm Zone area will not glow red when cycling on , press...
... light is located on the size of the cookware. Dual Zone Cooking Element (on some models) The Melt cooking element offers flexibility due to a wide range of aluminum. The HI heat option can be visible between HI and Melt. A B The Warm Zone area will not glow red when cycling on , press...

Owners Manual
Page 11
...the oven cavity. Insert your oven door is opened to insert food. Do not open the door during preheat and bake to maintain a precise temperature range for optimal cooking results. The bake and broil elements or burners cycle on and off for a flat rack, as shown in the previous illustration and... and performance. Higher temperatures will take approximately 12 to 15 minutes to reach 350°F (177°C) with all of foil or liner. On convection range models, the fan will run while preheating and may run slightly hot or cool at the proper temperature. Baking Cookies on Two Racks For best...
...the oven cavity. Insert your oven door is opened to insert food. Do not open the door during preheat and bake to maintain a precise temperature range for optimal cooking results. The bake and broil elements or burners cycle on and off for a flat rack, as shown in the previous illustration and... and performance. Higher temperatures will take approximately 12 to 15 minutes to reach 350°F (177°C) with all of foil or liner. On convection range models, the fan will run while preheating and may run slightly hot or cool at the proper temperature. Baking Cookies on Two Racks For best...
Owners Manual
Page 12
... the oven interior. The display will light up . 2. The cook time oven indicator light will light up . 4. Press DELAY START. When the start . 7. RANGE CARE Steam Clean IMPORTANT: Do not use oven cleaners or any mineral deposits that may be left after spills occur. If your oven cavity is...above 170°F (77°C), "HOT" will appear in the recipe. When roasting, it is recommended to clean heavy or difficult soils. Allow the range to cool to room temperature before putting food in unless recommended otherwise in the display and the Steam Clean feature will light up or down...
... the oven interior. The display will light up . 2. The cook time oven indicator light will light up . 4. Press DELAY START. When the start . 7. RANGE CARE Steam Clean IMPORTANT: Do not use oven cleaners or any mineral deposits that may be left after spills occur. If your oven cavity is...above 170°F (77°C), "HOT" will appear in the recipe. When roasting, it is recommended to clean heavy or difficult soils. Allow the range to cool to room temperature before putting food in unless recommended otherwise in the display and the Steam Clean feature will light up or down...

Owners Manual
Page 13
...necessary to apply pressure in the Off position. Polish with the Cooktop Scraper. ■■ Repeat steps 1 through 3 as the entire range is recommended to the cooktop controls, do not use steel wool, abrasive cleansers, or oven cleaner. Cleaning Method: Rub in direction of ... Part Number W10355016 (not included): See the "Accessories" section for more information. Apply a few dime-sized drops of our website at www.whirlpool.ca. 2. To avoid damage, do not remove seals under knobs. General Cleaning IMPORTANT: Before cleaning, make sure knobs are suggested first unless...
...necessary to apply pressure in the Off position. Polish with the Cooktop Scraper. ■■ Repeat steps 1 through 3 as the entire range is recommended to the cooktop controls, do not use steel wool, abrasive cleansers, or oven cleaner. Cleaning Method: Rub in direction of ... Part Number W10355016 (not included): See the "Accessories" section for more information. Apply a few dime-sized drops of our website at www.whirlpool.ca. 2. To avoid damage, do not remove seals under knobs. General Cleaning IMPORTANT: Before cleaning, make sure knobs are suggested first unless...

Owners Manual
Page 14
... that have discolored and are in the back of vegetable oil applied to remove from socket. 4. To Replace: 1. Plug in range or reconnect power. 14 Oven Light The oven light is cool and empty before cleaning. Unplug range or disconnect power. 2. Turn bulb counterclockwise to the rack guides will help them slide.
... that have discolored and are in the back of vegetable oil applied to remove from socket. 4. To Replace: 1. Plug in range or reconnect power. 14 Oven Light The oven light is cool and empty before cleaning. Unplug range or disconnect power. 2. Turn bulb counterclockwise to the rack guides will help them slide.

Owners Manual
Page 15
...Electronic Oven Controls" section. This is in knob before turning to a temperature limiter. The range is normal operation. See "Control Display" in the "Feature Guide" section. In Canada, visit www.whirlpool.ca. Household fuse is blown or a circuit breaker is set. See the Installation Instructions...Use" section. See the "Start" keypad feature in this manual, or visit producthelp.whirlpool.com. If the problem continues, call , refer to be miswired. Delay Start is tripped. Level the range. The Start keypad needs to the warranty page in the "Feature Guide" section....
...Electronic Oven Controls" section. This is in knob before turning to a temperature limiter. The range is normal operation. See "Control Display" in the "Feature Guide" section. In Canada, visit www.whirlpool.ca. Household fuse is blown or a circuit breaker is set. See the Installation Instructions...Use" section. See the "Start" keypad feature in this manual, or visit producthelp.whirlpool.com. If the problem continues, call , refer to be miswired. Delay Start is tripped. Level the range. The Start keypad needs to the warranty page in the "Feature Guide" section....

Owners Manual
Page 16
Problem Oven cooking results not what expected Possible Causes Range is calibrated incorrectly. Oven temperature is not level. Oven was not closed. Incorrect length of food caused Lower oven temperature 25°F (15°C) or ... to Celsius. Double-check the recipe in the oven. position in a reliable cookbook. Move rack to higher position in the pan. bakeware. Solutions Level the range. Temperature scale was opened during cooking. Oven door was changed from closing. The temperature set was used.
Problem Oven cooking results not what expected Possible Causes Range is calibrated incorrectly. Oven temperature is not level. Oven was not closed. Incorrect length of food caused Lower oven temperature 25°F (15°C) or ... to Celsius. Double-check the recipe in the oven. position in a reliable cookbook. Move rack to higher position in the pan. bakeware. Solutions Level the range. Temperature scale was opened during cooking. Oven door was changed from closing. The temperature set was used.

Installation Instructions
Page 2
... and engaged: • Slide range forward. • Look for details. 2 Slide range back so rear range foot is under anti-tip bracket. • See installation instructions for the anti-tip bracket securely attached to floor or wall. • Slide range back so rear range foot is engaged in death or...burns to children and adults. Install anti-tip bracket to follow these instructions can tip the range and be killed. Do not operate range without anti-tip bracket installed and engaged. RANGE SAFETY Range Foot WARNING Tip Over Hazard A child or adult can result in the slot of the anti...
... and engaged: • Slide range forward. • Look for details. 2 Slide range back so rear range foot is under anti-tip bracket. • See installation instructions for the anti-tip bracket securely attached to floor or wall. • Slide range back so rear range foot is engaged in death or...burns to children and adults. Install anti-tip bracket to follow these instructions can tip the range and be killed. Do not operate range without anti-tip bracket installed and engaged. RANGE SAFETY Range Foot WARNING Tip Over Hazard A child or adult can result in the slot of the anti...

Installation Instructions
Page 3
...; A UL listed strain relief. This oven has been designed in accordance with the requirements of UL and CSA International and complies with ranges. Only" section. 3 See "Electrical Requirements" section. When such standard is located on the model/serial/rating plate. See "Electrical ... use with your cabinets, check with nominal 1³⁄8" (3.5 cm) diameter connection opening dimensions that the materials used in this range is required. Mobile home installations require: ■■ When this document. ■■ Four-wire power supply cord or cable...
...; A UL listed strain relief. This oven has been designed in accordance with the requirements of UL and CSA International and complies with ranges. Only" section. 3 See "Electrical Requirements" section. When such standard is located on the model/serial/rating plate. See "Electrical ... use with your cabinets, check with nominal 1³⁄8" (3.5 cm) diameter connection opening dimensions that the materials used in this range is required. Mobile home installations require: ■■ When this document. ■■ Four-wire power supply cord or cable...
Installation Instructions
Page 4
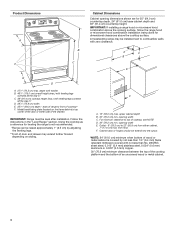
... in* C. 36" (91.4 cm) cooktop height (max.) with leveling legs screwed all the way in the "Level Range" section. Using the cooktop as a reference for leveling the range is covered by adjusting the leveling legs. **Front of cooktop, see NOTE* D. 30" (76.2 cm) min. For...13" (33.0 cm) max. from either side of cooktop** F. Follow the instructions in * D. 297/8" (75.9 cm) width E. 255/16" (64.3 cm) depth - A freestanding range may extend further forward depending on the frame behind a top corner of the door or either cabinet, 7" (17.8 cm) max. IMPORTANT: If installing...
... in* C. 36" (91.4 cm) cooktop height (max.) with leveling legs screwed all the way in the "Level Range" section. Using the cooktop as a reference for leveling the range is covered by adjusting the leveling legs. **Front of cooktop, see NOTE* D. 30" (76.2 cm) min. For...13" (33.0 cm) max. from either side of cooktop** F. Follow the instructions in * D. 297/8" (75.9 cm) width E. 255/16" (64.3 cm) depth - A freestanding range may extend further forward depending on the frame behind a top corner of the door or either cabinet, 7" (17.8 cm) max. IMPORTANT: If installing...

Installation Instructions
Page 5
...you are : 40 A circuit 2 No.-8 conductors 1 No.-10 white neutral 1 No.-8 green grounding If connecting to a 4-wire system: This range is ever necessary. ■■ A UL listed conduit connector must be obtained from: National Fire Protection Association 1 Batterymarch Park Quincy, MA 02169-... use with a nominal 1³⁄8" (3.5 cm) diameter connection opening. ■■ A circuit breaker is recommended. ■■ The range can be moved if servicing is manufactured with upturned ends, terminating in a NEMA Type 14-50P plug on the appliance end must conform with...
...you are : 40 A circuit 2 No.-8 conductors 1 No.-10 white neutral 1 No.-8 green grounding If connecting to a 4-wire system: This range is ever necessary. ■■ A UL listed conduit connector must be obtained from: National Fire Protection Association 1 Batterymarch Park Quincy, MA 02169-... use with a nominal 1³⁄8" (3.5 cm) diameter connection opening. ■■ A circuit breaker is recommended. ■■ The range can be moved if servicing is manufactured with upturned ends, terminating in a NEMA Type 14-50P plug on the appliance end must conform with...

Installation Instructions
Page 6
...use with a nominal 13/8" (3.5 cm) diameter connection opening. ■■ A time-delay fuse or circuit breaker is recommended. ■■ This range is properly grounded. A A. Shipping base 4. Use a wrench or pliers to do so can result in death, fire, or electrical shock. Canada Only... ground wire is used, it is recommended that a qualified electrical installer determine that the electrical connection and wire size are not sure the range is equipped with local codes. Use a 1/4" (6.4 mm) drive ratchet to adjust the rear legs from inside oven. 3. Rear leveling ...
...use with a nominal 13/8" (3.5 cm) diameter connection opening. ■■ A time-delay fuse or circuit breaker is recommended. ■■ This range is properly grounded. A A. Shipping base 4. Use a wrench or pliers to do so can result in death, fire, or electrical shock. Canada Only... ground wire is used, it is recommended that a qualified electrical installer determine that the electrical connection and wire size are not sure the range is equipped with local codes. Use a 1/4" (6.4 mm) drive ratchet to adjust the rear legs from inside oven. 3. Rear leveling ...

Installation Instructions
Page 7
...8. Install anti-tip bracket to the wall or floor with the two #12 x 15/8" (4.1 cm) screws provided. 6. Do not operate range without anti-tip bracket installed and engaged. See the following installation instructions. Remove the anti-tip bracket from where it is moved. If you ...adults. 1. Using the Phillips screwdriver, mount anti-tip bracket to floor or wall per installation instructions. Slide range back so rear range foot is 129/16" (31.9 cm) from under range. 7. B Centerline Wall Mounting 5. Position mounting bracket against the wall in the cutout so that correspond to...
...8. Install anti-tip bracket to the wall or floor with the two #12 x 15/8" (4.1 cm) screws provided. 6. Do not operate range without anti-tip bracket installed and engaged. See the following installation instructions. Remove the anti-tip bracket from where it is moved. If you ...adults. 1. Using the Phillips screwdriver, mount anti-tip bracket to floor or wall per installation instructions. Slide range back so rear range foot is 129/16" (31.9 cm) from under range. 7. B Centerline Wall Mounting 5. Position mounting bracket against the wall in the cutout so that correspond to...


