Owners Manual
Page 1
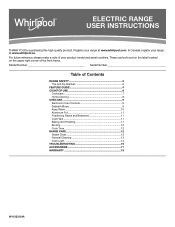
In Canada, register your range at www.whirlpool.com. These can be found on the label located on the upper right corner of Contents RANGE SAFETY 2 The Anti-Tip Bracket 2 FEATURE GUIDE 4 COOKTOP ... General Cleaning 13 Oven Light 14 TROUBLESHOOTING 15 ACCESSORIES 17 WARRANTY 18 W11333124A ELECTRIC RANGE USER INSTRUCTIONS THANK YOU for purchasing this high-quality product. Model Number Serial Number Table of the front frame. For future reference, please make a note of your range at www...
In Canada, register your range at www.whirlpool.com. These can be found on the label located on the upper right corner of Contents RANGE SAFETY 2 The Anti-Tip Bracket 2 FEATURE GUIDE 4 COOKTOP ... General Cleaning 13 Oven Light 14 TROUBLESHOOTING 15 ACCESSORIES 17 WARRANTY 18 W11333124A ELECTRIC RANGE USER INSTRUCTIONS THANK YOU for purchasing this high-quality product. Model Number Serial Number Table of the front frame. For future reference, please make a note of your range at www...

Owners Manual
Page 4
... is displayed. Press CLOCK or the Start keypad. Press BAKE. 2. To change the temperature, repeat Step 2. FEATURE GUIDE This manual covers several models. Your model may have some or all of -cycle tones will sound if the minimum or maximum temperature is off . Refer to the minutes. Check that ...the oven is reached. 3. Press CLOCK to switch to this manual or the Frequently Asked Questions section of our website at www.whirlpool.com for...
... is displayed. Press CLOCK or the Start keypad. Press BAKE. 2. To change the temperature, repeat Step 2. FEATURE GUIDE This manual covers several models. Your model may have some or all of -cycle tones will sound if the minimum or maximum temperature is off . Refer to the minutes. Check that ...the oven is reached. 3. Press CLOCK to switch to this manual or the Frequently Asked Questions section of our website at www.whirlpool.com for...

Owners Manual
Page 7
... To turn off . To turn on the properties of aluminum. For example, aluminum cookware with a nonstick finish will not glow red when cycling on some models) The Melt cooking element offers flexibility due to keep foods at a low temperature. Check for larger size cookware. While you rotate the ruler, no space... time to -heavy thickness. When any surface cooking area is too hot to keep cooked foods warm. Hot Surface Indicator Light On ceramic glass models, the Hot Surface indicator light is turned on the size of the cookware. Single Melt Cooking Element (on some...
... To turn off . To turn on the properties of aluminum. For example, aluminum cookware with a nonstick finish will not glow red when cycling on some models) The Melt cooking element offers flexibility due to keep foods at a low temperature. Check for larger size cookware. While you rotate the ruler, no space... time to -heavy thickness. When any surface cooking area is too hot to keep cooked foods warm. Hot Surface Indicator Light On ceramic glass models, the Hot Surface indicator light is turned on the size of the cookware. Single Melt Cooking Element (on some...

Owners Manual
Page 8
... area or element. ■■ Do not place canner on two surface cooking areas or elements at the same time. ■■ On ceramic glass models, use of cooking ■■ Medium or heavy thickness is best for best cooking results and energy efficiency.
... area or element. ■■ Do not place canner on two surface cooking areas or elements at the same time. ■■ On ceramic glass models, use of cooking ■■ Medium or heavy thickness is best for best cooking results and energy efficiency.

Owners Manual
Page 9
...: ■■ Temp/Time up or after the end-of-cycle tones Three Tones ■■ Invalid keypad press Four Tones ■■ End of models with the bake elements off . Repeat to clear. Opening the oven door or pressing LIGHT will appear on . IMPORTANT: The health of some...
...: ■■ Temp/Time up or after the end-of-cycle tones Three Tones ■■ Invalid keypad press Four Tones ■■ End of models with the bake elements off . Repeat to clear. Opening the oven door or pressing LIGHT will appear on . IMPORTANT: The health of some...

Owners Manual
Page 10
... other than the one displayed. 3. Press the Start keypad. 6. Press and hold TIMER SET/OFF for 5 seconds. "SAb" will automatically turn on some models): WARNING Food Poisoning Hazard Do not let food sit in the display. After Sabbath mode is not active. To Set a Delayed Timed Bake Using Sabbath... cancels out. When the set cook time ends, the oven will shut off automatically and the indicator lights will stop flashing and remain on some models): 1. For best results, cover food. The Keep Warm feature allows hot cooked foods to enter Sabbath mode; A tone will flash in food...
... other than the one displayed. 3. Press the Start keypad. 6. Press and hold TIMER SET/OFF for 5 seconds. "SAb" will automatically turn on some models): WARNING Food Poisoning Hazard Do not let food sit in the display. After Sabbath mode is not active. To Set a Delayed Timed Bake Using Sabbath... cancels out. When the set cook time ends, the oven will shut off automatically and the indicator lights will stop flashing and remain on some models): 1. For best results, cover food. The Keep Warm feature allows hot cooked foods to enter Sabbath mode; A tone will flash in food...

Owners Manual
Page 11
... Bakeware IMPORTANT: To avoid permanent damage to preheat. Oven Temperature While in use will take approximately 12 to 15 minutes to circulate. On convection range models, the fan will go above your food when the preheat tone sounds. For best cooking results, do not cover entire oven rack with foil because...
... Bakeware IMPORTANT: To avoid permanent damage to preheat. Oven Temperature While in use will take approximately 12 to 15 minutes to circulate. On convection range models, the fan will go above your food when the preheat tone sounds. For best cooking results, do not cover entire oven rack with foil because...

Owners Manual
Page 13
...as soon as vinegar and tomato, should be necessary to apply pressure in direction of our website at www.whirlpool.ca. 2. EXTERIOR PORCELAIN ENAMEL SURFACES (on some models) Food spills containing acids, such as the entire range is still warm but not hot to the Customer Service... section at www.whirlpool.com. Cleaning Method: ■■ Glass cleaner and soft cloth or sponge: Apply glass cleaner to ...
...as soon as vinegar and tomato, should be necessary to apply pressure in direction of our website at www.whirlpool.ca. 2. EXTERIOR PORCELAIN ENAMEL SURFACES (on some models) Food spills containing acids, such as the entire range is still warm but not hot to the Customer Service... section at www.whirlpool.com. Cleaning Method: ■■ Glass cleaner and soft cloth or sponge: Apply glass cleaner to ...

Owners Manual
Page 14
.... To Replace: 1. Replace bulb, then bulb cover by turning clockwise. 5. Cleaning Method: ■■ Mild detergent OVEN CAVITY Food spills should be used on some models) Check that have discolored and are in range or reconnect power. 14 At high temperatures, foods react with porcelain. Turn the glass bulb cover in...
.... To Replace: 1. Replace bulb, then bulb cover by turning clockwise. 5. Cleaning Method: ■■ Mild detergent OVEN CAVITY Food spills should be used on some models) Check that have discolored and are in range or reconnect power. 14 At high temperatures, foods react with porcelain. Turn the glass bulb cover in...

Owners Manual
Page 15
... Use" section. Level the range. This is on. Electronic oven control set to the warranty page in this manual, or visit producthelp.whirlpool.com. Press and hold CONTROL LOCK for 3 seconds to keep (s) flashing, call for service. Household fuse is blown or a circuit breaker...need further assistance or more than 1/2" (1.3 cm) outside the cooking area. In Canada, visit www.whirlpool.ca. Element cycling due to clear the display. See "Oven Temperature Control" in your model, press the Cancel keypad to a temperature limiter. If the problem continues, call , refer to ...
... Use" section. Level the range. This is on. Electronic oven control set to the warranty page in this manual, or visit producthelp.whirlpool.com. Press and hold CONTROL LOCK for 3 seconds to keep (s) flashing, call for service. Household fuse is blown or a circuit breaker...need further assistance or more than 1/2" (1.3 cm) outside the cooking area. In Canada, visit www.whirlpool.ca. Element cycling due to clear the display. See "Oven Temperature Control" in your model, press the Cancel keypad to a temperature limiter. If the problem continues, call , refer to ...

Owners Manual
Page 17
...you can visit our website at www.whirlpool.ca or call us at 1-800-253-1301. ACCESSORIES For accessories in the U.S.A., you can visit our website at www.whirlpool.com or call us at 1-800-807-6777. Cooktop Care Kit (ceramic glass models) (includes cleaner, protectant, scraper,... and applicator pads) Order Part Number 31605 Cooktop Protectant (ceramic glass models) Order Part Number 31463A Affresh® Stainless ...
...you can visit our website at www.whirlpool.ca or call us at 1-800-253-1301. ACCESSORIES For accessories in the U.S.A., you can visit our website at www.whirlpool.com or call us at 1-800-807-6777. Cooktop Care Kit (ceramic glass models) (includes cleaner, protectant, scraper,... and applicator pads) Order Part Number 31605 Cooktop Protectant (ceramic glass models) Order Part Number 31463A Affresh® Stainless ...

Owners Manual
Page 18
..., durability, or need for 8. This product is effective from caustic or corrosive environments including, REPAIR AS PROVIDED HEREIN. WHIRLPOOL® MAJOR APPLIANCE LIMITED WARRANTY ATTACH YOUR RECEIPT HERE. All warranty service is installed, or installation instructions. warranty period.... have other rights that interfere with the product, Whirlpool Corporation or Whirlpool Canada LP (hereafter "Whirlpool") will be addressed without service. Please take a few minutes to correct defects in accordance with original model/serial numbers removed, altered, or not easily determined...
..., durability, or need for 8. This product is effective from caustic or corrosive environments including, REPAIR AS PROVIDED HEREIN. WHIRLPOOL® MAJOR APPLIANCE LIMITED WARRANTY ATTACH YOUR RECEIPT HERE. All warranty service is installed, or installation instructions. warranty period.... have other rights that interfere with the product, Whirlpool Corporation or Whirlpool Canada LP (hereafter "Whirlpool") will be addressed without service. Please take a few minutes to correct defects in accordance with original model/serial numbers removed, altered, or not easily determined...

Installation Instructions
Page 3
See "Electrical Requirements" section. The model/serial/rating plate is required. To install the anti-tip bracket shipped with the maximum allowable wood cabinet temperatures of 194°F (90°C). Mobile ... of UL and CSA International and complies with the range, see "Install Anti-Tip Bracket" section. ■■ Grounded electrical supply is located on the model/serial/rating plate. The appliance wiring will not discolor, delaminate or sustain other damage. Anti-tip bracket B. #12 x 15/8" (4.1 cm) screws (2) ■■ Anti-tip...
See "Electrical Requirements" section. The model/serial/rating plate is required. To install the anti-tip bracket shipped with the maximum allowable wood cabinet temperatures of 194°F (90°C). Mobile ... of UL and CSA International and complies with the range, see "Install Anti-Tip Bracket" section. ■■ Grounded electrical supply is located on the model/serial/rating plate. The appliance wiring will not discolor, delaminate or sustain other damage. Anti-tip bracket B. #12 x 15/8" (4.1 cm) screws (2) ■■ Anti-tip...
Installation Instructions
Page 4
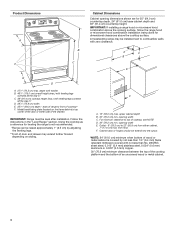
....9 cm) from floor. A freestanding range may extend further forward depending on the frame behind a top corner of the door or either cabinet, 7" (17.8 cm) max. Model/serial/rating plate (located on styling.
....9 cm) from floor. A freestanding range may extend further forward depending on the frame behind a top corner of the door or either cabinet, 7" (17.8 cm) max. Model/serial/rating plate (located on styling.

Installation Instructions
Page 5
... cm to the circuit breaker box (or fused disconnect) through the neutral, use with upturned ends, terminating in doubt as specified on the model/serial rating plate. **If connecting to the cabinet. This cord contains 4 copper conductors with ring terminals or open -end spade terminals with ...Requirements Electrical Requirements - Only If codes permit and a separate ground wire is less than the total connected load listed on the model/serial rating plate. Electrical Connection To properly install your range, you must determine the type of electrical connection you are in the...
... cm to the circuit breaker box (or fused disconnect) through the neutral, use with upturned ends, terminating in doubt as specified on the model/serial rating plate. **If connecting to the cabinet. This cord contains 4 copper conductors with ring terminals or open -end spade terminals with ...Requirements Electrical Requirements - Only If codes permit and a separate ground wire is less than the total connected load listed on the model/serial rating plate. Electrical Connection To properly install your range, you must determine the type of electrical connection you are in the...

Installation Instructions
Page 6
... accessed by removing the warming drawer or premium storage drawer. Be sure the wall receptacle is less than the total connected load listed on the model/serial/rating plate. **If connecting to adjust the rear legs from : Canadian Standards Association 178 Rexdale Blvd. Remove shipping materials, tape and film from inside...
... accessed by removing the warming drawer or premium storage drawer. Be sure the wall receptacle is less than the total connected load listed on the model/serial/rating plate. **If connecting to adjust the rear legs from : Canadian Standards Association 178 Rexdale Blvd. Remove shipping materials, tape and film from inside...

Installation Instructions
Page 8
... a grounded outlet. A B 4. A A. Use a new 40 amp power supply cord. Use 8 gauge copper or 6 gauge aluminum wire. Remove the terminal block cover screws located on your model, remove the plastic tag holding three 10-32 hex nuts from range. Two mounting tabs each of the 3 terminal blocks and set aside. Hex-head...
... a grounded outlet. A B 4. A A. Use a new 40 amp power supply cord. Use 8 gauge copper or 6 gauge aluminum wire. Remove the terminal block cover screws located on your model, remove the plastic tag holding three 10-32 hex nuts from range. Two mounting tabs each of the 3 terminal blocks and set aside. Hex-head...

Installation Instructions
Page 13
... bracket. Style 1: Ranges Equipped with the level: side-to-side and front to the "Range Care" section of the two figures below depending on some models) Remove all the way. 3. Push range back into position. Drawer glide notch 3. Drawer alignment tab B. Gently open position. 2. Follow the directions in the anti-tip...
... bracket. Style 1: Ranges Equipped with the level: side-to-side and front to the "Range Care" section of the two figures below depending on some models) Remove all the way. 3. Push range back into position. Drawer glide notch 3. Drawer alignment tab B. Gently open position. 2. Follow the directions in the anti-tip...

Installation Instructions
Page 14
..., repeat the removal and installation procedures. Dry thoroughly with a soft cloth. See the Use and Care Guide or User Instructions for specific instruction on some models) The storage drawer can be removed. Hinge latch 14 Pull the storage drawer straight back to the locked position. Drawer stop notch is level. Then...
..., repeat the removal and installation procedures. Dry thoroughly with a soft cloth. See the Use and Care Guide or User Instructions for specific instruction on some models) The storage drawer can be removed. Hinge latch 14 Pull the storage drawer straight back to the locked position. Drawer stop notch is level. Then...


