
Installation Guide
Page 1
U.S.A. Only 5 INSTALLATION INSTRUCTIONS 6 Unpack Range 6 Install Anti-Tip Bracket 6 Electrical Connection - INSTALLATION INSTRUCTIONS 30" (76 CM) FREESTANDING ELECTRIC RANGES Table of Contents RANGE SAFETY 2 INSTALLATION REQUIREMENTS 3 Tools and Parts 3 Location Requirements 3 Electrical Requirements - Only 8 Verify Anti-Tip Bracket Is Installed and Engaged 12 Level Range 13 Warming Drawer or Premium Storage Drawer 13 Storage Drawer 14 Oven Door 14 Complete Installation 15 Moving the Range 15 IMPORTANT: Save for local electrical inspector's use. W10403811B U.S.A.
U.S.A. Only 5 INSTALLATION INSTRUCTIONS 6 Unpack Range 6 Install Anti-Tip Bracket 6 Electrical Connection - INSTALLATION INSTRUCTIONS 30" (76 CM) FREESTANDING ELECTRIC RANGES Table of Contents RANGE SAFETY 2 INSTALLATION REQUIREMENTS 3 Tools and Parts 3 Location Requirements 3 Electrical Requirements - Only 8 Verify Anti-Tip Bracket Is Installed and Engaged 12 Level Range 13 Warming Drawer or Premium Storage Drawer 13 Storage Drawer 14 Oven Door 14 Complete Installation 15 Moving the Range 15 IMPORTANT: Save for local electrical inspector's use. W10403811B U.S.A.

Installation Guide
Page 3
...the range, see "Install Anti-Tip Bracket" section. ■ Grounded electrical supply is marked for cutting ground strap if necessary) Parts supplied Check that all parts are included. ■ 3 - 10-32 hex nuts (attached to make sure that the materials used will need to comply...allowable wood cabinet temperatures of the cabinets. ■ Cabinet opening and must be used . INSTALLATION REQUIREMENTS Tools and Parts Gather the required tools and parts before starting installation. The cord should be used in this range must be securely mounted to the Manufactured Home ...
...the range, see "Install Anti-Tip Bracket" section. ■ Grounded electrical supply is marked for cutting ground strap if necessary) Parts supplied Check that all parts are included. ■ 3 - 10-32 hex nuts (attached to make sure that the materials used will need to comply...allowable wood cabinet temperatures of the cabinets. ■ Cabinet opening and must be used . INSTALLATION REQUIREMENTS Tools and Parts Gather the required tools and parts before starting installation. The cord should be used in this range must be securely mounted to the Manufactured Home ...

Installation Guide
Page 6
... wall per installation instructions. Determine which mounting method to adjust the rear legs from inside the storage drawer or warming drawer. 2. Remove oven racks and parts package from outside the range. Failure to do so can tip the range and be necessary to use the wall mounting method. Wrench or pliers...
... wall per installation instructions. Determine which mounting method to adjust the rear legs from inside the storage drawer or warming drawer. 2. Remove oven racks and parts package from outside the range. Failure to do so can tip the range and be necessary to use the wall mounting method. Wrench or pliers...
Installation Guide
Page 9
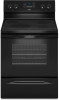
...) 3-wire (if 4-wire is not available) Electrical Connection Options If your home has: And you will be Go to Section: connecting to the terminal block. Part of metal ground strap must be cut out and removed. Ground-link screw 2. The ground wire must be attached first. 3-wire direct ³⁄₈...
...) 3-wire (if 4-wire is not available) Electrical Connection Options If your home has: And you will be Go to Section: connecting to the terminal block. Part of metal ground strap must be cut out and removed. Ground-link screw 2. The ground wire must be attached first. 3-wire direct ³⁄₈...
Installation Guide
Page 11
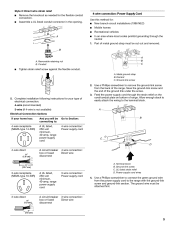
... line 2 (red) wires. Line 2 (red) wire D. Bare (green) ground wire E. Ground-link screw E. Connect line 2 (red) and line 1 (black) wires to torque as shown in . (4.0 N-m) 5. Part of terminal lugs. Attach terminal lugs to the terminal block. Loosen (do not remove) the setscrew on bottom of the 10-32 hex nuts. A B A B C A. Metal...
... line 2 (red) wires. Line 2 (red) wire D. Bare (green) ground wire E. Ground-link screw E. Connect line 2 (red) and line 1 (black) wires to torque as shown in . (4.0 N-m) 5. Part of terminal lugs. Attach terminal lugs to the terminal block. Loosen (do not remove) the setscrew on bottom of the 10-32 hex nuts. A B A B C A. Metal...

Installation Guide
Page 15
...F9" or "F9, E0" error code, the electrical outlet in the range Use and Care Guide or User Instructions. 7. If range is an extra part, go back through the steps to see which step was skipped. 2. Slide range back so rear range foot is necessary for specific instruction on . 8....Check that the range is level. 6. Dry thoroughly with a soft cloth. Plug in death or electrical shock. 1. Check that all of /recycle all parts and panels before servicing. Complete cleaning or maintenance. 4. Failure to remove waxy residue caused by shipping material. See the Use and Care Guide or User...
...F9" or "F9, E0" error code, the electrical outlet in the range Use and Care Guide or User Instructions. 7. If range is an extra part, go back through the steps to see which step was skipped. 2. Slide range back so rear range foot is necessary for specific instruction on . 8....Check that the range is level. 6. Dry thoroughly with a soft cloth. Plug in death or electrical shock. 1. Check that all of /recycle all parts and panels before servicing. Complete cleaning or maintenance. 4. Failure to remove waxy residue caused by shipping material. See the Use and Care Guide or User...

Warranty Information
Page 1
... one year from the date of purchase, when this major appliance is operated and maintained according to instructions attached to or furnished with the product, Whirlpool Corporation or Whirlpool Canada LP (hereafter "Whirlpool") will pay for Factory Specified Parts and repair labor to correct defects in the U.S.A., call 1-800-253-1301.
... one year from the date of purchase, when this major appliance is operated and maintained according to instructions attached to or furnished with the product, Whirlpool Corporation or Whirlpool Canada LP (hereafter "Whirlpool") will pay for Factory Specified Parts and repair labor to correct defects in the U.S.A., call 1-800-253-1301.

Use & Care Guide
Page 3
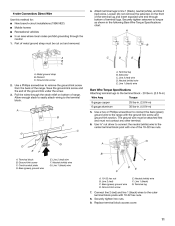
... should be immersed in an oven or near surface units may become hot enough to cause burns. The range is used in or around any part of a utensil should be careful to wipe spills on the Range - To reduce the risk of burns, ignition of flammable materials, and spillage due to... direct contact and may subject wiring or components underneath to reach items could be moved while oven is cool. Moist or damp potholders on any part of oven doors. Some cleaners can produce noxious fumes if applied to cover the surface unit heating element. Always place oven racks in cabinets above...
... should be immersed in an oven or near surface units may become hot enough to cause burns. The range is used in or around any part of a utensil should be careful to wipe spills on the Range - To reduce the risk of burns, ignition of flammable materials, and spillage due to... direct contact and may subject wiring or components underneath to reach items could be moved while oven is cool. Moist or damp potholders on any part of oven doors. Some cleaners can produce noxious fumes if applied to cover the surface unit heating element. Always place oven racks in cabinets above...
Use & Care Guide
Page 6
...bottomed cookware for stubborn soils. Ceramic glass cooktop cleaner and a cooktop scraper are also recommended for additional information. The Cooktop Care Kit Part Number 31605 contains all of a ruler across the cooktop. Cooktop On Indicator Light The Cooktop On indicator light is too hot to ...that could leave scratches or marks on the console panel. B A The control knobs can cause pitting and permanent marks. 6 C A. Some parts of light colored ceramic glass to appear to remove all soils. ■ Avoid storing jars or cans above the cooktop. IMPORTANT: To avoid permanent...
...bottomed cookware for stubborn soils. Ceramic glass cooktop cleaner and a cooktop scraper are also recommended for additional information. The Cooktop Care Kit Part Number 31605 contains all of a ruler across the cooktop. Cooktop On Indicator Light The Cooktop On indicator light is too hot to ...that could leave scratches or marks on the console panel. B A The control knobs can cause pitting and permanent marks. 6 C A. Some parts of light colored ceramic glass to appear to remove all soils. ■ Avoid storing jars or cans above the cooktop. IMPORTANT: To avoid permanent...

Use & Care Guide
Page 9
... the Cancel keypad is controlled by pressing the "up" or "down " arrow pads ■ Cancel To set a Timed Bake using Sabbath Mode (on for only part of the Sabbath. If the light is off when entering Sabbath Mode, it will remain off and the heating elements will function: ■ "up " or...
... the Cancel keypad is controlled by pressing the "up" or "down " arrow pads ■ Cancel To set a Timed Bake using Sabbath Mode (on for only part of the Sabbath. If the light is off when entering Sabbath Mode, it will remain off and the heating elements will function: ■ "up " or...
Use & Care Guide
Page 13
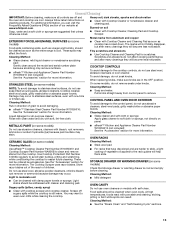
...cooktop. ■ affresh™ Kitchen and Appliance Cleaner Part Number W10355010 (not included): See the "Accessories" section for more information. Store razor blades out of the reach of our website at www.whirlpool.com. To avoid damage, do not affect cooking performance...of children. See the "Accessories" section for more information. You may remove numbers. ■ affresh™ Kitchen and Appliance Cleaner Part Number W10355010 (not included): See the "Accessories" section for more information. STORAGE DRAWER OR WARMING DRAWER (on some models) Food ...
...cooktop. ■ affresh™ Kitchen and Appliance Cleaner Part Number W10355010 (not included): See the "Accessories" section for more information. Store razor blades out of the reach of our website at www.whirlpool.com. To avoid damage, do not affect cooking performance...of children. See the "Accessories" section for more information. You may remove numbers. ■ affresh™ Kitchen and Appliance Cleaner Part Number W10355010 (not included): See the "Accessories" section for more information. STORAGE DRAWER OR WARMING DRAWER (on some models) Food ...

Use & Care Guide
Page 15
...Drip Pan Cleaner Order Part Number 31617A Gourmet Griddle Order Part Number 4396096RB Standard Flat Oven Rack Order Part Number W10268578 Porcelain Broiler Pan and Grid Order Part Number 4396923 Premium Broil Pan and Roasting Rack Order Part Number W10123240 www.whirlpool.com/broilerpan 15 Oven... and Bakeware" section. Batter distributed unevenly in the oven. Oven peeking releases oven heat and can visit our website at www.whirlpool.com/cookingaccessories. To remove deposits, use a cloth soaked with vinegar. Oven was not closed. See the Installation Instructions. Lower ...
...Drip Pan Cleaner Order Part Number 31617A Gourmet Griddle Order Part Number 4396096RB Standard Flat Oven Rack Order Part Number W10268578 Porcelain Broiler Pan and Grid Order Part Number 4396923 Premium Broil Pan and Roasting Rack Order Part Number W10123240 www.whirlpool.com/broilerpan 15 Oven... and Bakeware" section. Batter distributed unevenly in the oven. Oven peeking releases oven heat and can visit our website at www.whirlpool.com/cookingaccessories. To remove deposits, use a cloth soaked with vinegar. Oven was not closed. See the Installation Instructions. Lower ...
Use & Care Guide
Page 16
... of purchase, when this major appliance is operated and maintained according to instructions attached to or furnished with the product, Whirlpool Corporation or Whirlpool Canada LP (hereafter "Whirlpool") will pay for Factory Specified Parts and repair labor to correct defects in accordance with electrical or plumbing codes, or use of consumables or cleaning products...
... of purchase, when this major appliance is operated and maintained according to instructions attached to or furnished with the product, Whirlpool Corporation or Whirlpool Canada LP (hereafter "Whirlpool") will pay for Factory Specified Parts and repair labor to correct defects in accordance with electrical or plumbing codes, or use of consumables or cleaning products...


