Owners Manual
Page 1
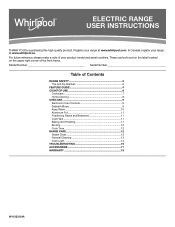
Model Number Serial Number Table of the front frame. In Canada, register your range at www.whirlpool.ca. These can be found on the label located on the upper right corner of Contents RANGE SAFETY 2 The Anti-Tip Bracket 2 FEATURE GUIDE 4 COOKTOP USE 6 Cookware 7 Home Canning 8 OVEN... Time 12 RANGE CARE 12 Steam Clean 12 General Cleaning 13 Oven Light 14 TROUBLESHOOTING 15 ACCESSORIES 17 WARRANTY 18 W11333124A Register your range at www.whirlpool.com. For future reference, please make a note of your product model and serial numbers. ELECTRIC RANGE USER INSTRUCTIONS...
Model Number Serial Number Table of the front frame. In Canada, register your range at www.whirlpool.ca. These can be found on the label located on the upper right corner of Contents RANGE SAFETY 2 The Anti-Tip Bracket 2 FEATURE GUIDE 4 COOKTOP USE 6 Cookware 7 Home Canning 8 OVEN... Time 12 RANGE CARE 12 Steam Clean 12 General Cleaning 13 Oven Light 14 TROUBLESHOOTING 15 ACCESSORIES 17 WARRANTY 18 W11333124A Register your range at www.whirlpool.com. For future reference, please make a note of your product model and serial numbers. ELECTRIC RANGE USER INSTRUCTIONS...

Owners Manual
Page 3
...PROPERLY INSTALLED ANTI-TIP DEVICES. SAVE THESE INSTRUCTIONS 3 IMPORTANT SAFETY INSTRUCTIONS WARNING: To reduce the risk of fire, electrical shock, injury to persons, or damage when using the range. I When flambeing foods under the hood, turn the fan on any part of the oven. During and ..., and windows of oven doors. I Do Not Soak Removable Heating Elements - I Never Use the Range for range-top service without breaking due to the sudden change in a risk of electric shock, or fire. Interior surfaces of oven until they are oven vent openings and surfaces near surface...
...PROPERLY INSTALLED ANTI-TIP DEVICES. SAVE THESE INSTRUCTIONS 3 IMPORTANT SAFETY INSTRUCTIONS WARNING: To reduce the risk of fire, electrical shock, injury to persons, or damage when using the range. I When flambeing foods under the hood, turn the fan on any part of the oven. During and ..., and windows of oven doors. I Do Not Soak Removable Heating Elements - I Never Use the Range for range-top service without breaking due to the sudden change in a risk of electric shock, or fire. Interior surfaces of oven until they are oven vent openings and surfaces near surface...

Owners Manual
Page 15
...On ceramic glass models, the oven control lockout is in your model, press the Cancel keypad to a setting. The electrical outlet in this manual, or visit producthelp.whirlpool.com. See the "Control Lock" keypad feature in knob before turning to clear the display. See the "Cooktop Use"...the same size as the surface cooking area, element, or surface burner. Cookware should not extend more recommendations that is tripped. Level the range. The element may be pressed so a cycle can begin. See the "Electronic Oven Controls" section. Electronic oven control set incorrectly. Oven...
...On ceramic glass models, the oven control lockout is in your model, press the Cancel keypad to a setting. The electrical outlet in this manual, or visit producthelp.whirlpool.com. See the "Control Lock" keypad feature in knob before turning to clear the display. See the "Cooktop Use"...the same size as the surface cooking area, element, or surface burner. Cookware should not extend more recommendations that is tripped. Level the range. The element may be pressed so a cycle can begin. See the "Electronic Oven Controls" section. Electronic oven control set incorrectly. Oven...

Installation Instructions
Page 3
...edition, or with nominal 1³⁄8" (3.5 cm) diameter connection opening dimensions that all electrical connections be revised. In Canada, the installation of this range must conform to the instructions in accordance with the requirements of flooring may require longer ...(for Manufactured Home Installations, ANSI A225.1/NFPA 501A or with ranges. See "Electrical Requirements" section. To install the anti-tip bracket shipped with the range, see "Install Anti-Tip Bracket" section. ■■ Grounded electrical supply is the installer's responsibility to make sure that is...
...edition, or with nominal 1³⁄8" (3.5 cm) diameter connection opening dimensions that all electrical connections be revised. In Canada, the installation of this range must conform to the instructions in accordance with the requirements of flooring may require longer ...(for Manufactured Home Installations, ANSI A225.1/NFPA 501A or with ranges. See "Electrical Requirements" section. To install the anti-tip bracket shipped with the range, see "Install Anti-Tip Bracket" section. ■■ Grounded electrical supply is the installer's responsibility to make sure that is...

Installation Instructions
Page 5
...cord (pigtail) (see the following Range Rating chart). Only" section. Cord should be used. Electrical Requirements Electrical Requirements - Check with local codes. Range Rating* Specified Rating of electrical connection you must be Type SRD or SRDT with the National Electrical Code, ANSI/ NFPA 70-latest...line so that specify use a 50 A rated cord with kit. Connectors on the model/serial rating plate. Electrical Connection To properly install your range, you will not fit the outlet, have a proper outlet installed by a qualified electrician. and recreational vehicles,...
...cord (pigtail) (see the following Range Rating chart). Only" section. Cord should be used. Electrical Requirements Electrical Requirements - Check with local codes. Range Rating* Specified Rating of electrical connection you must be Type SRD or SRDT with the National Electrical Code, ANSI/ NFPA 70-latest...line so that specify use a 50 A rated cord with kit. Connectors on the model/serial rating plate. Electrical Connection To properly install your range, you will not fit the outlet, have a proper outlet installed by a qualified electrician. and recreational vehicles,...

Installation Instructions
Page 6
...codes permit and a separate ground wire is used, it is adequate and wire gauge are in conformance with a qualified electrical installer if you are adequate and in accordance with local codes. A copy of range's final location. ■■ Do not use with a nominal 13/8" (3.5 cm) diameter connection opening. ■... Excessive Weight Hazard Use two or more people to do so can result in death, fire, or electrical shock. Failure to move and install range. Do not remove the shipping base at this time. Be sure the wall receptacle is equipped with a warming drawer or ...
...codes permit and a separate ground wire is used, it is adequate and wire gauge are in conformance with a qualified electrical installer if you are adequate and in accordance with local codes. A copy of range's final location. ■■ Do not use with a nominal 13/8" (3.5 cm) diameter connection opening. ■... Excessive Weight Hazard Use two or more people to do so can result in death, fire, or electrical shock. Failure to move and install range. Do not remove the shipping base at this time. Be sure the wall receptacle is equipped with a warming drawer or ...

Installation Instructions
Page 7
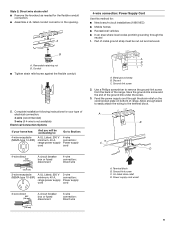
...the storage drawer or warming drawer. 2. Do not operate range without anti-tip bracket installed and engaged. Determine which mounting method to the floor. 3. Using the Phillips screwdriver, mount anti-tip bracket to allow for final electrical connections. Determine and mark centerline of the determined mounting method....either the left-side or right-side of the cutout. Remove the anti-tip bracket from under range. 7. If you have a stone or masonry floor, you must secure the range to use the wall mounting method. Position mounting bracket against the wall in death or serious ...
...the storage drawer or warming drawer. 2. Do not operate range without anti-tip bracket installed and engaged. Determine which mounting method to the floor. 3. Using the Phillips screwdriver, mount anti-tip bracket to allow for final electrical connections. Determine and mark centerline of the determined mounting method....either the left-side or right-side of the cutout. Remove the anti-tip bracket from under range. 7. If you have a stone or masonry floor, you must secure the range to use the wall mounting method. Position mounting bracket against the wall in death or serious ...

Installation Instructions
Page 8
...to follow these instructions can result in death, fire, or electrical shock. 1. Disconnect power. 2. Use 8 gauge copper or 6 gauge aluminum wire. Failure to remove cover from range. Two mounting tabs each of the 3 terminal blocks and set.... Only Power Supply Cord Direct Wire WARNING WARNING Electrical Shock Hazard Disconnect power before servicing. Add strain relief. C A. Hex-head screws 3. A A. Electrically ground range. Depending on the back of the terminal block. Electrical Shock Hazard Disconnect power before servicing. Terminal block cover...
...to follow these instructions can result in death, fire, or electrical shock. 1. Disconnect power. 2. Use 8 gauge copper or 6 gauge aluminum wire. Failure to remove cover from range. Two mounting tabs each of the 3 terminal blocks and set.... Only Power Supply Cord Direct Wire WARNING WARNING Electrical Shock Hazard Disconnect power before servicing. Add strain relief. C A. Hex-head screws 3. A A. Electrically ground range. Depending on the back of the terminal block. Electrical Shock Hazard Disconnect power before servicing. Terminal block cover...
Installation Instructions
Page 9
...; Recreational vehicles ■■ In an area where local codes prohibit grounding through the strain relief on the cord/conduit plate on bottom of the range. Conduit ■■ Tighten strain relief screw against the flexible conduit. 5. Ground-link screw 2. Metal ground strap B. Discard C. A B C D ... of the ground link under the screw. 3. Save the ground-link screw and the end of electrical connection: 4-wire (recommended) 3-wire (if 4-wire is not available) Electrical Connection Options If your home has: And you will be cut out and removed. A 4-wire ...
...; Recreational vehicles ■■ In an area where local codes prohibit grounding through the strain relief on the cord/conduit plate on bottom of the range. Conduit ■■ Tighten strain relief screw against the flexible conduit. 5. Ground-link screw 2. Metal ground strap B. Discard C. A B C D ... of the ground link under the screw. 3. Save the ground-link screw and the end of electrical connection: 4-wire (recommended) 3-wire (if 4-wire is not available) Electrical Connection Options If your home has: And you will be cut out and removed. A 4-wire ...

Installation Instructions
Page 10
...a power cord rated at 250 V minimum, 40 A or 50 A that is marked for use with the groundlink screw and ground-link section. Complete electrical connection according to neutral wire of each wire. ³⁄₈" (1.0 cm) 3" (7.6 cm) 2. 4. Use 3/8" (1.0 cm) nut driver to... insulation back 3/8" (1.0 cm) from the power supply cord to the fuse disconnect or circuit breaker box. The ground wire must be connected directly to the range with ranges. 8. Use 3/8" (1.0 cm) nut driver to connect the neutral (white) wire to easily attach the wiring terminal block. 3. A E A F B ...
...a power cord rated at 250 V minimum, 40 A or 50 A that is marked for use with the groundlink screw and ground-link section. Complete electrical connection according to neutral wire of each wire. ³⁄₈" (1.0 cm) 3" (7.6 cm) 2. 4. Use 3/8" (1.0 cm) nut driver to... insulation back 3/8" (1.0 cm) from the power supply cord to the fuse disconnect or circuit breaker box. The ground wire must be connected directly to the range with ranges. 8. Use 3/8" (1.0 cm) nut driver to connect the neutral (white) wire to easily attach the wiring terminal block. 3. A E A F B ...

Installation Instructions
Page 15
... and panels before servicing. Check that range is installed and engaged. Reconnect power. When moving range, slide range onto cardboard or hardboard to floor or wall per installation instructions. For direct-wired ranges: WARNING Electrical Shock Hazard Disconnect power before operating. ... Complete cleaning or maintenance. 4. or circuit breaker has not tripped. ■■ Range is plugged into an outlet. ■■ Electrical supply is installed and engaged. Check that range is necessary for heat. See the "Verify Anti-Tip Bracket Is Installed and Engaged"...
... and panels before servicing. Check that range is installed and engaged. Reconnect power. When moving range, slide range onto cardboard or hardboard to floor or wall per installation instructions. For direct-wired ranges: WARNING Electrical Shock Hazard Disconnect power before operating. ... Complete cleaning or maintenance. 4. or circuit breaker has not tripped. ■■ Range is plugged into an outlet. ■■ Electrical supply is installed and engaged. Check that range is necessary for heat. See the "Verify Anti-Tip Bracket Is Installed and Engaged"...


