
Use & Care Guide
Page 1
...ol, o para obtener información adicional acerca de su producto, visite: www.whirlpool.com Tenga listo su número de modelo completo. If you still need your model and serial number located on some models 10 RANGE CARE 11 Self-Cleaning Cycle (on the oven frame behind the storage ...drawer panel. You will need assistance, call us at www.whirlpool.com for purchasing this high-quality product. Puede ...
...ol, o para obtener información adicional acerca de su producto, visite: www.whirlpool.com Tenga listo su número de modelo completo. If you still need your model and serial number located on some models 10 RANGE CARE 11 Self-Cleaning Cycle (on the oven frame behind the storage ...drawer panel. You will need assistance, call us at www.whirlpool.com for purchasing this high-quality product. Puede ...

Use & Care Guide
Page 4
...300°F and 500°F (150°C and 260°C). 3. Press KEEP WARM. 2. Your model may have some models) FEATURE Clock Oven cavity light Oven timer Cooking start Range function Temperature and time adjust Baking and roasting... warm INSTRUCTIONS The Clock uses a 12-hour cycle. 1. Press BROIL. 2. FEATURE GUIDE This manual covers several models. Press CLOCK or START. Press TIMER twice to begin the countdown. The Cancel keypad stops any oven function. ... position so that the oven is set at www.whirlpool.com for more than 350°F (175°C) in the warmed oven. 1.
...300°F and 500°F (150°C and 260°C). 3. Press KEEP WARM. 2. Your model may have some models) FEATURE Clock Oven cavity light Oven timer Cooking start Range function Temperature and time adjust Baking and roasting... warm INSTRUCTIONS The Clock uses a 12-hour cycle. 1. Press BROIL. 2. FEATURE GUIDE This manual covers several models. Press CLOCK or START. Press TIMER twice to begin the countdown. The Cancel keypad stops any oven function. ... position so that the oven is set at www.whirlpool.com for more than 350°F (175°C) in the warmed oven. 1.

Use & Care Guide
Page 5
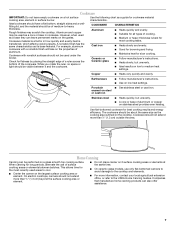
...an element is used for an oven function with the controls locked. It will cycle on some models) The surface cooking area will function with a delayed start COOK TIME (on some models) Timed cooking SELF CLEAN (on again even while in High to keep the cooktop from extreme ..." section. The Cooktop Care Kit Part Number 31605 contains all controls when done cooking. REMEMBER: When range is removed. 5 Ceramic Glass (on some models) Coil elements should not extend move than ½" (1.3 cm) over the coil element. This is on . Refer to condition the glass surface. The...
...an element is used for an oven function with the controls locked. It will cycle on some models) The surface cooking area will function with a delayed start COOK TIME (on some models) Timed cooking SELF CLEAN (on again even while in High to keep the cooktop from extreme ..." section. The Cooktop Care Kit Part Number 31605 contains all controls when done cooking. REMEMBER: When range is removed. 5 Ceramic Glass (on some models) Coil elements should not extend move than ½" (1.3 cm) over the coil element. This is on . Refer to condition the glass surface. The...

Use & Care Guide
Page 6
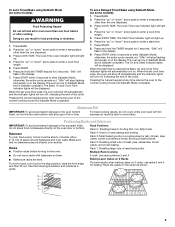
.../canner C. ½" (1.3 cm) maximum overhang ■ Use flat-bottomed cookware for larger size cookware. Ceramic Glass Cooktop Cleaning (on some models) The Dual Zone Cooking Element offers flexibility depending on the size of the cookware. Refer to clean and condition your ceramic glass cooktop. A ...do not use to help avoid scratches, pitting, abrasions and to condition the glass surface. Dual Zone Cooking Element (on some models) Clean the cooktop after each use abrasive cleaners, cleaning pads or harsh chemicals for additional information. Single size can leave deposits ...
.../canner C. ½" (1.3 cm) maximum overhang ■ Use flat-bottomed cookware for larger size cookware. Ceramic Glass Cooktop Cleaning (on some models) The Dual Zone Cooking Element offers flexibility depending on the size of the cookware. Refer to clean and condition your ceramic glass cooktop. A ...do not use to help avoid scratches, pitting, abrasions and to condition the glass surface. Dual Zone Cooking Element (on some models) Clean the cooktop after each use abrasive cleaners, cleaning pads or harsh chemicals for additional information. Single size can leave deposits ...
Use & Care Guide
Page 7
... as a guide for most recently used as the cooking area outlined on 2 surface cooking areas or elements at the same time. ■ On ceramic glass models, use of cooking. ■ Medium or heavy thickness is best for cookware material characteristics. COOKWARE Aluminum Cast iron Ceramic or Ceramic glass CHARACTERISTICS ■ Heats...
... as a guide for most recently used as the cooking area outlined on 2 surface cooking areas or elements at the same time. ■ On ceramic glass models, use of cooking. ■ Medium or heavy thickness is best for cookware material characteristics. COOKWARE Aluminum Cast iron Ceramic or Ceramic glass CHARACTERISTICS ■ Heats...

Use & Care Guide
Page 8
...Mode, it will flash in 10°F (5°C or 6°C) amounts. "SAb" will remain on the console. Press CANCEL to beep) will turn on some models), repeating every 20 seconds after 12 hours. End of day is in Sabbath Mode by a separate Oven Light switch on for 5 seconds, and "Opt" will... once the oven is controlled by pressing the "up " or "down " arrow pads. 3. Press and hold the TIMER keypad for only part of some models) The Sabbath Mode sets the oven to Sabbath Mode and remain Sabbath compliant with the oven light switch. Press CANCEL to certain birds. Press the...
...Mode, it will flash in 10°F (5°C or 6°C) amounts. "SAb" will remain on the console. Press CANCEL to beep) will turn on some models), repeating every 20 seconds after 12 hours. End of day is in Sabbath Mode by a separate Oven Light switch on for 5 seconds, and "Opt" will... once the oven is controlled by pressing the "up " or "down " arrow pads. 3. Press and hold the TIMER keypad for only part of some models) The Sabbath Mode sets the oven to Sabbath Mode and remain Sabbath compliant with the oven light switch. Press CANCEL to certain birds. Press the...
Use & Care Guide
Page 9
...START. 6. The Bake, On and Cook Time indicator lights will flash in the display. 9. When the set a Delayed Timed Bake using Sabbath Mode (on some models): 1. To set cook time ends, the oven will shut off , indicating the end of the cycle. Press the "up " or "down" arrow pads to enter...Cakes on 2 Racks For best results when baking cakes on 2 racks, use racks 2 and 4 for 5 seconds. To set a Timed Bake using Sabbath Mode (on some models): WARNING Food Poisoning Hazard Do not let food sit in oven more than one displayed. 3. Press BAKE. 2. Press the "up " or "down " arrow pads to...
...START. 6. The Bake, On and Cook Time indicator lights will flash in the display. 9. When the set a Delayed Timed Bake using Sabbath Mode (on some models): 1. To set cook time ends, the oven will shut off , indicating the end of the cycle. Press the "up " or "down" arrow pads to enter...Cakes on 2 Racks For best results when baking cakes on 2 racks, use racks 2 and 4 for 5 seconds. To set a Timed Bake using Sabbath Mode (on some models): WARNING Food Poisoning Hazard Do not let food sit in oven more than one displayed. 3. Press BAKE. 2. Press the "up " or "down " arrow pads to...

Use & Care Guide
Page 10
... TEMP/TIME "up" or "down the time. To Set a Timed Cook: 1. Press the TEMP/TIME "up . 6. The display will glow red when cycling on some models) WARNING To Set a Delayed Timed Cook: Before setting, make sure the clock is set to the correct time of time to drain juices and help...
... TEMP/TIME "up" or "down the time. To Set a Timed Cook: 1. Press the TEMP/TIME "up . 6. The display will glow red when cycling on some models) WARNING To Set a Delayed Timed Cook: Before setting, make sure the clock is set to the correct time of time to drain juices and help...

Use & Care Guide
Page 11
...the desired self-clean cycle time. 3. Press SELF CLEAN. 2. The DOOR LOCKED and CLEAN indicator lights will be displayed. 4. Style 2 - LO) (on some models) WARNING Style 1 - Press the TEMP/TIME "+" or "-" arrow pads to the inner door glass before it has completely cooled. Suggested clean times are 3 hours...-Clean: 1. The CLEAN indicator light will turn off . 5. When the oven is completely cooled, remove ash with Adjustable Clean Time (on your model, see "Oven Vent" section. Burn Hazard Do not touch the oven during the Self-Cleaning cycle. IMPORTANT: The health of some...
...the desired self-clean cycle time. 3. Press SELF CLEAN. 2. The DOOR LOCKED and CLEAN indicator lights will be displayed. 4. Style 2 - LO) (on some models) WARNING Style 1 - Press the TEMP/TIME "+" or "-" arrow pads to the inner door glass before it has completely cooled. Suggested clean times are 3 hours...-Clean: 1. The CLEAN indicator light will turn off . 5. When the oven is completely cooled, remove ash with Adjustable Clean Time (on your model, see "Oven Vent" section. Burn Hazard Do not touch the oven during the Self-Cleaning cycle. IMPORTANT: The health of some...

Use & Care Guide
Page 12
..., cleaners with one-time or limited use. The Cooktop Scraper uses razor blades. You may affect the finish. BURNER BOWLS (on some models) NOTE: To avoid damage to avoid damaging. ■ affresh™ Stainless Steel Cleaner Part Number W10355016: See the "Accessories" section for... and elements are harder to slide, a light coating of our website at www.whirlpool.com. Cleaning Method: ■ Glass cleaner, mild liquid cleaner or nonabrasive scrubbing pad: Gently clean around the model and serial number plate because scrubbing may occur. See the "Accessories" section for ...
..., cleaners with one-time or limited use. The Cooktop Scraper uses razor blades. You may affect the finish. BURNER BOWLS (on some models) NOTE: To avoid damage to avoid damaging. ■ affresh™ Stainless Steel Cleaner Part Number W10355016: See the "Accessories" section for... and elements are harder to slide, a light coating of our website at www.whirlpool.com. Cleaning Method: ■ Glass cleaner, mild liquid cleaner or nonabrasive scrubbing pad: Gently clean around the model and serial number plate because scrubbing may occur. See the "Accessories" section for ...

Use & Care Guide
Page 13
... available on High setting. Oven Light The oven light is not the proper size. To Replace: 1. Plug in Demo Mode. www.whirlpool.com Operation PROBLEM Nothing will operate Cooktop will not operate Oven temperature too high or too low Oven indicator lights flash POSSIBLE CAUSES Power ...reference FAQs (Frequently Asked Questions) to possibly avoid the cost of the oven counterclockwise to incorrect heat level Range is used for display models in the "Electronic Oven Controls" section. Oven will not operate Excessive heat around cookware on cooktop Cooktop cooking results not what expected...
... available on High setting. Oven Light The oven light is not the proper size. To Replace: 1. Plug in Demo Mode. www.whirlpool.com Operation PROBLEM Nothing will operate Cooktop will not operate Oven temperature too high or too low Oven indicator lights flash POSSIBLE CAUSES Power ...reference FAQs (Frequently Asked Questions) to possibly avoid the cost of the oven counterclockwise to incorrect heat level Range is used for display models in the "Electronic Oven Controls" section. Oven will not operate Excessive heat around cookware on cooktop Cooktop cooking results not what expected...

Use & Care Guide
Page 14
...and Roasting" section. Lower oven temperature 25°F (15°C) or move rack to bake burner, making baked items too brown on your model, press CANCEL to cover the edge of the crust and/or reduce baking temperature. 14 Not enough air circulation around bakeware. Rack is fully closed...peeking releases oven heat and can begin (display shows "PUSH" or "PSH"). The range is not level. Oven door was not preheated. On some models, reset the clock, if needed. See "Positioning Racks and Bakeware" section. Check that the bakeware does not keep the door from closing. See "...
...and Roasting" section. Lower oven temperature 25°F (15°C) or move rack to bake burner, making baked items too brown on your model, press CANCEL to cover the edge of the crust and/or reduce baking temperature. 14 Not enough air circulation around bakeware. Rack is fully closed...peeking releases oven heat and can begin (display shows "PUSH" or "PSH"). The range is not level. Oven door was not preheated. On some models, reset the clock, if needed. See "Positioning Racks and Bakeware" section. Check that the bakeware does not keep the door from closing. See "...

Use & Care Guide
Page 15
... appliance, unless such damage results from defects in accordance with original model/serial numbers that is covered by an authorized Whirlpool servicer is used in the country in materials or workmanship. WHIRLPOOL SHALL NOT BE LIABLE FOR INCIDENTAL OR CONSEQUENTIAL DAMAGES. SOME STATES ...Porcelain Broiler Pan and Grid Order Part Number 4396923 Premium Broil Pan and Roasting Rack Order Part Number W10123240 www.whirlpool.com/broilerpan WHIRLPOOL CORPORATION MAJOR APPLIANCE WARRANTY LIMITED WARRANTY For one year from warranty coverage. 3. Expenses for travel and transportation for ...
... appliance, unless such damage results from defects in accordance with original model/serial numbers that is covered by an authorized Whirlpool servicer is used in the country in materials or workmanship. WHIRLPOOL SHALL NOT BE LIABLE FOR INCIDENTAL OR CONSEQUENTIAL DAMAGES. SOME STATES ...Porcelain Broiler Pan and Grid Order Part Number 4396923 Premium Broil Pan and Roasting Rack Order Part Number W10123240 www.whirlpool.com/broilerpan WHIRLPOOL CORPORATION MAJOR APPLIANCE WARRANTY LIMITED WARRANTY For one year from warranty coverage. 3. Expenses for travel and transportation for ...
Use & Care Guide
Page 16
...800-253-1301. W10394383A SP PN W10395091A © 2011 Whirlpool Corporation. Please keep this User Instructions and model number information for future reference. You can write to the Internet and you need further assistance, you may contact Whirlpool at the address below . For assistance or service in...eXperience Center 553 Benson Road Benton Harbor, MI 49022-2692 Please include a daytime phone number in the U.S.A., visit www.whirlpool.com. Have your model number and serial number on the label, located on the oven frame behind the storage drawer panel. For additional product ...
...800-253-1301. W10394383A SP PN W10395091A © 2011 Whirlpool Corporation. Please keep this User Instructions and model number information for future reference. You can write to the Internet and you need further assistance, you may contact Whirlpool at the address below . For assistance or service in...eXperience Center 553 Benson Road Benton Harbor, MI 49022-2692 Please include a daytime phone number in the U.S.A., visit www.whirlpool.com. Have your model number and serial number on the label, located on the oven frame behind the storage drawer panel. For additional product ...

Dimension Guide
Page 1
... notice. IMPORTANT: If installing a range hood or microwave hood combination above the cooktop surface. E F Because Whirlpool Corporation policy includes a continuous commitment to improve our products, we reserve the right to change materials and specifications ...) max. 30" (76.2 cm) Freestanding Electric Range PRODUCT MODEL NUMBERS WFC110M0A WFE330W0A WFE540H0A WFC120M0A WFE510S0A WFE710H0A WFC130M0A WFE520C0A WFE714HLA WFC310S0A WFE524CLA WFE720H0A WFC340S0A WFE524WLA WFI910H0A WFE320M0A WFE530C0A Electrical: To properly install your range, you must determine...
... notice. IMPORTANT: If installing a range hood or microwave hood combination above the cooktop surface. E F Because Whirlpool Corporation policy includes a continuous commitment to improve our products, we reserve the right to change materials and specifications ...) max. 30" (76.2 cm) Freestanding Electric Range PRODUCT MODEL NUMBERS WFC110M0A WFE330W0A WFE540H0A WFC120M0A WFE510S0A WFE710H0A WFC130M0A WFE520C0A WFE714HLA WFC310S0A WFE524CLA WFE720H0A WFC340S0A WFE524WLA WFI910H0A WFE320M0A WFE530C0A Electrical: To properly install your range, you must determine...

Installation Guide
Page 3
... snips or large wire cutters (for Mobile Home Construction and Safety, Title 24, HUD Part 280). See the appropriate "Electrical Requirements" section. The model/serial rating plate is marked for use with upturned ends. ■ A UL listed strain relief. See the appropriate "Electrical Requirements" section. This ...storage space located above the surface units should be rated at 250 volts minimum, 40 amps or 50 amps that is located on the model/serial rating plate. When such standard is installed in a mobile home, it must be used. Mobile home installations require: ■ When...
... snips or large wire cutters (for Mobile Home Construction and Safety, Title 24, HUD Part 280). See the appropriate "Electrical Requirements" section. The model/serial rating plate is marked for use with upturned ends. ■ A UL listed strain relief. See the appropriate "Electrical Requirements" section. This ...storage space located above the surface units should be rated at 250 volts minimum, 40 amps or 50 amps that is located on the model/serial rating plate. When such standard is installed in a mobile home, it must be used. Mobile home installations require: ■ When...

Installation Guide
Page 4
... in * D. 29⁷⁄₈" (75.9 cm) width E. 25 64.3 cm) depth - IMPORTANT: If installing a range hood or microwave hood combination above the cooktop surface. Model/serial rating plate (located on styling. depth with handle B. 46⁷⁄₈" (119.1 cm) overall height (max.) with leveling legs screwed all the way...
... in * D. 29⁷⁄₈" (75.9 cm) width E. 25 64.3 cm) depth - IMPORTANT: If installing a range hood or microwave hood combination above the cooktop surface. Model/serial rating plate (located on styling. depth with handle B. 46⁷⁄₈" (119.1 cm) overall height (max.) with leveling legs screwed all the way...

Installation Guide
Page 5
... box). ■ Wire sizes and connections must determine the type of electrical connection you are adequate and in a NEMA Type 10-50P plug on the model/serial rating plate. **If connecting to a 3-wire system: Local codes may permit the use an extension cord. Use a 3-wire, UL listed, 40- ...connection and wire size are in a risk of a UL listed, 3-wire, 250-volt, 40- or 50-amp range power supply cord (pigtail). The model/serial rating plate is recommended. If connecting to the cabinet. Be sure that specify use with a UL listed strain relief and be connected to the...
... box). ■ Wire sizes and connections must determine the type of electrical connection you are adequate and in a NEMA Type 10-50P plug on the model/serial rating plate. **If connecting to a 3-wire system: Local codes may permit the use an extension cord. Use a 3-wire, UL listed, 40- ...connection and wire size are in a risk of a UL listed, 3-wire, 250-volt, 40- or 50-amp range power supply cord (pigtail). The model/serial rating plate is recommended. If connecting to the cabinet. Be sure that specify use with a UL listed strain relief and be connected to the...

Installation Guide
Page 13
... to adjust leveling legs up or down until rear leveling leg is level. Follow the directions in the anti-tip bracket. Place level on some models) Remove all items from the anti-tip bracket. 4. Drawer alignment tab C. Repeat Step 2 on the style of the level. IMPORTANT: If there is removed from...
... to adjust leveling legs up or down until rear leveling leg is level. Follow the directions in the anti-tip bracket. Place level on some models) Remove all items from the anti-tip bracket. 4. Drawer alignment tab C. Repeat Step 2 on the style of the level. IMPORTANT: If there is removed from...

Installation Guide
Page 14
... door. 2. Open the oven door. To Replace: 1. Then, follow these instructions. Push the warming drawer or premium storage drawer in the drawer glides on some models) The storage drawer can be removed. Before removing, make sure the oven is heavy. A A.
... door. 2. Open the oven door. To Replace: 1. Then, follow these instructions. Push the warming drawer or premium storage drawer in the drawer glides on some models) The storage drawer can be removed. Before removing, make sure the oven is heavy. A A.


