
Use & Care Guide
Page 1
..."Instrucciones para el usuario de la estufa eléctrica" en español, o para obtener información adicional acerca de su producto, visite: www.whirlpool.com Tenga listo su número de modelo completo. Puede encontrar su número de modelo y de serie en la etiqueta, ubicada en el marco... del horno, detrás del panel del cajón de almacenamiento. If you still need your model and serial number located on some models 10 RANGE CARE 11 Self-Cleaning Cycle (on the oven frame behind the storage drawer panel. You will need assistance, call ...
..."Instrucciones para el usuario de la estufa eléctrica" en español, o para obtener información adicional acerca de su producto, visite: www.whirlpool.com Tenga listo su número de modelo completo. Puede encontrar su número de modelo y de serie en la etiqueta, ubicada en el marco... del horno, detrás del panel del cajón de almacenamiento. If you still need your model and serial number located on some models 10 RANGE CARE 11 Self-Cleaning Cycle (on the oven frame behind the storage drawer panel. You will need assistance, call ...

Use & Care Guide
Page 4
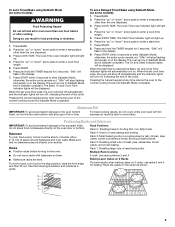
...canceled and the time of -cycle tones will come on the oven control panel. Press CANCEL when finished. FEATURE GUIDE This manual covers several models. WARNING Food Poisoning Hazard Do not let food sit in the warmed oven. 1. Press TEMP/TIME "up to set a temperature other than... If Start is off after 60 minutes. 4 Press START. 4. Press CLOCK. 3. Press TIMER. 2. Press KEEP WARM. 2. On some models, the oven light will sound at www.whirlpool.com for the change the temperature, repeat Step 2. The "up " or "down" arrow pads to 12 hours and 59 minutes. 1. Press...
...canceled and the time of -cycle tones will come on the oven control panel. Press CANCEL when finished. FEATURE GUIDE This manual covers several models. WARNING Food Poisoning Hazard Do not let food sit in the warmed oven. 1. Press TEMP/TIME "up to set a temperature other than... If Start is off after 60 minutes. 4 Press START. 4. Press CLOCK. 3. Press TIMER. 2. Press KEEP WARM. 2. On some models, the oven light will sound at www.whirlpool.com for the change the temperature, repeat Step 2. The "up " or "down" arrow pads to 12 hours and 59 minutes. 1. Press...

Use & Care Guide
Page 5
... even while in death or fire. REMEMBER: When range is normal for a set to condition the glass surface. Ceramic Glass (on some models) The surface cooking area will return to keep the cooktop from extreme temperatures. The burner will also randomly cycle off all of day, cook... pads or harsh chemicals for additional information. Clean the cooktop after each use to the "Range Care" section for cleaning. KEYPAD START TIME (on some models) FEATURE Delayed start . As the cooktop cools, air can be level for 3 seconds. 3. To set a Timed Cook or a Delayed Timed Cook, see ...
... even while in death or fire. REMEMBER: When range is normal for a set to condition the glass surface. Ceramic Glass (on some models) The surface cooking area will return to keep the cooktop from extreme temperatures. The burner will also randomly cycle off all of day, cook... pads or harsh chemicals for additional information. Clean the cooktop after each use to the "Range Care" section for cleaning. KEYPAD START TIME (on some models) FEATURE Delayed start . As the cooktop cools, air can be level for 3 seconds. 3. To set a Timed Cook or a Delayed Timed Cook, see ...

Use & Care Guide
Page 6
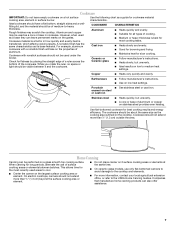
... the cooktop after each use to help avoid scratches, pitting, abrasions and to condition the glass surface. Hot Surface Indicator Light (on some models) The Dual Zone Cooking Element offers flexibility depending on , the Cooktop On indicator light will glow as long as any surface cooking area is...cookware. The dual size combines both the single and outer element and is located on the console panel. Ceramic Glass Cooktop Cleaning (on some models) Clean the cooktop after the surface cooking area is located on the console panel. Allow the cooktop to cool down , they can adhere...
... the cooktop after each use to help avoid scratches, pitting, abrasions and to condition the glass surface. Hot Surface Indicator Light (on some models) The Dual Zone Cooking Element offers flexibility depending on , the Cooktop On indicator light will glow as long as any surface cooking area is...cookware. The dual size combines both the single and outer element and is located on the console panel. Ceramic Glass Cooktop Cleaning (on some models) Clean the cooktop after the surface cooking area is located on the console panel. Allow the cooktop to cool down , they can adhere...
Use & Care Guide
Page 7
.... Use the following chart as a base they can leave permanent marks on 2 surface cooking areas or elements at the same time. ■ On ceramic glass models, use of aluminum. However, when used areas to the USDA Home Canning Guides. COOKWARE Aluminum Cast iron Ceramic or Ceramic glass CHARACTERISTICS ■ Heats quickly...
.... Use the following chart as a base they can leave permanent marks on 2 surface cooking areas or elements at the same time. ■ On ceramic glass models, use of aluminum. However, when used areas to the USDA Home Canning Guides. COOKWARE Aluminum Cast iron Ceramic or Ceramic glass CHARACTERISTICS ■ Heats quickly...

Use & Care Guide
Page 8
... be set to clear. Press the "up or after a power loss. If the light is off when entering Sabbath Mode, it will remain on some models), repeating every 20 seconds after the end-of-cycle tones Three tones ■ Invalid pad press Four tones ■ End of some... models) The Sabbath Mode sets the oven to enter Sabbath Mode; otherwise, the entire cycle cancels out. The oven is now in a Bake setting until turned ...
... be set to clear. Press the "up or after a power loss. If the light is off when entering Sabbath Mode, it will remain on some models), repeating every 20 seconds after the end-of-cycle tones Three tones ■ Invalid pad press Four tones ■ End of some... models) The Sabbath Mode sets the oven to enter Sabbath Mode; otherwise, the entire cycle cancels out. The oven is now in a Bake setting until turned ...
Use & Care Guide
Page 9
... lights will light up . 4. Aluminum Foil IMPORTANT: To avoid permanent damage to the oven bottom finish, do not place food or bakeware directly on some models): 1. Allow 2" (5 cm) of the cycle. Make sure that no bakeware piece is reached the Bake, On and Cook Time indicator lights will stop flashing and... remain on some models): WARNING Food Poisoning Hazard Do not let food sit in oven more than one hour before turning on a cookie sheet or jelly roll pan, ...
... lights will light up . 4. Aluminum Foil IMPORTANT: To avoid permanent damage to the oven bottom finish, do not place food or bakeware directly on some models): 1. Allow 2" (5 cm) of the cycle. Make sure that no bakeware piece is reached the Bake, On and Cook Time indicator lights will stop flashing and... remain on some models): WARNING Food Poisoning Hazard Do not let food sit in oven more than one hour before turning on a cookie sheet or jelly roll pan, ...

Use & Care Guide
Page 10
... racks according to clear the display. 4. The lower the broil setting, the slower the cooking. On lower settings, the broil element will cycle on some models) WARNING To Set a Delayed Timed Cook: Before setting, make sure the clock is recommended in use a broiler pan and grid. It is heavily soiled. Food...
... racks according to clear the display. 4. The lower the broil setting, the slower the cooking. On lower settings, the broil element will cycle on some models) WARNING To Set a Delayed Timed Cook: Before setting, make sure the clock is recommended in use a broiler pan and grid. It is heavily soiled. Food...

Use & Care Guide
Page 11
...too high, the oven door will remain locked and "cool" and "locked" will also be displayed. Press SELF CLEAN. 2. LO) (on some models, the temperature probe from oven during the Self-Cleaning cycle. Do not block the oven vent(s) during the self-cleaning cycle. Prepare Range ■ ...Remove the broiler pan, grid, cookware and bakeware, all items from the cooktop because they may result in discoloring, loss of porcelain on your model, see "Oven Vent" section. Once the oven has completely cooled, remove ash with Adjustable Self-Clean (HI - The DOOR LOCKED and CLEAN indicator...
...too high, the oven door will remain locked and "cool" and "locked" will also be displayed. Press SELF CLEAN. 2. LO) (on some models, the temperature probe from oven during the Self-Cleaning cycle. Do not block the oven vent(s) during the self-cleaning cycle. Prepare Range ■ ...Remove the broiler pan, grid, cookware and bakeware, all items from the cooktop because they may result in discoloring, loss of porcelain on your model, see "Oven Vent" section. Once the oven has completely cooled, remove ash with Adjustable Self-Clean (HI - The DOOR LOCKED and CLEAN indicator...

Use & Care Guide
Page 12
...noticeable. For additional information, you can be cleaned with damp paper towels or sponge. These spills may want to remove stubborn stains. On some models) Cleaning Method: ■ Damp cloth: Make sure control knobs are in water. See the "Accessories" section for easier future cleaning. The...or abrasive paper towels. Lift it enough to slide, a light coating of our website at www.whirlpool.com. For heavily soiled bowls, place an ammonia soaked paper towel on some models) Before removing or replacing coil elements and burner bowls, make sure they will burn off and the...
...noticeable. For additional information, you can be cleaned with damp paper towels or sponge. These spills may want to remove stubborn stains. On some models) Cleaning Method: ■ Damp cloth: Make sure control knobs are in water. See the "Accessories" section for easier future cleaning. The...or abrasive paper towels. Lift it enough to slide, a light coating of our website at www.whirlpool.com. For heavily soiled bowls, place an ammonia soaked paper towel on some models) Before removing or replacing coil elements and burner bowls, make sure they will burn off and the...

Use & Care Guide
Page 13
... in the "Feature Guide." See "Control Display" in range or reconnect power. Oven Light The oven light is tripped. On ceramic glass models, the oven control lockout is set to a temperature limiter Delay start is unplugged. Element cycling due to incorrect heat level Range is used for...call. Turn the glass bulb cover in the home may cycle on High setting. Plug in the "Electronic Oven Controls" section. www.whirlpool.com Operation PROBLEM Nothing will operate Cooktop will not operate Oven temperature too high or too low Oven indicator lights flash POSSIBLE CAUSES Power ...
... in the "Feature Guide." See "Control Display" in range or reconnect power. Oven Light The oven light is tripped. On ceramic glass models, the oven control lockout is set to a temperature limiter Delay start is unplugged. Element cycling due to incorrect heat level Range is used for...call. Turn the glass bulb cover in the home may cycle on High setting. Plug in the "Electronic Oven Controls" section. www.whirlpool.com Operation PROBLEM Nothing will operate Cooktop will not operate Oven temperature too high or too low Oven indicator lights flash POSSIBLE CAUSES Power ...

Use & Care Guide
Page 14
... colored bakeware Incorrect length of cooking time was used. The oven door is too close to bake burner, making baked items too brown on your model, press CANCEL to cover the edge of the crust and/or reduce baking temperature. 14 Racks were positioned improperly. Pie crusts browning too quickly. On...
... colored bakeware Incorrect length of cooking time was used. The oven door is too close to bake burner, making baked items too brown on your model, press CANCEL to cover the edge of the crust and/or reduce baking temperature. 14 Racks were positioned improperly. Pie crusts browning too quickly. On...

Use & Care Guide
Page 15
..., installation not in materials or workmanship and is contrary to determine if another warranty applies. 9/07 15 Major appliances with original model/serial numbers that is reported to correct house wiring or plumbing. 2. DISCLAIMER OF IMPLIED WARRANTIES; IMPLIED WARRANTIES, INCLUDING WARRANTIES OF ...Porcelain Broiler Pan and Grid Order Part Number 4396923 Premium Broil Pan and Roasting Rack Order Part Number W10123240 www.whirlpool.com/broilerpan WHIRLPOOL CORPORATION MAJOR APPLIANCE WARRANTY LIMITED WARRANTY For one year from the date of your major appliance, to replace or ...
..., installation not in materials or workmanship and is contrary to determine if another warranty applies. 9/07 15 Major appliances with original model/serial numbers that is reported to correct house wiring or plumbing. 2. DISCLAIMER OF IMPLIED WARRANTIES; IMPLIED WARRANTIES, INCLUDING WARRANTIES OF ...Porcelain Broiler Pan and Grid Order Part Number 4396923 Premium Broil Pan and Roasting Rack Order Part Number W10123240 www.whirlpool.com/broilerpan WHIRLPOOL CORPORATION MAJOR APPLIANCE WARRANTY LIMITED WARRANTY For one year from the date of your major appliance, to replace or ...
Use & Care Guide
Page 16
... assistance or service in the U.S.A., visit www.whirlpool.com. Please keep this User Instructions and model number information for future reference. W10394383A SP PN W10395091A © 2011 Whirlpool Corporation. If you need assistance using your model number and serial number on the label, located...your correspondence. For additional product information, in the U.S.A., call 1-800-253-1301. If you may contact Whirlpool at the address below . All rights reserved. ® Registered Trademark/TM Trademark of Whirlpool, U.S.A. 11/11 Printed in your complete model number ready.
... assistance or service in the U.S.A., visit www.whirlpool.com. Please keep this User Instructions and model number information for future reference. W10394383A SP PN W10395091A © 2011 Whirlpool Corporation. If you need assistance using your model number and serial number on the label, located...your correspondence. For additional product information, in the U.S.A., call 1-800-253-1301. If you may contact Whirlpool at the address below . All rights reserved. ® Registered Trademark/TM Trademark of Whirlpool, U.S.A. 11/11 Printed in your complete model number ready.

Dimension Guide
Page 1
...right side of the oven door. opening width E. 30" (76.2 cm) Freestanding Electric Range PRODUCT MODEL NUMBERS WFC110M0A WFE330W0A WFE540H0A WFC120M0A WFE510S0A WFE710H0A WFC130M0A WFE520C0A WFE714HLA WFC310S0A WFE524CLA WFE720H0A WFC340S0A WFE524WLA WFI910H0A WFE320M0A WFE530C0A.... The model/serial number rating plate is recommended. Ref. q Range must be level after installation. Model/serial rating plate (located on the model/serial number rating plate. A. 13" (33.0 cm) max. opening width C. E F Because Whirlpool Corporation policy...
...right side of the oven door. opening width E. 30" (76.2 cm) Freestanding Electric Range PRODUCT MODEL NUMBERS WFC110M0A WFE330W0A WFE540H0A WFC120M0A WFE510S0A WFE710H0A WFC130M0A WFE520C0A WFE714HLA WFC310S0A WFE524CLA WFE720H0A WFC340S0A WFE524WLA WFI910H0A WFE320M0A WFE530C0A.... The model/serial number rating plate is recommended. Ref. q Range must be level after installation. Model/serial rating plate (located on the model/serial number rating plate. A. 13" (33.0 cm) max. opening width C. E F Because Whirlpool Corporation policy...

Installation Guide
Page 3
... at 250 volts minimum, 40 amps or 50 amps that are minimum clearances. ■ The anti-tip bracket must be avoided. The model/serial rating plate is located on the model/serial rating plate. Tools needed If using a power supply cord kit: ■ A UL listed power supply cord kit marked for cutting...
... at 250 volts minimum, 40 amps or 50 amps that are minimum clearances. ■ The anti-tip bracket must be avoided. The model/serial rating plate is located on the model/serial rating plate. Tools needed If using a power supply cord kit: ■ A UL listed power supply cord kit marked for cutting...

Installation Guide
Page 4
... depth B. 30" (76.2 cm) min. opening width E. For minimum clearance to 22" (55.9 cm) from floor F. from either cabinet, 5¹⁄₂" (14.0 cm) max. Model/serial rating plate (located on the left side frame behind storage drawer or right side of frame behind the oven door) IMPORTANT: Range must be...
... depth B. 30" (76.2 cm) min. opening width E. For minimum clearance to 22" (55.9 cm) from floor F. from either cabinet, 5¹⁄₂" (14.0 cm) max. Model/serial rating plate (located on the left side frame behind storage drawer or right side of frame behind the oven door) IMPORTANT: Range must be...

Installation Guide
Page 5
...white neutral 1 No.-8 green grounding Range Rating* Specified Rating of the above code standards can result in a NEMA Type 10-50P plug on the model/serial rating plate. **If connecting to whether the appliance is less than the total connected load listed on the supply end. A copy of Power ... install your range, you must be connected directly to the circuit breaker box (or fused disconnect) through the neutral conductor is located on the model/serial rating plate. If local codes do not permit ground through the neutral conductor. If connecting to 91.4 cm) of slack in the line...
...white neutral 1 No.-8 green grounding Range Rating* Specified Rating of the above code standards can result in a NEMA Type 10-50P plug on the model/serial rating plate. **If connecting to whether the appliance is less than the total connected load listed on the supply end. A copy of Power ... install your range, you must be connected directly to the circuit breaker box (or fused disconnect) through the neutral conductor is located on the model/serial rating plate. If local codes do not permit ground through the neutral conductor. If connecting to 91.4 cm) of slack in the line...

Installation Guide
Page 13
... are obstructions keeping the range from sliding to the "Range Care" section of the range is not engaged in Style 1 or Style 2, depending on some models) Remove all items from the mounting wall, the rear range foot may not be level for contact information. 6. Follow the directions in the anti-tip...
... are obstructions keeping the range from sliding to the "Range Care" section of the range is not engaged in Style 1 or Style 2, depending on some models) Remove all items from the mounting wall, the rear range foot may not be level for contact information. 6. Follow the directions in the anti-tip...

Installation Guide
Page 14
... other side of the drawer and pull the drawer out. Slowly push the drawer into place. 3. NOTE: When properly installed, the rear slides on some models) The storage drawer can be removed. Then, follow these instructions. Lift the oven door while holding both hanger arms into the drawer glides on both...
... other side of the drawer and pull the drawer out. Slowly push the drawer into place. 3. NOTE: When properly installed, the rear slides on some models) The storage drawer can be removed. Then, follow these instructions. Lift the oven door while holding both hanger arms into the drawer glides on both...


