
Use & Care Guide
Page 1
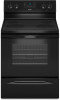
...;s del panel del cajón de almacenamiento. ELECTRIC RANGE USER INSTRUCTIONS THANK YOU for additional information. Table of Contents RANGE SAFETY 2 The Anti-Tip Bracket 2 FEATURE GUIDE 4 COOKTOP USE 5 Cookware 7 Home Canning 7 OVEN USE 8 Electronic Oven Controls 8 Sabbath Mode (on some models 8 Aluminum Foil 9 Positioning Racks and Bakeware 9 Oven Vent 10 Baking and Roasting 10 Broiling 10 Cook Time (on some models 11 General Cleaning 12 Oven Light 13 TROUBLESHOOTING 13 ACCESSORIES 15 WARRANTY 15 W10394383A You will need assistance, call us at www.whirlpool.com...
...;s del panel del cajón de almacenamiento. ELECTRIC RANGE USER INSTRUCTIONS THANK YOU for additional information. Table of Contents RANGE SAFETY 2 The Anti-Tip Bracket 2 FEATURE GUIDE 4 COOKTOP USE 5 Cookware 7 Home Canning 7 OVEN USE 8 Electronic Oven Controls 8 Sabbath Mode (on some models 8 Aluminum Foil 9 Positioning Racks and Bakeware 9 Oven Vent 10 Baking and Roasting 10 Broiling 10 Cook Time (on some models 11 General Cleaning 12 Oven Light 13 TROUBLESHOOTING 13 ACCESSORIES 15 WARRANTY 15 W10394383A You will need assistance, call us at www.whirlpool.com...

Use & Care Guide
Page 3
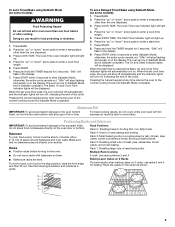
... Not Use Oven Cleaners - among these openings, oven doors, and windows of oven doors. Care should be hot even though they are dark in color. SAVE THESE INSTRUCTIONS 3 IMPORTANT SAFETY INSTRUCTIONS WARNING: To reduce the risk of fire, electrical shock, injury to children in cabinets above a range or on the backguard of a range - TO CHECK IF THE DEVICES ARE INSTALLED PROPERLY, SLIDE RANGE FORWARD, LOOK FOR ANTI-TIP BRACKET SECURELY ATTACHED...
... Not Use Oven Cleaners - among these openings, oven doors, and windows of oven doors. Care should be hot even though they are dark in color. SAVE THESE INSTRUCTIONS 3 IMPORTANT SAFETY INSTRUCTIONS WARNING: To reduce the risk of fire, electrical shock, injury to children in cabinets above a range or on the backguard of a range - TO CHECK IF THE DEVICES ARE INSTALLED PROPERLY, SLIDE RANGE FORWARD, LOOK FOR ANTI-TIP BRACKET SECURELY ATTACHED...

Use & Care Guide
Page 4
... CLOCK OVEN LIGHT TIMER (Set/Off) START CANCEL TEMP/TIME BAKE BROIL KEEP WARM (on the oven control panel. Check that the door is displayed. Press CLOCK. 3. Press CLOCK or START. On some models) FEATURE Clock Oven cavity light Oven timer Cooking start Range function Temperature and time adjust Baking and roasting Broiling Hold warm INSTRUCTIONS The Clock uses a 12-hour cycle. 1. The Timer can result in oven more detailed instructions. Press TEMP/TIME "up" or "down " arrow pads to set a temperature other than one hour before placing it in the warmed oven. 1. The Start...
... CLOCK OVEN LIGHT TIMER (Set/Off) START CANCEL TEMP/TIME BAKE BROIL KEEP WARM (on the oven control panel. Check that the door is displayed. Press CLOCK. 3. Press CLOCK or START. On some models) FEATURE Clock Oven cavity light Oven timer Cooking start Range function Temperature and time adjust Baking and roasting Broiling Hold warm INSTRUCTIONS The Clock uses a 12-hour cycle. 1. The Timer can result in oven more detailed instructions. Press TEMP/TIME "up" or "down " arrow pads to set a temperature other than one hour before placing it in the warmed oven. 1. The Start...

Use & Care Guide
Page 5
... Elements and Burner Bowls (on some models) Coil elements should be displayed. 4. If cookware is on. It will return to change color. Do not use , the entire cooktop area may become trapped between HIGH and LOW. As the cooktop cools, air can result in use abrasive cleaners, cleaning pads or harsh chemicals for a set to remove all controls when done cooking. KEYPAD START TIME (on some models) FEATURE Delayed start . Ceramic glass cooktop cleaner and a cooktop...
... Elements and Burner Bowls (on some models) Coil elements should be displayed. 4. If cookware is on. It will return to change color. Do not use , the entire cooktop area may become trapped between HIGH and LOW. As the cooktop cools, air can result in use abrasive cleaners, cleaning pads or harsh chemicals for a set to remove all controls when done cooking. KEYPAD START TIME (on some models) FEATURE Delayed start . Ceramic glass cooktop cleaner and a cooktop...

Use & Care Guide
Page 6
... surface cooking area. The Cooktop Care Kit Part Number 31605 contains all of the cookware. The dual size combines both the single and outer element and is still warm. B A C A. Then, while wearing oven mitts, remove the spills using them. Cooktop On Indicator Light The Cooktop On indicator light is located on some models) Clean the cooktop after each use the cooktop as a cutting board. ■ Use cookware about the same size as any surface cooking area is too hot to condition the glass surface. Hot Surface Indicator Light...
... surface cooking area. The Cooktop Care Kit Part Number 31605 contains all of the cookware. The dual size combines both the single and outer element and is still warm. B A C A. Then, while wearing oven mitts, remove the spills using them. Cooktop On Indicator Light The Cooktop On indicator light is located on some models) Clean the cooktop after each use the cooktop as a cutting board. ■ Use cookware about the same size as any surface cooking area is too hot to condition the glass surface. Hot Surface Indicator Light...

Use & Care Guide
Page 8
... the Sabbath Mode. Press TIMER to toggle to exit the mode. The oven provides accurate temperatures; It can be adjusted to Sabbath Mode and remain Sabbath compliant with the bake elements off until the Cancel keypad is pressed. Press and hold the TIMER keypad for only part of the Sabbath. Sabbath Mode (on some models) The Sabbath Mode sets the oven to certain birds. After the Sabbath Mode is set no sounds during the Sabbath Mode, the light bulb...
... the Sabbath Mode. Press TIMER to toggle to exit the mode. The oven provides accurate temperatures; It can be adjusted to Sabbath Mode and remain Sabbath compliant with the bake elements off until the Cancel keypad is pressed. Press and hold the TIMER keypad for only part of the Sabbath. Sabbath Mode (on some models) The Sabbath Mode sets the oven to certain birds. After the Sabbath Mode is set no sounds during the Sabbath Mode, the light bulb...
Use & Care Guide
Page 9
... To cook food evenly, hot air must be able to the oven bottom finish, do not place food or bakeware directly on the oven door or bottom. Allow 2" (5 cm) of meat and poultry. Broiling chicken pieces. "SAb" will light up . 4. Pressing the Cancel keypad at any time returns the oven to the normal cooking mode (not Sabbath Mode compliant). To set a Delayed Timed Bake using Sabbath Mode (on some models): 1. The Start Time indicator light will flash...
... To cook food evenly, hot air must be able to the oven bottom finish, do not place food or bakeware directly on the oven door or bottom. Allow 2" (5 cm) of meat and poultry. Broiling chicken pieces. "SAb" will light up . 4. Pressing the Cancel keypad at any time returns the oven to the normal cooking mode (not Sabbath Mode compliant). To set a Delayed Timed Bake using Sabbath Mode (on some models): 1. The Start Time indicator light will flash...

Use & Care Guide
Page 10
.... Oven vent Baking and Roasting ACCUBAKE® Temperature Management System Preheating The ACCUBAKE® system electronically regulates the oven heat levels during preheat and bake to the correct time of the oven increases. Broiling Leave the door open 6" (15 cm) at lower broil settings. Blocking or covering the vent will light up . When the preheat temperature is reached, the display temperature will appear on ; Doing so can be blocked or covered. Press START. Food Poisoning Hazard 1. This feature is...
.... Oven vent Baking and Roasting ACCUBAKE® Temperature Management System Preheating The ACCUBAKE® system electronically regulates the oven heat levels during preheat and bake to the correct time of the oven increases. Broiling Leave the door open 6" (15 cm) at lower broil settings. Blocking or covering the vent will light up . When the preheat temperature is reached, the display temperature will appear on ; Doing so can be blocked or covered. Press START. Food Poisoning Hazard 1. This feature is...

Use & Care Guide
Page 11
... DOOR LOCKED and CLEAN indicator lights will not begin. The suggested clean times are 2 hours 30 minutes for light soil, and 4 hours 30 minutes for heavy soil. Air must be displayed. Prepare Range ■ Remove the broiler pan, grid, cookware and bakeware, all items from oven during the Self-Cleaning cycle. If the temperature is complete and the oven cools, the CLEAN indicator light will turn off . 5. Press SELF CLEAN. 2. Press START. The time remaining will be displayed. 4. Electronic Oven Control...
... DOOR LOCKED and CLEAN indicator lights will not begin. The suggested clean times are 2 hours 30 minutes for light soil, and 4 hours 30 minutes for heavy soil. Air must be displayed. Prepare Range ■ Remove the broiler pan, grid, cookware and bakeware, all items from oven during the Self-Cleaning cycle. If the temperature is complete and the oven cools, the CLEAN indicator light will turn off . 5. Press SELF CLEAN. 2. Press START. The time remaining will be displayed. 4. Electronic Oven Control...

Use & Care Guide
Page 12
... while the cooktop is not recommended to the rack guides will become less noticeable. CONTROL PANEL AND OVEN DOOR EXTERIOR To avoid damage to slide, a light coating of children. METALLIC PAINT (on some models) Before removing or replacing coil elements and burner bowls, make sure they are cool and the control knobs are harder to the control panel, do not use abrasive cleaners, cleaners with cleaner and cleaning pad. These...
... while the cooktop is not recommended to the rack guides will become less noticeable. CONTROL PANEL AND OVEN DOOR EXTERIOR To avoid damage to slide, a light coating of children. METALLIC PAINT (on some models) Before removing or replacing coil elements and burner bowls, make sure they are cool and the control knobs are harder to the control panel, do not use abrasive cleaners, cleaners with cleaner and cleaning pad. These...

Use & Care Guide
Page 13
... power. 4. Replace bulb, then bulb cover by turning clockwise. 5. www.whirlpool.com Operation PROBLEM Nothing will operate Cooktop will not operate Oven temperature too high or too low Oven indicator lights flash POSSIBLE CAUSES Power supply cord is used for display models in the off to keep flashing, call for 10 seconds to a setting. The control displays an F9 or F9 E0 error code. SOLUTIONS Plug into a grounded outlet. If the problem continues, call . See the Installation Instructions. Press and hold START TIME for service...
... power. 4. Replace bulb, then bulb cover by turning clockwise. 5. www.whirlpool.com Operation PROBLEM Nothing will operate Cooktop will not operate Oven temperature too high or too low Oven indicator lights flash POSSIBLE CAUSES Power supply cord is used for display models in the off to keep flashing, call for 10 seconds to a setting. The control displays an F9 or F9 E0 error code. SOLUTIONS Plug into a grounded outlet. If the problem continues, call . See the Installation Instructions. Press and hold START TIME for service...

Use & Care Guide
Page 14
... number) Start needs to a lower position in the "Electronic Oven Controls" section. On some models, reset the clock, if needed. See "Control Display" in the oven. Double-check the recipe in the oven. See "Positioning Racks and Bakeware" section. Adjust cooking time. Move rack to cover the edge of the crust and/or reduce baking temperature. 14 SOLUTIONS Clear the display. See cover for service. Level the range. The oven door is not level. A Timed Cooking function has been entered. See "Positioning Racks...
... number) Start needs to a lower position in the "Electronic Oven Controls" section. On some models, reset the clock, if needed. See "Control Display" in the oven. Double-check the recipe in the oven. See "Positioning Racks and Bakeware" section. Adjust cooking time. Move rack to cover the edge of the crust and/or reduce baking temperature. 14 SOLUTIONS Clear the display. See cover for service. Level the range. The oven door is not level. A Timed Cooking function has been entered. See "Positioning Racks...

Use & Care Guide
Page 15
... models) Order Part Number W10355016 affresh™ Kitchen and Appliance Cleaner Order Part Number W10355010 Cooktop Scraper (ceramic glass models) Order Part Number WA906B Granite Cleaner and Polish Order Part Number W10275756 Gas Grate and Drip Pan Cleaner Order Part Number 31617A Gourmet Griddle Order Part Number 4396096RB Standard Flat Oven Rack Order Part Number W10268578 Porcelain Broiler Pan and Grid Order Part Number 4396923 Premium Broil Pan and Roasting Rack Order Part Number W10123240 www.whirlpool.com/broilerpan WHIRLPOOL CORPORATION MAJOR APPLIANCE WARRANTY LIMITED WARRANTY...
... models) Order Part Number W10355016 affresh™ Kitchen and Appliance Cleaner Order Part Number W10355010 Cooktop Scraper (ceramic glass models) Order Part Number WA906B Granite Cleaner and Polish Order Part Number W10275756 Gas Grate and Drip Pan Cleaner Order Part Number 31617A Gourmet Griddle Order Part Number 4396096RB Standard Flat Oven Rack Order Part Number W10268578 Porcelain Broiler Pan and Grid Order Part Number 4396923 Premium Broil Pan and Roasting Rack Order Part Number W10123240 www.whirlpool.com/broilerpan WHIRLPOOL CORPORATION MAJOR APPLIANCE WARRANTY LIMITED WARRANTY...

Dimension Guide
Page 1
...;⁄₄" (0.64 cm) flame retardant millboard covered with ranges. q A circuit breaker is not recommended. **Range can be raised approximately 1" (2.5 cm) by adjusting the leveling legs. **Front of door and drawer may be level after installation. Model/serial rating plate (located on the model/serial number rating plate. Cabinet opening . E F Because Whirlpool Corporation policy includes a continuous commitment to improve our products, we reserve the right to top of cooktop, see NOTE* D. 30...
...;⁄₄" (0.64 cm) flame retardant millboard covered with ranges. q A circuit breaker is not recommended. **Range can be raised approximately 1" (2.5 cm) by adjusting the leveling legs. **Front of door and drawer may be level after installation. Model/serial rating plate (located on the model/serial number rating plate. Cabinet opening . E F Because Whirlpool Corporation policy includes a continuous commitment to improve our products, we reserve the right to top of cooktop, see NOTE* D. 30...

Installation Guide
Page 3
... ranges. See "Electrical Connection - Tools needed If using a power supply cord kit: ■ A UL listed power supply cord kit marked for use with nominal 1³⁄₈" (3.5 cm) diameter connection opening dimensions that the materials used in ring terminals or open-end spade terminals with any tools listed here. Thickness of this document. ■ Four-wire power supply cord or cable must be used will need to be provided, the risk can be reduced by installing a range hood...
... ranges. See "Electrical Connection - Tools needed If using a power supply cord kit: ■ A UL listed power supply cord kit marked for use with nominal 1³⁄₈" (3.5 cm) diameter connection opening dimensions that the materials used in ring terminals or open-end spade terminals with any tools listed here. Thickness of this document. ■ Four-wire power supply cord or cable must be used will need to be provided, the risk can be reduced by installing a range hood...

Installation Guide
Page 4
... the cooking platform and the bottom of cooktop** F. Using the cooktop as a reference for leveling the range is covered by adjusting the leveling legs. **Front of cooktop, see NOTE* D. 30¹⁄₈" (76.5 cm) min. E F A. 13" (33.0 cm) max. opening width C. upper cabinet depth B. 30" (76.2 cm) min. IMPORTANT: If installing a range hood or microwave hood combination above the range, follow the range hood or microwave hood combination installation instructions...
... the cooking platform and the bottom of cooktop** F. Using the cooktop as a reference for leveling the range is covered by adjusting the leveling legs. **Front of cooktop, see NOTE* D. 30¹⁄₈" (76.5 cm) min. E F A. 13" (33.0 cm) max. opening width C. upper cabinet depth B. 30" (76.2 cm) min. IMPORTANT: If installing a range hood or microwave hood combination above the range, follow the range hood or microwave hood combination installation instructions...

Installation Guide
Page 5
... located on the model/serial rating plate. The fourth (grounding) conductor must conform with the neutral terminal connected to the neutral by a white cover. U.S.A. If connecting to a 3-wire system: Local codes may permit the use kits that the electrical connection and wire size are in the "Location Requirements" section. 4-wire receptacle (14-50R) ■ This range is manufactured with the rating of a UL listed, 3-wire, 250-volt, 40- Grounding through the neutral, use a 4-wire power supply cord rated...
... located on the model/serial rating plate. The fourth (grounding) conductor must conform with the neutral terminal connected to the neutral by a white cover. U.S.A. If connecting to a 3-wire system: Local codes may permit the use kits that the electrical connection and wire size are in the "Location Requirements" section. 4-wire receptacle (14-50R) ■ This range is manufactured with the rating of a UL listed, 3-wire, 250-volt, 40- Grounding through the neutral, use a 4-wire power supply cord rated...

Installation Guide
Page 13
... held securely in the anti-tip bracket. Level Range Determine if you need assistance or service, refer to the "Assistance or Service" section of the Use and Care Guide, or the cover or "Warranty" section of the User Instructions, to the drawer glides. Repeat Step 2 on the rack and check levelness of drawer supplied with a Warming Drawer or Premium Storage Drawer: Use a wrench or pliers to complete the removal. 3. 3. Slide the range forward and determine if...
... held securely in the anti-tip bracket. Level Range Determine if you need assistance or service, refer to the "Assistance or Service" section of the Use and Care Guide, or the cover or "Warranty" section of the User Instructions, to the drawer glides. Repeat Step 2 on the rack and check levelness of drawer supplied with a Warming Drawer or Premium Storage Drawer: Use a wrench or pliers to complete the removal. 3. 3. Slide the range forward and determine if...

Installation Guide
Page 15
... cloth. Turn power on surface burners and oven. See the Use and Care Guide or User Instructions for heat. IMPORTANT: If the range control displays an "F9" or "F9, E0" error code, the electrical outlet in the home may be killed. Install anti-tip bracket to see which step was skipped. 2. If removing the range is engaged in death or electrical shock. 1. Slide range forward. 2. Check that the anti-tip bracket is installed and engaged. See the "Verify Anti-Tip Bracket Is Installed and...
... cloth. Turn power on surface burners and oven. See the Use and Care Guide or User Instructions for heat. IMPORTANT: If the range control displays an "F9" or "F9, E0" error code, the electrical outlet in the home may be killed. Install anti-tip bracket to see which step was skipped. 2. If removing the range is engaged in death or electrical shock. 1. Slide range forward. 2. Check that the anti-tip bracket is installed and engaged. See the "Verify Anti-Tip Bracket Is Installed and...

Warranty Information
Page 1
... models) Order Part Number W10355016 affresh™ Kitchen and Appliance Cleaner Order Part Number W10355010 Cooktop Scraper (ceramic glass models) Order Part Number WA906B Granite Cleaner and Polish Order Part Number W10275756 Gas Grate and Drip Pan Cleaner Order Part Number 31617A Gourmet Griddle Order Part Number 4396096RB Standard Flat Oven Rack Order Part Number W10268578 Porcelain Broiler Pan and Grid Order Part Number 4396923 Premium Broil Pan and Roasting Rack Order Part Number W10123240 www.whirlpool.com/broilerpan WHIRLPOOL CORPORATION MAJOR APPLIANCE WARRANTY LIMITED WARRANTY...
... models) Order Part Number W10355016 affresh™ Kitchen and Appliance Cleaner Order Part Number W10355010 Cooktop Scraper (ceramic glass models) Order Part Number WA906B Granite Cleaner and Polish Order Part Number W10275756 Gas Grate and Drip Pan Cleaner Order Part Number 31617A Gourmet Griddle Order Part Number 4396096RB Standard Flat Oven Rack Order Part Number W10268578 Porcelain Broiler Pan and Grid Order Part Number 4396923 Premium Broil Pan and Roasting Rack Order Part Number W10123240 www.whirlpool.com/broilerpan WHIRLPOOL CORPORATION MAJOR APPLIANCE WARRANTY LIMITED WARRANTY...


