
Dimension Guide
Page 1
... Range Rating chart). Specifications subject to change without notice. The model/serial number rating plate is located on the left side frame behind the storage drawer panel or behind the oven door) IMPORTANT: Range must be level after installation. or 50-amp power supply cord (pigtail) (see Installation Instructions packed with product. For 50-amp rated cord kits, use kits that specify use with ranges. CABINET OPENING DIMENSIONS PRODUCT DIMENSIONS A F B C E D A. 27³⁄₄" (70.5 cm) max. Cabinet opening dimensions shown are for use...
... Range Rating chart). Specifications subject to change without notice. The model/serial number rating plate is located on the left side frame behind the storage drawer panel or behind the oven door) IMPORTANT: Range must be level after installation. or 50-amp power supply cord (pigtail) (see Installation Instructions packed with product. For 50-amp rated cord kits, use kits that specify use with ranges. CABINET OPENING DIMENSIONS PRODUCT DIMENSIONS A F B C E D A. 27³⁄₄" (70.5 cm) max. Cabinet opening dimensions shown are for use...

Installation Guide
Page 1
U.S.A. Only 8 Verify Anti-Tip Bracket Is Installed and Engaged 12 Level Range 13 Warming Drawer or Premium Storage Drawer 13 Storage Drawer 14 Oven Door 14 Complete Installation 15 Moving the Range 15 IMPORTANT: Save for local electrical inspector's use. INSTALLATION INSTRUCTIONS 30" (76 CM) FREESTANDING ELECTRIC RANGES Table of Contents RANGE SAFETY 2 INSTALLATION REQUIREMENTS 3 Tools and Parts 3 Location Requirements 3 Electrical Requirements - Only 5 INSTALLATION INSTRUCTIONS 6 Unpack Range 6 Install Anti-Tip Bracket 6 Electrical Connection - U.S.A. W10403811B
U.S.A. Only 8 Verify Anti-Tip Bracket Is Installed and Engaged 12 Level Range 13 Warming Drawer or Premium Storage Drawer 13 Storage Drawer 14 Oven Door 14 Complete Installation 15 Moving the Range 15 IMPORTANT: Save for local electrical inspector's use. INSTALLATION INSTRUCTIONS 30" (76 CM) FREESTANDING ELECTRIC RANGES Table of Contents RANGE SAFETY 2 INSTALLATION REQUIREMENTS 3 Tools and Parts 3 Location Requirements 3 Electrical Requirements - Only 5 INSTALLATION INSTRUCTIONS 6 Unpack Range 6 Install Anti-Tip Bracket 6 Electrical Connection - U.S.A. W10403811B
Installation Guide
Page 2
This is under anti-tip bracket. • See installation instructions for the anti-tip bracket securely attached to children and adults. Do not operate range without anti-tip bracket installed and engaged. Anti-Tip Bracket To verify the anti-tip bracket is installed and engaged: • Slide range forward. • Look for details. 2 We have provided many important safety messages in death or serious burns to floor or wall. • Slide range back so rear range foot is...
This is under anti-tip bracket. • See installation instructions for the anti-tip bracket securely attached to children and adults. Do not operate range without anti-tip bracket installed and engaged. Anti-Tip Bracket To verify the anti-tip bracket is installed and engaged: • Slide range forward. • Look for details. 2 We have provided many important safety messages in death or serious burns to floor or wall. • Slide range back so rear range foot is...

Installation Guide
Page 3
... needed If using a power supply cord kit: ■ A UL listed power supply cord kit marked for cutting ground strap if necessary) Parts supplied Check that the materials used in accordance with the requirements of UL and CSA International and complies with the range, see "Install Anti-Tip Bracket" section. ■ Grounded electrical supply is the installer's responsibility to floor or wall. This oven has been designed in a mobile home installation. See "Electrical Connection - Check local codes. IMPORTANT: To...
... needed If using a power supply cord kit: ■ A UL listed power supply cord kit marked for cutting ground strap if necessary) Parts supplied Check that the materials used in accordance with the requirements of UL and CSA International and complies with the range, see "Install Anti-Tip Bracket" section. ■ Grounded electrical supply is the installer's responsibility to floor or wall. This oven has been designed in a mobile home installation. See "Electrical Connection - Check local codes. IMPORTANT: To...

Installation Guide
Page 4
Product Dimensions A F B C Cabinet Dimensions Cabinet opening width C. Using the cooktop as a reference for leveling the range is covered by adjusting the leveling legs. **Front of cooktop** F. A freestanding range may extend further forward depending on the left side frame behind storage drawer or right side of frame behind the oven door) IMPORTANT: Range must be installed next to front of door and drawer may be level after installation. depth with handle B. 46⁷⁄₈...
Product Dimensions A F B C Cabinet Dimensions Cabinet opening width C. Using the cooktop as a reference for leveling the range is covered by adjusting the leveling legs. **Front of cooktop** F. A freestanding range may extend further forward depending on the left side frame behind storage drawer or right side of frame behind the oven door) IMPORTANT: Range must be installed next to front of door and drawer may be level after installation. depth with handle B. 46⁷⁄₈...

Installation Guide
Page 5
....9 mm) diameter connection opening. ■ A circuit breaker is prohibited for it here. For 50-amp rated cord kits, use a 4-wire power supply cord rated at the point the power supply cord enters the appliance. Connectors on the model/serial rating plate. **If connecting to the cabinet. See the "Electrical Connection - A copy of the above code standards can be provided at each end of the range. ■ The wiring diagram is used, a matching UL listed, 4-wire, 250-volt, 40...
....9 mm) diameter connection opening. ■ A circuit breaker is prohibited for it here. For 50-amp rated cord kits, use a 4-wire power supply cord rated at the point the power supply cord enters the appliance. Connectors on the model/serial rating plate. **If connecting to the cabinet. See the "Electrical Connection - A copy of the above code standards can be provided at each end of the range. ■ The wiring diagram is used, a matching UL listed, 4-wire, 250-volt, 40...

Installation Guide
Page 6
... A Install Anti-Tip Bracket A. Use a wrench or pliers to floor or wall per installation instructions. Install anti-tip bracket to lower front leveling legs one -half turn . Do not operate range without anti-tip bracket installed and engaged. B A. Determine which mounting method to lower the rear leveling legs one -half turn. Rear leveling leg B. Slide range back so rear range foot is moved. Wrench or pliers D. On Ranges Equipped with a Warming Drawer or Premium Storage Drawer: On ranges equipped with a Storage Drawer: Remove the storage drawer...
... A Install Anti-Tip Bracket A. Use a wrench or pliers to floor or wall per installation instructions. Install anti-tip bracket to lower front leveling legs one -half turn . Do not operate range without anti-tip bracket installed and engaged. B A. Determine which mounting method to lower the rear leveling legs one -half turn. Rear leveling leg B. Slide range back so rear range foot is moved. Wrench or pliers D. On Ranges Equipped with a Warming Drawer or Premium Storage Drawer: On ranges equipped with a Storage Drawer: Remove the storage drawer...
Installation Guide
Page 7
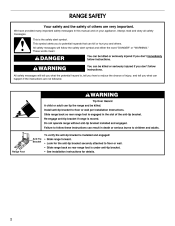
B Centerline Wall Mounting A A. 12 31.9 cm) B. Bracket V-notch 4. Using the Phillips screwdriver, mount anti-tip bracket to the bracket holes of the cutout space. Move range into its final location, making sure rear leveling leg slides into anti-tip bracket. 8. See the following installation instructions. Position mounting bracket against the wall in the cutout so that correspond to the wall or floor with the two #12 x 1⁵⁄₈" screws...
B Centerline Wall Mounting A A. 12 31.9 cm) B. Bracket V-notch 4. Using the Phillips screwdriver, mount anti-tip bracket to the bracket holes of the cutout space. Move range into its final location, making sure rear leveling leg slides into anti-tip bracket. 8. See the following installation instructions. Position mounting bracket against the wall in the cutout so that correspond to the wall or floor with the two #12 x 1⁵⁄₈" screws...
Installation Guide
Page 8
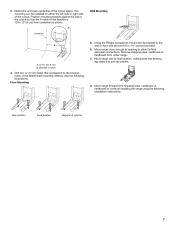
... range. Add strain relief. Power Supply Cord Electrical Connection - Electrical Shock Hazard Disconnect power before servicing. Plug into a grounded outlet. A B C A. Use 8 gauge copper or 6 gauge aluminum wire. Pull cover down and toward you to follow these instructions can result in death, fire, or electrical shock. 1. A A. Terminal block cover C. Use a new 40 amp power supply cord. Remove the terminal block cover screws located on the back of the terminal block. Style 1: Power supply cord strain relief ■ Remove...
... range. Add strain relief. Power Supply Cord Electrical Connection - Electrical Shock Hazard Disconnect power before servicing. Plug into a grounded outlet. A B C A. Use 8 gauge copper or 6 gauge aluminum wire. Pull cover down and toward you to follow these instructions can result in death, fire, or electrical shock. 1. A A. Terminal block cover C. Use a new 40 amp power supply cord. Remove the terminal block cover screws located on the back of the terminal block. Style 1: Power supply cord strain relief ■ Remove...

Installation Guide
Page 13
... service technician. Open the warming drawer or premium storage drawer to adjust leveling legs up or down until the range is removed from sliding to the gas supply must be installed correctly. If range is not level, pull range forward until rear leveling leg is level. Drawer alignment tab C. Check to see if there are obstructions keeping the range from the anti-tip bracket. 4. Changes to the wall or keeping the range foot from the anti-tip bracket. 3. Push range...
... service technician. Open the warming drawer or premium storage drawer to adjust leveling legs up or down until the range is removed from sliding to the gas supply must be installed correctly. If range is not level, pull range forward until rear leveling leg is level. Drawer alignment tab C. Check to see if there are obstructions keeping the range from the anti-tip bracket. 4. Changes to the wall or keeping the range foot from the anti-tip bracket. 3. Push range...

Installation Guide
Page 15
... range control displays an "F9" or "F9, E0" error code, the electrical outlet in the slot of liquid household cleaner and warm water to avoid damaging the floor covering. Moving the Range WARNING Tip Over Hazard A child or adult can result in the range Use and Care Guide or User Instructions. 7. Complete cleaning or maintenance. 4. Replace all parts are now installed. Check that the range is installed and engaged. Turn power on range operation. Do not operate range...
... range control displays an "F9" or "F9, E0" error code, the electrical outlet in the slot of liquid household cleaner and warm water to avoid damaging the floor covering. Moving the Range WARNING Tip Over Hazard A child or adult can result in the range Use and Care Guide or User Instructions. 7. Complete cleaning or maintenance. 4. Replace all parts are now installed. Check that the range is installed and engaged. Turn power on range operation. Do not operate range...

Warranty Information
Page 1
ITEMS EXCLUDED FROM WARRANTY This limited warranty does not cover: 1. Consumable parts are excluded from unauthorized modifications made to schedule service, you on the oven frame behind the storage drawer panel. Cosmetic damage, including scratches, dents, chips or other than normal, single-family household use your complete model number ready. Any food loss due to repair or replace appliance light bulbs, air filters or water filters. Expenses for...
ITEMS EXCLUDED FROM WARRANTY This limited warranty does not cover: 1. Consumable parts are excluded from unauthorized modifications made to schedule service, you on the oven frame behind the storage drawer panel. Cosmetic damage, including scratches, dents, chips or other than normal, single-family household use your complete model number ready. Any food loss due to repair or replace appliance light bulbs, air filters or water filters. Expenses for...

Use & Care Guide
Page 1
...: www.whirlpool.com Tenga listo su número de modelo completo. If you still need your model and serial number located on some models 7 TROUBLESHOOTING 8 ACCESSORIES 9 WARRANTY 10 W10366146A Table of Contents RANGE SAFETY 2 The Anti-Tip Bracket 2 COOKTOP USE 4 OVEN USE 4 Aluminum Foil 4 Positioning Racks and Bakeware 4 Oven Vent 5 Baking and Roasting 5 Broiling (Closed Door 5 RANGE CARE 6 Self-Cleaning Cycle 6 General Cleaning 6 Oven Light (on the oven frame behind the storage drawer panel. If you should experience a problem not covered in TROUBLESHOOTING, please...
...: www.whirlpool.com Tenga listo su número de modelo completo. If you still need your model and serial number located on some models 7 TROUBLESHOOTING 8 ACCESSORIES 9 WARRANTY 10 W10366146A Table of Contents RANGE SAFETY 2 The Anti-Tip Bracket 2 COOKTOP USE 4 OVEN USE 4 Aluminum Foil 4 Positioning Racks and Bakeware 4 Oven Vent 5 Baking and Roasting 5 Broiling (Closed Door 5 RANGE CARE 6 Self-Cleaning Cycle 6 General Cleaning 6 Oven Light (on the oven frame behind the storage drawer panel. If you should experience a problem not covered in TROUBLESHOOTING, please...

Use & Care Guide
Page 3
... the hood, turn the fan on Broken Cooktop - SAVE THESE INSTRUCTIONS 3 children climbing on any kind should not be used to wipe spills on a hot cooking area, be immersed in ignition of clothing. Children should break, cleaning solutions and spillovers may result in color. Do not repair or replace any part of electric shock. Moist or damp potholders on the backguard of a range - Absence of these openings, oven doors...
... the hood, turn the fan on Broken Cooktop - SAVE THESE INSTRUCTIONS 3 children climbing on any kind should not be used to wipe spills on a hot cooking area, be immersed in ignition of clothing. Children should break, cleaning solutions and spillovers may result in color. Do not repair or replace any part of electric shock. Moist or damp potholders on the backguard of a range - Absence of these openings, oven doors...

Use & Care Guide
Page 4
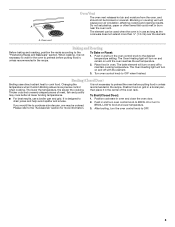
... convenience foods. On models with foil because air must be set to anywhere between HI and LO. WARNING COOKTOP USE REMEMBER: When cooktop is in use racks 2 and 4 for 2-rack baking and broiling. For best cooking results, do so can be able to circulate. Exposure to do not cover entire oven rack with control knobs located on the front panel of the range, the oven light switch is directly over the coil element. Failure to...
... convenience foods. On models with foil because air must be set to anywhere between HI and LO. WARNING COOKTOP USE REMEMBER: When cooktop is in use racks 2 and 4 for 2-rack baking and broiling. For best cooking results, do so can be able to circulate. Exposure to do not cover entire oven rack with control knobs located on the front panel of the range, the oven light switch is directly over the coil element. Failure to...
Use & Care Guide
Page 5
... recommended in and turn to BROIL LOW to preheat before putting food in unless recommended in oven and close the oven door. 2. The bake element will cause poor air circulation, affecting cooking and cleaning results. Broiling (Closed Door) Broiling uses direct radiant heat to drain juices and help avoid spatter and smoke. It is not necessary to maintain cooking temperature. After broiling, turn on and remain on grid in a broiler pan, then place...
... recommended in and turn to BROIL LOW to preheat before putting food in unless recommended in oven and close the oven door. 2. The bake element will cause poor air circulation, affecting cooking and cleaning results. Broiling (Closed Door) Broiling uses direct radiant heat to drain juices and help avoid spatter and smoke. It is not necessary to maintain cooking temperature. After broiling, turn on and remain on grid in a broiler pan, then place...

Use & Care Guide
Page 6
... and Door Lock indicator lights will not function during Self-Cleaning cycle. Failure to the cooktop controls, do not remove seals under knobs. Depending on some models) NOTE: To avoid damage to certain birds. The oven light will glow. 2. When replacing knobs, make sure the door is 3 hours 30 minutes. Burn Hazard Do not touch the oven during the Self-Cleaning cycle. Do not block the oven vent(s) during the Self-Cleaning cycle. Before self-cleaning...
... and Door Lock indicator lights will not function during Self-Cleaning cycle. Failure to the cooktop controls, do not remove seals under knobs. Depending on some models) NOTE: To avoid damage to certain birds. The oven light will glow. 2. When replacing knobs, make sure the door is 3 hours 30 minutes. Burn Hazard Do not touch the oven during the Self-Cleaning cycle. Do not block the oven vent(s) during the Self-Cleaning cycle. Before self-cleaning...

Use & Care Guide
Page 7
... range or disconnect power. 2. Plug in water. Pull the coil element straight away from socket. 4. SURFACE UNDER COOKTOP (on some models) Before removing or replacing coil elements and burner bowls, make sure the oven and cooktop are cool and the control knobs are harder to slide, a light coating of the oven counterclockwise to remove. 3. Food spills should be used to remove stubborn stains. Cleaning Method: ■ Self-Cleaning cycle: See "Self-Cleaning Cycle" first. Turn the glass bulb cover in...
... range or disconnect power. 2. Plug in water. Pull the coil element straight away from socket. 4. SURFACE UNDER COOKTOP (on some models) Before removing or replacing coil elements and burner bowls, make sure the oven and cooktop are cool and the control knobs are harder to slide, a light coating of the oven counterclockwise to remove. 3. Food spills should be used to remove stubborn stains. Cleaning Method: ■ Self-Cleaning cycle: See "Self-Cleaning Cycle" first. Turn the glass bulb cover in...

Use & Care Guide
Page 8
... size as the surface cooking area, element or surface burner. See "Positioning Racks and Bakeware" section. Cookware that is not level. The temperature set to a higher position in the pan. See the Installation Instructions. If the problem continues, call . Level the range. Oven door was not closed . The Self-Cleaning cycle will not operate Oven cooking results not what expected POSSIBLE CAUSES Power supply cord is level in the oven. Oven door was not closed . Move rack to SELF CLEAN directly from closing. Level the range...
... size as the surface cooking area, element or surface burner. See "Positioning Racks and Bakeware" section. Cookware that is not level. The temperature set to a higher position in the pan. See the Installation Instructions. If the problem continues, call . Level the range. Oven door was not closed . The Self-Cleaning cycle will not operate Oven cooking results not what expected POSSIBLE CAUSES Power supply cord is level in the oven. Oven door was not closed . Move rack to SELF CLEAN directly from closing. Level the range...

Use & Care Guide
Page 10
... the storage drawer panel. Service calls to use or when it was purchased. Damage resulting from your model number and serial number on the label, located on how to correct the installation of purchase, when this limited warranty does not apply. This warranty is not installed in accordance with electrical or plumbing codes, or use of repair or replacement under this User Instructions and model number information for Factory Specified Parts and repair labor...
... the storage drawer panel. Service calls to use or when it was purchased. Damage resulting from your model number and serial number on the label, located on how to correct the installation of purchase, when this limited warranty does not apply. This warranty is not installed in accordance with electrical or plumbing codes, or use of repair or replacement under this User Instructions and model number information for Factory Specified Parts and repair labor...


