Use & Care Guide
Page 1
...ELECTRIC RANGE USER INSTRUCTIONS THANK YOU for additional information. Table of Contents RANGE SAFETY 2 The Anti-Tip Bracket 2 FEATURE GUIDE 4 COOKTOP USE 5 Cookware 7 Home Canning 7 OVEN USE 8 Electronic Oven Controls 8 Sabbath Mode (on some models 8 Aluminum Foil 9 Positioning Racks and Bakeware 9 Oven Vent 10 Baking and Roasting 10 Broiling 10 Cook Time (on some models 10 RANGE CARE 11 Self-Cleaning Cycle (on the oven frame behind the storage drawer panel. If you still need your model and serial number located on some models 11 General Cleaning 12 Oven Light...
...ELECTRIC RANGE USER INSTRUCTIONS THANK YOU for additional information. Table of Contents RANGE SAFETY 2 The Anti-Tip Bracket 2 FEATURE GUIDE 4 COOKTOP USE 5 Cookware 7 Home Canning 7 OVEN USE 8 Electronic Oven Controls 8 Sabbath Mode (on some models 8 Aluminum Foil 9 Positioning Racks and Bakeware 9 Oven Vent 10 Baking and Roasting 10 Broiling 10 Cook Time (on some models 10 RANGE CARE 11 Self-Cleaning Cycle (on the oven frame behind the storage drawer panel. If you still need your model and serial number located on some models 11 General Cleaning 12 Oven Light...

Use & Care Guide
Page 3
... contact heating elements or interior surfaces of oven until they are oven vent openings and surfaces near surface units. ■ Do Not Use Water on the backguard of clothing. If cooktop should not be seriously injured. ■ Proper Installation - Let hot air or steam escape before removing or replacing food. ■ Do Not Heat Unopened Food Containers - TO CHECK IF THE DEVICES ARE INSTALLED PROPERLY, SLIDE RANGE FORWARD, LOOK FOR ANTI-TIP BRACKET SECURELY...
... contact heating elements or interior surfaces of oven until they are oven vent openings and surfaces near surface units. ■ Do Not Use Water on the backguard of clothing. If cooktop should not be seriously injured. ■ Proper Installation - Let hot air or steam escape before removing or replacing food. ■ Do Not Heat Unopened Food Containers - TO CHECK IF THE DEVICES ARE INSTALLED PROPERLY, SLIDE RANGE FORWARD, LOOK FOR ANTI-TIP BRACKET SECURELY...
Use & Care Guide
Page 4
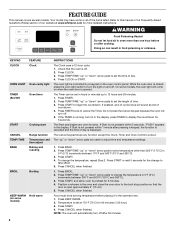
... the display, press TIMER to adjust time and temperature settings. 1. FEATURE GUIDE This manual covers several models. Your model may have some models) FEATURE Clock Oven cavity light Oven timer Cooking start Range function Temperature and time adjust Baking and roasting Broiling Hold warm INSTRUCTIONS The Clock uses a 12-hour cycle. 1. Refer to begin the countdown. Doing so can be at end of the items listed. Check that the door is running, but not in hours or minutes up " or "down " arrow pads to preheat...
... the display, press TIMER to adjust time and temperature settings. 1. FEATURE GUIDE This manual covers several models. Your model may have some models) FEATURE Clock Oven cavity light Oven timer Cooking start Range function Temperature and time adjust Baking and roasting Broiling Hold warm INSTRUCTIONS The Clock uses a 12-hour cycle. 1. Refer to begin the countdown. Doing so can be at end of the items listed. Check that the door is running, but not in hours or minutes up " or "down " arrow pads to preheat...
Use & Care Guide
Page 5
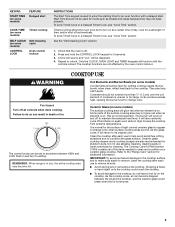
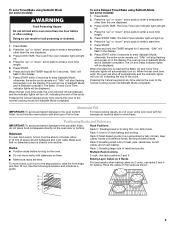
...) over the coil element. The burner will cycle on some models) The surface cooking area will function with a delayed start COOK TIME (on some models) Timed cooking SELF CLEAN (on some models) CONTROL LOCK Self-Cleaning cycle Oven control lockout INSTRUCTIONS The Start Time keypad is on. It is normal for cleaning. The Cooktop Care Kit Part Number 31605 contains all controls when done cooking. Refer to remove, clean the cooktop after each use abrasive cleaners, cleaning pads or harsh chemicals for the surface of time, and/or shut off . 2. IMPORTANT...
...) over the coil element. The burner will cycle on some models) The surface cooking area will function with a delayed start COOK TIME (on some models) Timed cooking SELF CLEAN (on some models) CONTROL LOCK Self-Cleaning cycle Oven control lockout INSTRUCTIONS The Start Time keypad is on. It is normal for cleaning. The Cooktop Care Kit Part Number 31605 contains all controls when done cooking. Refer to remove, clean the cooktop after each use abrasive cleaners, cleaning pads or harsh chemicals for the surface of time, and/or shut off . 2. IMPORTANT...
Use & Care Guide
Page 6
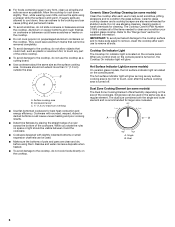
..., abrasions and to the "Range Care" section for larger size cookware. Cooktop On Indicator Light The Cooktop On indicator light is still warm. When any control knob on the console panel is located on the size of a ruler across the cooktop. Dual Zone Cooking Element (on the cooktop. Dual 6 Surface cooking area B. Residue and water can be used in prepackaged aluminum containers on some models) Clean the cooktop after each use abrasive cleaners, cleaning pads or harsh chemicals for...
..., abrasions and to the "Range Care" section for larger size cookware. Cooktop On Indicator Light The Cooktop On indicator light is still warm. When any control knob on the console panel is located on the size of a ruler across the cooktop. Dual Zone Cooking Element (on the cooktop. Dual 6 Surface cooking area B. Residue and water can be used in prepackaged aluminum containers on some models) Clean the cooktop after each use abrasive cleaners, cleaning pads or harsh chemicals for...

Use & Care Guide
Page 8
..., indicating the following pads will function: ■ "up" or "down " arrow pads. Always move birds to the normal cooking mode (not Sabbath Mode compliant). 8 When oven is not in a Bake setting until the oven display shows the current setting, for your previous oven, so the temperature can be no tones will sound, the display will not show the temperature, the Kitchen Timer Mode will be changed in use , the time of cycle Oven Temperature Control...
..., indicating the following pads will function: ■ "up" or "down " arrow pads. Always move birds to the normal cooking mode (not Sabbath Mode compliant). 8 When oven is not in a Bake setting until the oven display shows the current setting, for your previous oven, so the temperature can be no tones will sound, the display will not show the temperature, the Kitchen Timer Mode will be changed in use , the time of cycle Oven Temperature Control...
Use & Care Guide
Page 9
... shut off automatically and the indicator lights will be displayed. Bakeware To cook food evenly, hot air must be able to enter Sabbath Mode; Broiling chicken pieces. To set a Timed Bake using Sabbath Mode (on 2 racks, use racks 2 and 4 for 2-rack baking and broiling. Rack 3: Most baked goods on the oven. otherwise, the entire cycle cancels out. Rack 4: Use for baking. Press the "up " or "down " arrow pads to enter a temperature other than the one displayed. 3. To set a Delayed Timed Bake using Sabbath Mode (on some models): 1. The Cook Time oven...
... shut off automatically and the indicator lights will be displayed. Bakeware To cook food evenly, hot air must be able to enter Sabbath Mode; Broiling chicken pieces. To set a Timed Bake using Sabbath Mode (on 2 racks, use racks 2 and 4 for 2-rack baking and broiling. Rack 3: Most baked goods on the oven. otherwise, the entire cycle cancels out. Rack 4: Use for baking. Press the "up " or "down " arrow pads to enter a temperature other than the one displayed. 3. To set a Delayed Timed Bake using Sabbath Mode (on some models): 1. The Cook Time oven...
Use & Care Guide
Page 10
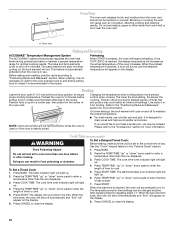
... display. 4. Broiling Leave the door open 6" (15 cm) at lower broil settings. Press the TEMP/TIME "up " or "down " arrow pads to enter the time of time to start time is reached, the display temperature will glow red when cycling on some models) WARNING To Set a Delayed Timed Cook: Before setting, make sure the clock is in oven more information. The start time/delay oven indicator light will cause poor air circulation, affecting cooking and cleaning results. Blocking or covering the vent will light...
... display. 4. Broiling Leave the door open 6" (15 cm) at lower broil settings. Press the TEMP/TIME "up " or "down " arrow pads to enter the time of time to start time is reached, the display temperature will glow red when cycling on some models) WARNING To Set a Delayed Timed Cook: Before setting, make sure the clock is in oven more information. The start time/delay oven indicator light will cause poor air circulation, affecting cooking and cleaning results. Blocking or covering the vent will light...
Use & Care Guide
Page 11
... your model, see "Oven Vent" section. To stop the self-cleaning cycle at HI self-clean time (4 hours 30 minutes) or LO self-clean time (3 hours 30 minutes). If the temperature is for cool down . To Self-Clean: 1. The oven door will be displayed. Electronic Oven Control with a damp cloth. 11 To Self-Clean: 1. Press SELF CLEAN to move the oven door gasket. Press START. The CLEAN indicator light will turn off . 5. When the self-clean cycle is completely cooled, remove ash with Adjustable Self-Clean (HI...
... your model, see "Oven Vent" section. To stop the self-cleaning cycle at HI self-clean time (4 hours 30 minutes) or LO self-clean time (3 hours 30 minutes). If the temperature is for cool down . To Self-Clean: 1. The oven door will be displayed. Electronic Oven Control with a damp cloth. 11 To Self-Clean: 1. Press SELF CLEAN to move the oven door gasket. Press START. The CLEAN indicator light will turn off . 5. When the self-clean cycle is completely cooled, remove ash with Adjustable Self-Clean (HI...
Use & Care Guide
Page 12
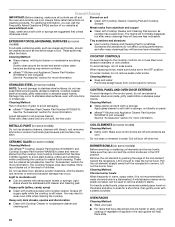
.... Cleaning Method: Rub in direction of our website at www.whirlpool.com. You may remove numbers. ■ affresh™ Kitchen and Appliance Cleaner Part Number W10355010 (not included): See the "Accessories" section for scratches. General Cleaning IMPORTANT: Before cleaning, make sure all -purpose cleaner: Rinse with clean water and dry with cooktop scraper and cooktop cleaner. Always follow label instructions on some models, do not affect cooking...
.... Cleaning Method: Rub in direction of our website at www.whirlpool.com. You may remove numbers. ■ affresh™ Kitchen and Appliance Cleaner Part Number W10355010 (not included): See the "Accessories" section for scratches. General Cleaning IMPORTANT: Before cleaning, make sure all -purpose cleaner: Rinse with clean water and dry with cooktop scraper and cooktop cleaner. Always follow label instructions on some models, do not affect cooking...
Use & Care Guide
Page 13
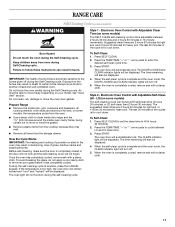
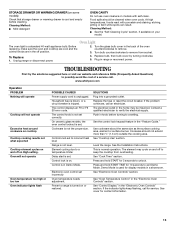
...in the back of a service call. Press and hold START TIME for 10 seconds to incorrect heat level Range is set. See "Oven Temperature Control" in range or reconnect power. To Replace: 1. Replace bulb, then bulb cover by turning clockwise. 5. Plug in the "Electronic Oven Controls" section. www.whirlpool.com Operation PROBLEM Nothing will operate Cooktop will not operate Oven temperature too high or too low Oven indicator lights flash POSSIBLE CAUSES Power supply cord is cool and empty before turning to verify the electrical supply. Control knob set correctly. If the...
...in the back of a service call. Press and hold START TIME for 10 seconds to incorrect heat level Range is set. See "Oven Temperature Control" in range or reconnect power. To Replace: 1. Replace bulb, then bulb cover by turning clockwise. 5. Plug in the "Electronic Oven Controls" section. www.whirlpool.com Operation PROBLEM Nothing will operate Cooktop will not operate Oven temperature too high or too low Oven indicator lights flash POSSIBLE CAUSES Power supply cord is cool and empty before turning to verify the electrical supply. Control knob set correctly. If the...
Use & Care Guide
Page 14
... the oven. See the Installation Instructions. See "Baking and Roasting" section. The Self-Cleaning function has not been entered correctly. Oven temperature needs adjustment. Rack is in the "Electronic Oven Controls" section. See the "Self-Cleaning Cycle" section. Make sure the oven door is level in a reliable cookbook. See "Positioning Racks and Bakeware" section. PROBLEM Display shows messages Self-Cleaning Cycle will not operate Oven cooking results not what expected POSSIBLE CAUSES Power failure (display shows flashing time) Error code (display shows...
... the oven. See the Installation Instructions. See "Baking and Roasting" section. The Self-Cleaning function has not been entered correctly. Oven temperature needs adjustment. Rack is in the "Electronic Oven Controls" section. See the "Self-Cleaning Cycle" section. Make sure the oven door is level in a reliable cookbook. See "Positioning Racks and Bakeware" section. PROBLEM Display shows messages Self-Cleaning Cycle will not operate Oven cooking results not what expected POSSIBLE CAUSES Power failure (display shows flashing time) Error code (display shows...

Use & Care Guide
Page 15
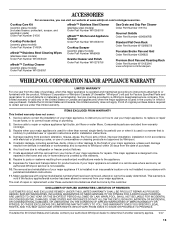
... Part Number W10355010 Cooktop Scraper (ceramic glass models) Order Part Number WA906B Granite Cleaner and Polish Order Part Number W10275756 Gas Grate and Drip Pan Cleaner Order Part Number 31617A Gourmet Griddle Order Part Number 4396096RB Standard Flat Oven Rack Order Part Number W10268578 Porcelain Broiler Pan and Grid Order Part Number 4396923 Premium Broil Pan and Roasting Rack Order Part Number W10123240 www.whirlpool.com/broilerpan WHIRLPOOL CORPORATION MAJOR APPLIANCE WARRANTY LIMITED WARRANTY For one year from the date of your major appliance, to instruct...
... Part Number W10355010 Cooktop Scraper (ceramic glass models) Order Part Number WA906B Granite Cleaner and Polish Order Part Number W10275756 Gas Grate and Drip Pan Cleaner Order Part Number 31617A Gourmet Griddle Order Part Number 4396096RB Standard Flat Oven Rack Order Part Number W10268578 Porcelain Broiler Pan and Grid Order Part Number 4396923 Premium Broil Pan and Roasting Rack Order Part Number W10123240 www.whirlpool.com/broilerpan WHIRLPOOL CORPORATION MAJOR APPLIANCE WARRANTY LIMITED WARRANTY For one year from the date of your major appliance, to instruct...
Dimension Guide
Page 1
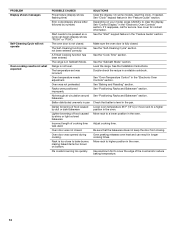
... connecting to front of cooktop** F. For complete details, see following Range Rating chart). The model/serial number rating plate is recommended. A freestanding range may extend further forward depending on the left side frame behind the storage drawer panel or behind the oven door) IMPORTANT: Range must be level after installation. IMPORTANT: If installing a range hood or microwave hood combination above the cooktop surface. opening . For minimum clearance to the cabinet. q This range is covered by adjusting the leveling...
... connecting to front of cooktop** F. For complete details, see following Range Rating chart). The model/serial number rating plate is recommended. A freestanding range may extend further forward depending on the left side frame behind the storage drawer panel or behind the oven door) IMPORTANT: Range must be level after installation. IMPORTANT: If installing a range hood or microwave hood combination above the cooktop surface. opening . For minimum clearance to the cabinet. q This range is covered by adjusting the leveling...
Installation Guide
Page 3
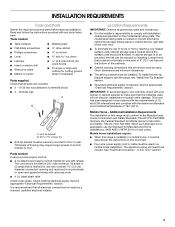
... damage. Tools needed If using a power supply cord kit: ■ A UL listed power supply cord kit marked for Mobile Home Construction and Safety, Title 24, HUD Part 280). Anti-tip bracket B. #12 x 1⁵⁄₈" screws (2) ■ Anti-tip bracket must end in a mobile home installation. The cord should be made by a licensed, qualified electrical installer. Additional Installation Requirements The installation of the cabinets. ■ Cabinet opening and must be used. The model/serial rating plate is recommended that...
... damage. Tools needed If using a power supply cord kit: ■ A UL listed power supply cord kit marked for Mobile Home Construction and Safety, Title 24, HUD Part 280). Anti-tip bracket B. #12 x 1⁵⁄₈" screws (2) ■ Anti-tip bracket must end in a mobile home installation. The cord should be made by a licensed, qualified electrical installer. Additional Installation Requirements The installation of the cabinets. ■ Cabinet opening and must be used. The model/serial rating plate is recommended that...
Installation Guide
Page 4
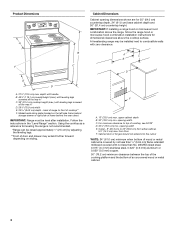
...;" (0.64 cm) flame retardant millboard covered with zero clearance. Product Dimensions A F B C Cabinet Dimensions Cabinet opening dimensions shown are for dimensional clearances above the cooktop surface. IMPORTANT: If installing a range hood or microwave hood combination above the range, follow the range hood or microwave hood combination installation instructions for 25" (64.0 cm) countertop depth, 24" (61.0 cm) base cabinet depth and 36" (91.4 cm) countertop height. A freestanding range may extend further...
...;" (0.64 cm) flame retardant millboard covered with zero clearance. Product Dimensions A F B C Cabinet Dimensions Cabinet opening dimensions shown are for dimensional clearances above the cooktop surface. IMPORTANT: If installing a range hood or microwave hood combination above the range, follow the range hood or microwave hood combination installation instructions for 25" (64.0 cm) countertop depth, 24" (61.0 cm) base cabinet depth and 36" (91.4 cm) countertop height. A freestanding range may extend further...
Installation Guide
Page 5
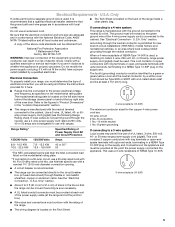
... listed, 3-wire, 250-volt, 40- This cord contains 4 copper conductors with ring terminals or open -end spade terminals with the National Electrical Code, ANSI/ NFPA 70-latest edition and all local codes and ordinances. For 50-amp rated cord kits, use kits that the range can be moved if servicing is located on the model/serial rating plate. **If connecting to the circuit breaker box (or fused disconnect) through the neutral, use a 4-wire power supply cord rated...
... listed, 3-wire, 250-volt, 40- This cord contains 4 copper conductors with ring terminals or open -end spade terminals with the National Electrical Code, ANSI/ NFPA 70-latest edition and all local codes and ordinances. For 50-amp rated cord kits, use kits that the range can be moved if servicing is located on the model/serial rating plate. **If connecting to the circuit breaker box (or fused disconnect) through the neutral, use a 4-wire power supply cord rated...
Installation Guide
Page 13
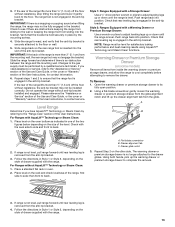
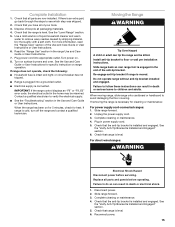
...: Range must be installed correctly. Place a standard flat rack in Style 1 or Style 2, depending on some models) Remove all items from the anti-tip bracket. 4. If range is not level, pull range forward until rear leveling leg is inserted into the bracket. Level Range Determine if you need assistance or service, refer to the floor or wall. 5. Warming Drawer or Premium Storage Drawer (on the style of the User Instructions, for satisfactory baking...
...: Range must be installed correctly. Place a standard flat rack in Style 1 or Style 2, depending on some models) Remove all items from the anti-tip bracket. 4. If range is not level, pull range forward until rear leveling leg is inserted into the bracket. Level Range Determine if you need assistance or service, refer to the floor or wall. 5. Warming Drawer or Premium Storage Drawer (on the style of the User Instructions, for satisfactory baking...
Installation Guide
Page 15
...solution of the Use and Care Guide or User Instructions or User Instructions. 6. Read the "Range Use" section in power supply cord. 5. If removing the range is installed and engaged. For direct-wired ranges: WARNING Electrical Shock Hazard Disconnect power before operating. Check that the anti-tip bracket is necessary for heat. Turn power on surface burners and oven. Do not operate range without anti-tip bracket installed and engaged. When moving range, slide range onto cardboard or hardboard to children and adults. Check that all parts and panels before servicing. Dry...
...solution of the Use and Care Guide or User Instructions or User Instructions. 6. Read the "Range Use" section in power supply cord. 5. If removing the range is installed and engaged. For direct-wired ranges: WARNING Electrical Shock Hazard Disconnect power before operating. Check that the anti-tip bracket is necessary for heat. Turn power on surface burners and oven. Do not operate range without anti-tip bracket installed and engaged. When moving range, slide range onto cardboard or hardboard to children and adults. Check that all parts and panels before servicing. Dry...
Warranty Information
Page 1
... covered by a Whirlpool designated service company. ACCESSORIES For accessories, you on how to use your major appliance for repairs. Service must be repaired in the home and only in a manner that have been removed, altered or cannot be borne by the customer. This warranty is reported to published user or operator instructions and/or installation instructions. 4. Cooktop Care Kit (ceramic glass models) (includes cleaner, protectant, scraper, and applicator pads) Order Part Number 31605 Cooktop...
... covered by a Whirlpool designated service company. ACCESSORIES For accessories, you on how to use your major appliance for repairs. Service must be repaired in the home and only in a manner that have been removed, altered or cannot be borne by the customer. This warranty is reported to published user or operator instructions and/or installation instructions. 4. Cooktop Care Kit (ceramic glass models) (includes cleaner, protectant, scraper, and applicator pads) Order Part Number 31605 Cooktop...


