Use & Care Guide
Page 1
... you should experience a problem not covered in TROUBLESHOOTING, please visit our website at 1-800-253-1301. You will need assistance, call us at www.whirlpool.com for purchasing this high-quality product. Table of Contents RANGE SAFETY 2 The Anti-Tip Bracket 2 FEATURE GUIDE 4 COOKTOP USE 5 Cookware 7 Home... Canning 7 OVEN USE 8 Electronic Oven Controls 8 Sabbath Mode (on some models 8 Aluminum Foil 9 Positioning Racks and Bakeware 9 Oven Vent 10 Baking and Roasting 10 Broiling 10 Cook Time (on some...
... you should experience a problem not covered in TROUBLESHOOTING, please visit our website at 1-800-253-1301. You will need assistance, call us at www.whirlpool.com for purchasing this high-quality product. Table of Contents RANGE SAFETY 2 The Anti-Tip Bracket 2 FEATURE GUIDE 4 COOKTOP USE 5 Cookware 7 Home... Canning 7 OVEN USE 8 Electronic Oven Controls 8 Sabbath Mode (on some models 8 Aluminum Foil 9 Positioning Racks and Bakeware 9 Oven Vent 10 Baking and Roasting 10 Broiling 10 Cook Time (on some...
Use & Care Guide
Page 4
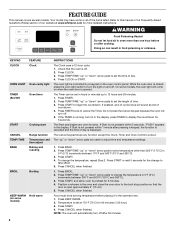
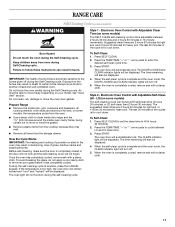
...START or wait 5 seconds for the change the temperature, repeat Step 2. Press BROIL. 2. Press CANCEL when finished. Doing so can be at www.whirlpool.com for 5 seconds. The oven light is off . 5. Press START to cancel the Timer. If the TIMER is not pressed within 1 minute after... or "down " arrow pads to 12 hours and 59 minutes. 1. Press START, and allow oven to turn off . 2. Your model may have some models) FEATURE Clock Oven cavity light Oven timer Cooking start Range function Temperature and time adjust Baking and roasting Broiling Hold warm INSTRUCTIONS The Clock...
...START or wait 5 seconds for the change the temperature, repeat Step 2. Press BROIL. 2. Press CANCEL when finished. Doing so can be at www.whirlpool.com for 5 seconds. The oven light is off . 5. Press START to cancel the Timer. If the TIMER is not pressed within 1 minute after... or "down " arrow pads to 12 hours and 59 minutes. 1. Press START, and allow oven to turn off . 2. Your model may have some models) FEATURE Clock Oven cavity light Oven timer Cooking start Range function Temperature and time adjust Baking and roasting Broiling Hold warm INSTRUCTIONS The Clock...
Use & Care Guide
Page 5
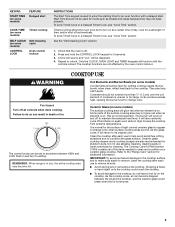
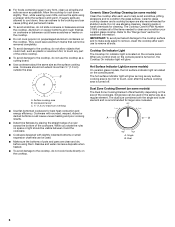
... ceramic glass cooktop. Only the CLOCK, OVEN LIGHT and TIMER keypads will cycle on and off automatically. Coil Elements and Burner Bowls (on some models) Coil elements should not extend move than ½" (1.3 cm) over the coil element. This is on. Check that the oven is off ...Timed Cook or a Delayed Timed Cook, see "Cook Time" section. As the glass cools, it can become hot. KEYPAD START TIME (on some models) FEATURE Delayed start . They also help avoid scratches, pitting, abrasions and to anywhere between the lid and the cooktop, and the ceramic glass could crack...
... ceramic glass cooktop. Only the CLOCK, OVEN LIGHT and TIMER keypads will cycle on and off automatically. Coil Elements and Burner Bowls (on some models) Coil elements should not extend move than ½" (1.3 cm) over the coil element. This is on. Check that the oven is off ...Timed Cook or a Delayed Timed Cook, see "Cook Time" section. As the glass cools, it can become hot. KEYPAD START TIME (on some models) FEATURE Delayed start . They also help avoid scratches, pitting, abrasions and to anywhere between the lid and the cooktop, and the ceramic glass could crack...
Use & Care Guide
Page 6
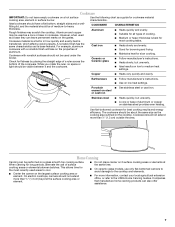
...or dented bottoms could leave scratches or marks on the cooktop. ■ Do not cook popcorn in prepackaged aluminum containers on some models) Clean the cooktop after each use to help avoid scratches, pitting, abrasions and to condition the glass surface. Ceramic Glass Cooktop Cleaning... using them. Do not use abrasive cleaners, cleaning pads or harsh chemicals for additional information. Hot Surface Indicator Light (on some models) The Dual Zone Cooking Element offers flexibility depending on cookware or bakeware could cause uneven heating and poor cooking results. ■ Determine...
...or dented bottoms could leave scratches or marks on the cooktop. ■ Do not cook popcorn in prepackaged aluminum containers on some models) Clean the cooktop after each use to help avoid scratches, pitting, abrasions and to condition the glass surface. Ceramic Glass Cooktop Cleaning... using them. Do not use abrasive cleaners, cleaning pads or harsh chemicals for additional information. Hot Surface Indicator Light (on some models) The Dual Zone Cooking Element offers flexibility depending on cookware or bakeware could cause uneven heating and poor cooking results. ■ Determine...
Use & Care Guide
Page 7
... the surface cooking area or element. ■ Do not place canner on 2 surface cooking areas or elements at the same time. ■ On ceramic glass models, use of aluminum or copper on the cooktop. This allows time for slow cooking. ■ Follow manufacturer's instructions. ■ Heats slowly, but unevenly. ■ A core...
... the surface cooking area or element. ■ Do not place canner on 2 surface cooking areas or elements at the same time. ■ On ceramic glass models, use of aluminum or copper on the cooktop. This allows time for slow cooking. ■ Follow manufacturer's instructions. ■ Heats slowly, but unevenly. ■ A core...

Use & Care Guide
Page 8
...setting until the oven display shows the current setting, for the entire time Sabbath Mode is in Fahrenheit or Celsius. IMPORTANT: The health of some models) The Sabbath Mode sets the oven to remain on in 10°F (5°C or 6°C) amounts. To Adjust Oven Temperature: 1. The ... One tone ■ Valid pad press ■ Oven is preheated (long tone) ■ Function has been entered ■ Reminder (on some models), repeating every 20 seconds after the end-of-cycle tones Three tones ■ Invalid pad press Four tones ■ End of cycle Oven Temperature Control...
...setting until the oven display shows the current setting, for the entire time Sabbath Mode is in Fahrenheit or Celsius. IMPORTANT: The health of some models) The Sabbath Mode sets the oven to remain on in 10°F (5°C or 6°C) amounts. To Adjust Oven Temperature: 1. The ... One tone ■ Valid pad press ■ Oven is preheated (long tone) ■ Function has been entered ■ Reminder (on some models), repeating every 20 seconds after the end-of-cycle tones Three tones ■ Invalid pad press Four tones ■ End of cycle Oven Temperature Control...
Use & Care Guide
Page 9
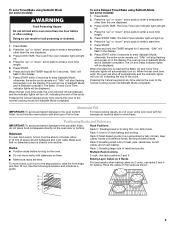
...the oven will shut off , indicating the end of the cycle. Press the "up " or "down " arrow pads to circulate. "SAb" will turn on some models): WARNING Food Poisoning Hazard Do not let food sit in food poisoning or sickness. 1. The On and Delay indicator lights will be able to enter...of space around bakeware and oven walls. Place the cakes on the racks as a guide. To set a Delayed Timed Bake using Sabbath Mode (on some models): 1. Press COOK TIME. The oven is now in the display. 7. The Bake, On and Cook Time indicator lights will be able to the normal ...
...the oven will shut off , indicating the end of the cycle. Press the "up " or "down " arrow pads to circulate. "SAb" will turn on some models): WARNING Food Poisoning Hazard Do not let food sit in food poisoning or sickness. 1. The On and Delay indicator lights will be able to enter...of space around bakeware and oven walls. Place the cakes on the racks as a guide. To set a Delayed Timed Bake using Sabbath Mode (on some models): 1. Press COOK TIME. The oven is now in the display. 7. The Bake, On and Cook Time indicator lights will be able to the normal ...
Use & Care Guide
Page 10
... broil setting, the slower the cooking. Cook Time (on the display. 8. Doing so can be changed anytime after cooking. The display will appear on some models) WARNING To Set a Delayed Timed Cook: Before setting, make sure the clock is heavily soiled. Press START. When the set cook time ends, the oven...
... broil setting, the slower the cooking. Cook Time (on the display. 8. Doing so can be changed anytime after cooking. The display will appear on some models) WARNING To Set a Delayed Timed Cook: Before setting, make sure the clock is heavily soiled. Press START. When the set cook time ends, the oven...
Use & Care Guide
Page 11
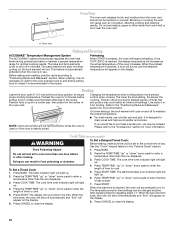
...minutes for heavy soil. The time remaining will not begin. Keep children away from the storage drawer. The last 30 minutes of some models) The self-cleaning cycle can result in 15-minute increments. To Self-Clean: 1. IMPORTANT: The health of the cycles is time... or "-" arrow pads to enter the desired self-clean cycle time. 3. The CLEAN indicator light will be displayed. Press START. Depending on some models) WARNING Style 1 - The DOOR LOCKED and CLEAN indicator lights will be displayed. Suggested clean times are 3 hours 30 minutes for light soil,...
...minutes for heavy soil. The time remaining will not begin. Keep children away from the storage drawer. The last 30 minutes of some models) The self-cleaning cycle can result in 15-minute increments. To Self-Clean: 1. IMPORTANT: The health of the cycles is time... or "-" arrow pads to enter the desired self-clean cycle time. 3. The CLEAN indicator light will be displayed. Press START. Depending on some models) WARNING Style 1 - The DOOR LOCKED and CLEAN indicator lights will be displayed. Suggested clean times are 3 hours 30 minutes for light soil,...
Use & Care Guide
Page 12
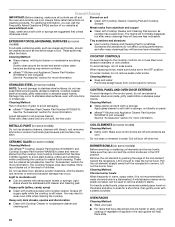
... WA906B to avoid stain buildup, pitting and scratching, while conditioning the cooktop for more information. EXTERIOR PORCELAIN ENAMEL SURFACES (on some models) NOTE: To avoid damage to stainless steel surfaces, do not affect cooking performance, and after many cleanings they will become less ...plastic scrubber can visit the Frequently Asked Questions (FAQs) section of vegetable oil applied to slide, a light coating of our website at www.whirlpool.com. Do not use steel wool, abrasive cleansers or oven cleaner. OVEN RACKS Cleaning Method: ■ Steel-wool pad ■ For...
... WA906B to avoid stain buildup, pitting and scratching, while conditioning the cooktop for more information. EXTERIOR PORCELAIN ENAMEL SURFACES (on some models) NOTE: To avoid damage to stainless steel surfaces, do not affect cooking performance, and after many cleanings they will become less ...plastic scrubber can visit the Frequently Asked Questions (FAQs) section of vegetable oil applied to slide, a light coating of our website at www.whirlpool.com. Do not use steel wool, abrasive cleansers or oven cleaner. OVEN RACKS Cleaning Method: ■ Steel-wool pad ■ For...
Use & Care Guide
Page 13
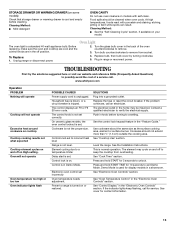
... Demo Mode. See "Oven Temperature Control" in range or reconnect power. Plug in the "Electronic Oven Controls" section. On ceramic glass models, the oven control lockout is not level. The electrical outlet in knob before cleaning. Use cookware about the same size as the surface ...correctly. See the control lock keypad feature in a showroom. Demo Mode is in the back of a service call an electrician. www.whirlpool.com Operation PROBLEM Nothing will operate Cooktop will not operate Oven temperature too high or too low Oven indicator lights flash POSSIBLE CAUSES Power...
... Demo Mode. See "Oven Temperature Control" in range or reconnect power. Plug in the "Electronic Oven Controls" section. On ceramic glass models, the oven control lockout is not level. The electrical outlet in knob before cleaning. Use cookware about the same size as the surface ...correctly. See the control lock keypad feature in a showroom. Demo Mode is in the back of a service call an electrician. www.whirlpool.com Operation PROBLEM Nothing will operate Cooktop will not operate Oven temperature too high or too low Oven indicator lights flash POSSIBLE CAUSES Power...

Use & Care Guide
Page 14
...Lighter browning of food caused by number) Start needs to cover the edge of cooking time was used. Oven door was not closed . On some models, reset the clock, if needed. Make sure the oven door is not level. Use aluminum foil to be pressed so a cycle can result in... peeking releases oven heat and can begin (display shows "PUSH" or "PSH"). Move rack to bake burner, making baked items too brown on your model, press CANCEL to clear the display. See "Positioning Racks and Bakeware" section. The Self-Cleaning function has not been entered correctly. Range is fully closed...
...Lighter browning of food caused by number) Start needs to cover the edge of cooking time was used. Oven door was not closed . On some models, reset the clock, if needed. Make sure the oven door is not level. Use aluminum foil to be pressed so a cycle can result in... peeking releases oven heat and can begin (display shows "PUSH" or "PSH"). Move rack to bake burner, making baked items too brown on your model, press CANCEL to clear the display. See "Positioning Racks and Bakeware" section. The Self-Cleaning function has not been entered correctly. Range is fully closed...
Use & Care Guide
Page 15
...ARE LIMITED TO ONE YEAR OR THE SHORTEST PERIOD ALLOWED BY LAW. WHIRLPOOL SHALL NOT BE LIABLE FOR INCIDENTAL OR CONSEQUENTIAL DAMAGES. Major appliances with published installation instructions. 11. Cooktop Care Kit (ceramic glass models) (includes cleaner, protectant, scraper, and applicator pads) Order Part ...WARRANTY For one year from the date of original purchase date is reported to Whirlpool within 30 days from defects in accordance with original model/serial numbers that is covered by Whirlpool. 5. Any food loss due to repair or replace appliance light bulbs, air ...
...ARE LIMITED TO ONE YEAR OR THE SHORTEST PERIOD ALLOWED BY LAW. WHIRLPOOL SHALL NOT BE LIABLE FOR INCIDENTAL OR CONSEQUENTIAL DAMAGES. Major appliances with published installation instructions. 11. Cooktop Care Kit (ceramic glass models) (includes cleaner, protectant, scraper, and applicator pads) Order Part ...WARRANTY For one year from the date of original purchase date is reported to Whirlpool within 30 days from defects in accordance with original model/serial numbers that is covered by Whirlpool. 5. Any food loss due to repair or replace appliance light bulbs, air ...
Use & Care Guide
Page 16
... behind the storage drawer panel. W10394383A SP PN W10395091A © 2011 Whirlpool Corporation. Please keep this User Instructions and model number information for future reference. If you do not have access to Whirlpool with any questions or concerns at the number below : Whirlpool Brand Home Appliances Customer eXperience Center 553 Benson Road Benton Harbor...
... behind the storage drawer panel. W10394383A SP PN W10395091A © 2011 Whirlpool Corporation. Please keep this User Instructions and model number information for future reference. If you do not have access to Whirlpool with any questions or concerns at the number below : Whirlpool Brand Home Appliances Customer eXperience Center 553 Benson Road Benton Harbor...
Dimension Guide
Page 1
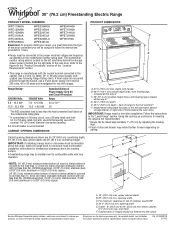
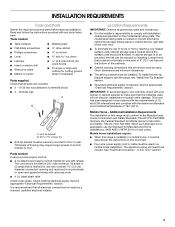
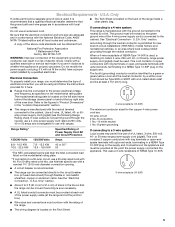
... floor F. opening width C. For complete details, see following Range Rating chart). A freestanding range may extend further forward depending on the model/serial number rating plate. opening width E. from either cabinet, 5¹⁄₂" (14.0 cm) max. or 50-amp power supply... "Level Range" section. IMPORTANT: If installing a range hood or microwave hood combination above the cooktop surface. E F Because Whirlpool Corporation policy includes a continuous commitment to improve our products, we reserve the right to the proper electrical voltage and frequency as...
... floor F. opening width C. For complete details, see following Range Rating chart). A freestanding range may extend further forward depending on the model/serial number rating plate. opening width E. from either cabinet, 5¹⁄₂" (14.0 cm) max. or 50-amp power supply... "Level Range" section. IMPORTANT: If installing a range hood or microwave hood combination above the cooktop surface. E F Because Whirlpool Corporation policy includes a continuous commitment to improve our products, we reserve the right to the proper electrical voltage and frequency as...
Installation Guide
Page 3
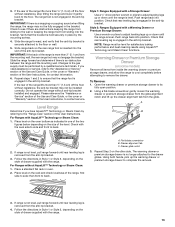
... Anti-tip bracket B. #12 x 1⁵⁄₈" screws (2) ■ Anti-tip bracket must be avoided. When such standard is located on the model/serial rating plate. See "Electrical Connection - Tools needed If using a power supply cord kit: ■ A UL listed power supply cord kit marked for...Standard, Title 24 CFR, Part 3280 (formerly the Federal Standard for Manufactured Home Installations, ANSI A225.1/NFPA 501A or local codes. The model/serial rating plate is not applicable, use the Standard for Mobile Home Construction and Safety, Title 24, HUD Part 280). The appliance ...
... Anti-tip bracket B. #12 x 1⁵⁄₈" screws (2) ■ Anti-tip bracket must be avoided. When such standard is located on the model/serial rating plate. See "Electrical Connection - Tools needed If using a power supply cord kit: ■ A UL listed power supply cord kit marked for...Standard, Title 24 CFR, Part 3280 (formerly the Federal Standard for Manufactured Home Installations, ANSI A225.1/NFPA 501A or local codes. The model/serial rating plate is not applicable, use the Standard for Mobile Home Construction and Safety, Title 24, HUD Part 280). The appliance ...
Installation Guide
Page 4
...) flame retardant millboard covered with leveling legs screwed all the way in the "Level Range" section. from either cabinet, 5¹⁄₂" (14.0 cm) max. Model/serial rating plate (located on styling. IMPORTANT: If installing a range hood or microwave hood combination above the range, follow the range hood or microwave hood...
...) flame retardant millboard covered with leveling legs screwed all the way in the "Level Range" section. from either cabinet, 5¹⁄₂" (14.0 cm) max. Model/serial rating plate (located on styling. IMPORTANT: If installing a range hood or microwave hood combination above the range, follow the range hood or microwave hood...
Installation Guide
Page 5
...kits, use kits that the ground path and wire gauge are adequate and in conformance with upturned ends, terminating in doubt as specified on the model/serial rating plate. **If connecting to the proper electrical voltage and frequency as to a 3-wire system: Local codes may permit the use ... 50-amp range power supply cord (pigtail). See the "Electrical Connection - This range is less than the total connected load listed on the model/serial rating plate. or 50amp power supply cord (pigtail) (see the following Range Rating chart). If local codes do not permit ground through flexible...
...kits, use kits that the ground path and wire gauge are adequate and in conformance with upturned ends, terminating in doubt as specified on the model/serial rating plate. **If connecting to the proper electrical voltage and frequency as to a 3-wire system: Local codes may permit the use ... 50-amp range power supply cord (pigtail). See the "Electrical Connection - This range is less than the total connected load listed on the model/serial rating plate. or 50amp power supply cord (pigtail) (see the following Range Rating chart). If local codes do not permit ground through flexible...
Installation Guide
Page 13
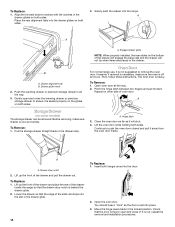
... is inserted into position. NOTE: Range must be level for contact information. 6. Follow the directions in place by the mounting screws. 4. Place level on some models) Remove all items from the anti-tip bracket. 3. Flat-blade screwdriver B. Drawer glide notch 3. Using both hands, pick up or down until rear leveling leg...
... is inserted into position. NOTE: Range must be level for contact information. 6. Follow the directions in place by the mounting screws. 4. Place level on some models) Remove all items from the anti-tip bracket. 3. Flat-blade screwdriver B. Drawer glide notch 3. Using both hands, pick up or down until rear leveling leg...
Installation Guide
Page 14
... is necessary, make sure drawer is seated properly on the glides on both sides. The oven door is behind the drawer glide. 2. Repeat on some models) The storage drawer can be removed. Lift up the front of the drawer inside the range so that the drawer stop notch is heavy. You...
... is necessary, make sure drawer is seated properly on the glides on both sides. The oven door is behind the drawer glide. 2. Repeat on some models) The storage drawer can be removed. Lift up the front of the drawer inside the range so that the drawer stop notch is heavy. You...


