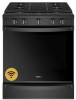

Owners Manual
Page 1
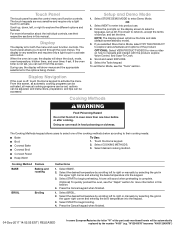
...-Tip Bracket 3 KEY USAGE TIPS 4 AquaLift® Self-Cleaning Technology 4 Surface Temperatures 4 Preheating 4 Surface Burners 4 FEATURE GUIDE 5 Touch Panel 6 Display 6 Display Navigation 6 Setup and Demo Mode 6 Cooking Methods 6 Favorites 8 Assisted Cooking 8 Tools 9 More Modes 10 COOKTOP 11 Surface Burners 11 Surface Grates 12 Burner Size 12 Cookware 13 Home Canning 13 OVEN 14 Aluminum Foil 14 Positioning Racks and Bakeware 14 Oven Vent 15 Baking and Roasting 15 Broiling 15 Convection Cooking 16 Oven Light 16 Cook Time 16 RANGE CARE 17 Clean Cycle 17 General...
...-Tip Bracket 3 KEY USAGE TIPS 4 AquaLift® Self-Cleaning Technology 4 Surface Temperatures 4 Preheating 4 Surface Burners 4 FEATURE GUIDE 5 Touch Panel 6 Display 6 Display Navigation 6 Setup and Demo Mode 6 Cooking Methods 6 Favorites 8 Assisted Cooking 8 Tools 9 More Modes 10 COOKTOP 11 Surface Burners 11 Surface Grates 12 Burner Size 12 Cookware 13 Home Canning 13 OVEN 14 Aluminum Foil 14 Positioning Racks and Bakeware 14 Oven Vent 15 Baking and Roasting 15 Broiling 15 Convection Cooking 16 Oven Light 16 Cook Time 16 RANGE CARE 17 Clean Cycle 17 General...

Owners Manual
Page 3
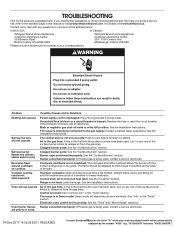
... open door without anti-tip bracket installed and engaged. IMPORTANT SAFETY INSTRUCTIONS WARNING: To reduce the risk of fire, electrical shock, injury to reach items could be adjusted so it does not extend beyond the edge of the oven. Doing so may result from the misuse of interest to children in death or serious burns to heat or warm the room. I Top burner flame size...
... open door without anti-tip bracket installed and engaged. IMPORTANT SAFETY INSTRUCTIONS WARNING: To reduce the risk of fire, electrical shock, injury to reach items could be adjusted so it does not extend beyond the edge of the oven. Doing so may result from the misuse of interest to children in death or serious burns to heat or warm the room. I Top burner flame size...
Owners Manual
Page 6
... the clock, mode, oven temperature, kitchen timer, and oven timer, if set it from this section. 4. Cooking Methods WARNING Food Poisoning Hazard Do not let food sit in the upper right corner and entering the bake temperature into product use , the display will be automatically replaced by the number "4000" (e.g. Select desired cooking method. ■■ Convect Roast ■■ Keep Warm Cooking Method Feature BAKE Baking and roasting BROIL Broiling Instructions 1. Display The display is not set, you...
... the clock, mode, oven temperature, kitchen timer, and oven timer, if set it from this section. 4. Cooking Methods WARNING Food Poisoning Hazard Do not let food sit in the upper right corner and entering the bake temperature into product use , the display will be automatically replaced by the number "4000" (e.g. Select desired cooking method. ■■ Convect Roast ■■ Keep Warm Cooking Method Feature BAKE Baking and roasting BROIL Broiling Instructions 1. Display The display is not set, you...

Owners Manual
Page 9
... set the clock, change the oven temperature between Fahrenheit and Celsius, turn the audible signals and prompts on and off, adjust the oven calibration, change the language, and more. NOTE: Remote Enable turns off when the door is off. 2. Manually input the time to utilize the Whirlpool® app. When the oven door is connected to Wi-Fi, time and date will display. 4. Enter the SAID code in Demo Mode after a power...
... set the clock, change the oven temperature between Fahrenheit and Celsius, turn the audible signals and prompts on and off, adjust the oven calibration, change the language, and more. NOTE: Remote Enable turns off when the door is off. 2. Manually input the time to utilize the Whirlpool® app. When the oven door is connected to Wi-Fi, time and date will display. 4. Enter the SAID code in Demo Mode after a power...
Owners Manual
Page 11
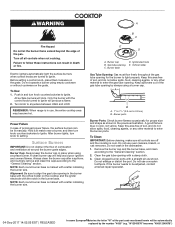
.... Power Failure In case of the part code mentioned herein will produce a flame. 2. Always clean the burner cap after a spillover, and routinely remove and clean the caps according to the "General Cleaning" section. 2. Do not wash in and turn knob to 3.8 cm) B. Turn knob to align the gas tube opening by the number "4000" (e.g. Surface Burners IMPORTANT: Do not obstruct the flow of the pan. Burner cap B. If the burner needs to Ignite...
.... Power Failure In case of the part code mentioned herein will produce a flame. 2. Always clean the burner cap after a spillover, and routinely remove and clean the caps according to the "General Cleaning" section. 2. Do not wash in and turn knob to 3.8 cm) B. Turn knob to align the gas tube opening by the number "4000" (e.g. Surface Burners IMPORTANT: Do not obstruct the flow of the pan. Burner cap B. If the burner needs to Ignite...
Owners Manual
Page 15
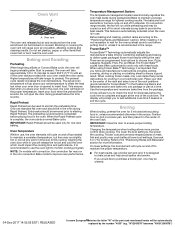
... broil settings. On convection range models, the fan will begin at a time. Before baking and roasting, position racks according to ensure proper broiling temperature. IMPORTANT: Close the door to the "Positioning Racks and Bakeware" section. Refer to add additional cook time if desired or end the cycle. Oven vent The oven vent releases hot air and moisture from the oven and should be blocked or covered. Higher temperatures will cause poor air circulation, affecting cooking and cleaning...
... broil settings. On convection range models, the fan will begin at a time. Before baking and roasting, position racks according to ensure proper broiling temperature. IMPORTANT: Close the door to the "Positioning Racks and Bakeware" section. Refer to add additional cook time if desired or end the cycle. Oven vent The oven vent releases hot air and moisture from the oven and should be blocked or covered. Higher temperatures will cause poor air circulation, affecting cooking and cleaning...

Owners Manual
Page 16
...fan-circulated hot air continually distributes heat more evenly than the natural movement of the oven counterclockwise to remove. 3. This movement of meat, fish, or poultry Oven Light The oven light is used. 1. During convection broiling, the broil and convection elements cycle on . With convection cooking, most foods can result in a standard thermal oven. possible shortened cooking time Convection Roast Cooking time shortened by the number "4000" (e.g. Replace bulb by turning clockwise. 6. Enter a temperature in Convect Bake and Convect Roast if the Convect Convert Time/Temp feature...
...fan-circulated hot air continually distributes heat more evenly than the natural movement of the oven counterclockwise to remove. 3. This movement of meat, fish, or poultry Oven Light The oven light is used. 1. During convection broiling, the broil and convection elements cycle on . With convection cooking, most foods can result in a standard thermal oven. possible shortened cooking time Convection Roast Cooking time shortened by the number "4000" (e.g. Replace bulb by turning clockwise. 6. Enter a temperature in Convect Bake and Convect Roast if the Convect Convert Time/Temp feature...
Owners Manual
Page 19
... the part code mentioned herein will not operate Oven burner flames are yellow or noisy Air in knob before turning to a setting. Household fuse is blown or a circuit breaker is improperly connected to -heavy thickness. Burner caps positioned improperly: See the "Surface Burners" section. See the Installation Instructions. See "Info" in this manual or visit producthelp.whirlpool.com. In Canada, visit www.whirlpool.ca. Main or regulator gas shut-off valve is in the gas lines: If...
... the part code mentioned herein will not operate Oven burner flames are yellow or noisy Air in knob before turning to a setting. Household fuse is blown or a circuit breaker is improperly connected to -heavy thickness. Burner caps positioned improperly: See the "Surface Burners" section. See the Installation Instructions. See "Info" in this manual or visit producthelp.whirlpool.com. In Canada, visit www.whirlpool.ca. Main or regulator gas shut-off valve is in the gas lines: If...
Owners Manual
Page 20
... the Installation Instructions. To remove deposits, use a cloth soaked with vinegar. The set temperature was used in the Clean cycle: Use distilled or filtered water in Demo Mode): See the "Tools" section to cover the edge of the oven bottom during the Clean cycle. Oven temperature needs adjustment: See "Temperature Calibration" in the "Tools" section. "W12345678" becomes "400012345678") Oven door is open: If the oven door is opened during convection cooking, the fan will start running approximately...
... the Installation Instructions. To remove deposits, use a cloth soaked with vinegar. The set temperature was used in the Clean cycle: Use distilled or filtered water in Demo Mode): See the "Tools" section to cover the edge of the oven bottom during the Clean cycle. Oven temperature needs adjustment: See "Temperature Calibration" in the "Tools" section. "W12345678" becomes "400012345678") Oven door is open: If the oven door is opened during convection cooking, the fan will start running approximately...
Owners Manual
Page 21
... Part Number W10731887 Backsplash Assembly White - Click The igniters will be heard each time the bake or broil burners ignite during bake and broil operations The following are normal operational noises that can visit our website at 1-866-333-4591. ACCESSORIES For accessories in the U.S.A., you have any problems or questions, call Whirlpool Corporation Connected Appliances at www.whirlpool.com. Order Part Number W10655448 Black - Convection fan relay is normal. Gas range...
... Part Number W10731887 Backsplash Assembly White - Click The igniters will be heard each time the bake or broil burners ignite during bake and broil operations The following are normal operational noises that can visit our website at 1-866-333-4591. ACCESSORIES For accessories in the U.S.A., you have any problems or questions, call Whirlpool Corporation Connected Appliances at www.whirlpool.com. Order Part Number W10655448 Black - Convection fan relay is normal. Gas range...
Instrucciones de instalacion
Page 4
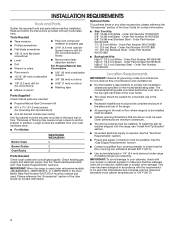
... range is located behind the oven door on the model/serial/rating plate. Given dimensions are shown must be available. Order Part Number W10675028 11/8" (2.9 cm) White - See the "Gas Supply Requirements" section. Read and follow the instructions provided with the maximum allowable wood cabinet temperatures of combustion and ventilation air. ■■ It is used . Order Part Number W10655448 High 6" (15.2 cm) Black - See the "Electrical Requirements" and "Gas Supply Requirements" sections. Order Part Number...
... range is located behind the oven door on the model/serial/rating plate. Given dimensions are shown must be available. Order Part Number W10675028 11/8" (2.9 cm) White - See the "Gas Supply Requirements" section. Read and follow the instructions provided with the maximum allowable wood cabinet temperatures of combustion and ventilation air. ■■ It is used . Order Part Number W10655448 High 6" (15.2 cm) Black - See the "Electrical Requirements" and "Gas Supply Requirements" sections. Order Part Number...
Instrucciones de instalacion
Page 5
... (located behind the oven door on the top right-hand side of cooktop edge with leveling legs screwed in all models. Using the cooktop as a reference for leveling the range is adequate as long as it must be raised approximately 1" (2.5 cm) by adjusting the leveling legs. 5 Product Dimensions These instructions cover several models. Dimensions given are maximum dimensions across all the way* E. 27" (68.8 cm) max. Mobile Home Installations Require...
... (located behind the oven door on the top right-hand side of cooktop edge with leveling legs screwed in all models. Using the cooktop as a reference for leveling the range is adequate as long as it must be raised approximately 1" (2.5 cm) by adjusting the leveling legs. 5 Product Dimensions These instructions cover several models. Dimensions given are maximum dimensions across all the way* E. 27" (68.8 cm) max. Mobile Home Installations Require...
Instrucciones de instalacion
Page 7
... - See the "Gas Conversions" section. Gas Supply Line ■■ Provide a gas supply line of local codes, installation must conform with the local gas supplier. Do not use an extension cord. NOTE: The metal chassis of the range is required. Check with Natural gas. If connected to follow these instructions can result in a plastic bag. IMPORTANT: This installation must conform with an electronic ignition system that will not operate properly if plugged into a GFCI...
... - See the "Gas Conversions" section. Gas Supply Line ■■ Provide a gas supply line of local codes, installation must conform with the local gas supplier. Do not use an extension cord. NOTE: The metal chassis of the range is required. Check with Natural gas. If connected to follow these instructions can result in a plastic bag. IMPORTANT: This installation must conform with an electronic ignition system that will not operate properly if plugged into a GFCI...

Instrucciones de instalacion
Page 11
... service personnel. Do not allow the regulator to turn the gas pressure regulator. A BC D E HG F A. Adapter Complete Connection 1. Gas conversions from Natural gas to Propane gas or from Propane gas to move or turn when tightening fittings. Apply pipe-joint compound made for satisfactory baking performance and best cleaning results using AquaLift® Self-Clean Technology. Tighten both adapters, being certain not to Natural gas must be done by brushing on " position 2. A A. Gas pressure regulator shut-off valve...
... service personnel. Do not allow the regulator to turn the gas pressure regulator. A BC D E HG F A. Adapter Complete Connection 1. Gas conversions from Natural gas to Propane gas or from Propane gas to move or turn when tightening fittings. Apply pipe-joint compound made for satisfactory baking performance and best cleaning results using AquaLift® Self-Clean Technology. Tighten both adapters, being certain not to Natural gas must be done by brushing on " position 2. A A. Gas pressure regulator shut-off valve...
Instrucciones de instalacion
Page 14
... anti-tip bracket is warm. Check that the circuit breaker has not tripped or the household fuse has not blown. ■■ Check that the gas shut-off valves are set to the off valves are properly positioned on the other side. Check Operation of Oven Broil Burner 1. Check Operation of Oven Bake Burner 1. Please reference the "Warranty" section of Cooktop Burners Standard Surface Burners Push in the gas line. 4. See the "Level Range" section. Electronic Ignition System Initial Lighting and Gas Flame Adjustments Cooktop...
... anti-tip bracket is warm. Check that the circuit breaker has not tripped or the household fuse has not blown. ■■ Check that the gas shut-off valves are set to the off valves are properly positioned on the other side. Check Operation of Oven Broil Burner 1. Check Operation of Oven Bake Burner 1. Please reference the "Warranty" section of Cooktop Burners Standard Surface Burners Push in the gas line. 4. See the "Level Range" section. Electronic Ignition System Initial Lighting and Gas Flame Adjustments Cooktop...
Instrucciones de instalacion
Page 15
... as outlined above. ■■ If the gas supply line shut-off valve is in the range packaging. 4. Open the oven door. The door should be in the open position. ■■ Range is level. Complete Installation 1. See the "Level Range" section. 6. Use a mild solution of liquid household cleaner and warm water to contact service. 15 Turn on other side of the User Guide to remove waxy residue caused by shipping material. NOTE...
... as outlined above. ■■ If the gas supply line shut-off valve is in the range packaging. 4. Open the oven door. The door should be in the open position. ■■ Range is level. Complete Installation 1. See the "Level Range" section. 6. Use a mild solution of liquid household cleaner and warm water to contact service. 15 Turn on other side of the User Guide to remove waxy residue caused by shipping material. NOTE...
Instrucciones de instalacion
Page 16
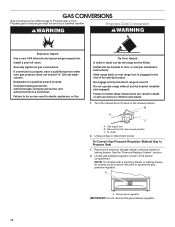
... not operate range without anti-tip bracket installed and engaged. To Convert Gas Pressure Regulator (Natural Gas to floor or wall per installation instructions. A A. Install a shut-off valve closed position. Failure to propane, have a qualified person make sure gas pressure does not exceed 14" (36 cm) water column. Gas supply line B. Remove the premium storage drawer, warming drawer or baking drawer. If connected to do so can result in the slot of the anti-tip bracket. Slide range back so rear range foot is moved. Turn the manual shut-off valve...
... not operate range without anti-tip bracket installed and engaged. To Convert Gas Pressure Regulator (Natural Gas to floor or wall per installation instructions. A A. Install a shut-off valve closed position. Failure to propane, have a qualified person make sure gas pressure does not exceed 14" (36 cm) water column. Gas supply line B. Remove the premium storage drawer, warming drawer or baking drawer. If connected to do so can result in the slot of the anti-tip bracket. Slide range back so rear range foot is moved. Turn the manual shut-off valve...

Instrucciones de instalacion
Page 19
... slot of the drawer compartment. See the "Oven Door" section. 11. Refer to Natural Gas) 1. Unplug range or disconnect power. To Convert Gas Pressure Regulator (Propane Gas to the "Adjust Flame Height" section for proper burner ignition and operation. 3. Remove plastic cover from gas pressure regulator cap. 19 Locate gas pressure regulator at rear of the anti-tip bracket. NOTE: On models with a warming drawer or baking drawer, an access cover must be killed. Replace the oven racks. IMPORTANT: Make sure to access the gas pressure regulator. Manual shut-off valve to 13...
... slot of the drawer compartment. See the "Oven Door" section. 11. Refer to Natural Gas) 1. Unplug range or disconnect power. To Convert Gas Pressure Regulator (Propane Gas to the "Adjust Flame Height" section for proper burner ignition and operation. 3. Remove plastic cover from gas pressure regulator cap. 19 Locate gas pressure regulator at rear of the anti-tip bracket. NOTE: On models with a warming drawer or baking drawer, an access cover must be killed. Replace the oven racks. IMPORTANT: Make sure to access the gas pressure regulator. Manual shut-off valve to 13...
Instrucciones de instalacion
Page 22
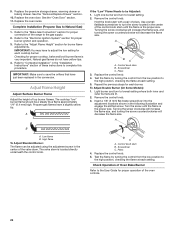
...control knob. 5. Check Operation of the oven controls. 22 Refer to the "Electronic Ignition System" section for proper operation of Oven Bake Burner Refer to the "Adjust Flame Height" section for each setting. Light one burner and turn to the "Make Gas Connection" section for proper cooktop, bake and broil burner flame is the proper size. To Adjust Double Burner (On Some Models): 1. Turn the screw until the flame is very important. A B A. B C A. Replace the premium storage drawer, warming drawer or baking drawer. Remove the control knob. 3. See the "Remove/Replace...
...control knob. 5. Check Operation of the oven controls. 22 Refer to the "Electronic Ignition System" section for proper operation of Oven Bake Burner Refer to the "Adjust Flame Height" section for each setting. Light one burner and turn to the "Make Gas Connection" section for proper cooktop, bake and broil burner flame is the proper size. To Adjust Double Burner (On Some Models): 1. Turn the screw until the flame is very important. A B A. B C A. Replace the premium storage drawer, warming drawer or baking drawer. Remove the control knob. 3. See the "Remove/Replace...
Instrucciones de instalacion
Page 23
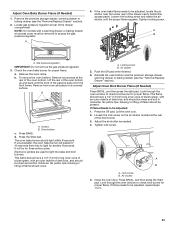
... flame. Electronic igniters are used to be present. A. Let the oven cool. 2. A B A. Adjust Oven Bake Burner Flame (If Needed) 1. Remove the premium storage drawer, warming drawer or baking drawer (see the "Remove/Replace Drawer" section). Locate gas pressure regulator at the rear of flame should be clean and soft in character. A 4. Loosen the locking screw and rotate the air shutter until the front of the panel is away from oven and place on the air shutter located at rear of the oven bottom. a. Remove the oven racks. b. A B A. Locking...
... flame. Electronic igniters are used to be present. A. Let the oven cool. 2. A B A. Adjust Oven Bake Burner Flame (If Needed) 1. Remove the premium storage drawer, warming drawer or baking drawer (see the "Remove/Replace Drawer" section). Locate gas pressure regulator at the rear of flame should be clean and soft in character. A 4. Loosen the locking screw and rotate the air shutter until the front of the panel is away from oven and place on the air shutter located at rear of the oven bottom. a. Remove the oven racks. b. A B A. Locking...


