

Installation Instructions
Page 2
...) ■ Level ■ Wire stripper (direct wire installations) ■ Vent clamps ■ Caulking gun and compound (for purchase from the dealer from dryer drum. Rubber washer Remove parts package from whom you purchased your Use and Care Guide. 2 Check that all parts are included. Leveling legs (4) B. Mobile home installations require metal...
...) ■ Level ■ Wire stripper (direct wire installations) ■ Vent clamps ■ Caulking gun and compound (for purchase from the dealer from dryer drum. Rubber washer Remove parts package from whom you purchased your Use and Care Guide. 2 Check that all parts are included. Leveling legs (4) B. Mobile home installations require metal...

Installation Instructions
Page 3
..., or do not permit, installation of the dryer in longer drying times. If using a pedestal, you are using the "Y" connector provided. Do not operate your washer using a power supply cord, a grounded electrical outlet located within 4 ft (1.2 m) of the dryer, and water pressure of 20-100 psi (137.9-689.6 kPa). This can...
..., or do not permit, installation of the dryer in longer drying times. If using a pedestal, you are using the "Y" connector provided. Do not operate your washer using a power supply cord, a grounded electrical outlet located within 4 ft (1.2 m) of the dryer, and water pressure of 20-100 psi (137.9-689.6 kPa). This can...

Installation Instructions
Page 5
... for cabinet installation NOTE: Some models are not recommended for cabinet installation. ■ For cabinet installation, with a door, minimum ventilation openings in conformance with stacked washer and dryer The dimensions shown are for the recommended spacing. 48 in.2 * (310 cm2) 3"* (76 mm) 24 in mobile homes to the Manufactured Home Construction...
... for cabinet installation NOTE: Some models are not recommended for cabinet installation. ■ For cabinet installation, with a door, minimum ventilation openings in conformance with stacked washer and dryer The dimensions shown are for the recommended spacing. 48 in.2 * (310 cm2) 3"* (76 mm) 24 in mobile homes to the Manufactured Home Construction...
Installation Instructions
Page 14
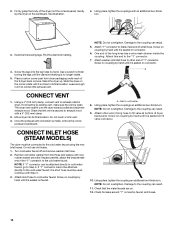
... to finish turning the legs until it is seated on the cardboard. NOTE: Do not overtighten. Damage to its final location. Remove old rubber washer from dryer packaging under each of the long hose has a wire mesh strainer inside the exhaust hood. NOTE: Do not overtighten. Check that the...Attach this end to exhaust outlet in dryer. Screw on coupling by hand until it is made, remove the corner posts and cardboard. A. Attach washer cold inlet hose to other end of long hose to fill valve at bottom of the "Y" connector to brass male end of the dryer (not...
... to finish turning the legs until it is seated on the cardboard. NOTE: Do not overtighten. Damage to its final location. Remove old rubber washer from dryer packaging under each of the long hose has a wire mesh strainer inside the exhaust hood. NOTE: Do not overtighten. Check that the...Attach this end to exhaust outlet in dryer. Screw on coupling by hand until it is made, remove the corner posts and cardboard. A. Attach washer cold inlet hose to other end of long hose to fill valve at bottom of the "Y" connector to brass male end of the dryer (not...
Owners Manual
Page 5
..., the following installation, see the QUICK START GUIDE on it (even after washing). Do not dry anything flammable on the next page. 5 Fire Hazard No washer can result in death, explosion, or fire. Do not dry anything that has ever had anything that has ever had any type of oil on...
..., the following installation, see the QUICK START GUIDE on it (even after washing). Do not dry anything flammable on the next page. 5 Fire Hazard No washer can result in death, explosion, or fire. Do not dry anything that has ever had anything that has ever had any type of oil on...


