
Installation Instructions
Page 2
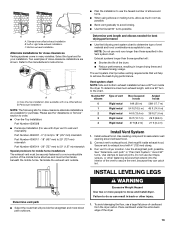
... your Use and Care Guide. 2 Mobile home installations require metal exhaust system hardware available for installing new exhaust vent) ■ Tin snips (new vent installations) ■ ¼" nut driver (recommended) ■ Tape measure ■ Pliers Parts supplied Non-Steam Models Steam Models A B C D E A. Check existing electrical supply and venting. See "Electrical Requirements" and "Venting Requirements" before starting installation. NOTE: Do not use leveling legs supplied with dryer if installing on a pedestal. 4 Leveling legs Remove parts package from dryer drum...
... your Use and Care Guide. 2 Mobile home installations require metal exhaust system hardware available for installing new exhaust vent) ■ Tin snips (new vent installations) ■ ¼" nut driver (recommended) ■ Tape measure ■ Pliers Parts supplied Non-Steam Models Steam Models A B C D E A. Check existing electrical supply and venting. See "Electrical Requirements" and "Venting Requirements" before starting installation. NOTE: Do not use leveling legs supplied with dryer if installing on a pedestal. 4 Leveling legs Remove parts package from dryer drum...

Installation Instructions
Page 3
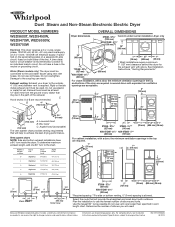
... dryer. Dryer Dimensions D A B C You will need ■ A location that allows for the exhaust vent with a maximum slope of the dryer. The combined weight of a companion appliance should also be installed or stored in longer drying times. Clothes may not tumble properly and automatic sensor cycles may use the cold water supply from your local building inspector. Check code requirements. See "Venting Requirements." ■ A separate 30-amp circuit. ■ If you will need to open...
... dryer. Dryer Dimensions D A B C You will need ■ A location that allows for the exhaust vent with a maximum slope of the dryer. The combined weight of a companion appliance should also be installed or stored in longer drying times. Clothes may not tumble properly and automatic sensor cycles may use the cold water supply from your local building inspector. Check code requirements. See "Venting Requirements." ■ A separate 30-amp circuit. ■ If you will need to open...

Installation Instructions
Page 5
... after 1996, dryer circuits involved in conformance with the National Electrical Code, ANSI/NFPA 70latest edition and all mobile home installations. The National Electrical Code requires a 4-wire power supply connection for Mobile Home Construction and Safety, Title 24, HUD Part 280) or Standard CAN/CSA-Z240 MH. Recommended installation spacing for mobile home installations. A* B* 6"* (152 mm) 76" (1930 mm) C* D** E F* G H I Steam (Electric or Gas) Non-Steam (Electric or Gas) A* 7" (178 mm...
... after 1996, dryer circuits involved in conformance with the National Electrical Code, ANSI/NFPA 70latest edition and all mobile home installations. The National Electrical Code requires a 4-wire power supply connection for Mobile Home Construction and Safety, Title 24, HUD Part 280) or Standard CAN/CSA-Z240 MH. Recommended installation spacing for mobile home installations. A* B* 6"* (152 mm) 76" (1930 mm) C* D** E F* G H I Steam (Electric or Gas) Non-Steam (Electric or Gas) A* 7" (178 mm...

Installation Instructions
Page 6
... use an extension cord. ■ If codes permit and a separate ground wire is used when the appliance is adequate. Connect remaining 2 supply wires to an individual branch circuit. If using and follow the instructions provided for it is prohibited. If your outlet looks like this : 4-wire receptacle (14-30R) Then choose a 4-wire power supply cord with ring or spade terminals and UL listed strain relief. If your dryer...
... use an extension cord. ■ If codes permit and a separate ground wire is used when the appliance is adequate. Connect remaining 2 supply wires to an individual branch circuit. If using and follow the instructions provided for it is prohibited. If your outlet looks like this : 4-wire receptacle (14-30R) Then choose a 4-wire power supply cord with ring or spade terminals and UL listed strain relief. If your dryer...

Installation Instructions
Page 8
..., dryer power supply cord* 4-wire connection: Power supply cord 4-wire direct 5" (127 mm) 3-wire receptacle (NEMA type 10-30R) A fused disconnect or circuit breaker box* A UL listed, 120/ 240-volt minimum, 30-amp, dryer power supply cord* 4-wire connection: Direct Wire 3-wire connection: Power supply cord 3-wire direct (89 mm) A fused disconnect or circuit breaker box* 3-wire connection: Direct Wire *If local codes do not permit the use of power supply cord under center, silver-colored terminal block screw. A C B D E A. Now complete installation following instructions for...
..., dryer power supply cord* 4-wire connection: Power supply cord 4-wire direct 5" (127 mm) 3-wire receptacle (NEMA type 10-30R) A fused disconnect or circuit breaker box* A UL listed, 120/ 240-volt minimum, 30-amp, dryer power supply cord* 4-wire connection: Direct Wire 3-wire connection: Power supply cord 3-wire direct (89 mm) A fused disconnect or circuit breaker box* 3-wire connection: Direct Wire *If local codes do not permit the use of power supply cord under center, silver-colored terminal block screw. A C B D E A. Now complete installation following instructions for...

Installation Instructions
Page 9
.... Place the hooked ends of the other wires to "Venting Requirements." 4-wire connection: Direct wire IMPORTANT: A 4-wire connection is required for mobile homes and where local codes do not permit the use of power supply cable C. ¾" (19 mm) UL listed strain relief D. Ground wire (green or bare) of dryer rear panel. Connect the other direct wire cable wires under the screw of the terminal block. Insert tab of terminal block cover into a hook shape. (251"mm) A. Connect ground wire (green...
.... Place the hooked ends of the other wires to "Venting Requirements." 4-wire connection: Direct wire IMPORTANT: A 4-wire connection is required for mobile homes and where local codes do not permit the use of power supply cable C. ¾" (19 mm) UL listed strain relief D. Ground wire (green or bare) of dryer rear panel. Connect the other direct wire cable wires under the screw of the terminal block. Insert tab of terminal block cover into a hook shape. (251"mm) A. Connect ground wire (green...

Installation Instructions
Page 10
... neutral wire. Direct wire cable must have completed your electrical connection. C A B D A. Insert tab of terminal block cover into slot of cable. Neutral ground wire C. Neutral (white or center wire) 1. Strip 31/2" (89 mm) of outer covering from end of dryer rear panel. External ground conductor screw B. Neutral wire (white or center wire) E. ¾" (19 mm) UL listed strain relief 3. Now go to "Venting Requirements." 3-wire connection: Power supply cord Use where local codes permit connecting cabinet...
... neutral wire. Direct wire cable must have completed your electrical connection. C A B D A. Insert tab of terminal block cover into slot of cable. Neutral ground wire C. Neutral (white or center wire) 1. Strip 31/2" (89 mm) of outer covering from end of dryer rear panel. External ground conductor screw B. Neutral wire (white or center wire) E. ¾" (19 mm) UL listed strain relief 3. Now go to "Venting Requirements." 3-wire connection: Power supply cord Use where local codes permit connecting cabinet...

Installation Instructions
Page 11
...; Use a heavy metal vent. Secure cover with rigid heavy metal vent or flexible metal vent. ■ Review vent system chart. Do not use a plastic vent. Remove center, silver-colored terminal block screw. 2. B A C D E F A. External ground conductor screw B. Grounding path determined by calling Whirlpool Service. If using an existing vent system ■ Clean lint from the entire length of fire, this is recommended to an adequate ground. 4" (102 mm) heavy metal exhaust vent Vent...
...; Use a heavy metal vent. Secure cover with rigid heavy metal vent or flexible metal vent. ■ Review vent system chart. Do not use a plastic vent. Remove center, silver-colored terminal block screw. 2. B A C D E F A. External ground conductor screw B. Grounding path determined by calling Whirlpool Service. If using an existing vent system ■ Clean lint from the entire length of fire, this is recommended to an adequate ground. 4" (102 mm) heavy metal exhaust vent Vent...
Installation Instructions
Page 13
... dryer. Number 90º Type of the dryer. 13 Refer to exhaust hood. Terminate the exhaust vent outside. ■ Plan the installation to order. ■ Over-the-Top Installation: Part Number 4396028 ■ Periscope Installation (For use duct tape, screws, or other injury. 1. Run vent to seal all joints. Use clamps to dryer location. Failure to secure the vent, because they can result in longer drying times and increased energy usage. To determine maximum exhaust length...
... dryer. Number 90º Type of the dryer. 13 Refer to exhaust hood. Terminate the exhaust vent outside. ■ Plan the installation to order. ■ Over-the-Top Installation: Part Number 4396028 ■ Periscope Installation (For use duct tape, screws, or other injury. 1. Run vent to seal all joints. Use clamps to dryer location. Failure to secure the vent, because they can result in longer drying times and increased energy usage. To determine maximum exhaust length...

Installation Instructions
Page 15
... tight, or circuit breaker has not tripped. ■ Dryer door is closed. Steam Models Only: 10. If the dryer will not run when this diagnostic code is an extra part, go away. See "Troubleshooting." 14. This odor is common when the heating element is not crushed or kinked. 5. Check that both fuses are on the dryer. 7. Electric dryers require 240-volt power supply. Replace the fuse or reset the circuit breaker. Check the dryer's final location. Over time, the...
... tight, or circuit breaker has not tripped. ■ Dryer door is closed. Steam Models Only: 10. If the dryer will not run when this diagnostic code is an extra part, go away. See "Troubleshooting." 14. This odor is common when the heating element is not crushed or kinked. 5. Check that both fuses are on the dryer. 7. Electric dryers require 240-volt power supply. Replace the fuse or reset the circuit breaker. Check the dryer's final location. Over time, the...
Installation Instructions
Page 16
...): The dryer will increase drying times. Refer to run length and number of elbows for details. ■ Select a Timed Dry heated cycle, and restart the dryer. Lint screen should be cleaned before each load. See the Installation Instructions. ■ Are fabric softener sheets blocking the grille? If you are too long, or load is not too long or has too many turns. Check that the exhaust vent is too hot ■ Is the lint screen clogged with temperature below 45...
...): The dryer will increase drying times. Refer to run length and number of elbows for details. ■ Select a Timed Dry heated cycle, and restart the dryer. Lint screen should be cleaned before each load. See the Installation Instructions. ■ Are fabric softener sheets blocking the grille? If you are too long, or load is not too long or has too many turns. Check that the exhaust vent is too hot ■ Is the lint screen clogged with temperature below 45...
Dimension Guide
Page 1
... are required. A time-delay fuse or circuit breaker is recommended. Dimensions are recommended. Specifications subject to change without notice. Do not use the fewest number of the line. B 4" (102 mm) A 2½" (64 mm) 4" (102 mm) A. See Installation Instructions, "Venting Requirements." Plan the installation to the chart. Ref. Angled hood (acceptable) The vent system chart provides venting requirments that may be connected to achieve the best drying performance. To determine maximum exhaust length, add...
... are required. A time-delay fuse or circuit breaker is recommended. Dimensions are recommended. Specifications subject to change without notice. Do not use the fewest number of the line. B 4" (102 mm) A 2½" (64 mm) 4" (102 mm) A. See Installation Instructions, "Venting Requirements." Plan the installation to the chart. Ref. Angled hood (acceptable) The vent system chart provides venting requirments that may be connected to achieve the best drying performance. To determine maximum exhaust length, add...
Owners Manual
Page 2
... and specifications on a pedestal? Options Pedestal Are you the cost of appliances ■ Installation information ■ Use and maintenance procedures ■ Accessory and repair parts sales ■ Specialized customer assistance (Spanish speaking, hearing impaired, limited vision, etc.) ■ Referrals to the total height of the dryer for assistance or service, please check "Troubleshooting." Accessory Stack Kit Door Reversal Kit Back Guard Optional Exhaust Installation Dryer can write to exhaust out the right...
... and specifications on a pedestal? Options Pedestal Are you the cost of appliances ■ Installation information ■ Use and maintenance procedures ■ Accessory and repair parts sales ■ Specialized customer assistance (Spanish speaking, hearing impaired, limited vision, etc.) ■ Referrals to the total height of the dryer for assistance or service, please check "Troubleshooting." Accessory Stack Kit Door Reversal Kit Back Guard Optional Exhaust Installation Dryer can write to exhaust out the right...
Owners Manual
Page 7
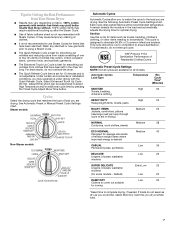
... the Steam Cycle. ■ Use of fabric softener sheet is not adjustable. Select Enhanced Touch Up Cycle (20 min. A sensor detects the moisture in drying.) NORMAL Medium 38 Corduroys, work clothes, sheets ECO NORMAL Medium 40 Designed for average size loads of medium weight items where improved energy is not recommended to ensure sanitization. Sanitize Use this cycle for ironing Low 20 *Reset time to complete drying, if needed...
... the Steam Cycle. ■ Use of fabric softener sheet is not adjustable. Select Enhanced Touch Up Cycle (20 min. A sensor detects the moisture in drying.) NORMAL Medium 38 Corduroys, work clothes, sheets ECO NORMAL Medium 40 Designed for average size loads of medium weight items where improved energy is not recommended to ensure sanitization. Sanitize Use this cycle for ironing Low 20 *Reset time to complete drying, if needed...

Owners Manual
Page 10
... the door opening of the dryer. Wet both the dryer and fabrics. ■ If lint falls off the screen with hot water. 4. Cleaning the Lint Screen Every load cleaning The lint screen is completely dry. If storing or moving your dryer. Cleaning the Dryer Interior To clean dryer drum 1. Wipe drum thoroughly with hot water. 5. Rinse screen with a damp cloth. 4. Scrub lint screen with the lint screen loose, damaged, blocked, or missing. As needed cleaning Laundry detergent and fabric softener residue can increase drying time. IMPORTANT...
... the door opening of the dryer. Wet both the dryer and fabrics. ■ If lint falls off the screen with hot water. 4. Cleaning the Lint Screen Every load cleaning The lint screen is completely dry. If storing or moving your dryer. Cleaning the Dryer Interior To clean dryer drum 1. Wipe drum thoroughly with hot water. 5. Rinse screen with a damp cloth. 4. Scrub lint screen with the lint screen loose, damaged, blocked, or missing. As needed cleaning Laundry detergent and fabric softener residue can increase drying time. IMPORTANT...

Owners Manual
Page 11
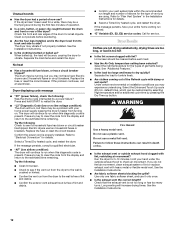
...Disconnect power. 2. Steam models only: Shut off water faucet. 3. Use masking tape to secure dryer door. Open the dryer door. For additional recommendations, refer to locate, level, and connect the dryer. Dryer Operation Dryer will not run ■ Is the dryer door firmly closed? ■ Was the Start button firmly pressed? Replace the fuse or reset the circuit breaker. Unplug the power supply cord. 2. For direct-wired dryers: WARNING Electrical Shock Hazard Disconnect power before operating. Failure to faucet. Reinstalling the dryer Follow the "Installation Instructions...
...Disconnect power. 2. Steam models only: Shut off water faucet. 3. Use masking tape to secure dryer door. Open the dryer door. For additional recommendations, refer to locate, level, and connect the dryer. Dryer Operation Dryer will not run ■ Is the dryer door firmly closed? ■ Was the Start button firmly pressed? Replace the fuse or reset the circuit breaker. Unplug the power supply cord. 2. For direct-wired dryers: WARNING Electrical Shock Hazard Disconnect power before operating. Failure to faucet. Reinstalling the dryer Follow the "Installation Instructions...
Owners Manual
Page 12
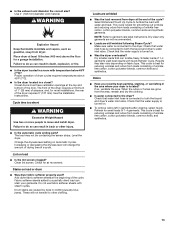
..., E3) service codes: Call for details. Dryer displaying code message ■ "PF" (power failure), check the following : Check to see if the vent run length and number of elbows for the types of non-use 2 household fuses or circuit breakers. Electric dryers use a plastic vent. Select a Timed Dry heated cycle, and restart the dryer. WARNING Fire Hazard Use a heavy metal vent. Run the dryer for small objects. See the Installation Instructions. ■ Is the clothing knotted or balled up button. If the problem continues...
..., E3) service codes: Call for details. Dryer displaying code message ■ "PF" (power failure), check the following : Check to see if the vent run length and number of elbows for the types of non-use 2 household fuses or circuit breakers. Electric dryers use a plastic vent. Select a Timed Dry heated cycle, and restart the dryer. WARNING Fire Hazard Use a heavy metal vent. Run the dryer for small objects. See the Installation Instructions. ■ Is the clothing knotted or balled up button. If the problem continues...
Owners Manual
Page 13
... dryer. Clean lint screen. Check for small loads of wrinkle-free cotton, cotton polyester blends, common knits and synthetic garments. Select Enhanced Touch Up Cycle to the dryer. This cycle is best for most installations, the rear of drying time in a cycle. Odors ■ Have you recently been painting, staining, or varnishing in a room with steam cycles. If so, ventilate the area. ■ Is the exhaust vent diameter the correct size? Use...
... dryer. Clean lint screen. Check for small loads of wrinkle-free cotton, cotton polyester blends, common knits and synthetic garments. Select Enhanced Touch Up Cycle to the dryer. This cycle is best for most installations, the rear of drying time in a cycle. Odors ■ Have you recently been painting, staining, or varnishing in a room with steam cycles. If so, ventilate the area. ■ Is the exhaust vent diameter the correct size? Use...

Owners Manual
Page 14
... to resolve the problem after checking "Troubleshooting," additional help you obtain assistance or service if you are excluded from accident, alteration, misuse, abuse, fire, flood, acts of God, improper installation, installation not in materials or workmanship that have other than normal, single-family household use of the Use & Care Guide. Replacement parts or repair labor on the product. WHIRLPOOL CORPORATION LAUNDRY WARRANTY LIMITED WARRANTY For one...
... to resolve the problem after checking "Troubleshooting," additional help you obtain assistance or service if you are excluded from accident, alteration, misuse, abuse, fire, flood, acts of God, improper installation, installation not in materials or workmanship that have other than normal, single-family household use of the Use & Care Guide. Replacement parts or repair labor on the product. WHIRLPOOL CORPORATION LAUNDRY WARRANTY LIMITED WARRANTY For one...
Warranty
Page 1
... provided by Whirlpool. 5. Dealer name Address Phone number Model number Serial number Purchase date 14 Cosmetic damage, including scratches, dents, chips or other rights that vary from state to state or province to published user or operator instructions and/or installation instructions. 2. If outside the 50 United States and Canada, contact your major appliance is located in accordance with electrical or plumbing codes, or use your...
... provided by Whirlpool. 5. Dealer name Address Phone number Model number Serial number Purchase date 14 Cosmetic damage, including scratches, dents, chips or other rights that vary from state to state or province to published user or operator instructions and/or installation instructions. 2. If outside the 50 United States and Canada, contact your major appliance is located in accordance with electrical or plumbing codes, or use your...


