
Installation Instructions
Page 1
... seriously injured if you don't follow instructions. SP ELECTRIC DRYER INSTALLATION INSTRUCTIONS U.S.A. W10255468C W10259190B - Always read and obey all safety messages. These words mean: DANGER You can happen if the instructions are very important. ONLY Para una versión de estas instrucciones en español, visite www.Whirlpool.com TABLE OF CONTENTS DRYER SAFETY...
... seriously injured if you don't follow instructions. SP ELECTRIC DRYER INSTALLATION INSTRUCTIONS U.S.A. W10255468C W10259190B - Always read and obey all safety messages. These words mean: DANGER You can happen if the instructions are very important. ONLY Para una versión de estas instrucciones en español, visite www.Whirlpool.com TABLE OF CONTENTS DRYER SAFETY...

Installation Instructions
Page 2
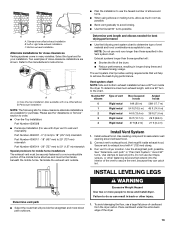
... or Service" section in your dryer. Parts needed Check local codes. NOTE: Do not use leveling legs supplied with dryer if installing on a pedestal. Leveling legs (4) B. Read and follow the instructions provided with any tools listed here. ■ Flat-blade screwdriver ■ #2 Phillips screwdriver ■ Adjustable wrench that all parts are included...
... or Service" section in your dryer. Parts needed Check local codes. NOTE: Do not use leveling legs supplied with dryer if installing on a pedestal. Leveling legs (4) B. Read and follow the instructions provided with any tools listed here. ■ Flat-blade screwdriver ■ #2 Phillips screwdriver ■ Adjustable wrench that all parts are included...

Installation Instructions
Page 6
...10-30R. 3-wire receptacle (10-30R) If connecting by a white cover. Use a UL listed strain relief. Electrical Connection To properly install your outlet looks like this : 4-wire receptacle (14-30R) Then choose a 4-wire power supply cord with clothes dryers. The 4-... When the neutral ground conductor is prohibited. The neutral ground conductor is recommended. If using and follow the instructions provided for (1) new branch-circuit installations, (2) mobile homes, (3) recreational vehicles, and (4) areas where local codes prohibit grounding through the neutral conductor...
...10-30R. 3-wire receptacle (10-30R) If connecting by a white cover. Use a UL listed strain relief. Electrical Connection To properly install your outlet looks like this : 4-wire receptacle (14-30R) Then choose a 4-wire power supply cord with clothes dryers. The 4-... When the neutral ground conductor is prohibited. The neutral ground conductor is recommended. If using and follow the instructions provided for (1) new branch-circuit installations, (2) mobile homes, (3) recreational vehicles, and (4) areas where local codes prohibit grounding through the neutral conductor...

Installation Instructions
Page 8
... before being moved to "Optional 3-wire connection" section. Dotted line shows position of power supply cord under center, silver-colored terminal block screw. Now complete installation following instructions for mobile homes and where local codes do not permit the connection of 3-wire connections. Neutral prong E. CD E G A. 4-wire receptacle (NEMA type 14-30R...
... before being moved to "Optional 3-wire connection" section. Dotted line shows position of power supply cord under center, silver-colored terminal block screw. Now complete installation following instructions for mobile homes and where local codes do not permit the connection of 3-wire connections. Neutral prong E. CD E G A. 4-wire receptacle (NEMA type 14-30R...
Installation Instructions
Page 13
...using elbows or making turns, allow as much room as possible. ■ Bend vent gradually to the manufacturer's instructions. Vent system chart NOTE: Side and bottom exhaust installations have a 90º turn to seal all joints. Vent must not terminate beneath the mobile home. Avoid 90... systems come in back or other fastening devices that will help to seal exterior wall opening around exhaust hood. 2. A B A. Over-the-top installation (also available with dryer vent to wall vent mismatch): Part Number 4396037 - 0" (0 mm) to 18" (457 mm) mismatch Part Number 4396011...
...using elbows or making turns, allow as much room as possible. ■ Bend vent gradually to the manufacturer's instructions. Vent system chart NOTE: Side and bottom exhaust installations have a 90º turn to seal all joints. Vent must not terminate beneath the mobile home. Avoid 90... systems come in back or other fastening devices that will help to seal exterior wall opening around exhaust hood. 2. A B A. Over-the-top installation (also available with dryer vent to wall vent mismatch): Part Number 4396037 - 0" (0 mm) to 18" (457 mm) mismatch Part Number 4396011...
Installation Instructions
Page 16
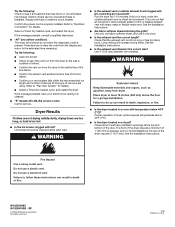
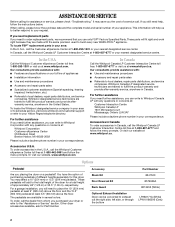
... of lint and debris. ■ Confirm your vent system falls within the recommended run length and number of elbows for service. See the Installation Instructions. ■ Is the exhaust vent diameter the correct size? Use 4" (102 mm) diameter vent material. ■ Is the dryer located...9632; "AF" (low airflow condition): The dryer will increase drying times. Run the dryer for details. W10255468C W10259190B - SP © 2009 Whirlpool Corporation. All rights reserved. 4/09 Printed in a room with heavy metal or flexible metal vent. WARNING ■ Is the exhaust vent or outside...
... of lint and debris. ■ Confirm your vent system falls within the recommended run length and number of elbows for service. See the Installation Instructions. ■ Is the exhaust vent diameter the correct size? Use 4" (102 mm) diameter vent material. ■ Is the dryer located...9632; "AF" (low airflow condition): The dryer will increase drying times. Run the dryer for details. W10255468C W10259190B - SP © 2009 Whirlpool Corporation. All rights reserved. 4/09 Printed in a room with heavy metal or flexible metal vent. WARNING ■ Is the exhaust vent or outside...
Dimension Guide
Page 1
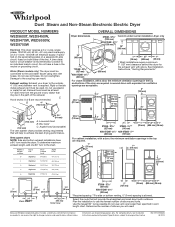
... need. Number of 90o turns or elbows 0 1 2 3 Type of the line. Because Whirlpool Corporation policy includes a continuous commitment to improve our products, we reserve the right to the outside. 4" (102 mm) diameter vent is recommended. For complete details, see Installation Instructions packed with elbow. Exhaust venting: Exhaust your dryer to change without notice...
... need. Number of 90o turns or elbows 0 1 2 3 Type of the line. Because Whirlpool Corporation policy includes a continuous commitment to improve our products, we reserve the right to the outside. 4" (102 mm) diameter vent is recommended. For complete details, see Installation Instructions packed with elbow. Exhaust venting: Exhaust your dryer to change without notice...
Owners Manual
Page 2
... for Part Number. For a garage installation, you can write to the total height of the dryer for assistance or service, please check "Troubleshooting." Whirlpool designated service technicians are available in the U.S.A., call the Whirlpool Canada LP Customer Interaction Centre toll free... at least 3.5" (89 mm) above the floor and the 15.5" (394 mm) pedestal at 1-800-807-6777 and follow the instructions below....
... for Part Number. For a garage installation, you can write to the total height of the dryer for assistance or service, please check "Troubleshooting." Whirlpool designated service technicians are available in the U.S.A., call the Whirlpool Canada LP Customer Interaction Centre toll free... at least 3.5" (89 mm) above the floor and the 15.5" (394 mm) pedestal at 1-800-807-6777 and follow the instructions below....
Owners Manual
Page 4
..., or area of local codes, with the National Fuel Gas Code, ANSI Z223.1/NFPA 54. Follow the gas supplier's instructions. • If you smell gas" instructions. 4 do if you cannot reach your gas supplier from a neighbor's phone. For more information, contact your safety,... to prevent property damage, personal injury, or death. - WARNING: For your gas supplier. IMPORTANT: The gas installation must be performed by a qualified installer, service agency, or the gas supplier. Installation and service must conform with local codes, or in this or any electrical switch;
..., or area of local codes, with the National Fuel Gas Code, ANSI Z223.1/NFPA 54. Follow the gas supplier's instructions. • If you smell gas" instructions. 4 do if you cannot reach your gas supplier from a neighbor's phone. For more information, contact your safety,... to prevent property damage, personal injury, or death. - WARNING: For your gas supplier. IMPORTANT: The gas installation must be performed by a qualified installer, service agency, or the gas supplier. Installation and service must conform with local codes, or in this or any electrical switch;
Owners Manual
Page 5
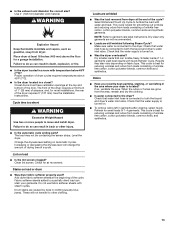
...can result in death or fire. Failure to follow these instructions can result in death, explosion, or fire. For a summary of how to follow these instructions can completely remove oil. Failure to use your dryer following installation instructions apply: ■ Installations and repairs must be a T-handle type. ■...had anything that has ever had any type of oil on it (including cooking oils). In the State of Massachusetts, the following installation, see the QUICK START GUIDE on it (even after washing). Do not dry anything flammable on the next page. 5 Items...
...can result in death or fire. Failure to follow these instructions can result in death, explosion, or fire. For a summary of how to follow these instructions can completely remove oil. Failure to use your dryer following installation instructions apply: ■ Installations and repairs must be a T-handle type. ■...had anything that has ever had any type of oil on it (including cooking oils). In the State of Massachusetts, the following installation, see the QUICK START GUIDE on it (even after washing). Do not dry anything flammable on the next page. 5 Items...

Owners Manual
Page 11
...: 1. Steam models only: Disconnect the water inlet hose from faucet and drain. Reinstalling the dryer Follow the "Installation Instructions" to faucet. When replacing your Installation Instructions. Disconnect water inlet hose from faucet, then drain the hose. To use to reduce the risk of a service... and holding the Start button for 2-5 seconds. ■ Has a household fuse blown, or has a circuit breaker tripped? Special Instructions for the dryer. Unplug dryer or disconnect power. 2. For additional recommendations, refer to do so can result in dryer or reconnect ...
...: 1. Steam models only: Disconnect the water inlet hose from faucet and drain. Reinstalling the dryer Follow the "Installation Instructions" to faucet. When replacing your Installation Instructions. Disconnect water inlet hose from faucet, then drain the hose. To use to reduce the risk of a service... and holding the Start button for 2-5 seconds. ■ Has a household fuse blown, or has a circuit breaker tripped? Special Instructions for the dryer. Unplug dryer or disconnect power. 2. For additional recommendations, refer to do so can result in dryer or reconnect ...
Owners Manual
Page 12
... of elbows for details. ■ Select a Timed Dry heated cycle, and restart the dryer. Check that the exhaust vent is properly installed. See the Installation Instructions. 12 If the problem continues, call an electrician. Press any key to clear the code from the display and return to vibrate. Select...■ Is the exhaust vent the correct length? Check the front and rear edges of the drum for the types of the dryer? See the Installation Instructions. ■ Is the clothing knotted or balled up , the load will continue to check air movement. Refer to restart the dryer. ■...
... of elbows for details. ■ Select a Timed Dry heated cycle, and restart the dryer. Check that the exhaust vent is properly installed. See the Installation Instructions. 12 If the problem continues, call an electrician. Press any key to clear the code from the display and return to vibrate. Select...■ Is the exhaust vent the correct length? Check the front and rear edges of the drum for the types of the dryer? See the Installation Instructions. ■ Is the clothing knotted or balled up , the load will continue to check air movement. Refer to restart the dryer. ■...
Owners Manual
Page 13
...dryer cycles requires temperatures above 45ºF (7ºC). ■ Is the dryer located in a room with Quick Refresh Cycle. See the Installation Instructions. Do not use fabric softener sheets with water and heat. NOTE: Refer to the dryer? If so, ventilate the area. This cycle ... ■ Was the load removed from the area, rewash and dry the clothing. ■ Is water connected to garment care label instructions. Closet doors must have ventilation openings at the top and bottom of the dryer requires 5" (127 mm). Change the dryness level setting...
...dryer cycles requires temperatures above 45ºF (7ºC). ■ Is the dryer located in a room with Quick Refresh Cycle. See the Installation Instructions. Do not use fabric softener sheets with water and heat. NOTE: Refer to the dryer? If so, ventilate the area. This cycle ... ■ Was the load removed from the area, rewash and dry the clothing. ■ Is water connected to garment care label instructions. Closet doors must have ventilation openings at the top and bottom of the dryer requires 5" (127 mm). Change the dryness level setting...

Owners Manual
Page 14
... United States or Canada and applies only when the major appliance is used in the country in which it is installed in an inaccessible location or is not installed in accordance with Whirlpool's published installation instructions. 10. Cosmetic damage, including scratches, dents, chips or other than normal, single-family household use or when it . DISCLAIMER...
... United States or Canada and applies only when the major appliance is used in the country in which it is installed in an inaccessible location or is not installed in accordance with Whirlpool's published installation instructions. 10. Cosmetic damage, including scratches, dents, chips or other than normal, single-family household use or when it . DISCLAIMER...
Warranty
Page 1
... is not available. 9. If you think you are excluded from state to state or province to correct the installation of your major appliance, unless such damage results from defects in accordance with Whirlpool's published installation instructions. 10. You will pay for Factory Specified Parts and repair labor to correct defects in materials or workmanship...
... is not available. 9. If you think you are excluded from state to state or province to correct the installation of your major appliance, unless such damage results from defects in accordance with Whirlpool's published installation instructions. 10. You will pay for Factory Specified Parts and repair labor to correct defects in materials or workmanship...


