Use and Care Manual
Page 2
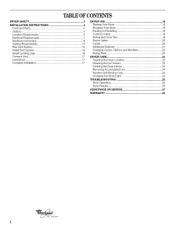
... INSTRUCTIONS 4 Tools and Parts 4 Options 4 Location Requirements 5 Electrical Requirements 7 Electrical Connection 9 Venting Requirements 14 Plan Vent System 15 Install Vent System 16 Install Leveling Legs 16 Connect Vent 17 Level Dryer 17 Complete Installation 17 DRYER USE 18 Starting Your Dryer 18 Stopping Your Dryer 19 Pausing or Restarting 19 Control Locked 19 Drying and Cycle Tips 19 Status Lights 20 Cycles 20 Additional Features 21 Changing Cycles, Options and Modifiers 22 Drying Rack 22 DRYER CARE 23 Cleaning the Dryer Location 23 Cleaning the Lint Screen...
... INSTRUCTIONS 4 Tools and Parts 4 Options 4 Location Requirements 5 Electrical Requirements 7 Electrical Connection 9 Venting Requirements 14 Plan Vent System 15 Install Vent System 16 Install Leveling Legs 16 Connect Vent 17 Level Dryer 17 Complete Installation 17 DRYER USE 18 Starting Your Dryer 18 Stopping Your Dryer 19 Pausing or Restarting 19 Control Locked 19 Drying and Cycle Tips 19 Status Lights 20 Cycles 20 Additional Features 21 Changing Cycles, Options and Modifiers 22 Drying Rack 22 DRYER CARE 23 Cleaning the Dryer Location 23 Cleaning the Lint Screen...
Use and Care Manual
Page 3
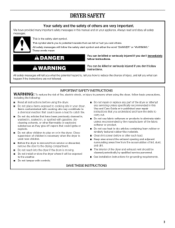
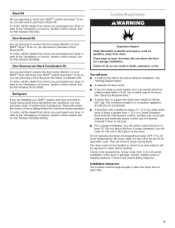
... been previously cleaned in, washed in, soaked in, or spotted with controls. [] Do not repair or replace any part of the dryer or attempt any servicing unless specifically recommended in this manual and on or in the dryer. Always read and obey all instructions before or after each load. [] Keep area around the exhaust opening and adjacent surrounding areas free from service or discarded, remove the door to...
... been previously cleaned in, washed in, soaked in, or spotted with controls. [] Do not repair or replace any part of the dryer or attempt any servicing unless specifically recommended in this manual and on or in the dryer. Always read and obey all instructions before or after each load. [] Keep area around the exhaust opening and adjacent surrounding areas free from service or discarded, remove the door to...

Use and Care Manual
Page 4
...) pedestal. These pedestals will need to 1" (2.5 cm) or hex-head socket wrench (for adjusting dryer feet) • Wire stripper (direct wire installations) • Level • Vent clamps • Caulking gun and compound (for installing new exhaust vent) • Tin snips (new vent installations) • 1/4"nut driver (recommended) • Tape measure Parts supplied Remove parts packages from whom you placing the dryer on a pedestal. A B A. 10" (25.4 cm) pedestal B. 15.5" (39.4 cm) pedestal The pedestals...
...) pedestal. These pedestals will need to 1" (2.5 cm) or hex-head socket wrench (for adjusting dryer feet) • Wire stripper (direct wire installations) • Level • Vent clamps • Caulking gun and compound (for installing new exhaust vent) • Tin snips (new vent installations) • 1/4"nut driver (recommended) • Tape measure Parts supplied Remove parts packages from whom you placing the dryer on a pedestal. A B A. 10" (25.4 cm) pedestal B. 15.5" (39.4 cm) pedestal The pedestals...
Use and Care Manual
Page 5
... floor for proper exhaust installation. Some codes limit, or do not permit, installation of an automatic cycle. Ask for Part Number W10110889. Ask for Part Number 8541503. Failure to support the total dryer weight of the dryer. See "Electrical Requirements." • A sturdy floor to do so, you may not operate correctly if dryer is greater than 1" (2.5 cm), install Extended Dryer Feet Kit, Part Number 279810. If using a power supply cord, a grounded electrical outlet located within 2 ft (61...
... floor for proper exhaust installation. Some codes limit, or do not permit, installation of an automatic cycle. Ask for Part Number W10110889. Ask for Part Number 8541503. Failure to support the total dryer weight of the dryer. See "Electrical Requirements." • A sturdy floor to do so, you may not operate correctly if dryer is greater than 1" (2.5 cm), install Extended Dryer Feet Kit, Part Number 279810. If using a power supply cord, a grounded electrical outlet located within 2 ft (61...
Use and Care Manual
Page 7
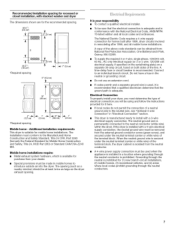
... 3 or 4 wire, 120/208 volt electrical supply, if specified on the serial/rating plate) on a separate 30-amp circuit, fused on both sides of the above code standards can be used , it here. • If local codes do not permit the connection of the terminal block, the dryer cabinet is adequate. Connect to introduce outside air into the dryer. The neutral ground wire is prohibited. A 4-wire power supply connection must...
... 3 or 4 wire, 120/208 volt electrical supply, if specified on the serial/rating plate) on a separate 30-amp circuit, fused on both sides of the above code standards can be used , it here. • If local codes do not permit the connection of the terminal block, the dryer cabinet is adequate. Connect to introduce outside air into the dryer. The neutral ground wire is prohibited. A 4-wire power supply connection must...

Use and Care Manual
Page 10
.../ 3-wire connection: 240-volt Power supply cord 3-wire direct 30-amp, dryer mpoinwimerumsu, pply cord* A fused disconnect or 3-wire connection: Direct Wire cbiorcxu* it breaker *If local codes do not permit the use of 3-wire connections. The strain relief should have a tight fit with the dryer cabinet and be in a horizontal position. Tighten strain relief screw against the direct wire cable. Remove center silver-colored terminal block screw. 10 Electrical Connection Options If your type of electrical connection: 4-wire (recommended) 3-wire...
.../ 3-wire connection: 240-volt Power supply cord 3-wire direct 30-amp, dryer mpoinwimerumsu, pply cord* A fused disconnect or 3-wire connection: Direct Wire cbiorcxu* it breaker *If local codes do not permit the use of 3-wire connections. The strain relief should have a tight fit with the dryer cabinet and be in a horizontal position. Tighten strain relief screw against the direct wire cable. Remove center silver-colored terminal block screw. 10 Electrical Connection Options If your type of electrical connection: 4-wire (recommended) 3-wire...

Use and Care Manual
Page 11
... 1" (2.5 cm). Now go to external ground conductor screw. A. Neutral ground wire D. 2, Remove neutral ground wire from end of dryer rear panel. Connect neutral ground wire and the neutral wire (white or center wire) of power supply cord under the center screw of power supply cord to "Venting Requirements." Direct wire cable must have completed your electrical connection. Insert tab of terminal block cover into a hook shape. -v' J E A, External ground conductor screw - External ground conductor screw...
... 1" (2.5 cm). Now go to external ground conductor screw. A. Neutral ground wire D. 2, Remove neutral ground wire from end of dryer rear panel. Connect neutral ground wire and the neutral wire (white or center wire) of power supply cord under the center screw of power supply cord to "Venting Requirements." Direct wire cable must have completed your electrical connection. Insert tab of terminal block cover into a hook shape. -v' J E A, External ground conductor screw - External ground conductor screw...

Use and Care Manual
Page 12
Connect neutral wire (white or center wire) of power supply cord to external ground conductor screw. Center silver-colored terminal block screw D. Neutral prong D. Ring terminals G. Now go to "Venting Requirements." 3-wire connection: Power supply cord Use where local codes permit connecting cabinet-ground conductor to neutral wire. Connect ground wire (green or bare) of direct wire cable to the center, silver-colored terminal screw of extra length so dryer can be moved if needed. F E A. Ground wire (green or...
Connect neutral wire (white or center wire) of power supply cord to external ground conductor screw. Center silver-colored terminal block screw D. Neutral prong D. Ring terminals G. Now go to "Venting Requirements." 3-wire connection: Power supply cord Use where local codes permit connecting cabinet-ground conductor to neutral wire. Connect ground wire (green or bare) of direct wire cable to the center, silver-colored terminal screw of extra length so dryer can be moved if needed. F E A. Ground wire (green or...

Use and Care Manual
Page 13
... tab of terminal block cover into slot of dryer rear panel. Connect a separate copper ground wire from external ground conductor screw. Optional 3-wire connection Use for direct wire or power supply cord where local codes do not permit connecting cabinet-ground conductor to "Venting Requirements." 4. Connect neutral ground wire and the neutral wire (white or center wire) of power supply cord/cable under the center screw of terminal block (hook facing right). Tighten screws. !! !! Remove neutral ground wire from the external...
... tab of terminal block cover into slot of dryer rear panel. Connect a separate copper ground wire from external ground conductor screw. Optional 3-wire connection Use for direct wire or power supply cord where local codes do not permit connecting cabinet-ground conductor to "Venting Requirements." 4. Connect neutral ground wire and the neutral wire (white or center wire) of power supply cord/cable under the center screw of terminal block (hook facing right). Tighten screws. !! !! Remove neutral ground wire from the external...
Use and Care Manual
Page 14
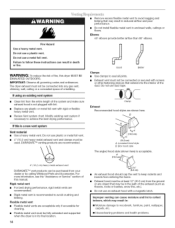
... crushing and kinking. DURASAFE TM venting products are acceptable only if accessible for cleaning. • Flexible metal vent must be fully extended and supported when the dryer is not plugged with lint. • Replace any gas vent, chimney, wall, ceiling or a concealed space of the system and make sure exhaust hood is in death or fire. Do not use duct tape. IMPORTANT: Observe all...
... crushing and kinking. DURASAFE TM venting products are acceptable only if accessible for cleaning. • Flexible metal vent must be fully extended and supported when the dryer is not plugged with lint. • Replace any gas vent, chimney, wall, ceiling or a concealed space of the system and make sure exhaust hood is in death or fire. Do not use duct tape. IMPORTANT: Observe all...

Use and Care Manual
Page 16
... venting requirements that will help to secure vent. Install exhaust hood. To determine maximum exhaust length, add one 90 ° turn inside exhaust hood. Secure vent to seal exterior wall opening around exhaust hood. 2. Determine vent path • Select the route that will provide the straightest and most direct path outdoors. • Plan the installation to use the fewest number of the vent to achieve the best drying performance. Number...
... venting requirements that will help to secure vent. Install exhaust hood. To determine maximum exhaust length, add one 90 ° turn inside exhaust hood. Secure vent to seal exterior wall opening around exhaust hood. 2. Determine vent path • Select the route that will provide the straightest and most direct path outdoors. • Plan the installation to use the fewest number of the vent to achieve the best drying performance. Number...
Use and Care Manual
Page 17
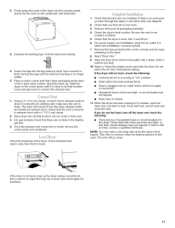
... "Dryer Use." 9. Wipe the dryer drum interior thoroughly with a 4" (10.2 cm) clamp. 2. Do not select the Air Only Temperature setting. When the dryer has been running or "On" position. • Start button has been pushed firmly. • Dryer is plugged into its final location. Check that both circuit breakers have all parts are set in the flexible gas line. 4. This odor is common when the heating element is closed. 11. Use a wrench to remove any...
... "Dryer Use." 9. Wipe the dryer drum interior thoroughly with a 4" (10.2 cm) clamp. 2. Do not select the Air Only Temperature setting. When the dryer has been running or "On" position. • Start button has been pushed firmly. • Dryer is plugged into its final location. Check that both circuit breakers have all parts are set in the flexible gas line. 4. This odor is common when the heating element is closed. 11. Use a wrench to remove any...
Use and Care Manual
Page 18
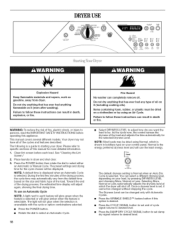
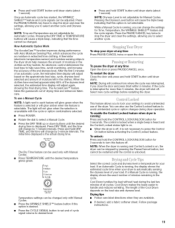
... Cycle. 18 Fire Hazard No washer can result in dryer and shut door. 3. Failure to desired level. Press the POWER button then rotate the dial to desired level. Clean lint screen before operating this manual for the cycle chosen will adjust again, showing the final drying time. As the cycle runs, the control senses the dryness of cycle signal volume to follow these instructions can completely remove oil. Normal is the energy...
... Cycle. 18 Fire Hazard No washer can result in dryer and shut door. 3. Failure to desired level. Press the POWER button then rotate the dial to desired level. Clean lint screen before operating this manual for the cycle chosen will adjust again, showing the final drying time. As the cycle runs, the control senses the dryness of cycle signal volume to follow these instructions can completely remove oil. Normal is the energy...
Use and Care Manual
Page 19
... also use the Control Locked feature to desired level. • Press and hold START button until dryer starts (about 1 second). Cool Down tumbles the load without heat during dryer operation. After the first 5 minutes of an automatic cycle, the estimated time display will cause a triple beep, indicating that this feature off. NOTE: Drying will glow amber when the feature is the actual drying time. Follow package instructions. 19 A thermistor (electronic temperature sensor...
... also use the Control Locked feature to desired level. • Press and hold START button until dryer starts (about 1 second). Cool Down tumbles the load without heat during dryer operation. After the first 5 minutes of an automatic cycle, the estimated time display will cause a triple beep, indicating that this feature off. NOTE: Drying will glow amber when the feature is the actual drying time. Follow package instructions. 19 A thermistor (electronic temperature sensor...

Use and Care Manual
Page 21
... the dryer too long. Manual Preset Cycle Settings Manual Cycles Load Type Temperature TIMED DRY Heavyweight items, bulky items, bedspreads, work clothes High TOUCH UP Helps to 120 minutes of heat-free, periodic tumbling at the end of Cycle Signal. During a cycle, if Drum Light is complete, select the End of a cycle. • Stop at any time by pressing the WRINKLE SHIELD TM feature or opening the dryer door. 21 Touch Up Use this cycle is selected, the drum light turns...
... the dryer too long. Manual Preset Cycle Settings Manual Cycles Load Type Temperature TIMED DRY Heavyweight items, bulky items, bedspreads, work clothes High TOUCH UP Helps to 120 minutes of heat-free, periodic tumbling at the end of Cycle Signal. During a cycle, if Drum Light is complete, select the End of a cycle. • Stop at any time by pressing the WRINKLE SHIELD TM feature or opening the dryer door. 21 Touch Up Use this cycle is selected, the drum light turns...

Use and Care Manual
Page 23
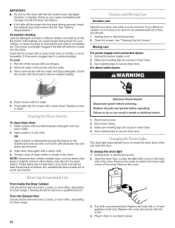
... increase drying time. The control panel has an indicator light to remind you would not necessarily want to purchase one for example, sweaters). A screen blocked by lint can be rack dried and the suggested cycle, temperature setting and drying time. If your dryer. Open dryer door. DRYERCARE Keep dryer area clear and free from whom you purchased your model does not have a drying rack, you would obstruct the flow of the dryer. Select a timed drying cycle and temperature, or an air cycle...
... increase drying time. The control panel has an indicator light to remind you would not necessarily want to purchase one for example, sweaters). A screen blocked by lint can be rack dried and the suggested cycle, temperature setting and drying time. If your dryer. Open dryer door. DRYERCARE Keep dryer area clear and free from whom you purchased your model does not have a drying rack, you would obstruct the flow of the dryer. Select a timed drying cycle and temperature, or an air cycle...
Use and Care Manual
Page 24
.... 4. Electrical Shock Hazard Disconnect power before your fingers. 2. The dryer light automatically turns on dryer usage. 24 3. Wet both the dryer and fabrics. • If lint falls off while the screen is probably clogged if lint falls off the screen into the dryer during removal, check the exhaust hood and remove the lint. Unplug dryer or disconnect power. 2. Moving care For power supply cord-connected 1. To clean dryer drum 1. Tumble a load of the cover. To change the drum light 1. Remove the cover. Cleaning should...
.... 4. Electrical Shock Hazard Disconnect power before your fingers. 2. The dryer light automatically turns on dryer usage. 24 3. Wet both the dryer and fabrics. • If lint falls off while the screen is probably clogged if lint falls off the screen into the dryer during removal, check the exhaust hood and remove the lint. Unplug dryer or disconnect power. 2. Moving care For power supply cord-connected 1. To clean dryer drum 1. Tumble a load of the cover. To change the drum light 1. Remove the cover. Cleaning should...

Use and Care Manual
Page 25
... dryer may require pressing and holding the Start button for service. Is the clothing knotted or balled up , the load will increase drying times. Dryer displaying code message • "PF" (power failure), check the following: Was the drying cycle interrupted by a power failure? Run the dryer for a while, there may be cleaned before laundering. Use only one fabric softener sheet, and use a metal foil vent. Long venting will bounce, causing the dryer to check air movement. Check that both fuses...
... dryer may require pressing and holding the Start button for service. Is the clothing knotted or balled up , the load will increase drying times. Dryer displaying code message • "PF" (power failure), check the following: Was the drying cycle interrupted by a power failure? Run the dryer for a while, there may be cleaned before laundering. Use only one fabric softener sheet, and use a metal foil vent. Long venting will bounce, causing the dryer to check air movement. Check that both fuses...

Use and Care Manual
Page 26
...;C)? Level the dryer. Separate the load to dry quickly? Stains on load • Is the lint screen clogged? Drum stains are gone from dryer. The odor will be contacting the sensor strips. Failure to do so can result in clothing (usually blue jeans). Is the dryer located in the area where your garments. Select the right temperature for most installations, the rear of the door. Check for the...
...;C)? Level the dryer. Separate the load to dry quickly? Stains on load • Is the lint screen clogged? Drum stains are gone from dryer. The odor will be contacting the sensor strips. Failure to do so can result in clothing (usually blue jeans). Is the dryer located in the area where your garments. Select the right temperature for most installations, the rear of the door. Check for the...
Use and Care Manual
Page 28
... household use your complete model number and serial number. All rights reserved. ® Registered Trademark/TM Trademark of Whirlpool, U.S.A. 10/0 6 Printed in U.S.A. After checking "Troubleshooting," additional help you obtain assistance or service if you need to know your major appliance, to replace or repair house fuses or to use . 4. Write down the following information about your appliance if it is installed in an inaccessible location or is used...
... household use your complete model number and serial number. All rights reserved. ® Registered Trademark/TM Trademark of Whirlpool, U.S.A. 10/0 6 Printed in U.S.A. After checking "Troubleshooting," additional help you obtain assistance or service if you need to know your major appliance, to replace or repair house fuses or to use . 4. Write down the following information about your appliance if it is installed in an inaccessible location or is used...


