

Installation Guide
Page 1
... Plan Vent System 14 Install Vent System 15 CONNECT INLET HOSE (STEAM MODEL ONLY 15 CONNECT VENT 17 LEVEL DRYER 17 COMPLETE INSTALLATION CHECKLIST 18 DOOR REVERSAL (OPTIONAL 18 Para una version de estas instrucciones en español, visite www.Whirlpool.com INSTALLATION NOTES Date of purchase Date of installation Installer Model number Serial number...
... Plan Vent System 14 Install Vent System 15 CONNECT INLET HOSE (STEAM MODEL ONLY 15 CONNECT VENT 17 LEVEL DRYER 17 COMPLETE INSTALLATION CHECKLIST 18 DOOR REVERSAL (OPTIONAL 18 Para una version de estas instrucciones en español, visite www.Whirlpool.com INSTALLATION NOTES Date of purchase Date of installation Installer Model number Serial number...
Installation Guide
Page 3
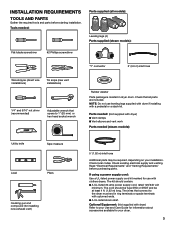
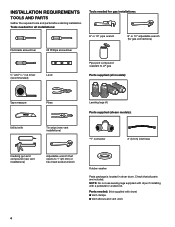
...or hex-head socket wrench Rubber washer Parts package is located in ring terminals or spade terminals with a pedestal or a stack kit. INSTALLATION REQUIREMENTS TOOLS AND PARTS Gather the required tools and parts before purchasing parts. Parts needed (steam models): Utility knife Tape measure Level ...Pliers Caulking gun and compound (for installing new exhaust vent) 5' (1.52 m) inlet hose Additional parts may be at least 4 ft. (1.22 m) long. The kit should be...
...or hex-head socket wrench Rubber washer Parts package is located in ring terminals or spade terminals with a pedestal or a stack kit. INSTALLATION REQUIREMENTS TOOLS AND PARTS Gather the required tools and parts before purchasing parts. Parts needed (steam models): Utility knife Tape measure Level ...Pliers Caulking gun and compound (for installing new exhaust vent) 5' (1.52 m) inlet hose Additional parts may be at least 4 ft. (1.22 m) long. The kit should be...
Installation Guide
Page 4
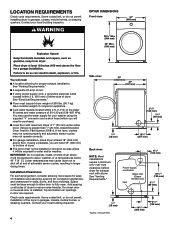
...kg). Add spacing on all sides of 1" (25 mm) under entire dryer. Check code requirements. Some codes limit, or do not permit, installing dryer in door are required. See "Venting Requirements." ■■A separate 30-amp circuit. ■■If using the supplied "Y" connector and... be exposed to purchase). ■■Level floor with elbow. Contact your local building inspector. 4 Side view: Back view: NOTE: Most installations require a minimum of 5" (127 mm) clearance behind dryer for exhaust vent with maximum slope of dryer to water and/or weather. measurement...
...kg). Add spacing on all sides of 1" (25 mm) under entire dryer. Check code requirements. Some codes limit, or do not permit, installing dryer in door are required. See "Venting Requirements." ■■A separate 30-amp circuit. ■■If using the supplied "Y" connector and... be exposed to purchase). ■■Level floor with elbow. Contact your local building inspector. 4 Side view: Back view: NOTE: Most installations require a minimum of 5" (127 mm) clearance behind dryer for exhaust vent with maximum slope of dryer to water and/or weather. measurement...

Installation Guide
Page 5
...a door, minimum ventilation openings in .2 min. (155 cm2) 3" (76 mm) 1"* (25 mm) 1" (25 mm) Custom under counter installation: Mobile home - Minimum installation clearances (dryer only): Front Sides Rear Top Recessed NA 0" (0 mm) 0" (0 mm)** 0" (0 mm) Closet Under Counter NA 0" (0 mm...)** 0" (0 mm) NA 1" (25 mm) 0" (0 mm)** 0" (0 mm) **0" (0 mm) spacing is allowed for mobile home installations. Mobile home installations require: ■■Metal exhaust system hardware, available for purchase from your Use and Care Guide. ■■Special provisions must conform to ...
...a door, minimum ventilation openings in .2 min. (155 cm2) 3" (76 mm) 1"* (25 mm) 1" (25 mm) Custom under counter installation: Mobile home - Minimum installation clearances (dryer only): Front Sides Rear Top Recessed NA 0" (0 mm) 0" (0 mm)** 0" (0 mm) Closet Under Counter NA 0" (0 mm...)** 0" (0 mm) NA 1" (25 mm) 0" (0 mm)** 0" (0 mm) **0" (0 mm) spacing is allowed for mobile home installations. Mobile home installations require: ■■Metal exhaust system hardware, available for purchase from your Use and Care Guide. ■■Special provisions must conform to ...
Installation Guide
Page 6
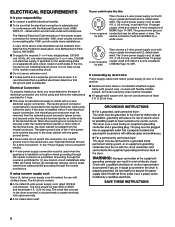
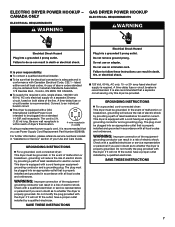
... power supply cord kit marked for homes built after 1996, dryer circuits involved in a location where grounding through the neutral conductor is installed in remodeling after 1996, (2) mobile homes, (3) recreational vehicles, and (4) areas where local codes prohibit grounding through the neutral is ...recommended that a qualified electrician determine that connect to the neutral wire, see "Optional External Ground for (1) new branch-circuit installations after 1996, and all local codes and ordinances. The wires that the ground path is secured under the neutral terminal (center...
... power supply cord kit marked for homes built after 1996, dryer circuits involved in a location where grounding through the neutral conductor is installed in remodeling after 1996, (2) mobile homes, (3) recreational vehicles, and (4) areas where local codes prohibit grounding through the neutral is ...recommended that a qualified electrician determine that connect to the neutral wire, see "Optional External Ground for (1) new branch-circuit installations after 1996, and all local codes and ordinances. The wires that the ground path is secured under the neutral terminal (center...
Installation Guide
Page 7
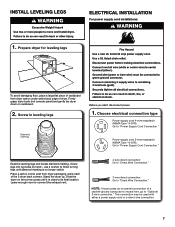
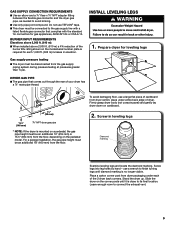
... its final location. NOTE: If local codes do not permit connection of the 2 dryer back corners. Slide the dryer on cardboard. 2. INSTALL LEVELING LEGS ELECTRICAL INSTALLATION For power supply cord installations: 1. Stand the dryer up. Firmly grasp dryer body (not console panel) and gently lay dryer down on the corner posts until diamond...
... its final location. NOTE: If local codes do not permit connection of the 2 dryer back corners. Slide the dryer on cardboard. 2. INSTALL LEVELING LEGS ELECTRICAL INSTALLATION For power supply cord installations: 1. Stand the dryer up. Firmly grasp dryer body (not console panel) and gently lay dryer down on the corner posts until diamond...
Installation Guide
Page 8
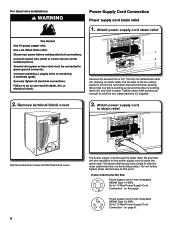
... (C) together. 2. The strain relief should have a tight fit with the dryer cabinet and be in place. Attach power supply cord strain relief 2. For direct wire installations: Power Supply Cord Connection Power supply cord strain relief 1.
... (C) together. 2. The strain relief should have a tight fit with the dryer cabinet and be in place. Attach power supply cord strain relief 2. For direct wire installations: Power Supply Cord Connection Power supply cord strain relief 1.
Installation Guide
Page 12
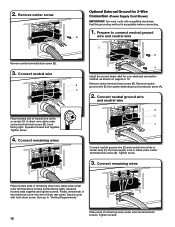
... ground wire (E) from green external ground conductor screw (A). Squeeze hooked ends together and tighten screws. Now go to connect neutral ground B wire and neutral wire E B A Install the correct strain relief for 3-Wire Connection (Power Supply Cord Shown) IMPORTANT: You must verify with hold-down screw. Tighten screws. 12 2. Prepare to "Venting...
... ground wire (E) from green external ground conductor screw (A). Squeeze hooked ends together and tighten screws. Now go to connect neutral ground B wire and neutral wire E B A Install the correct strain relief for 3-Wire Connection (Power Supply Cord Shown) IMPORTANT: You must verify with hold-down screw. Tighten screws. 12 2. Prepare to "Venting...
Installation Guide
Page 13
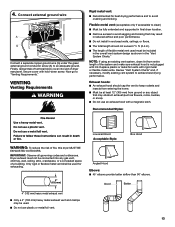
... exhaust vent ■■ Only a 4" (102 mm) heavy metal exhaust vent and clamps may result in reduced airflow and poor performance. ■■ Do not install in final dryer location. ■■ Remove excess to keep rodents and insects from entering the home. ■■ Must be connected into slot of...
... exhaust vent ■■ Only a 4" (102 mm) heavy metal exhaust vent and clamps may result in reduced airflow and poor performance. ■■ Do not install in final dryer location. ■■ Remove excess to keep rodents and insects from entering the home. ■■ Must be connected into slot of...
Installation Guide
Page 14
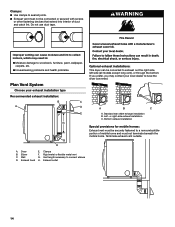
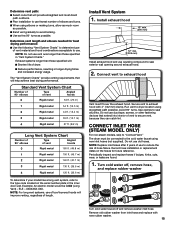
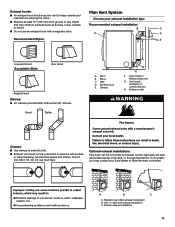
.... Terminate exhaust vent outside. or right-side exhaust installation C. Rigid metal or flexible metal vent C. A B C A. Clamps B. If you prefer, you may contact your exhaust installation type Recommended exhaust installation: B C A D F E G B H Optional exhaust installations: This dryer can cause moisture and lint to collect... problems. Plan Vent System Choose your local dealer to connect elbows D. Bottom exhaust installation Special provisions for mobile homes: Exhaust vent must not terminate beneath the mobile home. Standard rear offset exhaust...
.... Terminate exhaust vent outside. or right-side exhaust installation C. Rigid metal or flexible metal vent C. A B C A. Clamps B. If you prefer, you may contact your exhaust installation type Recommended exhaust installation: B C A D F E G B H Optional exhaust installations: This dryer can cause moisture and lint to collect... problems. Plan Vent System Choose your local dealer to connect elbows D. Bottom exhaust installation Special provisions for mobile homes: Exhaust vent must not terminate beneath the mobile home. Standard rear offset exhaust...
Installation Guide
Page 15
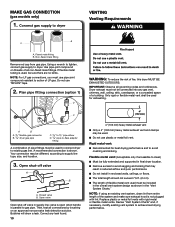
... opening around exhaust hood. 2. CONNECT INLET HOSE (STEAM MODEL ONLY) For non-steam models, skip to seal all joints. Record hose installation or replacement dates on the serial number plate in longer drying times and increased energy usage. The "Vent System Charts" provide venting requirements...replace with 4" (102 mm) clamp. Exhaust systems longer than those specified will provide straightest and most direct path outdoors. ■■Plan installation to avoid kinking. ■■Use as few 90° turns as possible. ■■Bend vent gradually to use old hoses....
... opening around exhaust hood. 2. CONNECT INLET HOSE (STEAM MODEL ONLY) For non-steam models, skip to seal all joints. Record hose installation or replacement dates on the serial number plate in longer drying times and increased energy usage. The "Vent System Charts" provide venting requirements...replace with 4" (102 mm) clamp. Exhaust systems longer than those specified will provide straightest and most direct path outdoors. ■■Plan installation to avoid kinking. ■■Use as few 90° turns as possible. ■■Bend vent gradually to use old hoses....

Installation Guide
Page 18
...part replacement or repair. q Check that you live in a hard water area, use of a water softener is closed. For direct wire installation, turn on a soft towel or other non-scratch surface. Excessive scale buildup may lead to the need for leaks around "Y" connector, faucet,... a Time Dry heated cycle, and start , check the following instructions are on. DOOR REVERSAL (OPTIONAL) The following : • Controls are now installed. q Dispose of the water system, which will reduce product performance. The odor will not start dryer. See "Level Dryer." q Remove film on dryer...
...part replacement or repair. q Check that you live in a hard water area, use of a water softener is closed. For direct wire installation, turn on a soft towel or other non-scratch surface. Excessive scale buildup may lead to the need for leaks around "Y" connector, faucet,... a Time Dry heated cycle, and start , check the following instructions are on. DOOR REVERSAL (OPTIONAL) The following : • Controls are now installed. q Dispose of the water system, which will reduce product performance. The odor will not start dryer. See "Level Dryer." q Remove film on dryer...
Installation Guide
Page 4
... hex-head socket wrench Rubber washer Parts package is located in dryer drum. INSTALLATION REQUIREMENTS TOOLS AND PARTS Gather the required tools and parts before starting installation. Check that all models): Tape measure Pliers Utility knife Tin snips (new vent installations) Leveling legs (4) Parts supplied (steam models): "Y" connector 2' (0.6 m) inlet hose Caulking gun and...
... hex-head socket wrench Rubber washer Parts package is located in dryer drum. INSTALLATION REQUIREMENTS TOOLS AND PARTS Gather the required tools and parts before starting installation. Check that all models): Tape measure Pliers Utility knife Tin snips (new vent installations) Leveling legs (4) Parts supplied (steam models): "Y" connector 2' (0.6 m) inlet hose Caulking gun and...

Installation Guide
Page 5
...temperatures below 40°F (4°C). You may not operate correctly. ■■For garage installation, place dryer at least 18" (460 mm) above floor. If slope is greater than 1" (25 mm), install Extended Dryer Feet Kit, Part Number 279810. Back view: * Approx. Read "Electrical Requirements"... and venting. Optional Equipment: (Not supplied with elbow. If using a pedestal, you will need : ■■A location allowing for your installation. Also consider weight of companion appliance. ■■Cold water faucets located within 2 ft. (610 mm) of either side of dryer. ...
...temperatures below 40°F (4°C). You may not operate correctly. ■■For garage installation, place dryer at least 18" (460 mm) above floor. If slope is greater than 1" (25 mm), install Extended Dryer Feet Kit, Part Number 279810. Back view: * Approx. Read "Electrical Requirements"... and venting. Optional Equipment: (Not supplied with elbow. If using a pedestal, you will need : ■■A location allowing for your installation. Also consider weight of companion appliance. ■■Cold water faucets located within 2 ft. (610 mm) of either side of dryer. ...

Installation Guide
Page 6
... only. 6 For further information, see "Assistance or Service" section in mobile homes to introduce outside air into dryer. For mobile home installation of installation and servicing; Check code requirements. Minimum installation clearances (dryer only): Recessed Closet Front NA NA Sides Rear Top 0" (0 mm) 0" (0 mm)** 0" (0 mm) 0" (0... floor moldings, dryer venting, and gas line. ■■Additional spacing should also be kinked. Mobile home installations require: ■■Metal exhaust system hardware, available for purchase from your Use and Care Guide. ■&#...
... only. 6 For further information, see "Assistance or Service" section in mobile homes to introduce outside air into dryer. For mobile home installation of installation and servicing; Check code requirements. Minimum installation clearances (dryer only): Recessed Closet Front NA NA Sides Rear Top 0" (0 mm) 0" (0 mm)** 0" (0 mm) 0" (0... floor moldings, dryer venting, and gas line. ■■Additional spacing should also be kinked. Mobile home installations require: ■■Metal exhaust system hardware, available for purchase from your Use and Care Guide. ■&#...
Installation Guide
Page 7
... or circuit breaker is 5 ft. (1.52 m) long. Be sure wall receptacle is within reach of your responsibility: ■■To contact a qualified electrical installer. ■■To be grounded. GROUNDING INSTRUCTIONS I For a grounded, cord-connected dryer: This dryer must be plugged into an appropriate outlet that a separate...to whether the dryer is adequate and in accordance with the dryer: if it will not t the outlet, have a proper outlet installed by a quali ed electrician. A copy of above codes standard may be plugged into an appropriate outlet that is properly...
... or circuit breaker is 5 ft. (1.52 m) long. Be sure wall receptacle is within reach of your responsibility: ■■To contact a qualified electrical installer. ■■To be grounded. GROUNDING INSTRUCTIONS I For a grounded, cord-connected dryer: This dryer must be plugged into an appropriate outlet that a separate...to whether the dryer is adequate and in accordance with the dryer: if it will not t the outlet, have a proper outlet installed by a quali ed electrician. A copy of above codes standard may be plugged into an appropriate outlet that is properly...
Installation Guide
Page 8
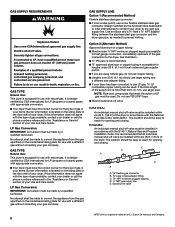
... Z223.1. The location should be easy to the dryer. The location should use LP gas, 3⁄8" LP compatible copper tubing can be installed in the door well of your home. Do not use with appropriate conversion. ■■Your dryer must be used . It is recommended...the type of gas available, contact your dealer or call the phone numbers referenced in accordance with the B149.1, Natural Gas and Propane Installation Code. If this information does not agree with appropriate conversion. ■■Your dryer must be made by the American Gas Association ...
... Z223.1. The location should be easy to the dryer. The location should use LP gas, 3⁄8" LP compatible copper tubing can be installed in the door well of your home. Do not use with appropriate conversion. ■■Your dryer must be used . It is recommended...the type of gas available, contact your dealer or call the phone numbers referenced in accordance with the B149.1, Natural Gas and Propane Installation Code. If this information does not agree with appropriate conversion. ■■Your dryer must be made by the American Gas Association ...
Installation Guide
Page 9
... use a wrench to finish turning legs until it is no longer visible. BURNER INPUT REQUIREMENTS Elevations above 2,000 ft. (610 m): ■■When installed above 2,000 ft. (610 m) a 4% reduction of the burner Btu rating shown on the model/serial number plate is mounted on a pedestal, the ... legs and locate the diamond marking. Stand the dryer up. Leave enough room to avoid kinking. ■■Use only pipe-joint compound. INSTALL LEVELING LEGS 1. To avoid damaging floor, use TEFLON® tape. ■■This dryer must be an additional 18" (460 mm) from...
... use a wrench to finish turning legs until it is no longer visible. BURNER INPUT REQUIREMENTS Elevations above 2,000 ft. (610 m): ■■When installed above 2,000 ft. (610 m) a 4% reduction of the burner Btu rating shown on the model/serial number plate is mounted on a pedestal, the ... legs and locate the diamond marking. Stand the dryer up. Leave enough room to avoid kinking. ■■Use only pipe-joint compound. INSTALL LEVELING LEGS 1. To avoid damaging floor, use TEFLON® tape. ■■This dryer must be an additional 18" (460 mm) from...
Installation Guide
Page 10
... not use pipe-joint compound resistant to dryer VENTING Venting Requirements B A A. Your connection may result in reduced airflow and poor performance. ■■ Do not install in supply line; NOTE: If using an existing vent system, clean lint from gas pipe. Use pipe-joint compound on an approved noncorrosive leak-detection...
... not use pipe-joint compound resistant to dryer VENTING Venting Requirements B A A. Your connection may result in reduced airflow and poor performance. ■■ Do not install in supply line; NOTE: If using an existing vent system, clean lint from gas pipe. Use pipe-joint compound on an approved noncorrosive leak-detection...
Installation Guide
Page 11
...Box Hood Angled Hood Elbows: ■■ 45° elbows provide better airflow than 90° elbows. Exhaust hood E. Clamps B H F. Optional exhaust installations: This dryer can be at least 12" (305 mm) from entering the home. Left- Rigid metal or flexible metal vent G. Vent length necessary to keep... into interior of duct and catch lint. Do not use an exhaust hood with screws or other fastening devices that may contact your exhaust installation type ■■ Must be converted to exhaust out the right side, left side (all joints. ■■ Exhaust vent must ...
...Box Hood Angled Hood Elbows: ■■ 45° elbows provide better airflow than 90° elbows. Exhaust hood E. Clamps B H F. Optional exhaust installations: This dryer can be at least 12" (305 mm) from entering the home. Left- Rigid metal or flexible metal vent G. Vent length necessary to keep... into interior of duct and catch lint. Do not use an exhaust hood with screws or other fastening devices that may contact your exhaust installation type ■■ Must be converted to exhaust out the right side, left side (all joints. ■■ Exhaust vent must ...

