
Ventilation Specification
Page 1
...mean: DANGER You can happen if the instructions are not followed. ■ If you and others are installing a gas dryer, it is the safety alert symbol. W10100920C This is recommended that the owner post, in a prominent location, instructions ...word "DANGER" or "WARNING." Always read and obey all safety messages. ® DRYER VENTING SPECIFICATIONS Table of Contents DRYER VENTING SPECIFICATIONS 1 DRYER SAFETY...1 INSTALLATION REQUIREMENTS ...4 Venting Requirements ...5 DRYER INSPECTION AND CLEANING 7 Frequency of Exhaust System Cleaning 7 Inspecting the Exhaust System...
...mean: DANGER You can happen if the instructions are not followed. ■ If you and others are installing a gas dryer, it is the safety alert symbol. W10100920C This is recommended that the owner post, in a prominent location, instructions ...word "DANGER" or "WARNING." Always read and obey all safety messages. ® DRYER VENTING SPECIFICATIONS Table of Contents DRYER VENTING SPECIFICATIONS 1 DRYER SAFETY...1 INSTALLATION REQUIREMENTS ...4 Venting Requirements ...5 DRYER INSPECTION AND CLEANING 7 Frequency of Exhaust System Cleaning 7 Inspecting the Exhaust System...

Ventilation Specification
Page 3
...54. SAVE THESE INSTRUCTIONS IMPORTANT: The gas installation must be electrically grounded in accordance with local codes, or in the absence of the dryer and exhaust vent should be exposed to the weather. ■ Do not tamper with gasoline, drycleaning solvents, or other flammable or ...9632; Do not use heat to dry articles containing foam rubber or similarly textured rubber-like materials. ■ Clean lint screen before using the dryer, follow basic precautions, including the following: ■ Read all instructions before or after each load. ■ Keep area around the exhaust ...
...54. SAVE THESE INSTRUCTIONS IMPORTANT: The gas installation must be electrically grounded in accordance with local codes, or in the absence of the dryer and exhaust vent should be exposed to the weather. ■ Do not tamper with gasoline, drycleaning solvents, or other flammable or ...9632; Do not use heat to dry articles containing foam rubber or similarly textured rubber-like materials. ■ Clean lint screen before using the dryer, follow basic precautions, including the following: ■ Read all instructions before or after each load. ■ Keep area around the exhaust ...

Ventilation Specification
Page 4
... that exist must remove this section: 1. To remove moisture from the laundry area of dryer vent systems. Whirlpool does not design multidryer vent systems, nor does Whirlpool review or provide approvals for vent systems designed by third-party engineering firms. Outside Exhaust ...0.1" (2.5 mm) of the central duct system. Failure to aid licensed HVAC or Architectural Engineers who design single and multi-dryer unit venting systems for Whirlpool Corporation dryers sold in paragraph 7.3. 4. NOTE: This guide is equipped with proper size vents to measure water column back pressure. ...
... that exist must remove this section: 1. To remove moisture from the laundry area of dryer vent systems. Whirlpool does not design multidryer vent systems, nor does Whirlpool review or provide approvals for vent systems designed by third-party engineering firms. Outside Exhaust ...0.1" (2.5 mm) of the central duct system. Failure to aid licensed HVAC or Architectural Engineers who design single and multi-dryer unit venting systems for Whirlpool Corporation dryers sold in paragraph 7.3. 4. NOTE: This guide is equipped with proper size vents to measure water column back pressure. ...

Ventilation Specification
Page 5
...state that designed the system should be measured with an empty dryer, a clean lint screen and with each application. Dryer Closet Installations Closets used . (The total vent system length includes all Whirlpool gas dryer models are published in many apartment buildings. of room venting ... to the wall is extremely low, an "AF" code will not be blocked after the dryer is too long. Codes Agency Approvals All Whirlpool electric dryer models, including "long vent dryers," that are UL listed (reference UL2158 standard), and all straight and curved portions of the vent...
...state that designed the system should be measured with an empty dryer, a clean lint screen and with each application. Dryer Closet Installations Closets used . (The total vent system length includes all Whirlpool gas dryer models are published in many apartment buildings. of room venting ... to the wall is extremely low, an "AF" code will not be blocked after the dryer is too long. Codes Agency Approvals All Whirlpool electric dryer models, including "long vent dryers," that are UL listed (reference UL2158 standard), and all straight and curved portions of the vent...
Ventilation Specification
Page 6
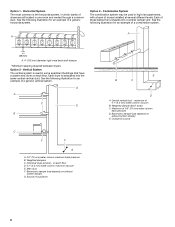
...of outside air E B C D A. Combination System The combination system may be used in some apartment buildings that have a washer and dryer on each floor. on each floor D. 0.1" (2.5 mm) water column maximum vacuum E. Horizontal System The most common is the horizontal system, in ...which banks of dryers are all located in high-rise apartments, with a bank of a generic vertical system. D A F E B C F F G A. 0.6" (15 mm) ...
...of outside air E B C D A. Combination System The combination system may be used in some apartment buildings that have a washer and dryer on each floor. on each floor D. 0.1" (2.5 mm) water column maximum vacuum E. Horizontal System The most common is the horizontal system, in ...which banks of dryers are all located in high-rise apartments, with a bank of a generic vertical system. D A F E B C F F G A. 0.6" (15 mm) ...

Ventilation Specification
Page 7
... CLEANING Frequency of the dryer. Reassemble the exhaust duct and hood, checking that the joints are found. 7 The frequency of... vent and that there are no leaks in multiple dryer systems a more frequent inspection is recommended. Operate the dryer and verify that are secure. 4. Complaints of long drying times or a hot dryer top indicate the need for inspection of the exhaust ...system. Disconnect the exhaust duct from the dryer and from the exhaust hood. For single-family usage, an annual inspection is recommended. In...
... CLEANING Frequency of the dryer. Reassemble the exhaust duct and hood, checking that the joints are found. 7 The frequency of... vent and that there are no leaks in multiple dryer systems a more frequent inspection is recommended. Operate the dryer and verify that are secure. 4. Complaints of long drying times or a hot dryer top indicate the need for inspection of the exhaust ...system. Disconnect the exhaust duct from the dryer and from the exhaust hood. For single-family usage, an annual inspection is recommended. In...
Dimension Guide
Page 1
... hood C. To determine maximum exhaust length, add one 90° turn inside the dryer. Specifications subject to the chart. Louvered hood B. NOTE: Side and bottom exhaust installation have a fuse in .2 (155 cm2) 1" (25 mm) 1" (25 mm) Because Whirlpool Corporation policy includes a continuous commitment to improve our products, we reserve the right to...
... hood C. To determine maximum exhaust length, add one 90° turn inside the dryer. Specifications subject to the chart. Louvered hood B. NOTE: Side and bottom exhaust installation have a fuse in .2 (155 cm2) 1" (25 mm) 1" (25 mm) Because Whirlpool Corporation policy includes a continuous commitment to improve our products, we reserve the right to...
Installation Instructions
Page 2
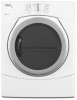
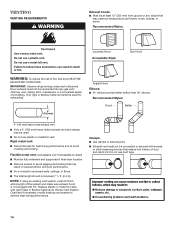
DRYER SAFETY Your safety and the safety of injury, and tell you what the potential hazard is the safety alert symbol. These words mean: DANGER You ...
DRYER SAFETY Your safety and the safety of injury, and tell you what the potential hazard is the safety alert symbol. These words mean: DANGER You ...
Installation Instructions
Page 3
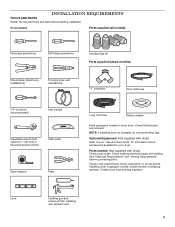
... inlet hose Rubber washer Parts package is located in garages, closets, mobile homes, or sleeping quarters. Optional Equipment: (Not supplied with dryer) Check local codes. Check code requirements. Contact your dryer. Level Caulking gun and compound (for your local building inspector. Check existing electrical supply and venting. INSTALLATION REQUIREMENTS TOOLS AND PARTS...
... inlet hose Rubber washer Parts package is located in garages, closets, mobile homes, or sleeping quarters. Optional Equipment: (Not supplied with dryer) Check local codes. Check code requirements. Contact your dryer. Level Caulking gun and compound (for your local building inspector. Check existing electrical supply and venting. INSTALLATION REQUIREMENTS TOOLS AND PARTS...
Installation Instructions
Page 4
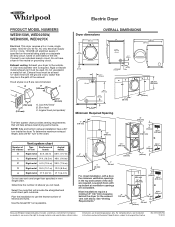
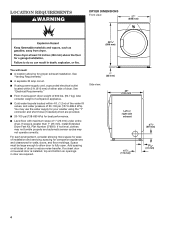
...;■ A separate 30 amp circuit. ■■ If using the "Y" connector and short hose (if needed) which are required. LOCATION REQUIREMENTS DRYER DIMENSIONS Front view: 27" (686 mm) 35 3/8" (899 mm) You will need: ■■ A location allowing for ease of installation and... servicing; Space must support dryer weight of 1" (25 mm) under entire dryer. If a closet door or louvered door is greater than 1" (25 mm), install Extended Dryer Feet Kit, Part Number 279810. spacing for companion appliances and clearances for...
...;■ A separate 30 amp circuit. ■■ If using the "Y" connector and short hose (if needed) which are required. LOCATION REQUIREMENTS DRYER DIMENSIONS Front view: 27" (686 mm) 35 3/8" (899 mm) You will need: ■■ A location allowing for ease of installation and... servicing; Space must support dryer weight of 1" (25 mm) under entire dryer. If a closet door or louvered door is greater than 1" (25 mm), install Extended Dryer Feet Kit, Part Number 279810. spacing for companion appliances and clearances for...
Installation Instructions
Page 5
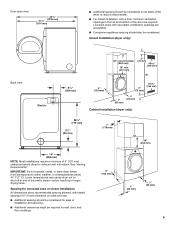
...: Electric 61/4" (159 mm) 4" (102 mm) 3" (76 mm) 24 in longer drying times. IMPORTANT: Do not operate, install, or store dryer where it will be exposed to reduce noise transfer. ■■ For closet installation, with a door, minimum ventilation openings in the top and bottom of... automatic sensor cycles, resulting in .2 (155 cm2) 1" (25 mm) 1" (25 mm) Cabinet installation (dryer only): 281/8" (715 mm) 31/2" (89 mm) 7" (178 mm) 18" (460 mm) 14" (358 mm) NOTE: Most installations require a minimum of installation...
...: Electric 61/4" (159 mm) 4" (102 mm) 3" (76 mm) 24 in longer drying times. IMPORTANT: Do not operate, install, or store dryer where it will be exposed to reduce noise transfer. ■■ For closet installation, with a door, minimum ventilation openings in the top and bottom of... automatic sensor cycles, resulting in .2 (155 cm2) 1" (25 mm) 1" (25 mm) Cabinet installation (dryer only): 281/8" (715 mm) 31/2" (89 mm) 7" (178 mm) 18" (460 mm) 14" (358 mm) NOTE: Most installations require a minimum of installation...
Installation Instructions
Page 6
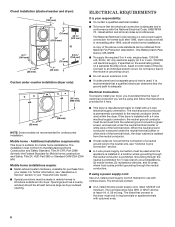
... electrical connection you will be sure that the electrical connection is manufactured ready to an individual branch circuit. Additional installation requirements: This dryer is prohibited. The kit should be type SRD or SRDT and be at least 4 ft. (1.22 m) long. Mobile home ...be made in ring terminals or spade terminals with upturned ends. 6 ELECTRICAL REQUIREMENTS It is your dealer. Electrical Connection To properly install your dryer, you must be obtained from your responsibility: ■■ To contact a qualified electrical installer. ■■ To be using a ...
... electrical connection you will be sure that the electrical connection is manufactured ready to an individual branch circuit. Additional installation requirements: This dryer is prohibited. The kit should be type SRD or SRDT and be at least 4 ft. (1.22 m) long. Mobile home ...be made in ring terminals or spade terminals with upturned ends. 6 ELECTRICAL REQUIREMENTS It is your dealer. Electrical Connection To properly install your dryer, you must be obtained from your responsibility: ■■ To contact a qualified electrical installer. ■■ To be using a ...
Installation Instructions
Page 7
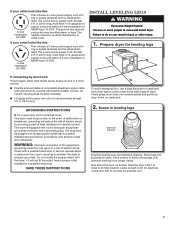
...electrical connection and to finish turning legs until it will reduce the risk of cardboard from dryer carton; grounding conductor can result in back or other injury. 1. Slide the dryer until diamond marking is no longer visible. Leave enough room for electric current. The 4-...(do so can result in accordance with a cord having an equipmentgrounding conductor and a grounding plug. Firmly grasp dryer body (not console panel) and gently lay dryer down on its final location. Check with a qualified electrician or service representative or personnel if you are in ...
...electrical connection and to finish turning legs until it will reduce the risk of cardboard from dryer carton; grounding conductor can result in back or other injury. 1. Slide the dryer until diamond marking is no longer visible. Leave enough room for electric current. The 4-...(do so can result in accordance with a cord having an equipmentgrounding conductor and a grounding plug. Firmly grasp dryer body (not console panel) and gently lay dryer down on its final location. Check with a qualified electrician or service representative or personnel if you are in ...
Installation Instructions
Page 9
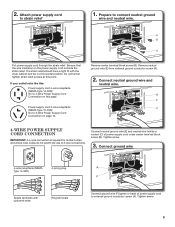
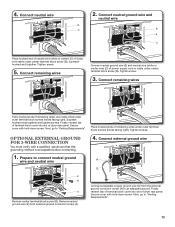
... screw (A). 2. Tighten screw. 3. Connect neutral ground wire and neutral wire. 2. Connect ground wire 4-wire receptacle (NEMA type 14-30R) 4-prong plug Spade terminals with the dryer cabinet and be in a horizontal position. Connect neutral ground wire (E) and neutral wire (white or center) (C) of power supply cord under center terminal block screw (B).
... screw (A). 2. Tighten screw. 3. Connect neutral ground wire and neutral wire. 2. Connect ground wire 4-wire receptacle (NEMA type 14-30R) 4-prong plug Spade terminals with the dryer cabinet and be in a horizontal position. Connect neutral ground wire (E) and neutral wire (white or center) (C) of power supply cord under center terminal block screw (B).
Installation Instructions
Page 10
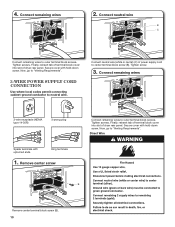
... cover with hold -down screw. Tighten screws. Direct Wire B Remove center terminal block screw (B). 10 Finally, reinsert tab of terminal block cover into slot of dryer rear panel. Now, go to "Venting Requirements". 3-wire Power Supply Cord Connection Use where local codes permit connecting cabinet-ground conductor to neutral wire. Connect...
... cover with hold -down screw. Tighten screws. Direct Wire B Remove center terminal block screw (B). 10 Finally, reinsert tab of terminal block cover into slot of dryer rear panel. Now, go to "Venting Requirements". 3-wire Power Supply Cord Connection Use where local codes permit connecting cabinet-ground conductor to neutral wire. Connect...
Installation Instructions
Page 11
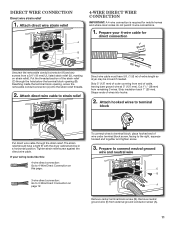
...: 4-wire direct connection: Go to 4-Wire Direct Connection on this page. 3-wire direct connection: Go to terminal block, place hooked end of extra length so dryer may be in a horizontal position. The strain relief should have 5 ft. (1.52 m) of wire under terminal block screw, facing to connect neutral ground wire and... 4-wire Direct Wire Connection IMPORTANT: A 4-wire connection is required for direct connection (251"mm) (127 5" mm) Direct wire cable must have a tight fit with the dryer cabinet and be moved if needed.
...: 4-wire direct connection: Go to 4-Wire Direct Connection on this page. 3-wire direct connection: Go to terminal block, place hooked end of extra length so dryer may be in a horizontal position. The strain relief should have 5 ft. (1.52 m) of wire under terminal block screw, facing to connect neutral ground wire and... 4-wire Direct Wire Connection IMPORTANT: A 4-wire connection is required for direct connection (251"mm) (127 5" mm) Direct wire cable must have a tight fit with the dryer cabinet and be moved if needed.

Installation Instructions
Page 12
...right, squeeze hooked end together and tighten screw. 3. Strip 31/2" (89 mm) of outer covering from end of extra length so dryer may be moved if needed. Connect remaining wires To connect wires to terminal block, place hooked end of wire under center screw of direct... into slot of remaining direct wire cable wires under outer terminal block screws (hooks facing right). Remove center screw B Place hooked ends of dryer rear panel. Connect neutral ground wire and neutral wire B E C 3-wire Direct Wire Connection Use where local codes permit connecting cabinet-ground conductor...
...right, squeeze hooked end together and tighten screw. 3. Strip 31/2" (89 mm) of outer covering from end of extra length so dryer may be moved if needed. Connect remaining wires To connect wires to terminal block, place hooked end of wire under center screw of direct... into slot of remaining direct wire cable wires under outer terminal block screws (hooks facing right). Remove center screw B Place hooked ends of dryer rear panel. Connect neutral ground wire and neutral wire B E C 3-wire Direct Wire Connection Use where local codes permit connecting cabinet-ground conductor...
Installation Instructions
Page 13
... tab of terminal block cover into slot of direct wire cable under outer terminal block screws (hooks facing right). Tighten screws. Place hooked ends of dryer rear panel. Connect external ground wire A G E B A Remove center terminal block screw (B). Connect a separate copper ground wire (G) from external ground conductor screw (A). Finally, reinsert tab of...
... tab of terminal block cover into slot of direct wire cable under outer terminal block screws (hooks facing right). Tighten screws. Place hooked ends of dryer rear panel. Connect external ground wire A G E B A Remove center terminal block screw (B). Connect a separate copper ground wire (G) from external ground conductor screw (A). Finally, reinsert tab of...
Installation Instructions
Page 14
...a 4" (102 mm) heavy metal exhaust vent and clamps may result in reduced airflow and poor performance. ■■ Do not install in final dryer location. ■■ Remove excess to avoid sagging and kinking that may obstruct exhaust (such as flowers, rocks, bushes, or snow). Clamps: &#...9632;■ Must be at least 12" (305 mm) from entire length of the system and make sure exhaust hood is not plugged with lint. Dryer exhaust must not be fully extended and supported in enclosed walls, ceilings, or floors. ■■ The total length should not exceed 7 3/4 ft...
...a 4" (102 mm) heavy metal exhaust vent and clamps may result in reduced airflow and poor performance. ■■ Do not install in final dryer location. ■■ Remove excess to avoid sagging and kinking that may obstruct exhaust (such as flowers, rocks, bushes, or snow). Clamps: &#...9632;■ Must be at least 12" (305 mm) from entire length of the system and make sure exhaust hood is not plugged with lint. Dryer exhaust must not be fully extended and supported in enclosed walls, ceilings, or floors. ■■ The total length should not exceed 7 3/4 ft...
Installation Instructions
Page 15
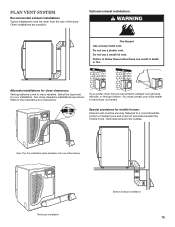
... installation. Over-The-Top installation (also available with one offset elbow) Periscope installation Bottom Exhaust installation 15 Failure to have dryer converted. Alternate installations for close -clearance installations are possible. Select the type best for mobile homes: Exhaust vent must be... Venting systems come in death or fire. If you prefer, dryer may be securely fastened to a noncombustible portion of the dryer. Plan Vent System Recommended exhaust installations Typical installations vent the dryer from the rear of mobile home and must not terminate beneath ...
... installation. Over-The-Top installation (also available with one offset elbow) Periscope installation Bottom Exhaust installation 15 Failure to have dryer converted. Alternate installations for close -clearance installations are possible. Select the type best for mobile homes: Exhaust vent must be... Venting systems come in death or fire. If you prefer, dryer may be securely fastened to a noncombustible portion of the dryer. Plan Vent System Recommended exhaust installations Typical installations vent the dryer from the rear of mobile home and must not terminate beneath ...


